


eBOX800-841-FL Series u
ser’s Manual
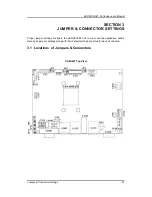
Jumper & Connector Settings
24
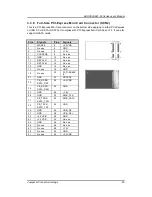
3.2.2 Auto Power On (JP10)
If JP10 is enabled for AC power input, the system will be automatically power on without
pressing soft power button. If JP10 is disabled for AC power input, it is necessary to manually
press soft power button to power on the system
3.2.3 COM 2 Data/Power Selection (JP11)
The COM2 port has +5V level power capability on DCD and +12V level on RI by setting this
jumper. When this port is set to +5V or +12V level, please make sure its communication mode
is RS-232.
3.2.4 COM 1 Data/Power Selection (JP12)
The COM1 port has +5V level power capability on DCD and +12V level on RI by setting this
jumper. When this port is set to +5V or +12V level, please make sure its communication mode
is RS-232.
Functions
Settings
Disable auto power on
1-2 closed
Enable auto power on (Default)
2-3 closed
Functions
Settings
Power: Set COM2 pin 1 to +5V level
1-3 closed
Data: Set COM2 pin 1 to DCD (Default)
3-5 closed
Power: Set COM2 pin 8 to +12V level
2-4 closed
Data: Set COM2 pin 8 to RI (Default)
4-6 closed
Functions
Settings
Power: Set COM1 pin 1 to +5V level
1-3 closed
Data: Set COM1 pin 1 to DCD (Default)
3-5 closed
Power: Set COM1 pin 9 to +12V level
2-4 closed
Data: Set COM1 pin 9 to RI (Default)
4-6 closed
3
2
1
1
Summary of Contents for EBOX800-841-FL Series
Page 1: ...eBOX800 841 FL Series Embedded System User s Manual...
Page 14: ...eBOX800 841 FL Series user s Manual Introduction 6 1 3 2 Wall mount Bracket Dimensions...
Page 15: ...eBOX800 841 FL Series user s Manual Introduction 7 1 3 3 VESA mount Bracket Dimensions...
Page 17: ...eBOX800 841 FL Series user s Manual Introduction 9 Right side View Left side View...


