background image

Operation instructions | HKM 40-0x

18

2018-10-05 | Technical improvements, changes in design, printing- and other errors expected.

3.6.4.

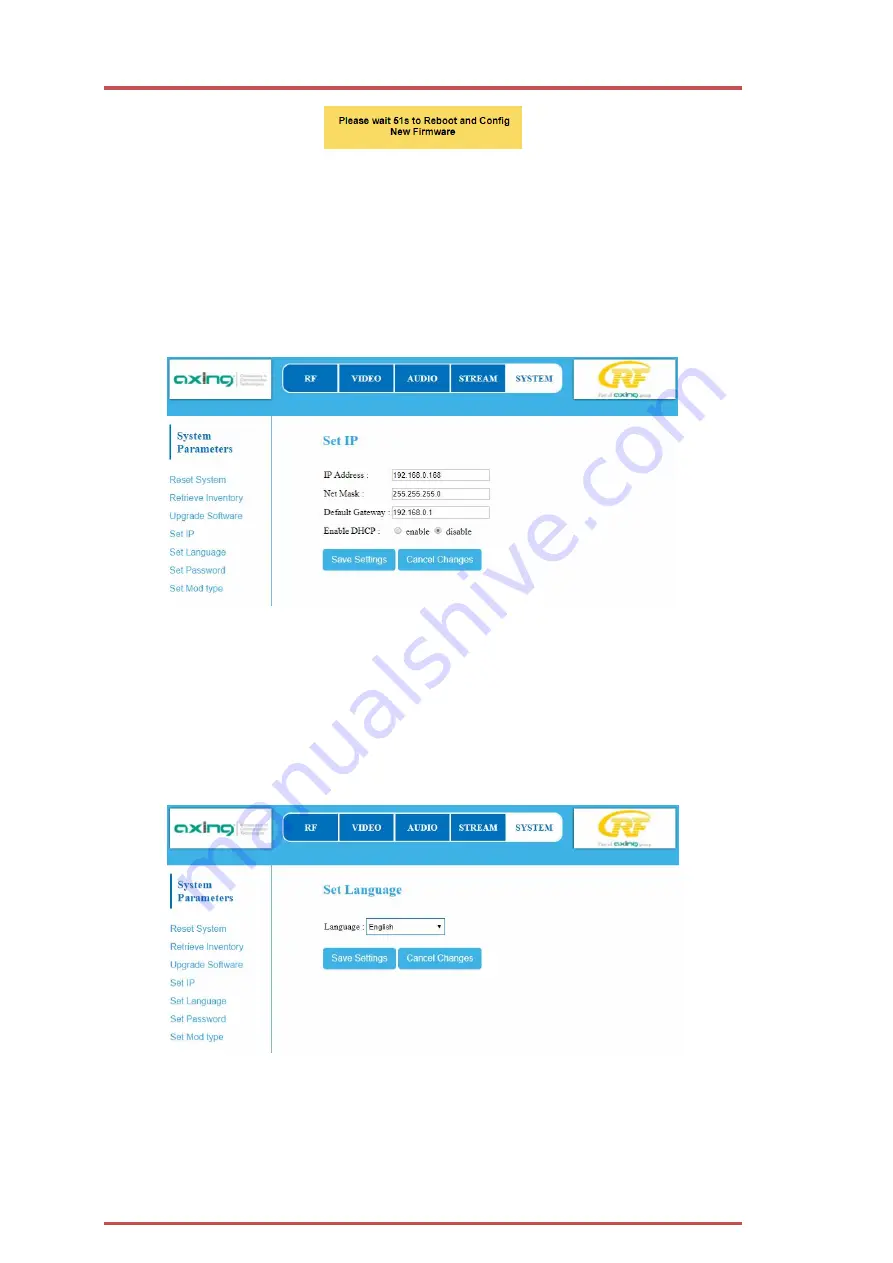
IP Adress

Dynamic IP address

For

Enable DHCP

, select

enable

 to include the device in a network with a DHCP server.

Static IP address

For

Enable DHCP

, select

disable

 to link the device to a network with a fixed IP address. The IP

address, Net mask and Default Gateway can be changed here.

Click

Safe Settings

 to save your settings.

After the changes have been saved, the HKM 40-0x is restarted automatically.

After restarting, you must enter the new IP address in the browser and log in again.

3.6.5.

Language

Here you can select the language of the interface.

Click

Safe Settings

 to save your settings.

Summary of Contents for HKM 40-0 Series

Page 1: ...HKM 40 0x HDMI DVB C T Encoder Modulator Betriebsanleitung...

Page 2: ...Anschluss 7 2 4 HF Ausgang 7 2 5 Spannungsversorgung 8 3 Konfiguration 9 3 1 Anmelden 10 3 2 HF Einstellungen RF 10 3 2 1 DVB C nur HKM 40 00 10 3 2 2 DVB T 11 3 2 3 Erweiterte HF Einstellungen 12 3 3...

Page 3: ...igt am Ger t und dessen Anschl ssen spielen k nnen Der Montage bzw Aufstellort muss eine sichere Verlegung aller angeschlossenen Kabel erm glichen Stromversorgungskabel sowie Zuf hrungskabel d rfen ni...

Page 4: ...g F r Wandmontage oder als 19 Einheit verwendbar Eingebautes Netzteil 1 2 Lieferumfang 1 Encoder Modulator 1 Netzkabel 1 Quickstartanleitung 1 3 Eing nge Der HKM 40 0x verf gt ber vier HDMI Eing nge V...

Page 5: ...e Benutzeroberfl che ben tigen sie einen handels blichen PC Laptop inklusive Netzwerkschnittstelle mit der aktuellen Version des installierten Webbrowsers 1 6 Anzeigeelemente und Anschl sse 1 LED Anze...

Page 6: ...n einem 19 Rack eingebaut werden 2 1 Wandmontage Der HKM 40 0x ist ab Werk mit Wandhalterungen ausgestattet Hinweis Das Ger t muss bei Wandmontage mit mindestens 5 cm Freiraum entlang aller 4 Seiten m...

Page 7: ...40 0x in das 19 Rack Schrauben Sie den HKM 40 0x mit vier Schrauben fest 2 Halten Sie die EN 60728 11 ein 2 3 HDMI Anschluss Der HKM 40 0x verf gt ber vier HDMI Eing nge Verbinden Sie diese mit vier...

Page 8: ...r vorbehalten 2 5 Spannungsversorgung Das Ger t verf gt ber ein eingebautes Netzteil 100 240 VAC 50 60 Hz Schlie en Sie das Ger t erst an nachdem alle Montage und Installationsarbeiten abgeschlossen s...

Page 9: ...utz wird mittels Passwortabfrage realisiert Ab Werk sind folgende Werte voreingestellt IP Adresse 192 168 0 168 Subnetzmaske 255 255 255 0 Der Computer und das Ger t m ssen sich im gleichen Teilnetz b...

Page 10: ...e automatische Abmeldung Bleibt das Browserfenster ge ffnet erfolgt keine automatische Abmeldung Dadurch wird die berwachnung der Anlage ber den Webbrowser erm glicht 3 2 HF Einstellungen RF Klicken S...

Page 11: ...ntry und Area Je nach getroffener Auswahl werden im Auswahlfeld Frequenzy die landestypischen Kan le angezeigt Wenn Sie im Auswahlfeld Country die Option Others ausw hlen dann k nnen Sie die Frequenze...

Page 12: ...32 Die Option IQ swap aktiviert oder deaktiviert die inverse Phasendrehung des IQ Signals durch Austauschen der I und Q Eing nge Klicken Sie auf Safe Settings um Ihre Einstellungen zu speichern 3 2 3...

Page 13: ...sgangsdatenrate nicht berschritten wird Die Felder Output Resolution und Current Rate zeigen die Aufl sung und die Bitrate der angeschlossenen Video Quelle an Klicken Sie auf Safe Settings um Ihre Ein...

Page 14: ...t Diese werden im TV Ger t nach dem Suchlauf als Programmnamen angezeigt W hlen Sie im Auswahlfeld Port die Option 1 bis 4 Geben Sie im Feld Service name einen maximal 15stelligen Programmnamen ein Kl...

Page 15: ...zen dann wird der jeweilige Stream unter dem eingegebenen Programmplatz abgelegt Klicken Sie auf Safe Settings um Ihre Einstellungen zu speichern 3 5 4 PID nderungen der Packet Identifier sollten nur...

Page 16: ...NIT Einstellung muss nur in gro en Netzen eingegriffen werden nderungen sollten nur von erfahrenen Nutzern durchgef hrt werden Klicken Sie auf Safe Settings um Ihre Einstellungen zu speichern 3 5 6 PD...

Page 17: ...itere Transportstreams in Ihrem DVB C T Netz vorkommen m ssen Sie ggf hier eine andere ID vergeben Klicken Sie auf Safe Settings um Ihre Einstellungen zu speichern 3 5 8 Service Type HD oder SD W hlen...

Page 18: ...en ein Softwareupdate durchgef hrt die IP Adresse ge ndert ein neues Passwort vergeben 3 6 1 Reset W hlen Sie im Feld Reset Mode ob Sie einen Hardware Reset oder einen Software Reset durchf hren m cht...

Page 19: ...e Software von einem lokalen Laufwerk geladen werden Software Updates finden Sie auf www axing com Downloads Laden Sie die Upgrade Datei z B auf Ihren PC herunter W hlen Sie Download From Remote Serve...

Page 20: ...able um das Ger t mit einer fest vergebenen IP Adresse in ein Netzwerk einzubinden Hier kann die IP Adresse Netzmaske und das Gateway ge ndert werden Klicken Sie auf Safe Settings um Ihre Einstellunge...

Page 21: ...swort erneut ein Klicken Sie auf Safe Settings um Ihre Einstellungen zu speichern Nach dem die nderungen gespeichert wurden wird die Startseite eingeblendet Sie m ssen sich neu anmelden 3 6 7 Modulato...

Page 22: ...Sie im Feld Email address die E Mail Adresse ein mit der Sie sich im SMARTPortal registriert haben Geben Sie im Feld Userkey den Benutzercode ein den Sie bei der Registrierung am SMARTPortal erhalten...

Page 23: ...DVB T 45 862 MHz Ausgangspegel einstellbar 1 Ausgagskanal 2 Ausgagskan le 90 105 dB V 90 105 dB V 87 102 dB V Ausgangs Modulation DVB C DVB T QAM 16 32 64 128 256 QAM 16 64 QAM 16 64 Ausgangs bertragu...

Page 24: ...Betriebsanleitung HKM 40 0x 24 2018 10 05 Technische Verbesserungen nderungen im Design Druckfehler und Irrt mer vorbehalten...

Page 25: ...HKM 40 0x HDMI DVB C T encoder modulator Operation instructions...

Page 26: ...HDMI installation 7 2 4 RF Output 7 2 5 Power supply 7 3 Configuration 8 3 1 Login 8 3 2 RF settings 9 3 2 1 DVB C HKM 40 00 only 9 3 2 2 DVB T 10 3 2 3 Advanced RF settings 11 3 3 Video Source 11 3 4...

Page 27: ...on such that children cannot play near the device and its connections without supervision The mounting or installation location must allow a safe installation of all connected cables Power supply cabl...

Page 28: ...tenance Can be used for wall mounting or as a 19 unit Built in power supply 1 2 Scope of delivery 1 Encoder Modulator 1 AC power cord 1 Quick start guide 1 3 Inputs The HKM 40 0x has four HDMI inputs...

Page 29: ...ace and thus configure the devices you need a standard PC laptop with a network interface and the actual version of the installed web browser 1 6 Display elements and connectors 1 LED indicators HDMI...

Page 30: ...ther at the wall or be mounted in a 19 rack 2 1 Wall mounting The HKM 40 0x are factory fitted with wall brackets Note The unit must be wall mounted with at least 5 cm clearance along the 4 sides The...

Page 31: ...on The HKM 40 00 has four HDMI inputs Connect them to four HDMI sources 2 4 RF Output Connect the output of the HKM 40 0x to the existing distribution network Use shielded coaxial cables with F connec...

Page 32: ...255 0 The computer and the headend must be in the same subnetwork The network part of the IP address of the computer must be set to 192 168 0 and the subnet mask must be set to 255 255 255 0 The host...

Page 33: ...described under 3 6 7 Modulator Type on page 19 HKM 40 00 The RF PARAMETERS for DVC T are displayed 3 2 1 DVB C HKM 40 00 only Make a pre selection using the Country and Area menus Depending on the s...

Page 34: ...select the FEC factor 1 2 2 3 3 4 5 6 7 8 By changing the FEC factor the proportion of the FEC data is changed in relation to the user data FEC low data rate but strong error protection FEC 7 8 high d...

Page 35: ...be output as an output signal Click Safe Settings to save your settings 3 3 Video Source On the main menu click Video The settings for the video source can be made for each of the four input ports In...

Page 36: ...128 256 or 384 Kbps for each audio source in the Encoder Rate field Click Safe Settings to save your settings 3 5 Stream On the main menu click Stream Settings can be made for each of the four output...

Page 37: ...ween 1 and 65535 The service IDs of all streams in your network must be unique Click Safe Settings to save your settings 3 5 3 LCN In the Port selection field select 1 to 4 In the LCN field enter a lo...

Page 38: ...y experienced users In the Port selection field select 1 to 4 Enter the PMT PID Program Map Table PCR PID Program Clock Reference Video PID and Audio PID in the appropriate fields Click Safe Settings...

Page 39: ...rivate Data Specification It is a binary 8 bit field values are allowed from 00000000 to 11111111 3 5 7 Transporstream ID The TS ID Transportstream ID must be unique for each transportstream If furthe...

Page 40: ...ther it is output in HD or SD Click Safe Settings to save your settings 3 6 System On the main menu click System In the System menu item the system can be reset a software update is carried out the IP...

Page 41: ...n of the HKM 40 0x Alternatively the software can be loaded from a local drive Software updates can be found at www axing com Downloads Download the upgrade file to your PC Select Download From Remote...

Page 42: ...For Enable DHCP select disable to link the device to a network with a fixed IP address The IP address Net mask and Default Gateway can be changed here Click Safe Settings to save your settings After...

Page 43: ...numbers Re enter the password Click Safe Settings to save your settings After the changes have been saved the start page is displayed you must log on again 3 6 7 Modulator Type HKM 40 00 only Dependi...

Page 44: ...at AXING support the option allowed In the field Email address enter the e mail address with which you are registered at SMARTPortal In the field Userkey enter the user key that you received when regi...

Page 45: ...tput level adjustable 1 output channel 2output channels 90 105 dB V 90 105 dB V 87 102 dB V Output modulation DVB C DVB T QAM 16 32 64 128 256 QAM 16 64 QAM 16 64 Output transmission symbol rate 1 7 5...

Page 46: ...Operation instructions HKM 40 0x 22 2018 10 05 Technical improvements changes in design printing and other errors expected...

Reviews: