


Page 6 of 24
Axicon Auto ID Limited | PV-1000 operating manual | January 2022
www.axicon.com
Getting started
Open the battery housing cover to check if the four AA-sized batteries have been
fitted. Observe the correct polarity when inserting the batteries. Ensure their
output is at least 2500 mAh.
Plug in an Axicon 6000, 6500 or 7000 series verifier to the USB port on the base of
the PV-1000.
Switch on the verifier by pressing the on/off switch.
A light will come on but nothing will be displayed on the screen for about 15
seconds. This is the power-up and initialisation phase.
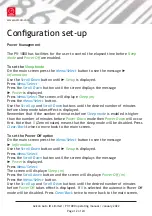
The PV-1000 will show an
initialising
message before showing the message:
Axicon Verifier
Ready to Scan !
If the PV-1000 is left for some time the screen will go blank to conserve battery
power, but can quickly be restarted by pressing the
on/off
button again. The time-
out period before this happens can be adjusted to suit the requirements of the user
– see page 12.
Please note that a warning message will be shown if a particular verifier read-head
has not previously been calibrated on the PV-1000 (Each read-head has its own
serial number, and it must be calibrated before use).