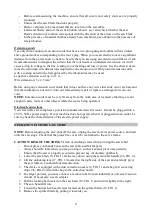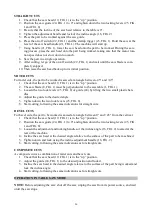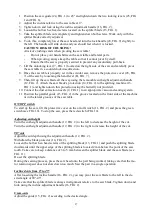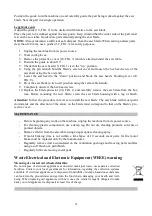
24
21.
Saw head up/down handle
22.
Saw head on/off switch
23.
Saw head start button
24.
Working part guide
25.
Parallel guide locking lever
26.
Chip collection bag
28.
Protective safety cover
29.
Parallel guide
30.
Saw blade protection
31.
Additional guide
32.
Pusher
33.
Set of wrenches
34.
Dust bag
35.
Feet
36.
Removable handle
37.
Angle guide
ASSEMBLY
CAUTION! Do not carry the device by the table, because the table is not designed to bear the
weight of the device.
1.
Two persons will be needed to remove the saw from its packaging. Take the saw out of the
packaging by the two transport tubes and, before assembling, inspect all unassembled parts
to make sure that no damage has occurred due to transport. If you observe any damage,
make a claim immediately with your retailer. Check the integrality of the delivery.
2.
Place all parts on a flat surface.
3.
The saw may be used either with the feet provided (4) FIG.1, or on a table using the four
plastic mounted feet.
4.
Secure the feet (4) in the drilled holes provided and tighten them securely using the four ro-
tating locking handles (5) on the feet.
5.
Take the two large stops (A, FIG.5) and assemble the two rubber protectors (B, FIG. 5) onto
the screw heads. Mount these stops inside the left and right lateral panels so that these pan-
els abut against the table when the saw is in miter saw mode. To do this, use washers (C,
FIG. 5) and nuts (D, FIG. 5) and proceed as illustrated (FIG. 6). Make sure that the saw ta-
ble remains level when it is resting on the two stops.
6.
Attach the protective safety grating (28, FIG. 7) onto the saw table (1, FIG. 2) before start-
ing up the saw:
-
Lower the saw blade (8, FIG.1) all the way down.
-
First attach the rear of the protector by positioning it in the two notches provided in the
table, then the front using the tightening handle (B, FIG. 7).
BEFORE STARTING
-
Your new reversible saw is shipped complete in a carton. Unpack it carefully from it as well
as all detached parts. Remove the protective coating from all parts that are not painted. This
protective coating may be removed using a soft rag dampened with WD40. Do not use ace-
tone, gasoline or paint thinner.
-
Before using your machine, be sure that your machine is very stable and that there is no pos-
sible risk of slippage.
-
Be sure that you have enough room around the machine to be able to use it without risk.
-
Carefully read and respect all safety notices.


