background image

14 

COOKING ADVICES 

Pan quality 

Adapted materials:

 steel, enamelled steel, cast iron, ferromagnetic stainless-steel, 

  aluminium with ferromagnetic bottom. 

Not adapted materials:


aluminium and stainless-steel without ferromagnetic bottom,  

         cupper, brass, glass, ceramic, porcelain. 

The manufacturers specify if their products are compatible induction. 
To check if pans are compatibles: 

  Put a little water in a pan placed on an induction heating zone set at level [ 9 ]. This water 

must heat in a few seconds. 

  A magnet sticks to the bottom of the pan. 

Certain pans can make noise when they are placed on an induction cooking zone. This noise 
doesn’t mean any failure of the appliance and doesn’t influence the cooking operating. 


Pan dimension 

The cooking zones are, automatically adapted to the diameter of the pan. However, the bottom of 
this pan must have a minimum diameter corresponding to the cooking zone. 
To obtain the best efficiency of your hob, please place the pan well in the centre of the cooking 
zone. 

Summary of Contents for H103

Page 1: ...INSTRUCTION OF USE H103 ...

Page 2: ... PANEL 7 USE OF THE APPLIANCE 7 DISPLAY 7 VENTILATION 7 STARTING UP AND APPLIANCE MANAGEMENT 8 BEFORE THE FIRST USE 8 INDUCTION PRINCIPLE 8 SENSITIVE TOUCH 8 POWER SELECTION ZONE SLIDER AND TIMER SETTING ZONE 8 STARTING UP 9 PAN DETECTION 9 RESIDUAL HEAT INDICATION 9 BOOSTER FUNCTION 10 TIMER 10 AUTOMATIC COOKING 11 PAUSE FUNCTION 11 RECALL FUNCTION 12 BRIDGE FUNCTION 12 KEEP WARM FUNCTION 12 CONT...

Page 3: ... freestanding or as working surface The appliance must be grounded and connected conforming to local standards Do not use extension cables or multi boxes when connecting the appliance The appliance cannot be used above a dishwasher or a tumble dryer steam may damage the electronic appliances The appliance is not intended to be operated by means of an external timer or separate remote control syste...

Page 4: ...or damaged saucepans not enamelled cast iron pots may damage the ceramic glass Sand or other abrasive materials may damage ceramic glass Avoid dropping objects even little ones on the ceramic glass Do not hit the edges of the glass with saucepans Make sure that the ventilation of the appliance works according to the manufacturer s instructions Do not put or leave empty saucepans on the ceramic gla...

Page 5: ...ectric shock Other protections Make sure cookware is always centred on the cooking zone The bottom of the pot should cover as much of the cooking zone as possible For the users of cardiac pacemakers the magnetic field may influence the operation We recommend getting information from the retailer or the doctor Do not place aluminium or synthetic material containers on the hob the residual heat coul...

Page 6: ... W Booster power 1850 W Standardised cookware category B Energy consumption ECcw 164 Wh kg Rear right heating zone Ø 185 mm Minimum detection Ø 100 mm Nominal power 1400 W Booster power 1850 W Standardised cookware category C Energy consumption ECcw 172 7 Wh kg Front right heating zone Ø 185 mm Minimum detection Ø 100 mm Nominal power 1400 W Booster power 1850 W Standardised cookware category A En...

Page 7: ... U No pan detection No pan or inadequate pan A Heat accelerator Automatic cooking E Error message Electronic failure H Residual heat The heating zone is hot P Power The boosted power is activated L Locking Control panel locking U Keep warm Maintain automatically of 70 C II Stop Go The hob is in pause Bridge 2 cooking zones are combined Ventilation The cooling system operates continuously It starts...

Page 8: ...ed cupper pure stainless steel aluminium glass wood ceramic stoneware The induction heating zone adapts automatically to the size of the pan A too small diameter pan doesn t work The pan diameter should be matched to the heat zone diameter If the pan is not adapted to the induction hob the display will show U Sensitive touch Your ceramic hob is equipped with electronic controls with sensitive touc...

Page 9: ...e heating zone or if this pan is not adapted to the induction In this case it is impossible to increase the power and the display shows U This symbol disappears when a pan is put on the heating zone If the pan is removed from the heating zone the operation is stopped The display shows U The symbol U disappears when the pan is put back to the heating zone The cooking continues with the power level ...

Page 10: ...to 7 depending the type of zone Timer The timer is able to be used simultaneous with all heating zones with different time settings from 0 to 99 minutes for each heating zone Setting and modification of the cooking time Example for 16 minutes at power 7 Action Control panel Display Zone selection Press display 0 selected 0 and control light on Select the power level Slide the SLIDER to 7 7 Select ...

Page 11: ...ones are equipped with an automatic go and stop cooking device The cooking zone starts at full power during a certain time then reduces automatically its power on the pre selected level Start up Action Control panel Display Zone selection Press display 0 selected 0 and control light on Full power setting Slide the SLIDER to 9 pass from 0 to 9 Automatic cooking Re press on display SLIDER 9 9 is bli...

Page 12: ...the 2 cooking 0 appears on the front zone on the rear zone Increase bridge Slide the SLIDER 1 to 9 or U 1 to 9 or key U Stop the bridge Press on the 2 cooking zones 0 or H on the 2 zones Keep warm Function This function automatically maintains a temperature of 70 C This will avoid liquids overflowing and fast burning at the bottom of the pan To engage to start the function Keep warm Action Control...

Page 13: ...t Press key 0 or H on the displays Hob locking Press simultaneously and 0 no modification from the front right zone display Re press display 0 L on the displays Unlocking Action Control panel Display Start Press key L on the displays In the 5 seconds after start Unlocking the hob Press simultaneously and 0 or H on the L on the front right zone display displays Press key no light on the displays ...

Page 14: ...a pan placed on an induction heating zone set at level 9 This water must heat in a few seconds A magnet sticks to the bottom of the pan Certain pans can make noise when they are placed on an induction cooking zone This noise doesn t mean any failure of the appliance and doesn t influence the cooking operating Pan dimension The cooking zones are automatically adapted to the diameter of the pan Howe...

Page 15: ...rface thoroughly Highly corrosive or abrasive detergents and cleaning equipment likely to cause scratches must be absolutely avoided Do not use a steam cleaner or pressure washer Do not use any object that may scratch the ceramic glass Ensure that the pan is dry and clean Ensure that there are no grains of dust on your ceramic hob or on the pan Sliding rough saucepans will scratch the surface Spil...

Page 16: ...ontrol panel displays E5 Defective network Check the voltage of the electrical network The control panel displays E6 Defective network Check the frequency of the electrical network The control panel displays E8 The air inlet of the ventilator is obstructed release it The control panel displays U400 The hob is not connected to the network Check the connection and reconnect the hob If one of the sym...

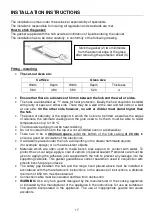
Page 17: ... of a not ventilated oven or a dishwasher There has to be a minimum space under the bottom of the hob casing of 20 mm to ensure a good air circulation of the electronics If a drawer is placed under the hob avoid putting in the drawer flammable objects for example sprays or not heat resistant objects Materials which are often used to make bench tops expand on contact with water To protect the cut o...

Page 18: ...18 Under all circumstances makes sure the hob is well ventilated and all air inlets and outlet are free from obstruction See below for installation ...

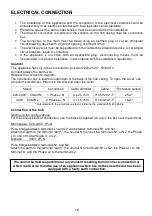
Page 19: ...ox is located underneath at the back of the hob casing To open the cover use a medium screwdriver Place it in the slits and open the cover calculated with the simultaneous factor following the standard EN 60 335 2 6 Connection of the hob Setting up the configurations For the various kinds of connection use the brass bridges which are in the box next the terminal Monophase 220 240V 1P N Put a bridg...

Page 20: ...Award Appliances NZ Limited E mail sales award co nz www awardappliances co nz 26518 0 ...

Reviews: