background image

12

Connections

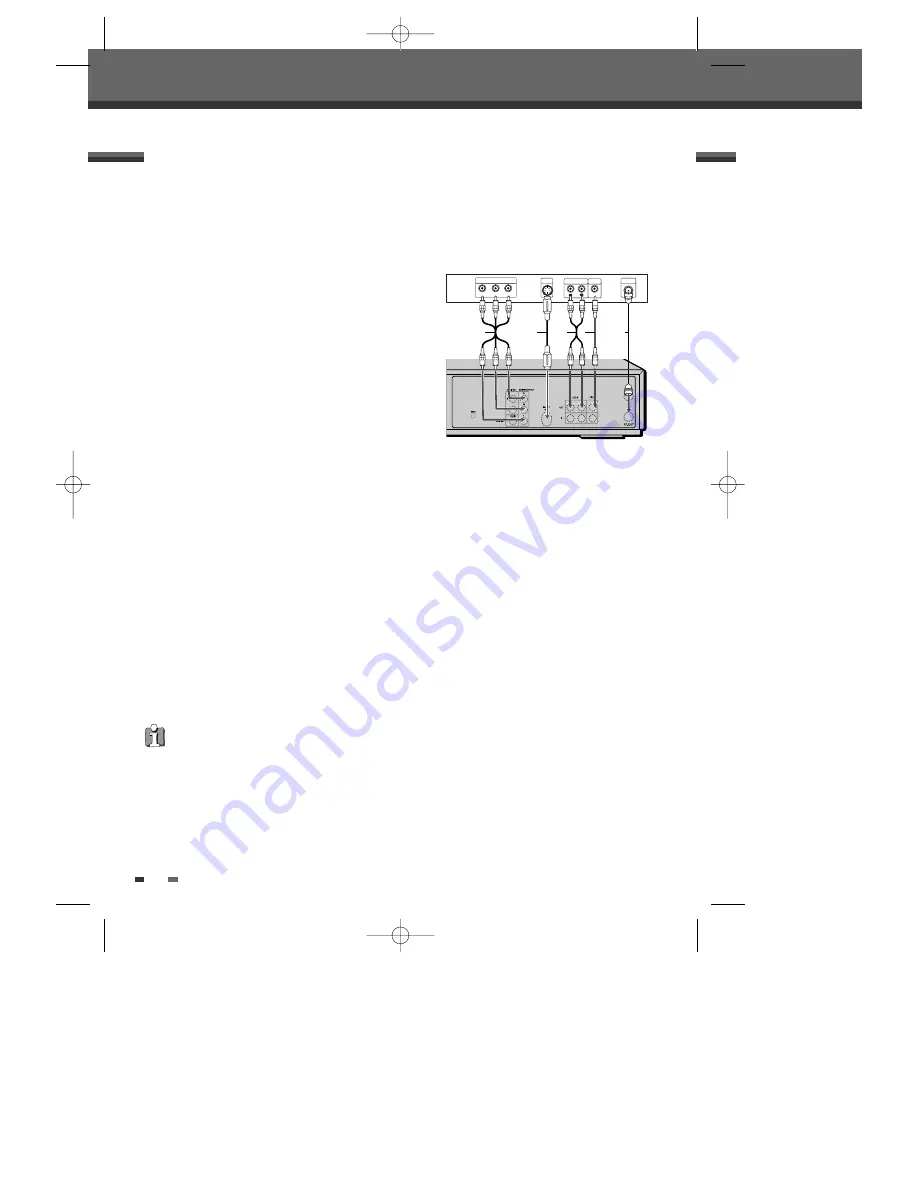
Choose one of the following TV connections, depending on the capabilities of your equipment.

RF Connection

Connect the RF OUT (TO TV) jack on the DVD RVCR to the antenna in jack on your TV using the supplied
75-ohm RF cable (R). If you use this connection, tune your TV to the DVD RVCR's RF output channel (CH
36 for Australia, CH 35 for NewZealand).

Audio/Video Connection
1

Connect the VIDEO OUT jack on the DVD
RVCR to the video in jack on your TV using
the supplied video cable (V). 

2

Connect the Left and Right AUDIO OUT jacks from
the DVD RVCR to the left/right audio in jacks
on your TV using the supplied audio cables (A).

S-Video Connection
1

Connect the S-VIDEO OUT jack on the DVD
RVCR to the S-Video in jack on your TV using
an S-Video cable (S).

2

Connect the Left and Right AUDIO OUT jacks from the DVD
RVCR to the left/right audio in jacks on your TV using the supplied audio cables.

Component Video Connection
1

Connect the COMPONENT/PROGRESSIVE VIDEO OUT jacks on the DVD RVCR to the corresponding
input jacks on your TV using a Y Pb Pr cable (C) if the Component Video jacks (Y, Pb, Pr) are available on
your TV.

2

Connect the Left and Right AUDIO OUT jacks from the DVD RVCR to the left/right audio in jacks on
your TV using the supplied audio cables.

Progressive Scan Connection

• If your television is a high-definition or ‘digital ready‘ television, you may take advantage of the DVD

RVCR’s Progressive Scan output for the highest video resolution possible.

• If your TV does not accept the Progressive Scan format, the picture will appear scrambled.

1

Connect the COMPONENT/PROGRESSIVE VIDEO OUT jacks on the DVD RVCR to the corresponding
in jacks on your TV using an optional Y Pb Pr cable (C).

2

Connect the Left and Right AUDIO OUT jacks from the DVD RVCR to the left/right audio in jacks on
your TV using the supplied audio cables.

Connecting a TV

• Be sure to set the DVD RVCR to Progressive Scan mode by pressing and holding [P.SCAN] for 3 seconds

(or changing the Video Output in the Setup Menu; see page 22).

• Progressive Scan does not work with the RF, Audio/Video or S-Video connections.

ANTENNA

INPUT

Y

Pb

Pr

COMPONENT/PROGRESSIVE VIDEO INPUT

S-VIDEO 

INPUT

R

S

C

L

R

AUDIO INPUT

VIDEO 

INPUT

A

V

Rear of DVD RVCR

Rear of TV

DF-Q7412D-JS/H  2006.3.15 3:38 PM  ˘

` 12   mac001  1200DPI 90LPI

Summary of Contents for W1090

Page 1: ...DVD Recorder VCR DVD Recorder VCR W1090 User Manual P N 97P95600D0 9Q DF Q7412D JS H 2006 3 15 3 38 PM A mac001 1200DPI 90LPI ...

Page 2: ...ature Make sure the product is placed at least 10 cm apart from other home appliances or obstacles to ensure sufficient ventilation The apparatus should not be exposed to dripping or splashing and no objects filled with liquids such as vases should be placed on top of the recorder Before a storm and or lightning unplug the product from the mains supply and aerial Put the product on a steady flat s...

Page 3: ...ODUCT CAUTION TO REDUCE THE RISK OF ELECTRIC SHOCK DO NOT REMOVE COVER OR BACK NO USER SERVICEABLE PARTS INSIDE REFER SERVICING TO QUALIFIED SERVICE PERSONNEL The lightning flash with arrowhead symbol within an equilateral triangle is intended to alert the user to the presence of uninsulated dangerous voltage within the product s enclosure that may be of sufficient magnitude to constitute a risk o...

Page 4: ...se openings must not be blocked or covered These openings must not be blocked by placing the unit on a bed sofa rug or other similar surface This unit should never be placed near or over a radiator or heat radiator This unit should not be placed in a built in installation such as a bookcase or rack unless proper ventilation is provided or the manufacturer s instructions have been adhered to 10 POW...

Page 5: ...dition 22 WALL OR CEILING MOUNTING The product should be mounted to a wall or ceiling only as recommended by the manufacturer 23 HEAT The product should be situated away from heat sources such as radiators heat registers stoves or other products including amplifiers that produce heat 24 To prevent battery electrolyte leakage which may result in injury and damage to the unit or other objects observ...

Page 6: ...m Information 27 Restore Defaults 27 On Screen Display Overview __________________28 SETUP DVD Playback _________________________________30 VCR Playback _________________________________33 Other Disc Playback __________________________35 PLAYBACK Basic Recording________________________________38 Recording from TV 38 One Touch Record OTR 38 Checking the Recording Time 39 To Pause the Recording 39 O...

Page 7: ...cordings titles are marked deleted title Before a DVD R can be played in a DVD player it must be finalized in the DVD Recorder VCR Once this process is complete no further recordings can be added What can I do with my DVD Recorder VCR Your DVD Recorder VCR is a machine for recording and playing back digital video discs with two way compatibility with the universal DVD video standard This means exi...

Page 8: ...is assigned a number enabling you to easily locate the track you want Overview Which discs you can use The following discs can be used in your DVD Recorder VCR Playback and recording DVD RW Digital Versatile Disc ReWritable DVD RW DVD Rerecordable DVD R Digital Versatile Disc Recordable DVD R DVD Recordable Playback only DVD Video Digital Versatile Disc VCD Video CD Audio CD Compact Disc Digital A...

Page 9: ...uring a recording recording will pause or stop automatically and an error message will be displayed on screen Video that is copy once only can only be recorded using DVD RW discs with CPRM Copyright Notice Audio and video recordings you make using the DVD Recorder VCR are for your personal use only You may not sell lend or rent them to other people This product incorporates copyright protection te...

Page 10: ... sure the polarities and are aligned correctly A A A A A A Caution Do not mix old and new batteries Never mix different types of batteries standard alkaline etc Handling Discs Do not touch the playback side of the disc Hold the disc by the edges so that fingerprints will not get on the surface Do not stick paper or tape on the disc Storing Discs After playing store the disc in its case Do not expo...

Page 11: ...pter VCR Advances the tape during Stop mode Press during Play mode for fast forward picture search Front Panel Display Shows the current status of the DVD Recorder VCR 1 COPY Copies from DVD to VCR or from VCR to DVD 2 PR Scans up or down through memorized channels Also moves up and down in DVD navigation menus 3 SELECT DVD VCR Toggles control between the DVD deck and the VCR deck 4 OPEN CLOSE Ope...

Page 12: ...in standby mode Indicates the DVD is recording Recording Pause mode 0 30 OTR Recording mode Recording on tape Indicates a VCR Timer Recording is set 1 1 1 5 Indicates a VCR Timer Recording is in standby mode Indicates the VCR is recording Recording Pause mode 0 30 OTR Recording mode Others SAFE Indicates when the DVD Recorder VCR is locked Identification of Controls COPY 1 1 1 5 R E C RECP 1 1 1 5...

Page 13: ...witches the DVD Recorder VCR input to TV tuner AV1 FAV or DV Selects DVD mode Selects VCR mode Displays or exits the Setup menu Displays information about the currently loaded disc VHS tape or TV channel VCR Commercial Skip skips forward 30 seconds Confirms menu selections œ Selects menu options PR Selects channels Accesses DVD disc menus Selects numbered options in menus Selects TV channels Manua...

Page 14: ...ive Scan Mode If your TV supports Progressive Scan you can view high quality video by setting the DVD Recorder VCR to Progressive Scan mode If your TV does not support Progressive Scan do NOT change to Progressive Scan mode If you do so accidentally press and hold the P SCAN button for 3 seconds to restore normal viewing As component outputs have their own Jacks on the back side change the TV inpu...

Page 15: ... of an additional device s video_output and audio_output RF IN FROM ANT Connect to your antenna or cable TV outlet RF OUT TO TV Connect to a TV with an RF coaxial input S VIDEO OUT Connect to a TV with an S Video Input COAXIAL Digital Audio Out Connect to an amplifier with a coaxial digital audio input RESET Button Recover from system down Caution Do not touch the inner pins of the jacks on the re...

Page 16: ...ent Use only one of the connections described below Whichever TV connection you use will work with all input sources Please refer to the manuals for your TV VCR stereo system or other devices as necessary to make the best connections For better sound reproduction connect the DVD Recorder VCR s AUDIO OUT jacks to the audio in jacks of your amplifier receiver stereo or audio video equipment See Conn...

Page 17: ...sing a Y Pb Pr cable C if the Component Video jacks Y Pb Pr are available on your TV 2 Connect the Left and Right AUDIO OUT jacks from the DVD Recorder VCR to the left right audio in jacks on your TV using the supplied audio cables Progressive Scan Connection If your television is a high definition or digital ready television you may take advantage of the DVD Recorder VCR s Progressive Scan output...

Page 18: ...s one or more of the audio formats supported by your DVD Recorder VCR MPEG 2 Dolby Digital and DTS Check the receiver manual and the logos on the front of the receiver Connecting an Amplifier Receiver Due to the DTS Licensing agreement the digital output will be in DTS digital out when DTS audio stream is selected If the audio format of the digital output does not match the capabilities of your re...

Page 19: ... digitally transfer DV tapes or DVD R RW discs to DVD R RW Use a DV cable not supplied to connect the DV In Out jack of your DV camcorder video deck to the front panel DV IN jack of the DVD Recorder VCR Connecting a Digital Camcorder This jack is for connection to DV equipment only It is not compatible with digital satellite tuners or D VHS video decks DV IN DV IN OUT Front of DVD Recorder VCR Jac...

Page 20: ...see page 27 2 Power On then you see the Initial Installation 3 Select the country which you want to then repeat the steps as above Complete 7 7 Setup has been completed Enjoy using your recorder ENTER OK Back Finish 1 Initial Setup Wizard is displayed on the screen Make sure the RF cable from your antenna or cable TV jack is connected Press ENTER to begin initial installation 2 OSD Lang message is...

Page 21: ...it Setup Disc Oper Disc Edit Timer REC Installation Manual Set Auto Scan Clock Set Adjust channels Choose OK Exit ENTER SETUP œ Manual Set Standard PAL BG Reception Aerial Auto Search 25 Store Channel PR No NAME 4 P 04 Store Cancel Decoder Off Fine Tune 0 Manual Setting To complete the set up of your DVD Recorder VCR when the auto set has not stored all of the channels or when you wish to store a ...

Page 22: ... next letter with the œ Manual Set Standard PAL BG Reception Aerial Auto Search 25 Store Channel PR No NAME 4 P 04 Store Cancel Decoder Off Fine Tune 0 Manual Set Standard PAL BG Reception Aerial Auto Search 25 Store Channel PR No NAME 4 P 04 Store Cancel Decoder Off Fine Tune 0 Manual Set Standard PAL BG Reception Aerial Auto Search 25 Store Channel PR No NAME 4 P 04 Store Cancel Decoder Off Fine...

Page 23: ...he DVD Recorder VCR to the desired type of antenna or cable TV system as shown in Connecting Antenna Cable on page 11 1 Follow steps 1 2 as shown under Manual Set 2 While Installation is selected press to select Auto Scan 3 Press ENTER to begin the channel search The tuner will automatically search for all available channels in your area and place them in the tuner s memory After Auto Scan is comp...

Page 24: ... exit Sort channels After tuning TV stations into your DVD Recorder VCR you may wish to change the order of PR s you have in your set to your preference 1 Select the PR number you want to move using 2 Press to select the PR number you want to move to 3 Press ENTER The selected PR Will be moved to the new PR number 4 Select OK to exit Installation Manual Set Auto Scan Clock Set Adjust channels Choo...

Page 25: ...l 5 Use to select the desired Record Quality HQ SP EP or SEP 6 Press ENTER to confirm your selection then press SETUP to exit the menu VCR Record Quality You can set the default VCR recording quality to SP Standard Play or LP Long Play SP is higher quality but LP provides 2 times the recording time e g a 2 hour tape will record for 4 hours in LP mode Follow the same procedure as the DVD Record Qua...

Page 26: ...guage for Disc Menus Subtitles and Audio soundtracks Follow the same procedure as the OSD Language Language Settings Language OSD Lang English Disc Menu Français Subtitle Español Audio Portugues Italiano Deutsch Nederlands Magyar Choose OK Exit ENTER SETUP œ Language OSD Lang Disc Menu Subtitle Audio Choose OK Exit ENTER SETUP œ Auto English French Spanish Portuguese Italian German Dutch Language ...

Page 27: ...quality with reduced flickering Interlace or Progressive If you connect the DVD Recorder VCR to a digital television DTV or Monitor using the COMPONENT jacks set Video Output to Interlace or Progressive RGB Not available for this set Follow the same procedure as TV Aspect Ratio to change the Video Output Caution Once the Progressive Scan setting is entered an image will only be visible on a Progre...

Page 28: ... play a DVD recorded with a Dolby Digital only for DVD or MPEG soundtrack If the DVD is recorded with a DTS sound track then no sound will be heard Dynamic Range While watching DVD movies you may wish to compress the dynamic range of the audio output the difference between the loudest and quietest passages This allows you to listen to a movie at a lower volume without losing clarity of sound Set D...

Page 29: ... is available on the disc The alternative must have the same rating or a lower one If no suitable alternative is found playback will stop You must enter the 4 digit password or change the rating level in order to play the disc 8 Press ENTER to confirm your rating selection then press SETUP to exit the menu The initial password is 3308 You must enter this password before you can change the Parental...

Page 30: ...ssword to confirm press ENTER Master Password If you forget your password press 3 3 0 8 on the remote control and then press ENTER Set the new password to something other than 0000 Preferences Choose OK Exit ENTER SETUP œ Video Audio Parental Ctrl Parental Auto Settings Password Change VCR Modulator Out Input Password Old Password New Password Confirm PWD Input digits Select OK OK Cancel ENTER 0 9...

Page 31: ...on 0 00 00 and stop You can change the modulator output channel using the 0 9 buttons Initial Setup Preferences Video Audio Parental Ctrl Auto Settings VCR Index Modulator Out Index Go to Zero Choose OK Exit ENTER SETUP œ The initial Modulator Out channel is 36 in Australia The initial Modulator Out channel is 35 in Newzealand Preferences VCR Preferences Modulator Output The VCR menu is activated ...

Page 32: ...ore Defaults 3 The Initialize menu will appear Use the œ buttons to select RESET and press ENTER System Information System Information helps service personnel identify key firmware information about your DVD Recorder VCR in case service is required Restore Defaults System Info Choose OK Exit ENTER SETUP œ Restore Defaults Choose OK Exit ENTER SETUP œ Version WP3000000FQ 050813 Loader Version AA003...

Page 33: ...g Repeat Shows the current repeat mode and changes the setting Chapter Title All or Off A B Repeat Shows the current A B repeat mode and changes the setting A A B or Off Random Repeat Shows the current random repeat mode and changes the setting On or Off OSD Language Shows the current OSD language and changes the setting 1 Press DISPLAY during playback The on screen display appears on the TV scree...

Page 34: ...ality when set to Stereo you can often improve it by changing to Mono When an external input is selected the audio channel can be switched only to Stereo Changing the TV Audio Channel Changing TV Channels If no disc is playing you can change TV channels using the 0 9 or PR buttons on the remote control or PR buttons on the front panel While watching TV press DISPLAY to display remove the on screen...

Page 35: ...de for this DVD Recorder VCR is 4 four Unless stated otherwise all operations described below use the remote control Some features may also be available in the Setup menu A disc which is recorded by computer at high speeds greater than or equal to 2x may not be recognized A disc which is recorded with unauthorized movie material may not be played A disc which is recorded by another recorder or not...

Page 36: ...erent audio language or audio track Subtitles DVD Press SUBTITLE and then press SUBTITLE repeatedly during playback to select among all available subtitle languages Camera Angle DVD If a DVD contains scenes recorded at different camera angles angle icon displays automatically You can select among these angles during playback Press ANGLE and then press it repeatedly during playback to select the de...

Page 37: ...hen press ENTER to display a submenu Use to select the desired chapter number and press ENTER to confirm Disc Menus Many DVDs contain Disc menus that allow you to access special features To open a Disc menu press MENU Then use the 0 9 buttons to directly select the desired options or use the buttons to highlight your desired selection and press ENTER 1 Press MENU The Disc menu is displayed 2 To ex...

Page 38: ...to stop playback The STOP icon appears on the TV screen If the tape reaches the end before STOP is pressed the DVD Recorder VCR will automatically stop and rewind Playing a VHS Tape Auto Tracking The automatic tracking function adjusts the picture to remove snow or streaks It works in the following cases When a tape is played for the first time When the tape speed SP LP changes When streaks or sno...

Page 39: ...reen If a still picture vibrates vertically stabilize it by using the TRACKING buttons on the remote control If the DVD Recorder VCR is left in Still mode for more than 5 minutes the DVD Recorder VCR will automatically enter Stop mode to protect the tape and video heads 2 To return to normal playback press PLAY Slow Motion 1 Press SLOW for Slow Motion playback 2 Press SLOW and SLOW repeatedly to a...

Page 40: ...T to repeat a track file and press again to repeat the whole disc On the MP3 CD menu you can display the folders on the disc Use œ to select the folder icon on the MP3 CD menu then press ENTER or PLAY You can also display just the tracks in the folders Use œ to select a folder then press ENTER MP3 1 Insert your CD and close the tray The JPEG CD or Kodak Picture CD folder tree appears 2 If there ar...

Page 41: ...MP3 files encoded below 64kbps are not supported You can enjoy a slide show while listening to MP3 music files 1 Prepare a CD which includes both MP3 and JPEG files 2 Insert the CD and play an MP3 file 3 Press TITLE while playing the MP3 file to change the Play mode The music playback will not stop 4 Select an image file and press ENTER to start the slide show 5 The MP3 file you selected continues...

Page 42: ...compression format for creating editing and distributing multimedia content More than just a video technology DivX is a global phenomenon that has become the new standard for digital video Dubbed the MP3 of video for its remarkable compression and widespread popularity DivX video enables anyone anywhere to create and enjoy DVD quality digital video Playable MPEG 4 SP and ASP is DivX5 1 DivX5 05 Di...

Page 43: ...or lights on the front panel display Recording continues until you press STOP or the disc is full To record for a fixed length of time see One Touch Record 6 Press STOP to stop recording The maximum number of DVD titles per disc is 49 If the DVD Recorder VCR is powered off during DVD recording the recording will not be saved If a DVD RW or unfinalized DVD R disc is inserted in the tray no title is...

Page 44: ... are disabled 1 Insert a Disc Insert the disc you wish to copy in the DVD deck and close the disc tray 2 Insert a VHS Tape Insert a blank VHS videotape into the VCR deck 3 Find the place on the DVD disc tape from which you want to start recording using the PLAY PAUSE FF and REW functions And press STOP 4 Press VCR œ œ DVD on the front panel 5 Press ENTER to select the desired Record Mode in Copy t...

Page 45: ...DVD on the front panel 5 Press ENTER to select the desired Record Mode in Copy to Disc menu HQ High Quality 1 hr disc SP Standard Play 2 hrs disc EP Extended Play 4 hrs disc SEP Very Low Quality 8 hrs disc 6 Press VCR DVD again to start copying 7 Stop the Copy Process To stop copying at any time press STOP Copying will stop automatically when the VHS tape ends One Touch Copy VHS to DVD If the VHS ...

Page 46: ...sing Mode Choose a Record mode DVD HQ SP EP or SEP VCR SP LP œ Moves the cursor left right Changes the setting at the current cursor position Press SETUP to exit the Timer Record menu Press ENTER to save the program after filling in all the program information 7 Timer indicator will light or blink You must power off the DVD Recorder VCR to start the Timer Recording Timer Recording Timer Recording ...

Page 47: ... or blink You must power off the DVD Recorder VCR to start the Timer Recording Timer Recording using G Code system G Code is not available in some countries G Code is a trademark applied for by Gemstar Development Corp The G Code system is manufactured under license from Gemstar Development Corporation Timer Recording 01 01 00 13 23 Timer Recording 01 01 00 13 23 Input Digits Delete Exit timer rec...

Page 48: ... is not possible when Disc is protected in the Disc Operation menu see page 46 There are already 49 titles recorded on the disc If the disc is damaged the recording may not complete successfully even if the Check field shows Rec OK Timer Recording Troubleshooting You can clear a Timer Recording any time before the recording actually starts Use to select the program you want to erase on the Timer R...

Page 49: ...e DVD Recorder VCR remote to control both the camcorder and the DVD Recorder VCR Before recording make sure the digital camcorder is properly connected to the front panel DV IN jack see page 14 1 Make sure your digital camcorder is connected to the front panel DV IN jack see page 14 2 Press INPUT repeatedly to select the DV input DV appears on the front panel display and the TV screen 3 Find the p...

Page 50: ...s are not compatible You cannot connect more than one DV camcorder at a time to the DVD Recorder VCR You cannot control the DVD Recorder VCR from external equipment connected via the DV IN jack including two DVD Recorders It may not always be possible to control the connected camcorder via the DV IN jack Audio input to the DV IN jack should be 32 or 48kHz not 44 1kHz Picture disturbance on the rec...

Page 51: ...c Later if you change your mind you can unprotect the disc 3 Use to select Protect menu 4 If you want to protect the whole disc press ENTER 5 To confirm select OK To cancel select Cancel If you select OK and press ENTER all the contents of the disc will be protected Disc Operation in DVD RW disc DVD Recorder Init Setup Disc Operation œ Select Init Setup Disc Oper Disc Edit Timer REC Disc Operation...

Page 52: ...enu 4 If you want to adapt the whole disc press ENTER 5 To confirm select OK To cancel select Cancel If you select OK and press ENTER the disc will be adapted Disc Operation Select OK Exit ENTER DISC Erase Finalize Protect Make Comp Adapt Disc Info _ Exit Adapt Adapt this disc OK Cancel Information 3 Press to select Disc Info 4 The Disc Info Menu shows you disc information such as disc type number...

Page 53: ... discs you can manage the disc using the Disc Menu The DVD R DVD RW Disc Menu allows you to rename your disc or finalize it so it will be compatible with most other DVD players At first go to Disc Operation mode 1 Press SETUP The Setup menu appears 2 While Disc Oper is selected press ENTER to go to the Disc Operation page Disc Operation in DVD R DVD RW disc Once you have finalized a DVD R DVD RW d...

Page 54: ... is complete the erased title remains as an empty title Title Menu You can only erase titles on DVD RW discs DVD Recorder Init Setup Disc Edit œ Select Init Setup Disc Oper Disc Edit Timer REC Edit TITLE CH 10 10 20 am 12 21 04 SEP Select Exit Confirm Prev Page Next Page ENTER SETUP Label Erase Divide Protect Chap Edit Index Pic _ Exit TITLE CH 10 10 34 am 12 21 04 HQ œ Edit TITLE CH 10 10 20 am 1...

Page 55: ...be displayed This may takes several seconds The Protect icon will appear in front of the Title name Edit TITLE CH 10 10 20 am 12 21 04 SEP Select Exit Confirm Prev Page Next Page ENTER SETUP Label Erase Divide Protect Chap Edit Index Pic _ Exit TITLE CH 10 10 34 am 12 21 04 HQ œ Edit TITLE CH 10 10 20 am 12 21 04 SEP Select Exit Confirm Prev Page Next Page ENTER SETUP Label Erase Divide Protect Ch...

Page 56: ...ayed in the Playlist menu is represented by a thumbnail picture taken from the start of that title or chapter If you prefer you can select a different still picture from within the title 2 Select the title to be edited using ENTER 3 Select Index Pic using 4 Press ENTER to change the index picture 5 Press ENTER when the preferred picture is on your TV screen Chap Edit 1 Select Exit Confirm Prev Pag...

Page 57: ...ith the Adjust Channels menu Antenna or cables are loose Wrong Tuning Band is selected in the DVD Recorder VCR Setup menu Camcorder is off DVD Recorder VCR s source is not set to AV1 AVF or DV Plug the power cord into the wall outlet securely Select the appropriate video input on the TV so the picture from the DVD Recorder VCR appears on the TV screen Connect the video cable securely Turn on the T...

Page 58: ...VD Recorder VCR Audio Video Out is not selected for viewing at the TV DVD Recorder VCR s TV audio channel is set to BIL or MONO The remote control is not pointed at the remote sensor of the DVD Recorder VCR The remote control is too far from the DVD Recorder VCR There is an obstacle in the path of the remote control and the DVD Recorder VCR The batteries in the remote control are dead Finalise the...

Page 59: ...event condensation When condensation has occurred wait a few hours for the DVD Recorder VCR to dry before using it Moisture Condensation Troubleshooting Moisture condensation can occur In locations where moisture condensation may occur AWA brand is imported and sold under license by Big W Discount Stores 3 City View Rd Pennant Hills NSW 2120 DF Q7412D JS H 2006 3 15 3 38 PM 54 mac001 1200DPI 90LPI...

Page 60: ...ng frequency 48kHz Compression format MPEG1 Layer2 VCR Specifications Head system 4 Head Video 2 Head Hi Fi helical scan azimuth system Timer 24 hour display type Tape speed SP 23 39 mm sec LP 11 70 mm sec Tape width 12 7 mm Rewind time less than 150 sec E 180 Channel coverage VHF 2 12 13 20 74 80 UHF 21 69 CATV 1 41 Frequency range 20Hz to 20kHz Signal to noise ratio 43 dB Dynamic range 75 dB Cha...

Reviews: