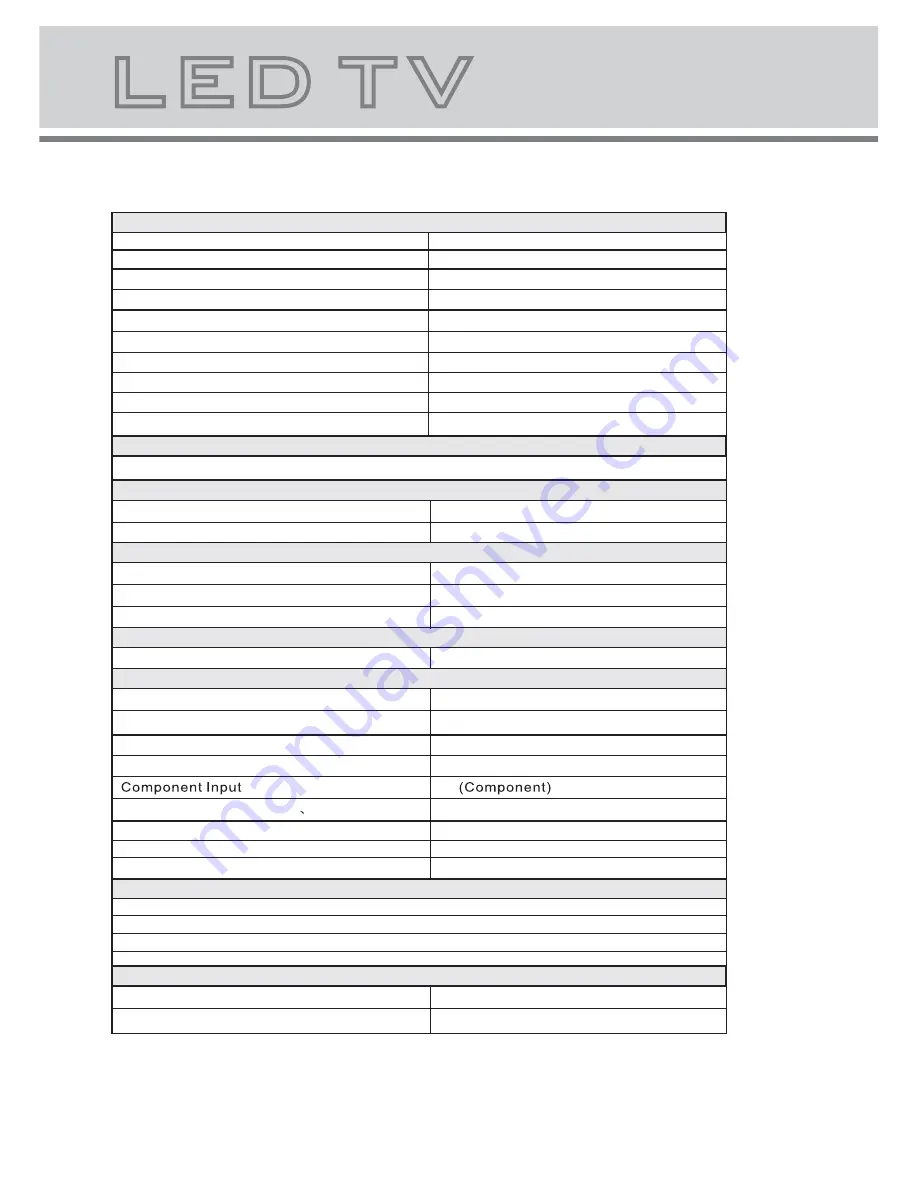
background image

25

Power

Power

Power Consumption

130W

AC 100V - 240V ~ 50 / 60Hz

English.French.German.Italian.Spanish.

Panel Features

Screen Size

42 inch

Active Area

930.24mm(H) X 530.26mm(V)

Aspect Ratio

16:9

Panel Resolution

1920 X 1080

Brightness

450 cd/m²

Contrast Ratio

4000:1

Viewing Angle

176º(H) X 176º (V)

Dot Pitch

0.1915mm(H) X 0.4845mm(V)

Maximum Colour

1.07G

Response Time Black-White (R&D)

4ms

OSD Languages

TV Function

Broadcast System

Receiving Channel

Video Standards Supported

Composite Video input

NTSC / PAL / SECAM

NTSC / PAL / SECAM

S-Video Input

Antenna (RF)

Audio Output

Maximum Audio Output

Input Connections

TV Input (Analogue TV Antenna)

1 (RF - 75 Ohm)

2

VGA Input

1 (15 pin D-Sub)

L + R Audio Input (For AV

S-Video )

PC Audio in

4 (White RCA, Red RCA)

Stereo Mini Phono Jack Input (3.5mm)

VGA Resolutions Supported

640x480 @ 60Hz
800x600 @ 60Hz

1024x768 @ 60Hz

2X6W

1920x1080 @ 60Hz

AV Input (Video)

2 Composite (Yellow RCA)

HDMI

3 (19 pin )

S-Video Input

1

(4 pin DIN)

PAL / SECAM

DK / BG / I

PAL / SECAM

USB 2.0

2 (4 pin )

Specifications for model LEF4290:

Summary of Contents for 32G90G

Page 1: ......

Page 2: ...USER MANUAL 32G90G 42G90 ...

Page 3: ... contact the help line before you return this product back to the place of purchase Contact our Toll Free Warranty Support Help Line 1300 366 144 Email warrantyhelp awa com au Visit our web site for FAQ s or request for service www awa com au ...

Page 4: ......

Page 5: ...nstructions handy and close by your LED TV Contents Important safety instructions 2 Accessories 3 Remote control 4 Remote control functions 5 LED TV panel overview 7 Connecting to external devices 9 The OSD menus 10 Menu Operation when TV is the selected source 11 Menu Operation when VGA is the selected source 19 Source Selection 19 TELETEXT function buttons 6 Trouble shooting 22 Maintenance 23 US...

Page 6: ... the presence of insinuated dangerous voltage within the product s enclosure that may be of sufficient magnitude to constitute a risk of electric shock to persons The exclamation point within an equilateral triangles is intended to alert the user to the presence of important operating and maintenance servicing instructions in the literature accompanying the appliance WARNING TO REDUCE THE RISK OF ...

Page 7: ...net Do not push foreign objects into cabinet slots or holes The screen surface is easily scratched Do not touch the screen with hands or any hard object Do not pull the power cord when disconnecting power Turn off the switch on the socket and pull the plug not the cord Do not attempt to open this product yourself There are no user serviceable parts inside Note This handling description is printed ...

Page 8: ...tton Signal source selection button Main menu Up LEFT Right Down Volume adjusting button Channel selection button Mute button Exit the OSD menu button RED button GREEN button YELLOW button BLUE button INDEX button FORWARD REVEAL button HOLD NEXT button SUBPAGE button SUBTITLE button PREV TTX MIX button Size button REVERSE CANCEL button MEDIA button STOP Favourite button ADD DEL button EPG Play Pau...

Page 9: ...annel SOURCE Select the source TV AV1 AV2 S VIDEO YPBPR1 YPBPR2 VGA HDMI1 HDMI2 HDMI3 MENU TV system setup menu OK Confirm button for OSD menu Enter Initial Setup menu EXIT Exit the menu or cancel the current operation MUTE Turn the speaker output on off UP Down Move cursor in menu Left Right Move cursor in menu adjust VOL Volume up down CH Channel up down EPG Display the electronic program guide ...

Page 10: ...cture press again to go back to the text mode Press this key to change the size of the character of the current text page as following Normal Display the upper half Display the bottom half Normal Display Stop refreshing the current page press again to cancel HOLD Reveal Conceal the concealed information of the current text page To enter the subpage To show teletext index RED GREEN YELLOW BLUE Fast...

Page 11: ... the TV s Touch Control Panel 1 First touch lightly just under any of the labels shown above to activate the touch panel the blue indicators will light up 2 While the blue indicators are still lit touch the desired indicator the indicator will flash in acknowledgement NOTE Touch the blue indicators not the actual label wording You do not need to apply pressure a light touch is sufficient to activa...

Page 12: ...2 2 HDMI Input 3 3 AV Input 2 4 Headphone output 5 1 9 2 4 3 6 7 8 1 Antenna input 75 Ohm VHF UHF 2 3 4 S VIDEO input 5 6 7 Coaxial audio 8 PC audio input 9 Composite Video Stereo Audio Output AV Input 1 Component Video Audio Inputs x 2 VGA PC Video Input output HDMI Inputs x 2 ...

Page 13: ...7 Connecting to external devices 9 HDMI HDMI ANTENNA VGA PC AUDIO PC Y PB PR S VIDEO L R VIDEO DVD L R HDMI3 L R VIDEO2 USB1 USB2 ...

Page 14: ...nels 0 Digital Channels 0 Initial Setup Complete Congratulations Completed Initial Setup Please press OK to exit the wizard Initial Setup Please select your language Initial Setup Welcome Welcome to use the Wizard for Initial Setup Please press OK to start the wizard Language Back Back Select Next EXIT Exit Initial Setup Please select your country Country Back Select Next EXIT Exit Initial Setup B...

Page 15: ...ngeof 0 to 7 b 6 DNR Change the in the sequence Medium Strong Auto b 7 Color Temperature Change the color temperature in the sequence User Cool Standard Warm G Gain B Gain included in each is an overview of Dynamic picture Noise Reduction Off Low does not work when using VGA HDMI YPbPr sources R Gain item Menu Operation when TV is the selected source Audio TV Setup Parental Color Temperature R Gai...

Page 16: ... Treble Change the value of Treble with the key in the range of 0 to 100 b 4 Sound Surround b 5 Equalizer Change the Equalizer in the sequence as Off Concert Living Room Hall Bathroom Cave Arena Church b 6 Auto volume control Change the auto volume control in the sequence as on off is an overview Turn Surround Sound On Off TV Setup Parental Balance Bass Treble Sound Surround Equalizer Auto Volume ...

Page 17: ...T Exit Manual scan Video Video OK Enter Single RF Scan b 3 3 Manual Scan Try this if Channel Scan doesn t pick up all desired channels Tune individual channels with Single RF Scan or a range of digital analog channels with the other options EXIT Cancel b 3 4 Channel Skip Channels selected here will not be accessible when scrolling through channels with the CH CH buttons they will still be accessib...

Page 18: ...ste 4 Digital WDR Dortmund 5 Digital WDR Dusseldorf 6 Digital WDR Essen 900 Analog 901 Analog 902 Analog BBC1 903 Analog BBC1 Digital 1 arte b 3 5 Channel Sort Change the channel position b 3 6 Channel Edit Edit channel details see below Press numeric button to edit channel name 1 A B C 1 2 D E F 2 3 G H I 3 4 J K L 4 5 M N O 5 6 P Q R 6 7 S T U 7 8 V W X 8 9 Y Z 9 0 0 Exit Exit Audio TV Setup Par...

Page 19: ...ode Change the screen mode in the sequence as Auto 16 9 4 3 b 3 OSD TIMEOUT set of OSD Menu in the sequence Short Middle Long b 4 OSD Transparency set the transparency of the OSD Menu in the sequence as Middle Low High b 5 Time Setup b 6 Subtitle b 7 Teletext b 8 Blue Mute b 9 Reset Default Spanish display duration set the time see next page for details Set subtitles Teletext setup teletext not av...

Page 20: ...e type Normal NORMAL isfor thenormal person Hearing Impaired HearingImpaired isfor peoplewho with hearingproblems subtitles for analog channels On Off for digital channels the 2nd Parental Video Video Audio TV Setup Time Zone Time As Broadcaster Time Setup Select EXIT Parental Video Video Audio TV Setup Analog Subtitle Digital Subtitle Language Digital Subtitle Language 2nd Subtitle Type Off Off O...

Page 21: ... Channel Block Program Block Input Block Change Password Clean All Hotel Block b 1 The submenu of Hotel Block b 1 1 Hotel lock On Off b 1 2 On source Select input source b 1 3 On channel Select your TV channel No while you open the main unit under TV mode b 1 4 Max Volume Set the maximum volume level startup TV AV1 AV2 S VIDEO YPBPR1 YPBPR2 VGA HDMI1 HDMI2 HDMI3 Select EXIT Exit Hotel Block Parent...

Page 22: ...ock Restriction of Access No Block Select EXIT Exit Input Block Parental Video Video Audio TV Setup TV AV2 S VIDEO YPBPR2 2 3 4 1 Select EXIT OK Set Exit AV1 5 6 7 VGA HDMI1 HDMI2 HDMI3 8 9 10 YPBPR1 b 5 The submenu of Change Password You need to input the new password and confirm it b 6 Confirmation screen when Clean All is selected pressing OK will restore settings to factory defaults If you do ...

Page 23: ... the V Position of the picture you can set the value range 0 100 a 4 Phase Adjust the phase of the picture you can set the value range 0 31 a 5 Clock set the clock you can set the value range 0 255 SOURCE SELECTION 1 Press SOURCE button to enter the signal source menu 2 Press button to select signal source 3 Press OK button to confirm 4 Press EXIT button to exit signal source menu TV Source Video ...

Page 24: ...ess buttons to select Picture press OK button to enter Press EXIT button to return to the previous menu press the buttons to select the photo you want to view press the OK button to view the picture press the EXIT button to exit NOTE format supported JPEG Press the RED button on the remote control to pause press again to Press the GREEN button on the remote control to select different duration mod...

Page 25: ... Music mode Multimedia Operation Video Press buttons to select press the buttons to select the Video to view the OK button to play the movie Press the EXIT button to exit NOTE SD MPEG1 dat mpg SD MPEG2 vob mpg SD MPEG4 avi Press button once to pause Press button again to return to normal play Press button to stop playback Press button to play the previous Press button to play the next Press button...

Page 26: ...ith correct polarity to to Install new batteries Power is suddenly turned off Had the Sleep Timer been set Check the power source Picture appears slowly after switching on This is normal the image is muted during the product startup process Please contact if the picture has not appeared after five minutes Customer Support No or poor color or poor picture Adjust the color in menu option Keep a suff...

Page 27: ...gin any cleaning Cleaning the screen Cleaning the screen 1 Here s a great way to keep the dust off your screen for a while Wet a soft cloth in a mixture of lukewarm water and a little fabric softener or dish washing detergent Wring the cloth until it s almost dry and then used it to wipe the screen 2 Make sure the excess water is off the screen and then let it air dry you turn on your TV fully bef...

Page 28: ...ction Broadcast System Receiving Channel Video Standards Supported Composite Video input NTSC PAL SECAM NTSC PAL SECAM S Video Input Antenna RF Audio Output Maximum Audio Output Input Connections TV Input Analogue TV Antenna 1 RF 75 Ohm 2 VGA Input 1 15 pin D Sub L R Audio Input For AV S Video PC Audio in 4 White RCA Red RCA Stereo Mini Phono Jack Input 3 5mm VGA Resolutions Supported 640x480 60Hz...

Page 29: ...ion Broadcast System Receiving Channel Video Standards Supported Composite Video input NTSC PAL SECAM NTSC PAL SECAM S Video Input Antenna RF Audio Output Maximum Audio Output Input Connections TV Input Analogue TV Antenna 1 RF 75 Ohm 2 VGA Input 1 15 pin D Sub L R Audio Input For AV S Video PC Audio in 4 White RCA Red RCA Stereo Mini Phono Jack Input 3 5mm VGA Resolutions Supported 640x480 60Hz 8...

Reviews: