background image


www.avonic.eu 

Contents 


Product Overview .......................................................................... 5


Features ............................................................................................................................................... 5 

Packing List .......................................................................................................................................... 5 

PTZ Camera ...................................................................................................................................... 5 

DIP Switch Setting ................................................................................................................................ 6 

SW1 Settings .................................................................................................................................... 6 

SW2 Settings .................................................................................................................................... 6 

Remote Control.................................................................................................................................... 7 

Installation ..................................................................................... 9


Cable Connecting ................................................................................................................................. 9 

Mounting ............................................................................................................................................. 9 

Desktop Mount Installation ................................................................................................................. 9 

Wall Mount Installation ....................................................................................................................... 9 

Ceiling Mount Installation ................................................................................................................. 10 

Menu Settings .............................................................................. 12


Menu Explanation .............................................................................................................................. 12 

Video .................................................................................................................................................. 12 

Exposure ............................................................................................................................................ 13 

White Balance .................................................................................................................................... 14 

Pan/Tilt/Zoom .................................................................................................................................... 14 

System................................................................................................................................................ 15 

Status ................................................................................................................................................. 15 

Restore Defaults ................................................................................................................................ 15 

Special Preset Commands.................................................................................................................. 16 

Annex 1 Technical Specifications .................................................. 16


Annex 2 Size and Dimension ......................................................... 18


Annex 3 SW1 Definition ................................................................ 19


Summary of Contents for CM55-VCU

Page 1: ...eu 1 Avonic CM55 VCU Full HD 1080p60 Video Conference Camera USB3 0 User Manual Version 2 2 Update notes Added social media accounts Join Avonic linkedin com company avonic twitter com avonic facebook...

Page 2: ...e is 0 C 40 C humidity at 90 Please avoid to have unrelated objects get into the device like corrosive liquid that may cause damage or danger Please avoid shock vibration soaking may cause to the devi...

Page 3: ...Cable Connecting 9 Mounting 9 Desktop Mount Installation 9 Wall Mount Installation 9 Ceiling Mount Installation 10 Menu Settings 12 Menu Explanation 12 Video 12 Exposure 13 White Balance 14 Pan Tilt Z...

Page 4: ...www avonic eu 4 Troubleshooting 22...

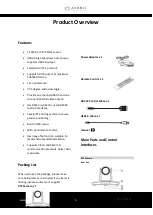
Page 5: ...es Special PTZ driving system to ensure precise positioning Built in OSD menu With an IR remote control Has image flip function suitable for stand and suspended installation Supports VISCA and PELCO D...

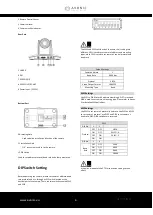
Page 6: ...eir settings are different SW1 is used to set camera s address and mounting types while SW2 is used to set camera s control protocol and baud rate Default Settings Camera Address 1 Baud Rate 9600bps P...

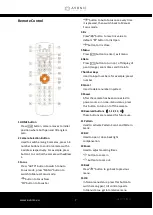
Page 7: ...to Iris Close 5 Menu Press MENU button to enter exit menu 6 Data Press DATA button to turn on off display of pan tilt angel zoom times and title info 7 Number Keys Used to input numbers for example p...

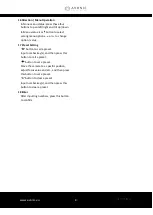
Page 8: ...n value 17 Preset Setting button to call a preset Input number key s and then press this button to call a preset button to set a preset Move the camera to a specific position adjust focus value and et...

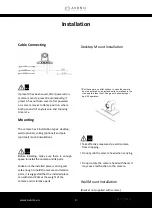
Page 9: ...mera and its parts Make sure the installed place is strong and safe enough to hold the camera and relative parts it is suggested that the installed place can withstand 4 times the weight of the camera...

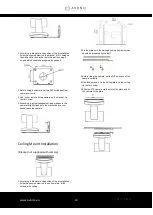
Page 10: ...t and make sure the camera is tightly fixed onto the bracket before your hands leave the camera Ceiling Mount Installation Bracket not supplied with camera 1 According to diameter and position of the...

Page 11: ...www avonic eu 11...

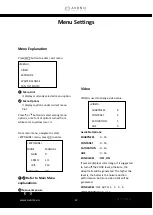
Page 12: ...used to change video value Available Options SHARPNESS 0 15 CONTRAST 0 14 SATURATION 0 14 HUE 0 14 2DNR LEVEL OFF ON If camera displays color image it is suggested to turn off the 2DNR level otherwis...

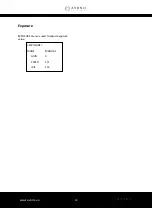
Page 13: ...www avonic eu 13 Exposure EXPOSURE menu is used to adjust exposure value EXPOSURE MODE MANUAL GAIN 0 SPEED 1 1 IRIS F14 EXP COMP ON LEVEL 0 BLC ON ANTI FLICKER OFF...

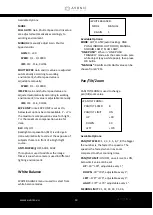
Page 14: ...s option is used to address the image flicker issue when camera is used in different lighting environment White Balance WHITE BALANCE menu is used to select from white balance modes Available Options...

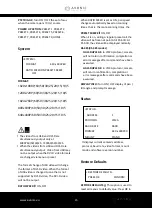
Page 15: ...s automatically based on zooming times that is the more zooming times the PRESET FREEZE ON OFF When it is on during a regular preset call the video will be frozen at point A till Point B At Point B th...

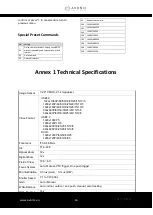
Page 16: ...2 14 megapixel Video Format USB3 0 1920x1080P 60 50 30 25 20 15 10 5 1280x720P 60 50 30 25 20 15 10 5 1024x768P 60 50 30 25 20 15 10 5 800x600P 60 50 30 25 20 15 10 5 640x480P 60 50 30 25 20 15 10 5 U...

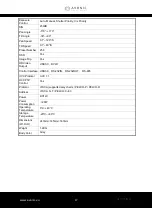
Page 17: ...D Yes Image Flip Yes HD Video Output USB3 0 DVI D Control Interface USB3 0 RS 232IN RS 232OUT RS 485 UVC Protocol UVC 1 1 UVC PTZ Control Yes Protocol VISCA supports daisy chain PELCO P PELCO D Addres...

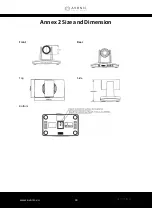
Page 18: ...www avonic eu 18 Annex 2 Size and Dimension Front Rear Top Side Bottom...

Page 19: ...OFF ON OFF OFF 10 OFF ON OFF ON OFF OFF 11 ON ON OFF ON OFF OFF 12 OFF OFF ON ON OFF OFF 13 ON OFF ON ON OFF OFF 14 OFF ON ON ON OFF OFF 15 ON ON ON ON OFF OFF 16 OFF OFF OFF OFF ON OFF 17 ON OFF OFF...

Page 20: ...FF ON OFF ON OFF ON 43 ON ON OFF ON OFF ON 44 OFF OFF ON ON OFF ON 45 ON OFF ON ON OFF ON 46 OFF ON ON ON OFF ON 47 ON ON ON ON OFF ON 48 OFF OFF OFF OFF ON ON 49 ON OFF OFF OFF ON ON 50 OFF ON OFF OF...

Page 21: ...www avonic eu 21 reserve reserve reserve DIP No 8 Mounting Type ON Ceiling OFF Desktop...

Page 22: ...nce of 8M After power on self test successfully but not controllable Wrong address protocol baud rate Check set again Wrong connection or open circuit of RS 485 or RS 232 cable Check reconnect Video l...

Page 23: ...www avonic eu 23...

Page 24: ...www avonic eu 24 CM55 VCUSB3 0 MAN2 2 Avonic 2017...

Reviews: