www.avonic.eu
6
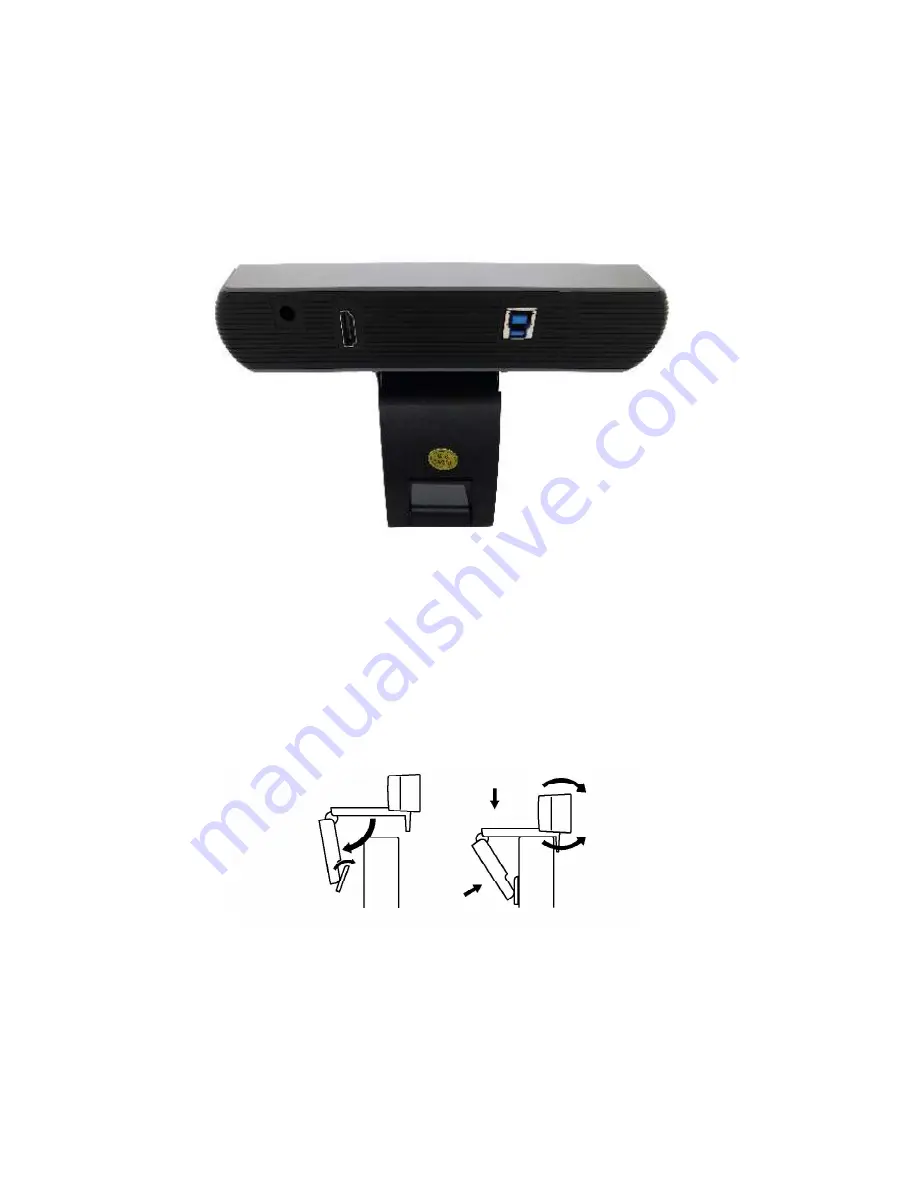
1.
Audio Line in (not in use)
2.
HDMI output
3.
USB 3.0 connector
Connections
Camera placement
Installation
1
2
7
9
10
11
3
The Avonic CM20-VCU is designed to be placed on top of a computer monitor.
Page 1: ...www avonic eu User Manual Version 1 0 AV CM20 VCU Avonic 4K Video Conference Camera USB3 0...
Page 2: ...Handling precautions 6 Product Overview 7 Features 7 Installation 8 Connections 8 Camera placement 8 Operation 9 Remote controller 9 Other Key Combinations 11 OSD Menu 12 Maintenance 16 Camera Mainten...
Page 3: ...conform to all local codes This unit is designed for indoor use only and it must not be installed where exposed to water or other liquids and moisture Before powering on the device check the input po...
Page 4: ...y its base and do not touch the lens Quantity Description Avonic SKU 1 pc Device AV CM20 VCU 1 pc Power Supply AV CM20 PSU 1 pc Remote Control AV CM20 RC 1 pc USB 3 0 cable AV USB30 AB Handling precau...
Page 5: ...30 on both hdmi and USB3 0 Control Control the camera with UVC IR remote control included Presets Up to 10 presets with 0 1 accuracy The Avonic CM20 VCU is a high quality 4K USB 3 0 video conferencing...
Page 6: ...vonic eu 6 1 Audio Line in not in use 2 HDMI output 3 USB 3 0 connector Connections Camera placement Installation 1 2 6 7 9 10 11 3 The Avonic CM20 VCU is designed to be placed on top of a computer mo...
Page 7: ...Reset Key 14 PTZ control key 15 Menu Key 16 Backlight Key 17 PTZ reset key 1 Standby Key 2 Number Key 3 Key 4 Preset Key 5 Home key 6 Return Key 7 Zoom Button 8 Left Right Setting Key 9 Focus Key 7 Re...
Page 8: ...s no function with this camera 9 Focus Key This button has no function with this camera 10 Selection Key Select IR channel 1 to 4 to control multiple cameras individually 11 Key Used with other keys 1...
Page 9: ...9 Quick Codes list 1 OSD menu default English 4 1080P 30fps default hdmi resolution 6 Factory default 7 1080P 60fps default resolution...
Page 10: ...www avonic eu 10 The OSD menu can be accessed by the Remote Control or an Avonic PTZ controller In the following pages the navigating is described for using the IR Remote Control OSD Menu...
Page 11: ...the screen Use the arrow buttons to move the cursor to the item to be set Press the HOME button to enter the corresponding sub menu MENU Exposure Color Image Focus Noduction Setting Information Restor...
Page 12: ...FF Select Item Change Value Menu Back COLOR WB Mode auto indoor outdoor One Push manual VAR AWB Sense low middle high Saturation 60 200 Focus Noise Reduction Select Item Change Value Menu Back 4 IMAGE...
Page 13: ...Value Menu Back 5 FOCUS 6 NOISE REDUCTION FOCUS AF Sense Low High Medium Focus Area Middle Upper half Lower half All Select Item Change Value Menu Back NOISE REDUCTION 2D NR Close Auto 1 5 3D NR Close...
Page 14: ...t be used for a long time please turn off the power switch disconnect AC power cord of AC adaptor to the outlet Use soft cloth or tissue to clean the camera cover Please use the soft dry cloth to clea...
Page 15: ...ck serial communication settings on both camera and controller Check VISCA PELCO address settings on both camera and controller No image Check power of camera and monitor Check video cable quality and...
Page 16: ...www avonic eu 16 www avonic eu 16 Appendix A Dimensions...