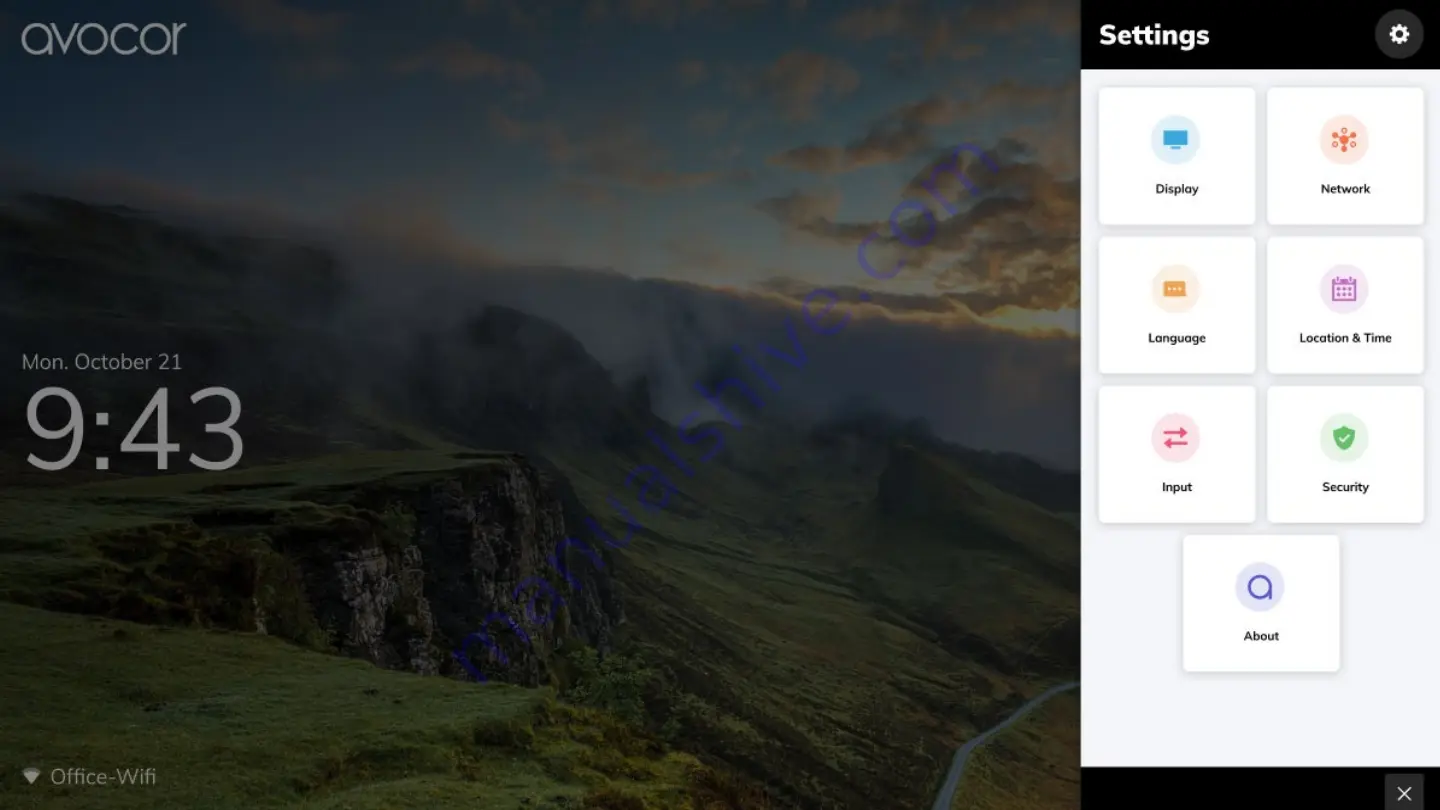
There are seven categorical tiles to choose from in the Settings menu: Display, Network, Language, Location & Time, Input, Security, and About.
Touch one of these tiles to open a subset of configuration options for your chosen Settings category."
Page 1: ...E 30 Series AVE 5530 AVE 6530 A AVE 7530 A AVE 8630 A Quick Start Guide...
Page 2: ...0 simultaneous touch points multiple source inputs for your computers and peripheral devices and the new intuitive Avocor UiQ on screen display OSD menu This Quick Start Guide will provide basic opera...
Page 3: ...Welcome to Avocor UiQ Avocor s UiQ is the new smart touch enabled dynamic user interface with source preview and menu settings that allows for remote control free usage...
Page 4: ...Time Date and Week Temperature C F Room Name Settings Wi Fi connection Source Preview Selection...
Page 5: ...Select the gear icon to access the settings menu...
Page 6: ...ategorical tiles to choose from in the Settings menu Display Network Language Location Time Input Security and About Touch one of these tiles to open a subset of configuration options for your chosen...
Page 7: ...t or custom user images for the Home Screen Energy Saving Set Auto Power On Off Power On Time Power Off Time Eco Mode OPS Always On Display Sleep Picture Set the Scheme Backlight and Advanced Settings...
Page 8: ...Status Shows Network LAN status LAN Set a Static IP or DHCP Wi Fi Configure Wi Fi settings Wake On LAN Toggle Wake On LAN...
Page 9: ...Configure Wi Fi settings When the optional USB dongle is connected to the display you will see a list of available networks to choose from Now select your network and type in your password...
Page 10: ...uto Date Time Toggle Auto Date Time on off Use 24 Hour Time Toggle 24 Hour Time on off Date Format Set a date format for the Home Screen Location Weather Set the region for accurate weather informatio...
Page 11: ...ault source the display will show automatically upon powering on the display Home Screen OPS PC HDMI Front HDMI 1 HDMI 2 DisplayPort Type C 55 Only Auto Detect New Input Toggle Auto Detect New Input d...
Page 12: ...Require Passkey Toggle Require Passkey on off Set Passkey Set a custom Passkey to access display settings...
Page 13: ...1 The Display at a Glance 55 2 3 2 4 Power Switch Power Socket OPS PC Slot 1 Guest Inputs 5 2 Speakers 6 3 Front Buttons 7 4 Pen Tray 8 Rear Ports 7 8 6 5...
Page 14: ...1 The Display at a Glance 65 2 3 2 Power Switch Power Socket OPS PC Slot 1 Guest Inputs 5 2 Speakers 6 3 Front Buttons 7 4 Pen Tray 8 Rear Ports 4 7 8 6 5...
Page 15: ...1 The Display at a Glance 75 86 2 3 2 Power Switch Power Socket OPS PC Slot 1 Guest Inputs 5 2 Speakers 6 3 Front Buttons 7 4 Pen Tray 8 Rear Ports 4 7 8 6 5...
Page 16: ...Source Source switching and preview 5 Menu Displays menu options 6 Home Access to the UiQ Home screen 7 Volume Short press to reduce one level of volume Long press continue to reduce the volume 8 Volu...
Page 17: ...Display Input Sources 55...
Page 18: ...Display Input Sources 65 75 86...
Page 19: ...te to the UiQ home screen MENU Open the OSD menu Brightness Decreases the Brightness Brightness Increases the Brightness MUTE Toggle Mute on off VOL Decreases the volume VOL Increases the volume SOURC...
Page 20: ...which tells you that the screen is switched on 5 After a brief warm up period the Avocor UiQ interface will be displayed Switching off 1 Switch the display off by pressing the power button on the dis...
Page 21: ...quipment before making any connections 2 Use the correct signal cables for each source 3 For best performance and to minimise cable clutter use high quality cables that are only as long as necessary t...
Page 22: ...the Type C port of the touchscreen and to the external PC 2 Using the Avocor UiQ interface or Remote Control select the Type C source button or press the Source Button see operating buttons on the Fro...
Page 23: ...ect the HDMI source button or press the Source Button see operating buttons on the Front Connection bar to select HDMI This display supports the VESA Display Data Channel DDC standard This standard pr...
Page 24: ...creen and to the USB port USB A on the external PC 3 Using the Avocor UiQ interface or Remote Control select the DisplayPort source button or press the Source Button see operating buttons on the Front...
Page 25: ...necting the Display to a Host Computer 1 Connect the signal cable to the display and then turn on the display 2 Connect the USB Cable USB Type A connector to the display 3 Connect the other end of USB...
Page 26: ...y screwing it onto the display input panel using the screws that were removed earlier Step 5 Ensure the installation is complete before turning on the power Step 6 Turn on the display When using an Av...
Page 27: ...avocor website www avocor com support Please visit www avocor com support to download the full E 30 A Series user manual Warranty Support Organisation Name Contact Person 1st Contact Number Landline 2...