background image


6-3 


6.2


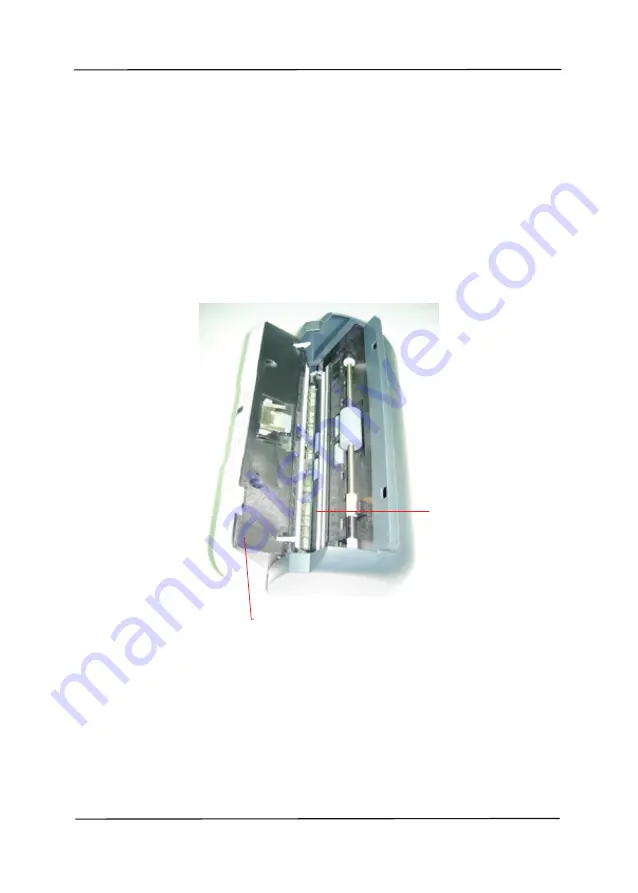
Cleaning the Glass  


1.


Press the Paper Jam Clearing button.  Open the front door 

to the left. 

2.


Wet a cotton swab with some isopropyl alcohol. (95%) 

3.


Wipe the glass and the white area as illustrated in below 

by moving the swab from side to side to rid the dust or 

dirt.   


ADF Front Door 

Glass 

Summary of Contents for AV121

Page 1: ...Sheet fed Scanner Quick Guide Avision Inc ENGLISH ...

Page 2: ...ge or computer language in any form or by any means electronic mechanical magnetic optical chemical manual or otherwise without the prior written permission of Avision Inc Material scanned by this product may be protected by governmental laws and other regulations such as copyright laws the customer is solely responsible for complying with all such laws and regulations Warranty The information con...

Page 3: ...leting Your First Scan 3 1 3 1 Loading Your Paper 3 1 3 1 1 Notice on Using the ADF 3 1 3 1 2 Placing Your Document in the ADF Paper Tray 3 2 3 2 Verifying Your Scanner Installation 3 3 3 3 A Glance of the Scanner Properties Dialog Box 3 5 4 ISIS Interface Operation 4 1 5 Using the Buttons 4 1 5 1 Installing Button Manager V2 5 2 5 2 Checking the Button Configurations before Scanning 5 2 5 3 Scann...

Page 4: ...rs Before you install and operate the new scanner please take a few minutes to read through this manual It provides proper instructions for you to unpack install operate and maintain the scanner The following figure indicates the package contents Please check all the items against your checklist If you do not receive all the items please contact your authorized local dealer immediately ...

Page 5: ... 4 USB Cable 5 Power Adapter Power Cord Note 1 Using other AC adapters may damage the machine and void the warranty 2 Please unpack the packing carefully and check the contents against the checklist If any items are missing or damaged please contact your dealer immediately 4 5 1 2 3 ...

Page 6: ... heat may cause damage to the unit Do not install the scanner in a humid or dusty place Be sure to use the proper AC power source Place the scanner securely on an even flat surface Tilted or uneven surfaces may cause mechanical or paper feeding problems Retain the scanner box and packing materials for shipping purposes ...

Page 7: ...2 2 2 1 Installing the ADF Paper Tray Unit Attach the Paper Support to the ADF Auto Document Feeder Paper Tray Paper Support ADF Paper Tray ...

Page 8: ...he Paper Jam Clearing Button to open the front door to the left 3 Insert four protrusions on the bottom of the ADF Paper Tray into the holes on the front of the scanner Paper Jam Clearning Button Protrusions Front Door ...

Page 9: ...2 4 4 Insert two protrusions in the middle of the ADF Paper Tray into the holes on the top of the scanner Protrusions Holes ...

Page 10: ...2 5 2 2 Installing the Output Paper Tray Insert the right and left protrusion of the Output Paper Tray into the holes on the front of the scanner Scanner Output Paper Tray Protrusion Holes ...

Page 11: ...small end of the power adaptor into the power jack of your scanner Insert the other end to an appropriate power outlet 2 3 2 Turning on the Power After the power cable and the USB cable have all connected press the power switch to the I position to turn on the scanner To turn off the scanner please press the power switch to the O position Power Switch ...

Page 12: ...e FIRST install Button Manager before installing the scanner driver Install Scanner Driver To communicate with your scanner you need to install the scanner driver After installing the Button Manager software click Install Scanner Driver to install the scanner driver on your computer Install Adobe Reader To view the user s manuals for the scanner and Button Manager V2 you need to use Adobe Reader t...

Page 13: ...driver on your computer 2 3 4 Connecting to Computer 1 Connect the square end of the USB cable to the USB port of your scanner Connect the rectangle end to the USB port of your computer 2 The computer should detect a new USB device and prompt a New Hardware Found message 3 Click the Next button to continue When the certification screen appears click Continue Anyway to complete the installation 4 W...

Page 14: ... the ADF please make sure that your paper meets the following specifications Document s should be square or rectangular and in good condition not fragile or worn Document s should be free of curl wrinkle tears wet ink or punch holes Document s should be free of staples paper clips paper sticky notes ...

Page 15: ...sional paper jam when automatically feeding multiple documents loosen the paper before loading Document feeding Place your document with the text face down on the ADF Paper Tray Align the two sides of the document with the slide guides Please note that the ADF Paper Tray can hold up to 50 page document at a time Your Document Face Down Paper Slider ...

Page 16: ...lowing procedure describes how to verify your scanner installation If the installation is not correct please review the preceding section to check if the cable connection and scanner driver have been successfully installed Before you begin be sure the scanner is on 1 Select Start Programs Avision AVxxx Scanner Avision Capture Tool The Select Scanner Model dialog box will be displayed 2 Select your...

Page 17: ...or choose Scan from the File menu 4 The document will be scanned and displayed in the Scan Validation screen After the scanned images have been displayed your scanner installation verification is completed Setup Actual Size Fit Page Scan File Format Save File Path ...

Page 18: ... based on type of scanner 3 Brightness Adjust the brightness level from 100 to 100 4 Contrast Adjust the contrast level from 100 to 100 5 Resolution Determine the quality of the scanned image The industry standard is 200 dpi 6 Invert Reverse the color of your scanned image 7 Scan Source Choice Auto Document Feeder Flatbed Flatbed Book Automatic varies due to different scanner model 8 Defaults Rese...

Page 19: ...on on the ISIS interface screen is briefly described as below Mode Select one of scan modes including B W gray color options Dither 5 halftone levels available can be disabled Dots per inch Select your desired resolution Paper Size Select your desired paper size Brightness Adjust your scan image brightness or darkness Contrast Adjust the range between the darkest and the lightest shades in the ima...

Page 20: ...5 1 5 Using the Buttons The following picture shows the 3 buttons and 1 function screen on the scanner The Scan button The Cancel Stop button Function display screen Function selector ...

Page 21: ...d a destination application 5 2 Checking the Button Configurations before Scanning 1 Button Manager V2 runs from the system tray After Button Manager V2 and the scanner driver are properly installed Button Manager V2 is started and the Button icon will be displayed on the system tray at the bottom right corner of your computer screen 2 Left click the Button Manager V2 icon to prompt the following ...

Page 22: ...you wish to change the setting use this window to reset the setting for the file format destination application or other scan settings 4 Click the OK button to leave the window Folder and file name for the scanned image Image Mode Selection Box Name of the Selected Button Scan To destination and settings Button Name OCR settings Basic Scan Parameters ...

Page 23: ...displays the scanned image in the window of Microsoft Paint the LCD screen should show Scan to App 3 Press the Scan button on the scanner 4 After the scanning is finished the Microsoft Paint software will be launched and the scanned image appears in the main window of Microsoft Paint as below Note 1 For details information on how to use the Button Manager V2 please refer to the user s manual in th...

Page 24: ...The Cleaning Procedures 1 Soak a cotton swab with some isopropyl alcohol 95 2 Press the Paper Jam Clearing button Open the front door to the left Wipe the upper feeding roller by moving the swab from side to side Rotate the roller forward with your finger and repeat the cleaning steps above until the entire roller is cleaned 3 Wipe the pad in one direction from top to bottom or the other way aroun...

Page 25: ...6 2 Front Door Paper Jam Release Button Feeding Roller ADF Pad ...

Page 26: ... Jam Clearing button Open the front door to the left 2 Wet a cotton swab with some isopropyl alcohol 95 3 Wipe the glass and the white area as illustrated in below by moving the swab from side to side to rid the dust or dirt ADF Front Door Glass ...

Page 27: ... the procedures below to remove the paper 1 Press the ADF Release Button on the left side Gently open the Scanner Front Door to the left 2 Carefully pull the paper out of the ADF unit 3 Close the scanner front door Your Scanner is now ready to use Paper Jam Clearing Button Document ...

Reviews: