background image


21 


Controlled reply: The following data is saved in return command payload of control command. 


Delivery confirmation: 

VISCA  over  IP  uses  UDP  as  transmission  communication  protocol.  UDP  communication  message 

transmission is not stable, it is necessary to confirm delivery and resent in application. 

Generally,  when  controller  sends  a  command  to  peripheral  equipment,  controller  will  wait  for  the 

return message then send the next command, we can detect and confirm if the peripheral equipment receive 

the  commands  from  its  return  message’s  lag  time.  If  controller  detects  it  overtime,  it  is  regarded  as  error 

transmission.  Controller  will  resend  the  commands  to  check  peripheral’s  status.  The  resent  command 

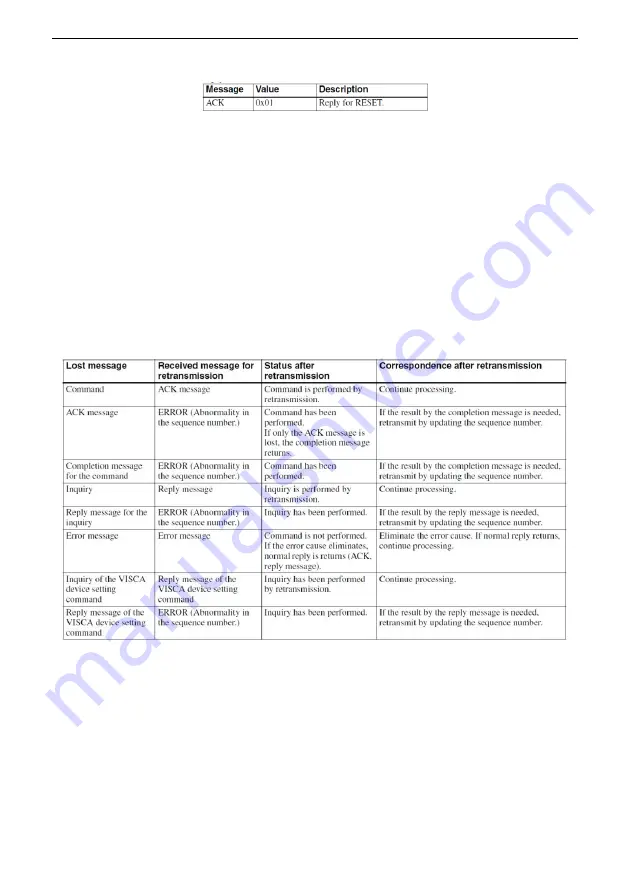
sequence  number  is  same  as  the  last  one.  Following  chart  lists  possible  received  message  and  the 

corresponding status after the resent command. 


Summary of Contents for AV-2020

Page 1: ...Model AV 2020 20x HD All in one PTZ Camera User Manual V1 0 Please read this user manual thoroughly before using www avipas com ...

Page 2: ...amera to rain or moisture Do not remove the cover Otherwise you may risk receiving an electric shock In case of unintended equipment operation contact an authorized engineer Never operate under unspecified temperature humidity or power supply Please use soft dry cloth to clean the camera If the camera is very dirty clean it with diluted neuter detergent do not use any type of solvents which may da...

Page 3: ...HTS 3 CAMERA SPECIFICATIONS 3 CAMERA INTERFACE 5 CAMERA DIMENSION 5 IR REMOTE CONTROLLER 6 VISCA IN RS232 PORT 9 OSD MENU 10 UVC CONTROL 13 WEB SETTINGS 14 VIEW RTSP STREAM VIA VLC 18 VISCA OVER IP 19 VISCA PROTOCOL 22 PELCO D PROTOCOL 29 PELCO P PROTOCOL 30 WARRANTY 32 ...

Page 4: ...mera lens by hand Mechanical damage may result from doing so Do not use in corrosive liquid gas or solid environment to avoid any cover plastic material damage Make sure there is no obstacle within rotation range Do not power on before installation is completed 5 Do not dismantle the camera We are not responsible for any unauthorized modification or dismantling CAUTION Certain frequencies of elect...

Page 5: ... Double sided Adhesive 1pc QC certification 1pc QUICK START 1 External interface RS232 I O HDMI output 3G SDI output USB2 0 output LAN output DC12V power Audio input Please check all connections before powering on the device 2 Dial switch settings at the bottom of the camera Dial Switch ARM SW 1 SW 2 Instruction 1 OFF OFF Updating mode 2 ON OFF Debugging mode 3 OFF ON Undefined 4 ON ON Working mod...

Page 6: ...port VISCA PELCO P PELCO D and VISCA over IP control protocol IP VISCA over both TCP and UDP Support RS232 daisy chain up to 7 cameras under VISCA protocol Support upside down ceiling installation H V flip Support RS232 UVC control Standard UVC1 1 protocol seamlessly compatible with all major video conferencing software and platforms CAMERA SPECIFICATIONS Video Format HD MI 1920 1080P60 59 94 50 3...

Page 7: ...M Video encode H 264 H 265 default H 264 Bit Rate Control Variable Bit Rate Constant Bit Rate Video Bit Rate 0Kbps 15360Kbps IP Protocol TCP IP HTTP RTSP DHCP Onvif PoE Supported Daisy Chain RS232 serial daisy chain up to 7 units under VISCA protocol Minimum Lux 0 01 lux White Balance Auto Indoor Outdoor Manual AWT PUSH Exposure Auto Manual Bright Shutter Iris Focus Auto Manual Iris Auto Manual El...

Page 8: ... 3 IR Receiver Panel 4 Power Indicator Light 5 Dial Switch 6 Tripod Screw Hole 7 Installation Hole 8 RS232 Control Input 9 RS232 Control Output 10 HDMI Output 11 3G SDI Output 12 USB Output 13 RJ45 Output 14 DC12V Power Jack 15 Line in Audio Input ...

Page 9: ...6 CAMERA DIMENSION MM ...

Page 10: ...d pass the IR remote control signal to the codec terminal via VISCA IN port SET 1 SET4 ADDRESS SETTING To set the current camera s address ID press and hold the key for 3seconds until the backlight of that key is ON CAM1 CAM4 CAMERA SELECTING Press the corresponding camera number to select the camera NUMERIC KEY 1 9 Set preset press and hold the number for 3 seconds to set preset position Call pre...

Page 11: ... its HOME position After entering camera OSD press OK to confirm selection AF Auto focus MF Manual focus RESET Press and hold for 3 seconds to reset camera MENU Enter OSD menu LEARN LIMIT L Set the pan tilt left limit position LEARN LIMIT R Set the pan tilt right limit position LEARN LMT CLR Clear all limit position BLC OFF BLC ON Not available BRIGHT BRIGHT Set image brightness only valid under b...

Page 12: ... VISCA IN DB9 Connection Camera VISCA IN Windows DB 9 1 DTR 6 DSR 2 DSR 4 DTR 3 TXD 2 RXD 4 GND 5 GND 5 RXD 3 TXD 6 A 7 IR OUT 8 B VISCA IN Mini DIN Connection Camera VISCA IN Mini DIN 1 DTR 1 DSR 2 DSR 2 DTR 3 TXD 5 RXD 4 GND 4 GND 5 RXD 3 TXD 6 A 6 NC 7 IR OUT 7 NC 8 B 8 NC Parameter Value Parameter Value Baud rate 2400 4800 9600 115200 Stop Bit 1bit Start Bit 1 bit Check Bit None Date Bit 8 bit...

Page 13: ...VISCA ADDRESS VISCA 1 7 PELCO P D 1 255 Default 1 BAUD RATE 2400 4800 9600 115200 Default 9600 PTL LOCK Protocol lock once set above protocol settings will be locked Default OFF RS485 RS485 ON OFF Default ON VISCA OVER ALL OVER IP OVER COM Default OVER ALL LANGUAGE Chinese English Default English EXPOSURE EXPOSUR E MODE AUTO MANUAL SHUTTER IRIS BRIGHT Default AUTO SHUTTER Shutter speed 1 30 1 1000...

Page 14: ...reduction the bigger value the less noise on image the lower the resolution Default OFF 3D NR 3D noise reduction OFF AUTO 0 4 the bigger value the less motion noise on image high value will cause image smear Default AUTO SHARPNESS Sharpness setting 0 15 Default 3 CONTRAST Set contrast level Default 8 SATURATION Set saturation level Default 8 GAMMA Select gramma level Default 0 AF SENSITIVITY LOW N...

Page 15: ...P60 720P30 1080I60 1080P24 IP DHCP ON OFF Use up down left right navigation keys to select item to set and use numeric keys to enter parameters Press menu button to return IP 192 168 001 188 MASK 255 255 255 000 GW Gateway 192 168 001 001 MAIN Default 1920 1080 BITRATE Default 04096k SUB Default 1280 720 BITRATE Default 02048k RESET SYS RESET Reset communication settings to default CAM RESET Reset...

Page 16: ... configuration under OSD 1 Press MENU to enter the camera OSD then select IP 2 Press navigation key to enter the IP setting interface Select the parameter needs to be changed using the navigation and keys 3 Use numeric keys to set the corresponding parameters After finishing entering press the MENU again to complete and save the setting 4 Press MENU again to exit menu UVC CONTROL 1 Make sure the U...

Page 17: ... F CT_PANTILT_RELATIVE_CONTROL 8x 01 06 01 pp qq rr ss FF CT_ZOOM_RELATIVE_CONTROL 8x 01 04 07 pp FF WEB SETTINGS 1 Download and install Flash Player When access the camera via Internet Explorer browser for the first time Flash Player needs to be installed We recommend users download it from flash official website to get latest version https www flash cn english After installation is complete it w...

Page 18: ...us speed and zoom speed On the bottom of image preview main stream and sub stream preview can be selected 4 Configuration Click Setting to enter camera configuration interface shown below Video Encode To set image encoding mode main stream and sub stream resolution bit rate frame rate bit rate control option I frame interval etc as shown above ...

Page 19: ...ngs Audio Setting To enable disable embedded audio Audio encoding mode can be selected Parameters such as sampling rate and bit rate can be adjusted Image Parameter To set focus exposure white balance image image quality noise reduction etc ...

Page 20: ...ort 80 Subnet mask 255 255 255 0 RTSP port 554 Firmware upgrade To update the camera ISP Steps are shown below Click clicking to upload file in the dialog box select the upgrade file Click upgrade to start the updating process DO NOT power off or do any operation when upgrading Please reboot the camera at least 5 min after the upgrade is finished Then re login to web interface select Reset all to ...

Page 21: ...otocol Reboot reboot ISP part of the camera Account Setting To set camera account username and password USING VLC TO VIEW RTSP RTMP VIDEO Default RTSP main streaming URL rtsp 192 168 1 188 stream main Default RTSP sub streaming URL rtsp 192 168 1 188 stream sub Default RTMP main streaming URL rtmp 192 168 1 188 1935 app rtmpstream0 Default RTMP sub streaming URL rtmp 192 168 1 188 1935 app rtmpstr...

Page 22: ... To apply enter camera OSD choose VISCA option OVER IP How to use VISCA over IP VISCA Command Commands are sent from controller to peripheral equipment camera and when peripheral equipment receives commands it returns ACK When the command is executed a complete message will be returned VISCA Inquiry Inquiry is sent from controller to peripheral equipment camera and when peripheral equipment receiv...

Page 23: ...in Payload 1 16 is the command length For example when valid data length is 16 byte Byte 2 0x00 Byte 3 0x10 Controller will save sequence number of each command when one command sent the sequence number of the command will add 1 when the sequence number reaches the max it will return back to 0 The peripheral equipment will save sequence number of each command and return the sequence number to cont...

Page 24: ... sends a command to peripheral equipment controller will wait for the return message then send the next command we can detect and confirm if the peripheral equipment receive the commands from its return message s lag time If controller detects it overtime it is regarded as error transmission Controller will resend the commands to check peripheral s status The resent command sequence number is same...

Page 25: ...dderss 8 Error Messages Command Packet Note Syntax Error z0 60 02 FF Returned when the command format is different or when a command with illegal command parameters is accepted Command Not Executable z0 61 41 FF Returned when a command cannot be executed due to current conditions For example when commands controlling the focus manually are received during auto focus Part 2 Camera Control Commands ...

Page 26: ...rol Separate Mode 81 01 04 36 01 FF Separate with optical zoom control Stop 81 01 04 06 00 FF Enable In separate mode Tele Variable 81 01 04 06 2p FF Enable In separate mode Wide Variable 81 01 04 06 3p FF Enable In separate mode Direct 81 01 04 46 0p 0q 0r 0s FF Enable In separate mode CAM_Focus Stop 8x 01 04 08 00 FF Far Standard 8x 01 04 08 02 FF Near Standard 8x 01 04 08 03 FF Far Variable 81 ...

Page 27: ... mode Manual 81 01 04 39 03 FF Manual Control mode Shutter Priority 81 01 04 39 0A FF Shutter Priority Automatic Exposure mode Iris Priority 81 01 04 39 0B FF Iris Priority Automatic Exposure mode Bright 81 01 04 39 0D FF Bright Mode Manual control CAM_Shutter Reset 8x 01 04 0A 00 FF Shutter Setting Up 8x 01 04 0A 02 FF Down 8x 01 04 0A 03 FF Direct 8x 01 04 4A 00 00 0p 0q FF pq Shutter Position 0...

Page 28: ...ds to 0 to 9 on the Remote Commander Set 8x 01 04 3F 01 0p FF Recall 8x 01 04 3F 02 0p FF CAM_LR_Reverse On 8x 01 04 61 02 FF Image Flip Horizontal ON OFF Off 8x 01 04 61 03 FF CAM_PictureFlip On 8x 01 04 66 02 FF Image Flip Vertical ON OFF Off 8x 01 04 66 03 FF CAM_RS485Ctl On 8x 01 06 A5 02 FF Off 8x 01 06 A5 03 FF CAM_Saturation Saturation 8x 01 04 A1 00 00 0p 0q FF Pq saturation level 0x00 0xf...

Page 29: ...0n 0x 0y FF Set ip to pq rs mn xy Mask set 8x 01 04 AC 0p 0q 0r 0s 0m 0n 0x 0y FF Set mask to pq rs mn xy Gateway set 8x 01 04 AD 0p 0q 0r 0s 0m 0n 0x 0y FF Set gateway to pq rs mn xy SYS_Menu Menu On 8x 01 06 06 02 FF Turn on the menu Menu Off 8x 01 06 06 03 FF Turn off the menu Menu Back 8x 01 06 06 10 FF Menu step back Menu Ok 8x 01 7E 01 02 00 01 FF Menu ok IR_Receive On 8x 01 06 08 02 FF IR r...

Page 30: ...cus Position CAM_WBModeInq 8x 09 04 35 FF y0 50 00 FF Auto y0 50 01 FF Indoor mode y0 50 02 FF Outdoor mode y0 50 03 FF OnePush mode y0 50 04 FF ATW y0 50 05 FF Manual CAM_RGainInq 8x 09 04 43 FF y0 50 00 00 0p 0q FF pq R Gain CAM_BGainInq 8x 09 04 44 FF y0 50 00 00 0p 0q FF pq B Gain CAM_AEModeInq 8x 09 04 39 FF y0 50 00 FF Full Auto y0 50 03 FF Manual y0 50 0A FF Shutter priority y0 50 0B FF Iri...

Page 31: ...ormat VideoSystemInq Sony 8x 09 04 24 72 FF y0 50 0p 0p FF pp Video format IR_Transfer 8x 09 06 1A FF y0 50 02 FF On y0 50 03 FF Off IR_Receive 8x 09 06 08 FF y0 50 02 FF On y0 50 03 FF Off IR_ReceiveReturn y0 07 7D 01 04 00 FF Power ON OFF y0 07 7D 01 04 07 FF Zoom tele wide y0 07 7D 01 04 38 FF AF On Off y0 07 7D 01 04 33 FF CAM_Backlight y0 07 7D 01 04 3F FF CAM_Memory y0 07 7D 01 06 01 FF Pan_...

Page 32: ...0x0510 135 0x0798 170 0x0990 VISCA Pan Tilt Speed Value Pan Degree Second Pan Degree Second 0 0 3 0 0 3 1 1 1 1 2 1 5 2 1 5 3 2 2 3 2 2 4 2 4 4 3 6 5 2 6 5 4 7 6 2 8 6 6 7 3 0 7 8 8 3 2 8 10 9 3 4 9 12 10 3 8 10 15 11 4 5 11 18 12 6 12 23 13 9 13 30 14 15 14 39 15 19 15 48 16 25 16 59 17 32 17 69 18 38 18 80 19 45 20 58 21 75 22 88 23 105 24 120 PELCO D PROTOCOL COMMAND LIST Function Byte1 Byte2 B...

Page 33: ...SUM Query Pan Position 0Xff Address 0x00 0x51 0x00 0x00 SUM Query Pan Position Response 0Xff Address 0x00 0x59 Value High Byte Value Low Byte SUM Query Tilt Position 0Xff Address 0x00 0x53 0x00 0x00 SUM Query Tilt Position Response 0Xff Address 0x00 0x5B Value High Byte Value Low Byte SUM Query Zoom Position 0Xff Address 0x00 0x55 0x00 0x00 SUM Query Zoom Position Response 0Xff Address 0x00 0x5D V...

Page 34: ... XOR Clear Preset 0xA0 Address 0x00 0x05 0x00 Preset ID 0xAF XOR Call Preset 0xA0 Address 0x00 0x07 0x00 Preset ID 0xAF XOR Query Pan Position 0xA0 Address 0x00 0x51 0x00 0x00 0xAF XOR Query Pan Position Respons e 0xA0 Address 0x00 0x59 Value High Byte Value Low Byte 0xAF XOR Query Tilt Position 0xA0 Address 0x00 0x53 0x00 0x00 0xAF XOR Query Tilt Position Respons e 0xA0 Address 0x00 0x5B Value Hi...

Page 35: ...age not resulting from defects in material To receive warranty service please contact AVIPAS Inc first We will decide whether a repair or replacement is needed and will advise you of the cost of such repair or replacement Copyright Notice All contents of this manual whose copyright belongs to our Corporation cannot be cloned copied or translated without the permission of the company Product specif...

Reviews: