Avio iP-01BE User Manual Download Page 31

E-31

6

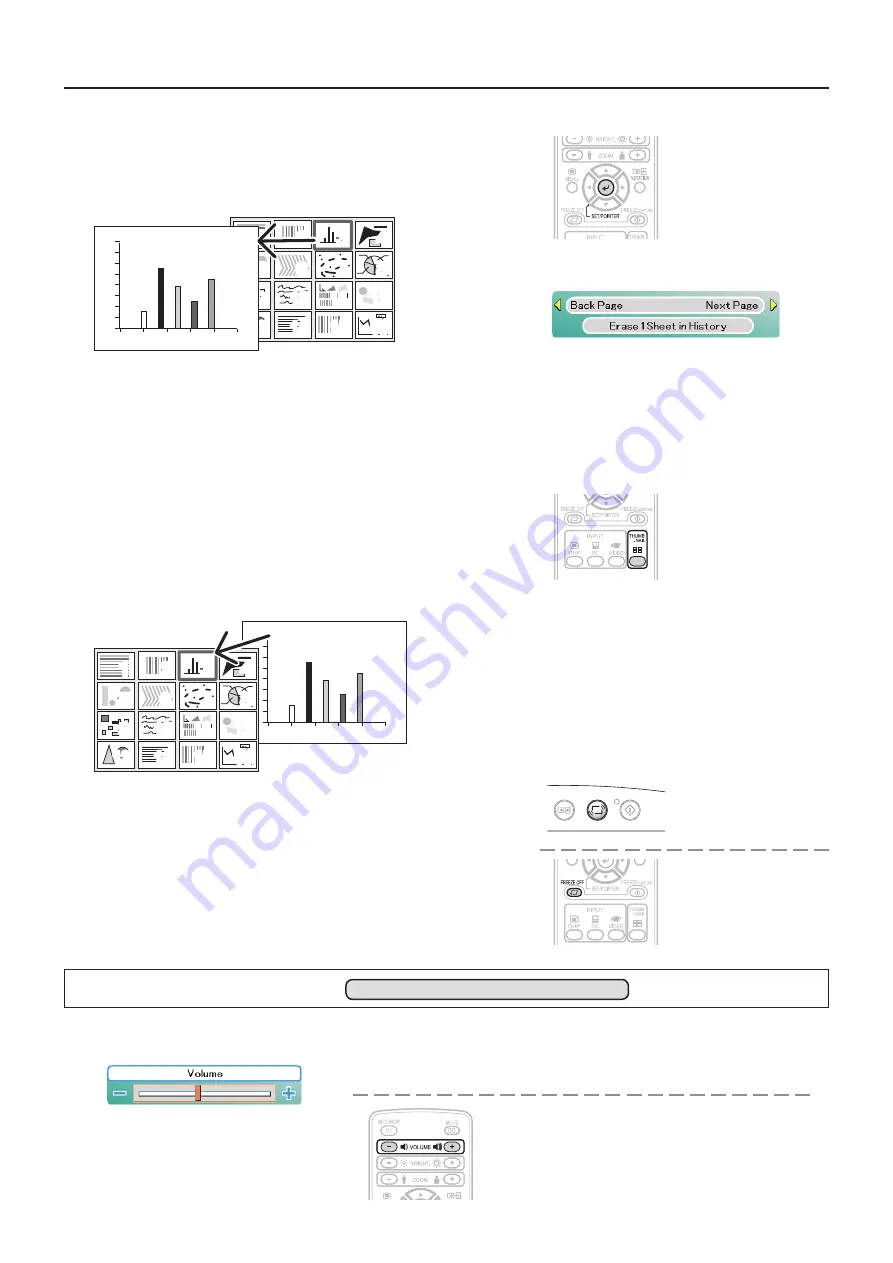
Projection on the full screen

Press the SET/POINTER button of the remote control.

The  reduced  image  at  the  cursor  position  is  projected  on  the  full 

projection screen of the projector.

7

Choosing the other image

Press the remote control THUMBNAIL button and return to the file 

list display. To choose another image in the folder, press the Scroll 

▲▼◀▶

 button.

To return to the folder list, press the THUMBNAIL button again.

Start operation with step 3 to choose an intended image.

8

Projecting/terminating the OHP image

Press the remote control FREEZE OFF button or OHP button.

See Page E-12 for information about removal of the USB memory 

stick.

NOTE:
When using the PC to perform operations on the image data on the USB 

memory  stick,  handle  the  data  copied  from  the  USB  memory  stick  to 

prevent it from becoming unreadable on the projector after the operation. 

When feeding a page, choose the menu “Next.”

The operation can also be changed with the  and VOLUME – 
buttons of the remote control. 
*  When  the  zoom  is  at  the  minimum,  pressing  the  SCROLL 

  button 

permits switching to the image before the displayed image, and press-
ing the SCROLL 

 button permits switching to the next image. 

1

2

3

4

5

6

7

8

9

10 11 12

13

14 15 16

1

2

3

4

5

6

7

8

9

10 11

12

13

14 15

16

Operation with the 
Remote Control

Operation with the 
Projector
FREEZE/CAPTURE 
LED (light off)

Operation with the 
Remote Control

Operation with the 
Remote Control

Onscreen operation

Regular Operation

ON/STANDBY

LAMP/COVER

TEMP

FREEZE

/CAPTURE

PORTRAIT

INPUT

FREEZE OFF

Operation with the Projector
Volume adjustment cannot be made at the operation 
panel of the projector.

Operation with the Remote Control
Adjust using the VOLUME (+/-) buttons.

Volume adjustment bar

Adjusting the Volume

Effective only During PC and VIDEO Input

NOTE:  If  no  operation  is  performed  for  several 
seconds  while  the  volume  adjustment  bar  is 
displayed, the volume adjustment bar turns off.

Summary of Contents for iP-01BE

Page 1: ...A Proposal for New Presentations Intelligent Projector User s Manual iP 01UE BE O N S T A N D B Y L A M P C O V E R T E M P F R E E Z E O F F F R E E Z E P O R T R A I T I N P U T...

Page 2: ...aving small characters that were not created for presentations such as catalogs and word pro cessed documents the iP 01 can enlarge the document without changing the screen size to provide an easy to...

Page 3: ...r electric shock if you continue using the damaged power cable Do not peep into the lens Do not peep into the lens of the projector during operation The powerful rays passing through the lens could da...

Page 4: ...If blocked the internal temperature may increase resulting in malfunctions Do not bump the projector Avoid bumping the projector when moving or handling Shocks can cause damage Care of the projector...

Page 5: ...to the outside from the ventilation slots During use do not bring your face close to the vicinity of the ventilation slots at the projector front side and rear When a lamp explodes the gas from within...

Page 6: ...and plug Do not put the power cable near a heater Doing so could cause the sheath of the cable to melt down resulting in fire or electric shock Do not connect or disconnect the power cable with wet ha...

Page 7: ...s Not Projected E 20 Table of Supported Input Signals E 21 Connections with Video Equipment E 22 Connection of the Power Cable and On Off Switching E 23 Switch On the Power E 23 Switch Off the Power E...

Page 8: ...e Menu Parts E 35 Method of Menu Operation E 36 Menu Description E 38 Pointer Screen E 38 History menu E 39 Image adjustment E 40 Settings E 42 Maintenance E 44 Fault Protection E 44 Replacement of th...

Page 9: ...e the remote control CD ROM iP 01 User s Manual iP 01 Important Information USB Memory USB memory is the supplied items only for iP 01UE model PC connection cable 2 m Pull out the sheet before use I m...

Page 10: ...Exhaust vents Air is discharged from here Lamp unit cover Underneath projector The projection lamp unit is located inside See Page E 46 O N S TA N D B Y L A M P C O V E R T E M P F R E E Z E O F F F...

Page 11: ...on Computer Products Group Phone 650 572 2700 Fax 650 267 2800 URL http www kensington com CAUTION When a lamp explodes it is possible that particles of glass and other material may be released outsid...

Page 12: ...ommercially available stereo mini plug to RCA stereo conversion cable See Pages E 16 and 22 NOTE Left and right channel sounds will be output from a monau ral speaker Sound will be output when audio i...

Page 13: ...on to standby Green Green Off Projecting Red Red Off Lamp cover open Power has been switched OFF because of the alarm Lamp burned out Lamp usage exceeds 2 000 hours Red Orange Off Internal problem Red...

Page 14: ...6 27 29 and 32 8 SET POINTER Button During menu display this button advances the menu to the next level This button finalizes the setting at the time of item selection See Page E 34 This button displa...

Page 15: ...been inserted for protection during transportation prior to shipping Please pull out and remove the sheet before use Insulation sheet NOTE When it is time to replace the battery please purchase a CR2...

Page 16: ...23 Switch Off the Power See Page E 23 4 Switch on the power of the personal computer or video equipment 5 Properly adjust the projection image to the screen See Page E 17 6 Select the input equipment...

Page 17: ...r in locations that will reach high temperatures or low temperatures Operation ambient temperature 0 C 32 F to 35 C 95 F Set the screen so that it is not exposed to direct sunlight or the light of dir...

Page 18: ...personal computer Please contact your dealer of purchase for further information The image of the PC cannot be projected while the USB cable is connected Connect the PC connec tion cable Connections...

Page 19: ...GND GND NC GND NC SDA DDC2B H SYNC V SYNC SCL DDC2B RED VIDEO GREEN VIDEO BLUE VIDEO GND NC Connecting Macintosh Computers When the monitor output is set to the VGA port mini D SUB 15 pin mount the P...

Page 20: ...Problems with the Personal Manufacturer External Output Switching Method Manufacturer External Output Switching Method IBM Fn f7 DELL Fn f8 NEC Parallel output Toshiba Fn f5 Switching from the Task Ba...

Page 21: ...768 35 5 43 No 1024 768 60Hz 1024 768 48 3 60 Yes 1024 768 70Hz 1024 768 56 4 70 Yes 1024 768 75Hz 1024 768 60 0 75 Yes 1024 768 85Hz 1024 768 68 7 85 Yes MAC19 1024 768 1024 768 60 2 75 Yes 1280 768...

Page 22: ...with the Video select menu to suit the input signal When a condition in which a signal has not been input continues for 15 minutes or longer the lamp is turned off automatically This only functions wh...

Page 23: ...cable can also be disconnected i e direct power off function when the lamp cover LED is flashing green The projector is now able to make a projection ON STANDBY LAMP COVER TEMP To wall outlet Operatio...

Page 24: ...and 42 Making Focus Zoom Adjustments Turn the focus ring zoom lever of the projection lens and adjust the projection image Adjusting the Tilt Slant Adjustment of the tilt foot allows the position and...

Page 25: ...When the PC input is set to component For instructions on selecting the PC input see page E 38 NOTE The input mode at starting time will be the same as it was the last time the projector was switched...

Page 26: ...played with the SCROLL buttons A B C Enlarging and Reducing the Projection Image This operation enlarges or reduces the size of projected image Operation with the Projector Enlarging reducing is not p...

Page 27: ...om the main unit s control panel Operation with the Remote Control Adjust using the BRIGHTNESS buttons Projection image becomes brighter Projection image becomes darker To change the brightness perfor...

Page 28: ...der Up to 1 000 images are stored in one folder and when 1 000 images are exceeded a new folder will be created automatically To automatically save a file When you would like to save images to a new f...

Page 29: ...ved on a USB memory stick are projected with a projector Conducting a presentation using USB memory stick images Our optional USB memory stick is guaranteed to operate Operation will not be guaranteed...

Page 30: ...yed on the folder list is the first one in the file list Operation with the Remote Control Regular Operation NOTE The image that was changed over and saved in the vertical direction is projected verti...

Page 31: ...n When feeding a page choose the menu Next The operation can also be changed with the VOLUME and VOLUME buttons of the remote control When the zoom is at the minimum pressing the SCROLL button permits...

Page 32: ...le from the main unit s control panel Operation with the Remote Control Press the SCROLL buttons See Page E 38 for information about the form color and size of the pointer NOTE If the brightness is ad...

Page 33: ...unnecessary items may be projected which will make the image difficult to view When shiny paper like magazine covers or black paper is placed on the projector the internal fluorescent light bulb may b...

Page 34: ...Red Projection mode Computer input Blue Economy mode Sharpness Auto power off Aspect Ratio Lamp usage time Color mode Input signal Sync adjustment PC input component Pointer shape Contrast Keystone P...

Page 35: ...on of menu names and item names and to set and adjust item contents Names and Functions of the Menu Parts Adjustment bar Indicates the adjustment condi tion according to the increase or decrease of th...

Page 36: ...ton and display the menu 2 Select Settings with the SCROLL buttons Each press of the SCROLL button switches the menu one step in the sequence of Pointer Screen Image adjustment Settings and each press...

Page 37: ...tton Each press causes the numerical value to decrease The lower portion of the projection im age becomes narrower SCROLL button Each press causes the numerical value to increase The upper portion of...

Page 38: ...lue Pointer size The size of the pointer i e Large M e d i u m a n d S m a l l c a n b e changed in 3 levels USB Format All of the data in the USB memory stick will be deleted Only for iP 01UE Compute...

Page 39: ...during the projection of displayed images that were selected from the USB memory stick Back page in history Next page in history Set the cursor then use the but ton on the remote control unit to se le...

Page 40: ...s the aspect ratio of the projected im age to 4 3 or 16 9 When automatic detection has been selected the aspect ratio will be switched in accordance with the input Color mode Standard The contrast is...

Page 41: ...nge from 50 to 50 Aspect Ratio Switches the aspect ratio of the projected image to 4 3 or 16 9 When automatic de tection has been selected the aspect ratio will be switched in accordance with the inpu...

Page 42: ...platform and set the numerical value of the Keystone menu to 0 no correction Compared to when keystone correction is not applied the application of keystone correction results in a display image of c...

Page 43: ...he lamp will be approximately 90 The lamp ser vice life will be extended OFF The brightness of the lamp will be 100 There will be a bright screen As the default Eco mode is set to ON Auto power off Wh...

Page 44: ...jector in an operation ambient temperature of 0 C 32 F to 35 C 95 F Are the ventilation vents blocked Rearrange the setup location of the projector and separate the projector from surrounding objects...

Page 45: ...vents blocked Are the Air Intake Ventilation Slots blocked Breakdown of an internal cir cuit could be the problem Please use the projector in an operation ambient tempera ture of 0 C 32 F to 35 C 95...

Page 46: ...p usage time that is displayed on the menu screen displays the usage time when the Eco mode is both ON and OFF as a value converted to usage time when the Eco mode is OFF It is for this reason that wh...

Page 47: ...all a new lamp unit Take the lamp unit and press it into the projector Check that the two positioning prongs on the bottom of the lamp unit are securely fit into the two holes Tighten the 2 mounting s...

Page 48: ...e cannot be performed with the remote control The LAMP COVER LED will flash green following this and projection will start The power plug is plugged into a power outlet and only the ON STANDBY LED is...

Page 49: ...the internal heat of the projector Depending on the flow of the air dust may collect while you are using the projector When dust collects the internal temperature will rise and the rotation of the fa...

Page 50: ...k Is the remote control IR sensor exposed to illumination or other light Is the remote control IR sensor blocked Is an inverter device located close by E 4 15 E 15 E 15 E 15 At the time of personal co...

Page 51: ...rranty period When repair work enables the maintenance of product functions charges will apply for the repairs Before asking for repair service check the Troubleshooting section on page E 50 once more...

Page 52: ...Terminal RCA Pin Jack 1 ch PC Video component video 1 Audio Signal 0 4Vrms 47 k Input Terminal RCA L R pin plug jack x 1 Image File Format Exit JPEG 2048 x 1536 dots Memory interface USB memory 2 slo...

Reviews: