background image

5


6. 

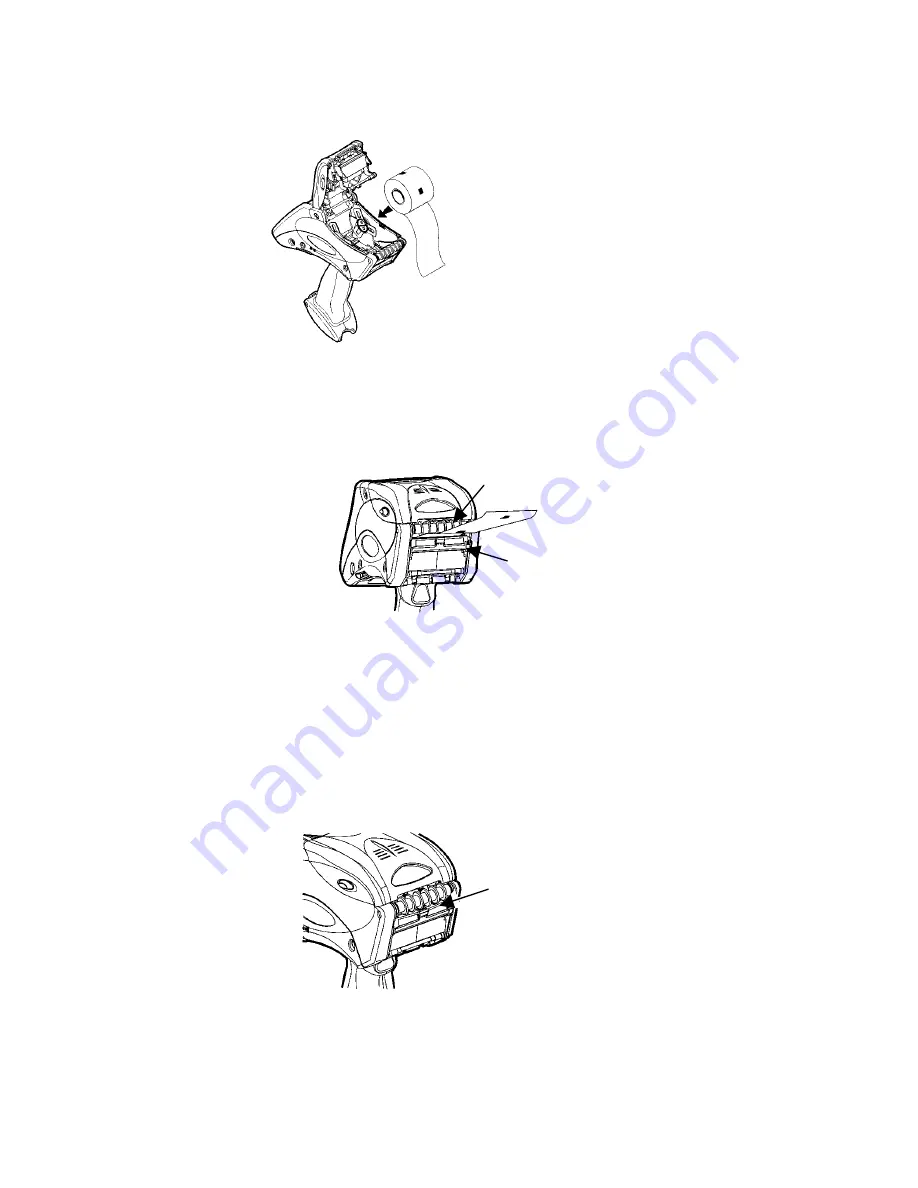
Place a roll of supply in the supply holder so it unrolls from the bottom. 

7. 

Load the supplies for the printing mode you want: Peel or Non-Peel. 

Loading for Non-Peel Mode 

1. 

Feed the supply 

under

 the applicator roller and 

over

 the label deflector.  

2. 

Close the supply cover. 

3. 

Select 

Load Supply

 from the printer icon menu, choose your supply type, 

and then select 

Calibrate

Loading for Peel Mode 

1. 

Peel and discard the first four inches of labels from the backing paper. 

2. 

Hold the printer upright and gently press down on the label deflector.   
It may be stiff. 

Label Deflector

Applicator Roller 

Label 
Deflector 

Summary of Contents for Monarch Pathfinder Ultra Platinum 6039

Page 1: ... versions Check our Web site for the latest documentation and release information Getting Started 1 Review the printer safety information in the Regulatory Compliance document provided with your printer 2 Charge the main battery Use either the Monarch 9462 or 9465 battery charger Refer to the documentation with those chargers for more information Important You must charge the main battery when you...

Page 2: ...fety strap and push it through the loop at the bottom of the printer handle near the battery compartment 4 Push the thick end of the safety strap through the thin end s loop 5 Pull the strap It may be necessary to help the thin end s loop fit over the plastic piece in the middle of the strap Pull the strap tight 6 Attach the stylus strap to the loop as shown ...

Page 3: ...e battery as it slides out 3 Insert a new battery into the compartment connector end first 4 Slide the compartment door shut until it clicks into place Charging the Backup Battery The internal backup battery is a 3 6 volt lithium ion battery that maintains the printer s system settings The backup battery maintains its charge through the main battery or the Battery Backup Power When fully charged t...

Page 4: ...tery Backup Power as shown Loading Supplies 1 Turn on the printer 2 Press the latch buttons and open the supply cover 3 Pull back the supply lock tab 4 Open the spring loaded supply holder Spread the supply holder tabs apart with one hand so it adjusts to the size of your supply roll You can set it at 1 2 1 5 and 2 0 5 Press the supply lock tab down to lock the supply holder in place Supply Cover ...

Page 5: ...pplicator roller and over the label deflector 2 Close the supply cover 3 Select Load Supply from the printer icon menu choose your supply type and then select Calibrate Loading for Peel Mode 1 Peel and discard the first four inches of labels from the backing paper 2 Hold the printer upright and gently press down on the label deflector It may be stiff Label Deflector Applicator Roller Label Deflect...

Page 6: ... the feed and pinch rollers and press the trigger 8 Close the cover completely 9 Select Load Supply from the printer icon menu choose your supply type and then select Calibrate Removing Supplies in Peel Mode Tear the backing paper just above the pinch roller Open the supply cover completely Spread the supply holder tabs apart and remove the supply roll Carefully pull out the supply backing paper s...

Page 7: ...eld Fct Performs an application defined function when pressed with a single digit number Esc Exits the current screen or application Alpha Enters upper case or lower case alphabetic mode Right Arrow Moves the cursor to the right in a menu Pressing Fct right arrow scrolls the cursor down in a menu Left Arrow Moves the cursor to the left in a menu Pressing Fct left arrow scrolls the cursor up in a m...

Page 8: ...pecial characters and symbols when in Lower case and Upper case Alpha Mode Press Key Lower case Alpha Mode Press Alpha Once Upper case Alpha Mode Press Alpha Twice 1 space space 0 Cleaning the Printer Do not use sharp objects to clean the printer Do not use household cleaners to clean the printer Use isopropyl alcohol on the interior areas only except where specified never on the exterior Cleaning...

Page 9: ... supply cover 2 Remove the supplies 3 Clean the black mark sensor with a dry cotton swab 4 Reload the supplies and close the supply cover Cleaning the On Demand Sensor 1 Turn off the printer and open the supply cover 2 Remove the supplies 3 Open the label deflector 4 Clean the on demand sensor with a soft cloth moistened with distilled water 5 Reload the supplies and close the label deflector and ...

Page 10: ...ner flex cable as shown below To clean the cable 1 Turn off the printer and open the supply cover 2 Inspect the scanner flex cable At any place that adhesive buildup appears clean the cable with 99 isopropyl alcohol and a cotton swab 3 Close the supply cover Cleaning the Scanner Window and Display Screen 1 Moisten a soft cloth with distilled water 2 Wipe the window and the display screen until the...

Page 11: ...completely Switch to a fully charged battery Clean the printhead Printer partially prints and fails to respond to the keypad or trigger Re load the supply or load new supplies Clear any supply jams Clean the printhead Switch to a fully charged battery Scanner will not scan a bar code Alter the scan angle and distance Clean the scanner window or move to a more dimly lit area Scan a bar code you hav...

Page 12: ...tly 756 The printer is out of supplies Load supplies 757 The calibrated supply length differs by plus or minus 25 inches from the format Load supplies 758 Check supply Either the supply is not seen or the on demand sensor is broken purchase optional Check for a label jam Clear the supply path or reload supplies The printer does not recalibrate after this error 762 Low battery Recharge the battery ...

Reviews: