7
ENGLISH
Name
Function
(11) OUTPUT LED
Indicate TV-RGB switch selection to show which port the video signal
is sent out.
RGB indicates the video signal is sent out thru RGB OUT and DVI-
I OUT ports.
TV indicates that the video signal is sent out thru RS232/CVBS
port via RCA connection.
(12)
▲,▼,◄, & ►
- Pan the image when image is magnified in playback and camera
mode.
- Move the selection in Playback mode and in OSD menu.
.
R
R
e
e
m
m
o
o
t
t
e
e
C
C
o
o
n
n
t
t
r
r
o
o
l
l
The remote control requires two (2)
“AAA” size batteries (supplied), make sure batteries
are installed properly before use. You can access all the features of AVerVision W30 with
the remote.
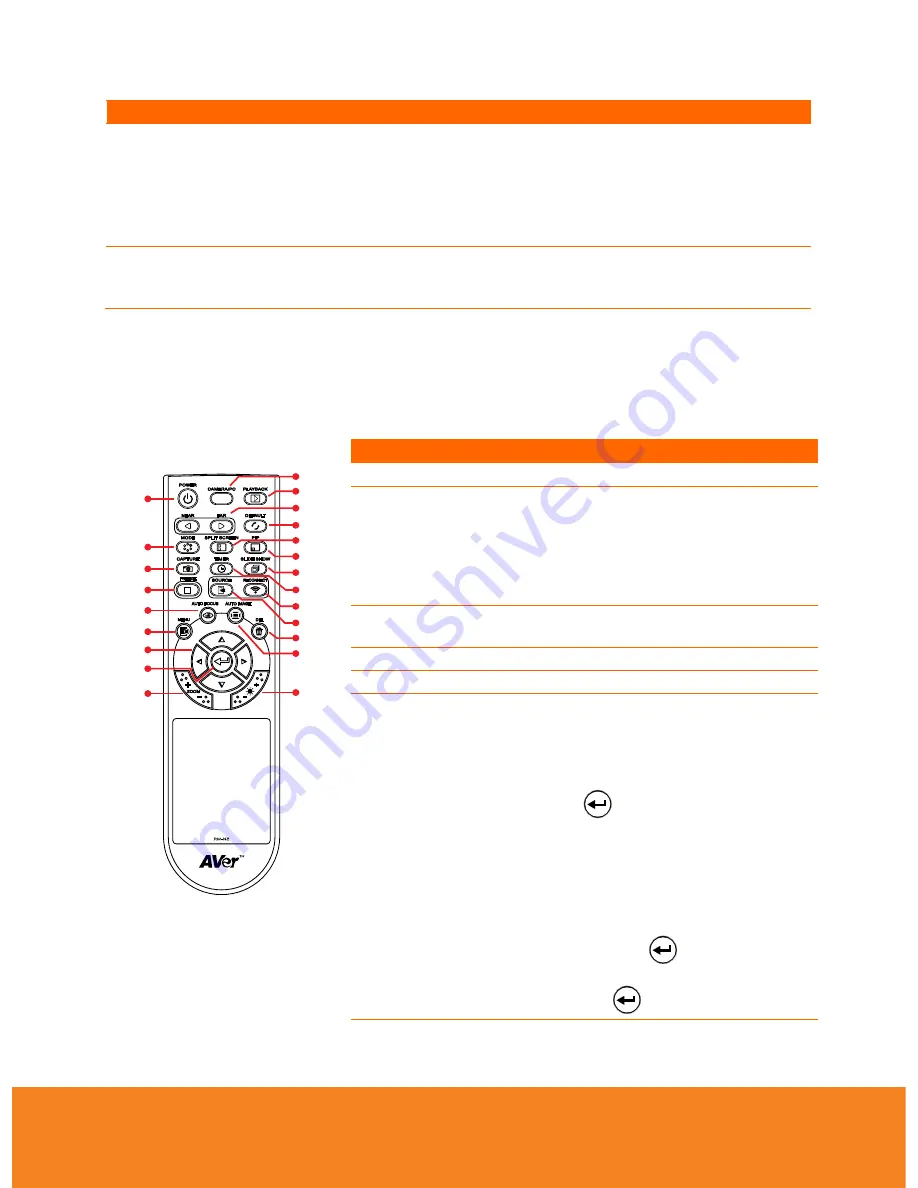
Name
Function
(11)
(6)
(19 )
(18 )
(16 )
(17 )
(20 )
(1 )
(9)
(13 )
(5)
(21 )
(22 )
(7)
(2)
(4)
(3)
(8)
(10 )
(14 )
(12 )
(15 )
(fig. 2.0)
(1) POWER
Turn the unit on/standby.
(2) CAMERA / PC
Switch between Camera and computer
mode.
- Camera mode displays the video
signal from the W30 camera.
- PC mode displays the video signal
from the RGB IN port of W30 base.
(3) PLAYBACK
View the captured picture from the
memory in 16-thumbnail images.
(4) NEAR / FAR
Adjust the focus manually.
(5) DEFAULT
Reset to factory default setting.
(6) SPLIT
SCREEN
Divide the screen into two. One side
displays the live image from the W30
camera and the other side displays 8-
thumbnail size picture from the
memory.
Press
to only display the
selected image and again to revert
back to 16-thumbnail preview.
Use ◄, & ► buttons to pan the single
image preview to the left and right.
To change the split screen layout,
press MENU > PRESENTATION >
PBP and press
to enter. Use the
◄, & ► to choose from the selections
and press
to make a selection.


