background image

User Manual 


9

Using the AVerMedia TVBox 5  

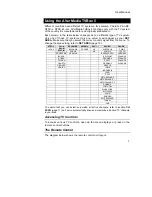
Different countries have different TV systems, for example, PAL-BG, PAL-DK, 
NTSC-J, NTSC-M…etc. AVerMedia TVBox 5 functions only with the TV system 
of the country it is manufactured for and originally distributed in.  
Each column in the table below corresponds to a different type of TV system. 
Only one of these TV systems (only one column) will appear as your 

SET 

AREA

. Make sure that you select the correct country signal from the menu. To 

change the area setting, refer to 

SET AREA 

(page 13).


NTSC-J 

SECAM-DK 

SECAM-L 

PAL-I 

PAL-BG 

PAL-DK 

JAPAN BULGARIA 

FRANCE UK 

AUSTRALIA 

CHINA 


PAL-N 

PAL-M


NTSC-M 

RUSSIA  HK AUSTRIA CZECH 

 ARGENTINA

UKRAINE 


  BANGLADESH HUNGARY 

 BRAZIL   


  BELGIUM POLAND-1 

 KOREA   


  DENMARK 

POLAND-2 

 TAIWAN   


EGYPT  POLAND-3 

 USA-STD   


GERMANY SLOVAKIA 

 USA-HRC   


GREECE 


 USA-IRC   


INDIA 


INDONESIA  

        IRAN 


        ITALY 


NETHERLANDS 


NETHERLANDS_1 


NETHERLANDS_2 


RUMANIA   


PORTUGAL  


SINGAPORE  


SLOVENIA  

       SPAIN   
       

SWEDEN   


SWITZERLAND 


       TURKEY   
        UAE 


To ensure that you can select and watch all active channels, refer to section 

CH 

SCAN

 (page 11) on how to automatically scan and memorize all active TV channels 

in your area

.  


Accessing TV Controls 

To access various TV controls, open up the menu displays or press on the 
remote control buttons. 

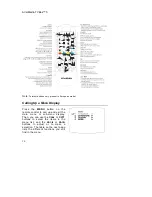
The Remote Control 

The diagram below shows the remote control unit layout. 

Summary of Contents for TVBox 5

Page 1: ......

Page 2: ...and peripherals must be shielded and grounded Operation with non certified computers or non shielded cables may result in interference to radio or television reception Any changes or modifications not expressly approved by the grantee of this device could void the user s authority to operate the equipment CE NOTICE This is a Class B product DISCLAIMER No warranty or representation either expressed...

Page 3: ...able 7 Connecting the External Amplified Speaker 7 Connecting the Power Adapter 7 Connecting the Audio Video Equipment 8 Connecting an Earphone or Headphone 8 Using the AVerMedia TVBox 5 9 Accessing TV Controls 9 The Remote Control 9 Calling Up a Menu Display 10 TV Source 11 CH Finetune 11 CH Scan 11 More 12 Default 12 Favorite CH 12 Set Area 13 OSD Positioning 13 Resolution 13 Language 13 Customi...

Page 4: ...th or without turning on your PC It is true plug n play and there is no software driver required You can easily switch between TV Video source and PC display at anytime What s in the Package Your AVerMedia TVBox 5 package contains the following items User s Manual AVerMedia TVBox 5 Power Adapter Audio Cable VGA Cable Remote Control Batteries included Vertical Stand ...

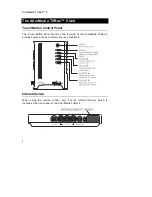
Page 5: ...rol Panel The Touch Button Panel found on the top side of the AVerMedia TVBox 5 provides quick access to commonly used functions Infrared Sensor When using the remote control aim it at the Infrared Sensor which is located at the front panel of the AVerMedia TVBox 5 ...

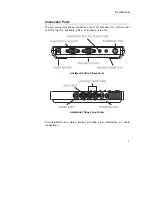
Page 6: ...ors allow connection of your TV antenna PC VGA monitor or LCD projector speakers video or s video source etc AVerMedia TVBox 5 Back Panel AVerMedia TVBox 5 Front Panel The Installation and Setup section provides more information on cable connections ...

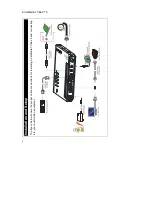
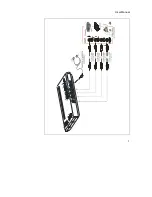
Page 7: ...AVerMedia TVBox 5 4 Installation and Setup The figure below shows the proper cable connections for installing AVerMedia TVBox 5 and connecting it to your audio video equipment ...

Page 8: ...User Manual 5 ...

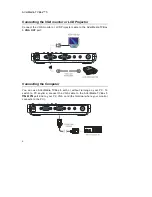
Page 9: ...ojector cable to the AVerMedia TVBox 5 VGA OUT port Connecting the Computer You can use AVerMedia TVBox 5 with or without turning on your PC To switch to PC anytime connect the VGA cable to the AVerMedia TVBox 5 VGA IN port and to your PC VGA card the terminal where your monitor connects to the PC ...

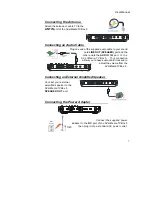
Page 10: ...AVerMedia TVBox 5 This connection allows you to have audio at all times and to adjust the volume from the AVerMedia TVBox 5 Connecting an External Amplified Speaker Connect your external amplified speaker to the AVerMedia TVBox 5 SPEAKER OUT port Connecting the Power Adapter Connect the supplied power adapter to the DC port of the AVerMedia TVBox 5 then plug it into a standard AC power outlet Wall...

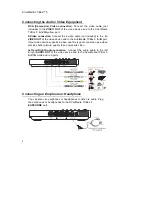
Page 11: ...evice and to the AVerMedia TVBox 5 S IN port If your video device supports s video use this type of connection as s video provides better picture quality than composite video Left and Right Audio connection Connect the audio cable to the left right AUDIO OUT of the video device and to the AVerMedia TVBox 5 A V IN white and red ports Connecting an Earphone or Headphone You can also use earphones or...

Page 12: ... PAL BG PAL DK JAPAN BULGARIA FRANCE UK AUSTRALIA CHINA PAL N PAL M NTSC M RUSSIA HK AUSTRIA CZECH ARGENTINA UKRAINE BANGLADESH HUNGARY BRAZIL BELGIUM POLAND 1 KOREA DENMARK POLAND 2 TAIWAN EGYPT POLAND 3 USA STD GERMANY SLOVAKIA USA HRC GREECE USA IRC INDIA INDONESIA IRAN ITALY NETHERLANDS NETHERLANDS_1 NETHERLANDS_2 RUMANIA PORTUGAL SINGAPORE SLOVENIA SPAIN SWEDEN SWITZERLAND TURKEY UAE To ensur...

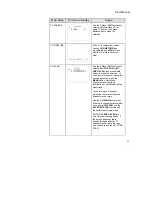
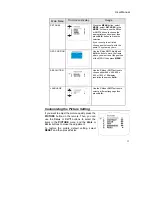
Page 13: ...he MENU button on the remote control to call up and exit the main menu or sub menu display Then you can use the CH or CH buttons to select the items in the menu list and the Vol or Vol buttons to adjust or to make a selection The table on the next page lists the different functions you will find in the menu ...

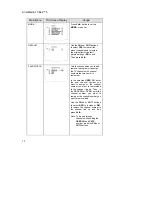
Page 14: ...n to make the selection If you want to interrupt or cancel the scanning process press the MENU button Only those channels scanned prior to interruption or cancellation will be memorized These two types of channel preset functions recall all active channels in your area Use the CH SCAN function first If there are channels missing after you perform CH SCAN use the ALL FREQ SCAN function and repeat t...

Page 15: ...he TV channels with channel numbers that are easier to remember In the selected USER CH enter the new channel number you want to assign or the channel number you want to remove add to the channel line up Then in the CATV CH or TV CH enter the channel number you want to remap or the channel number you want to remove add Use the CH or CH buttons to select ADD to include or DEL to remove the channel ...

Page 16: ...he frame where you want to set the position of the MENU then press MENU RESOLUTION Use the CH or CH buttons to choose either 640 x 480 800 x 600 or 1024 x 768 display resolution then press Vol LANGUAGE Use the CH or CH buttons to select a different language then press Vol Customizing the Picture Setting If you want to adjust the picture quality press the PICTURE button on the remote Then you can u...

Page 17: ...y to You as the original purchaser Except for the foregoing the Product is provided AS IS In no event does AVerMedia warrant that You will be able to operate the Product without problems or interruptions or that the Product is suitable for your purposes Your exclusive remedy and the entire liability of AVerMedia under this paragraph shall be at AVerMedia s option the repair or replacement of the P...

Page 18: ...r its authorized agents or iv installation alteration or repair of the Product by anyone other than AVerMedia or its authorized agents 3 Disclaimer of Warranty EXCEPT AS EXPRESSLY PROVIDED OTHERWISE HEREIN AND TO THE MAXIMUM EXTENT PERMITTED BY APPLICABLE LAW AVERMEDIA DISCLAIMS ALL OTHER WARRANTIES WITH RESPECT TO THE PRODUCT WHETHER EXPRESS IMPLIED STATUTORY OR OTHERWISE INCLUDING WITHOUT LIMITA...

Page 19: ...cific legal rights you may also have other rights granted under state law These rights vary from state to state Section 6 Warranty Period of AVerMedia Product Purchased AVerVision110 2 Year Limited Parts and Labor 1 Year of Remote Control Microscope Lens Adapters AVerVision300 3 Year Limited Parts and Labor 1 Year of LED Document Positioning Light Module Remote Control and Microscope Lens Adapters...

Page 20: ......

Reviews: