


13
Chapter 3
OSD Navigation Tree
RECORD SCHEDULE
RECORD SCHEDULE
13 : 00 - 14 : 00
13 : 00 - 14 : 00
14 : 00 - 15 : 00
14 : 00 - 15 : 00
15 : 00 - 16 : 00
15 : 00 - 16 : 00
18 : 00 - 19 : 00
18 : 00 - 19 : 00
19 : 00 - 20 : 00
19 : 00 - 20 : 00
20 : 00 - 21 : 00
20 : 00 - 21 : 00
21 : 00 - 22 : 00
21 : 00 - 22 : 00
22 : 00 - 23 : 00
22 : 00 - 23 : 00
23 : 00 - 00 : 00
23 : 00 - 00 : 00
17 : 00 - 18 : 00
17 : 00 - 18 : 00
16 : 00 - 17 : 00
16 : 00 - 17 : 00
ALWAYS REC
ALWAYS REC
ALWAYS REC
ALWAYS REC
ALWAYS REC
ALWAYS REC
ALWAYS REC
ALWAYS REC
ALWAYS REC
ALWAYS REC
ALWAYS REC
ALWAYS REC
ALWAYS REC
ALWAYS REC
ALWAYS REC
ALWAYS REC
ALWAYS REC
ALWAYS REC
ALWAYS REC
ALWAYS REC
ALWAYS REC
ALWAYS REC
RECORD SCHEDULE
RECORD SCHEDULE
00 : 00 - 01 : 00
00 : 00 - 01 : 00
01 : 00 - 02 : 00
01 : 00 - 02 : 00
02 : 00 - 03 : 00
02 : 00 - 03 : 00
05 : 00 - 06 : 00
05 : 00 - 06 : 00
06 : 00 - 07 : 00
06 : 00 - 07 : 00
07 : 00 - 08 : 00
07 : 00 - 08 : 00
08 : 00 - 09 : 00
08 : 00 - 09 : 00
09 : 00 - 10 : 00
09 : 00 - 10 : 00
10 : 00 - 11 : 00
10 : 00 - 11 : 00
11 : 00 - 12 : 00
11 : 00 - 12 : 00
12 : 00 - 13 : 00
12 : 00 - 13 : 00
04 : 00 - 05 : 00
04 : 00 - 05 : 00
03 : 00 - 04 : 00
03 : 00 - 04 : 00
ALWAYS REC
ALWAYS REC
ALWAYS REC
ALWAYS REC
ALWAYS REC
ALWAYS REC
ALWAYS REC
ALWAYS REC
ALWAYS REC
ALWAYS REC
ALWAYS REC
ALWAYS REC
ALWAYS REC
ALWAYS REC
ALWAYS REC
ALWAYS REC
ALWAYS REC
ALWAYS REC
ALWAYS REC
ALWAYS REC
ALWAYS REC
ALWAYS REC
ALWAYS REC
ALWAYS REC
ALWAYS REC
ALWAYS REC
1
2
3
4
1
2
3
4
1
2
3
4
1
2
3
4
QUAD
QUAD
MPEG4
MPEG4
10
10
GOOD
GOOD
ENGLISH
ENGLISH
MAIN MENU
MAIN MENU
CAMERA SELECT
CAMERA SELECT
RECORD SELECT
RECORD SELECT
RECORD MODE
RECORD MODE
VIDEO FORMAT
VIDEO FORMAT
RECORD FRAMERATE
RECORD FRAMERATE
VIDEO QUALITY
VIDEO QUALITY
RECORD SCHEDULE
RECORD SCHEDULE
SUBMENU
SUBMENU
HARD DRIVE SETUP
HARD DRIVE SETUP
SENSOR SETUP
SENSOR SETUP
LANGUAGE SETUP
LANGUAGE SETUP
2006 / 04 / 20
2006 / 04 / 20
17 : 54 : 50
17 : 54 : 50
ON
ON
ON
ON
ON
ON
OFF
OFF
NO
NO
SUBMENU
SUBMENU
PASSWORD CHANGE
PASSWORD CHANGE
VIDEO ADJUSTMENT
VIDEO ADJUSTMENT
DATE
DATE
TIME
TIME
AUTO RECORD
AUTO RECORD
AUTO SCAN
AUTO SCAN
PASSWORD SETUP
PASSWORD SETUP
AUDIO RECORD
AUDIO RECORD
AUDIO MUTE
AUDIO MUTE
OFF
Color Stability
PASSWORD
PASSWORD
CURRENT
CURRENT
NEW
NEW
CONFIRM
CONFIRM
1
1
050
050
050
050
000
000
024
024
Mode 1
VIDEO ADJUSTMENT
VIDEO ADJUSTMENT
CAMERA
CAMERA
BRIGHTNESS
BRIGHTNESS
CONTRAST
CONTRAST
HUE
HUE
SATURATION
SATURATION
Color Phase
NO
RESET TO DEFAULT VALUE
NO
NO
HARD DRIVE SETUP
HARD DRIVE SETUP
OVERWRITE ENABLED
OVERWRITE ENABLED
HD1 SIZE 37 GB 78MB
HD1 SIZE 37 GB 78MB
HD1 USED 0 GB 232MB 0%
HD1 USED 0 GB 232MB 0%
HD1 FORMAT
HD1 FORMAT
HD2 SIZE 0 GB 0MB
HD2 SIZE 0 GB 0MB
HD2 USED 0 GB 232MB 0%
HD2 USED 0 GB 232MB 0%
HD2 FORMAT
HD2 FORMAT
010 SEC
010 SEC
010 SEC
010 SEC
NOT INSTALLED
NOT INSTALLED
NOT INSTALLED
NOT INSTALLED
NOT INSTALLED
NOT INSTALLED
NOT INSTALLED
NOT INSTALLED
SENSOR SETUP
SENSOR SETUP
SENSOR REC TIME
SENSOR REC TIME
ALARM OUT TIME
ALARM OUT TIME
CHANNEL - 1
CHANNEL - 1
CHANNEL - 2
CHANNEL - 2
CHANNEL - 3
CHANNEL - 3
CHANNEL - 4
CHANNEL - 4
3.1
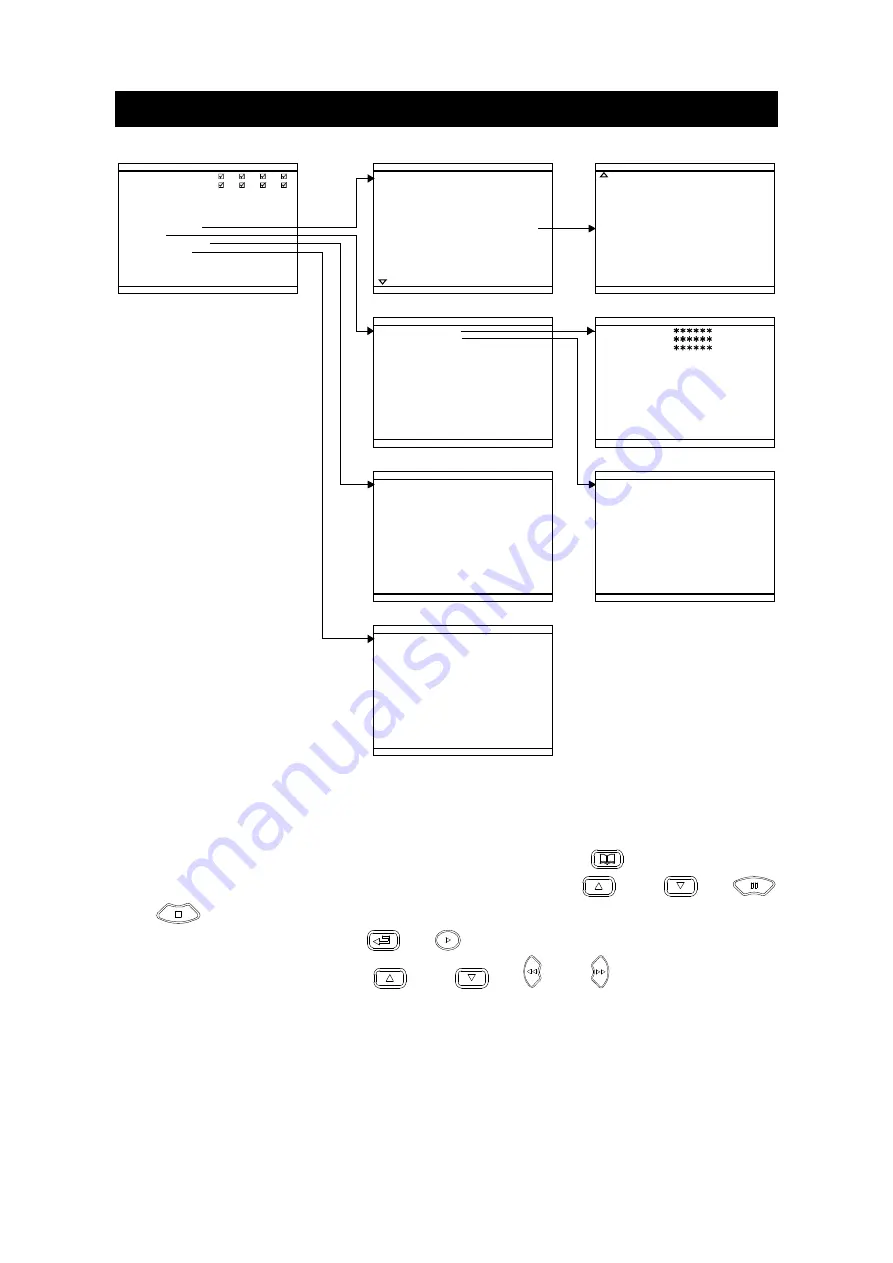
Menu Function
If the unit is currently recording the video, you may have to stop video recording to
change the settings. To navigate in the OSD menu, press
to call up and exit
from the main menu or sub-menu display. Then use the
and
or
and
buttons to go up and down and select the items in the menu list or
change the settings. Use the
or
button to enter sub-menu or make a
selection. You can also use the
and
or
and
buttons to move the
selection to the left and right. The red frame turns yellow when you are making a
selection.


