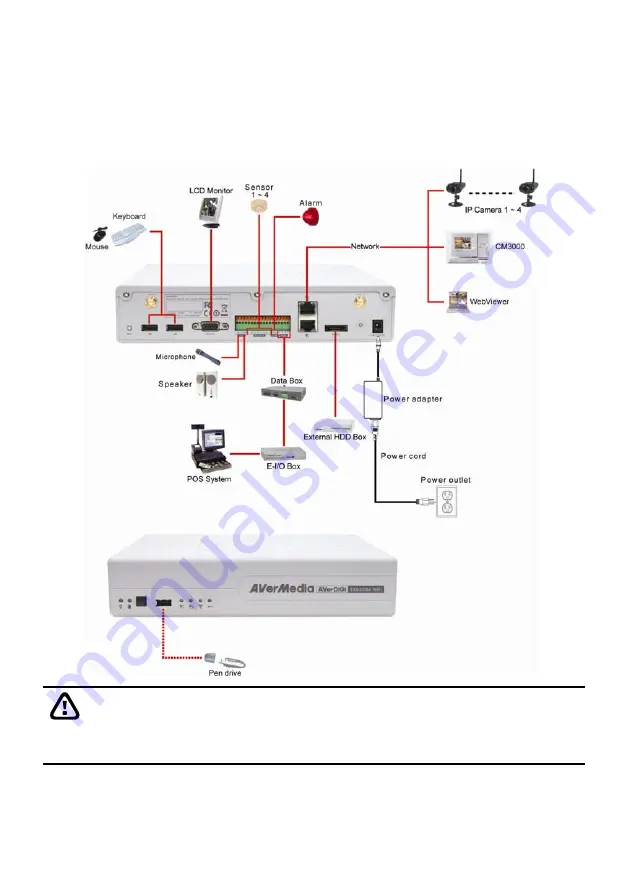
Avermedia AVerDiGi EXR 6004 WiFi Quick Installation Manual Download Page 3

B. Device 

Connection 

The back panel of the DVR unit, user can connect the 4 sensor devices, 1 alarm device, audio 

input/output device and an external HDD storage device. Through the Gigabit LAN ports can connect 

with the IP cameras and allows user to remote access the DVR server. The USB ports can connect the 

mouse and keyboard for more easily to operate DVR server. 

Follow the illustration below to make the connection: 


WARNING  
TO REDUCE RISK OF FIRE OR ELECTRIC SHOCK. DO NOT EXPOSE THIS APPLIANCE 
TO RAIN OR MOISTURE 

WARRANTY VOID FOR ANY UNAUTHORIZED PRODUCT MODIFICATION 


Summary of Contents for AVerDiGi EXR 6004 WiFi

Page 1: ...unit of the Wireless IP camera 1 or 4 in package may vary that depends on the model of DVR user has purchased 1 Wireless IP camera unit 2 Power Adapter The power cord varies depending on the standard...

Page 2: ...by yourself Follow the steps to install the hard disk 1 Loosen all screws 2 Push the cover backward and lift 3 Secure the brackets on the hard disk 4 Connect the end of the SATA cable and the power co...

Page 3: ...t LAN ports can connect with the IP cameras and allows user to remote access the DVR server The USB ports can connect the mouse and keyboard for more easily to operate DVR server Follow the illustrati...

Page 4: ...button of IP camera until the power LED turns off about 5 seconds and then the LED will start to blink at every 2 seconds And then wait about 120 seconds for IP camera to communicate with the DVR uni...

Page 5: ...Click System Click Switch to Advance Setup if the setup mode is in Basic Setup mode 3 Click Add to call out Disk Management windows Select the hard disk and click Format 4 And then click Start to for...

Page 6: ...access This feature allows you to access DVR server from a remote location via internet connection The default is disabled 6 Setup Configure the system settings 7 Preview Switch to Preview mode This...

Page 7: ...row icon When you switch to full screen in multiple screen mode Left click to toggle to only display one of the video in the multiple screen mode or all 15 Alarm Alert and display warning info 16 WiFi...

Page 8: ...ame i The Hour buttons represent the time in 24 hour clock The blue bar on top of the hour button indicates that there is a recorded video file on that period of time While the red bar indicates that...

Page 9: ...in dvr format to external USB storage device Backup Save the playback file to USB device or DVD ROM disk 11 Segment Keep a portion of the recorded video 1 Use the Playback Control buttons or drag the...

Page 10: ...series of frames appear by date click on the frame to display another series of frames and search by every Hour of that date every Minutes of that hour and every Seconds of that minute Using and to go...

Reviews: