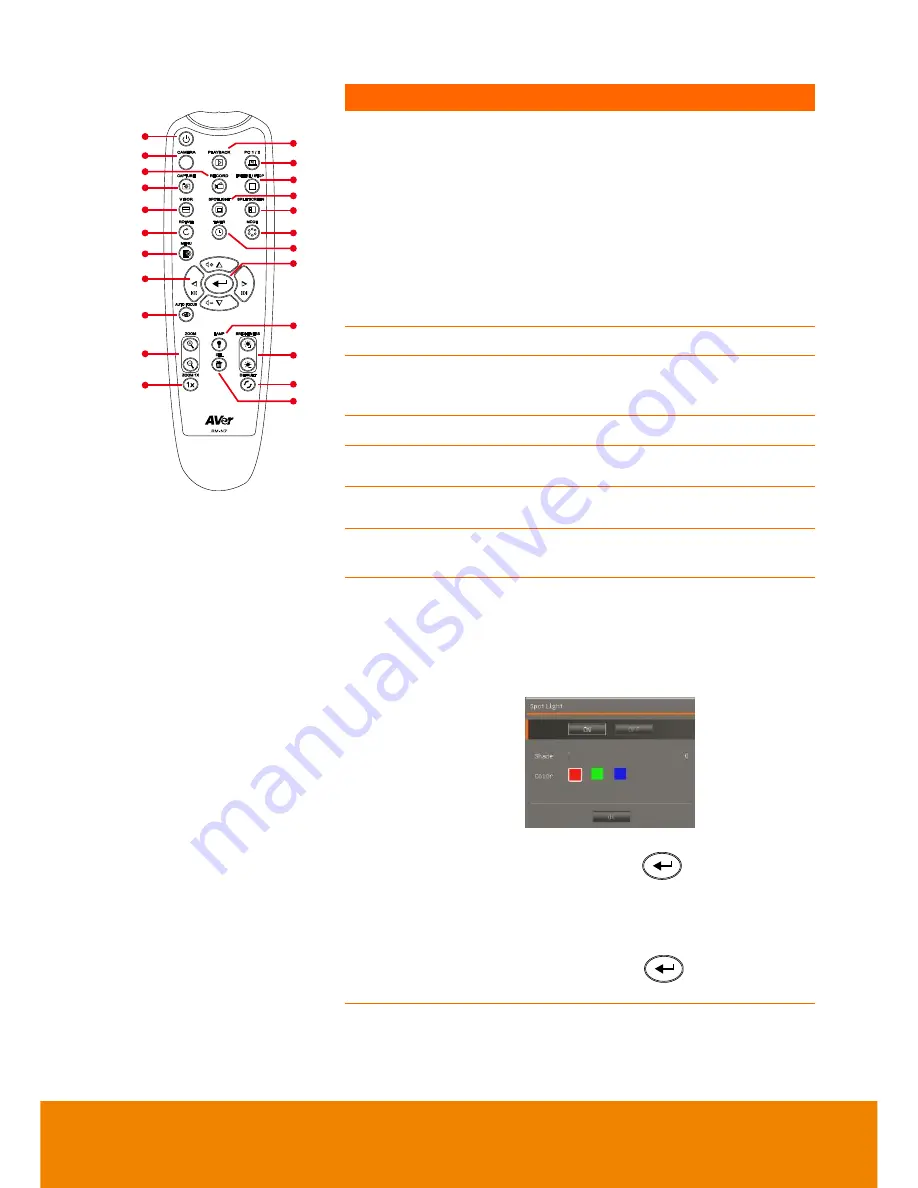
background image


7


Name 

Function 

(18 )

(14 )

(11)

(7)

(8)

(5)

(2)

(1)

(22 )

(13 )

(4)

(3)

(15 )

(12 )

(17 )

(23 )

(20 )

(19 )

(9)

(6)

(16 )

(10 )

(21 )


(

fig. 1.6

)


(8) 

▲,▼,◄, & ► 

-  Pan and zoom-in image (above digital 

zoom level) in both live and playback 
mode. 

-  Select options in OSD menu. 

-  Use 

▲&▼ to increase and decrease 

the video playback volume.  

Use ◄&► to play the video 
backward and forward. 

Move the Spotlight frame and Visor 

screen cover.


(9)  AUTO FOCUS 

Adjust the focus automatically.


(10)  ZOOM +/- 

Increase/decrease the image 
magnification in camera and picture 
playback mode. 

(11)  ZOOM RESET 

Reset zoom level to 100%.


(12)  PLAYBACK 

View the captured picture/video from 
the memory in 16-thumbnail images.


(13)  PC 1/2 

PC mode displays the video signal 
from the RGB INPUT port of F50HD. 

(14)  FREEZE / 

STOP 

-  Freeze live images. 
-  Stop video playback. 

(15)  SPOTLIGHT 


Call the Spotlight submenu. Spotlight 
overlays a box frame on the 
presentation screen. You can adjust the 
box size and move it around.  
In the Spotlight submenu, the following 
options are available.   


ON/OFF


– select to run/cancel the 

Spotlight. Press 

 to move to the 

next selection. 

Shade


– set the opacity level of the area 

outside the box. The shaded area will 
completely turns black when it is set to 

level 100. Press 

 to move to the 

next selection. 

Summary of Contents for AVerVision F50HD

Page 1: ...AVerVision F50HD User Manual ...

Page 2: ...ply with the requirements set out in the Council Directives on the Approximation of the laws of the Member States relating to Electromagnetic Compatibility Directive 2014 30 EU Warning This is a Class A product In a domestic environment this product may cause radio interference in which case the user may be required to take adequate measures to correct this interference DISCLAIMER No warranty or r...

Page 3: ...P WHERE YOU PURCHASED THE PRODUCT Remote Control Battery Safety Information Store batteries in any cool dry place Do not dispose used batteries in domestic waste Dispose batteries at special collection points or return to stores if applies Remove the batteries if they are not in use for long period of time Battery leakage and corrosion can damage the remote control dispose batteries safely Do not ...

Page 4: ... to a Computer 11 Connect to a Computer via USB 12 Connect to a Computer with HDMI Input interface 13 Connect an External Microphone 13 Connect an Amplified Speaker 14 Connect to a Microscope 14 Setting Up AVerVision F50HD 15 Storing and Handling 15 Shooting Area 16 Overhead Light 17 Infrared Sensor 17 Mounting the F50HD on a Flat Surface 18 Anti glare Sheet 18 External Memory Storage 19 I In ns s...

Page 5: ...72BStorage 27 73BFormat 27 76BUSB to PC 27 55BFlicker 28 System 28 74BLanguage 28 75BOutput Display 28 77BBackup 28 78BSave Setting 29 Recall Setting 29 80BInformation 29 52BDefault 29 Playback 30 81BSlide Show 30 Interval 30 83BSlide Show Effect 30 84BCurrent Storage 30 85BDelete All 30 Annotation 31 Connecting a USB mouse 31 Using the Annotation 32 Transfer Captured Images Videos to a computer 3...

Page 6: ...ge 35 Using the RS 232 Interface 35 Connect to the Computer RS 232 35 RS 232 Cable Specifications 36 RS 232 Transmission Specifications 36 RS 232 Communication Format 36 RS 232 Send Command Table 37 RS 232 Get Command Table 42 Troubleshooting 43 Limited Warranty 44 ...

Page 7: ...on the standard power outlet of the country where it is sold USB Cable Remote Control batteries included O Op pt ti io on na al l A Ac cc ce es ss so or ri ie es s Carrying Bag Anti glare Sheet RS 232 CVBS Cable Software Manual CD Microscope Adapter 28mm and 34mm Rubber Coupler are included For User Manual and Software please visit the link below http averusa com classroom technology support ...

Page 8: ... 6 Control panel Easy access to various functions 7 IR sensor Receive remote control commands 8 Rear panel Connections for power computer RGB RCA external display device RS 232 and USB to PC 9 Right panel Connections for the camera head holder SD card TV RGB display output switch and antitheft Kensington security lock compatible slot Right Panel 4 1 2 3 fig 1 2 Name Function 1 Camera Holder Hold t...

Page 9: ...se AVerVision F50HD as a USB camera or transfer the captured images videos from the memory source to computer Left Panel 1 2 3 4 5 6 fig 1 4 Name Function 1 Speaker port Connect to an amplified speaker to playback recorded audio video clip 2 MIC port Connect a 3 5mm plug microphone The built in mic will be disabled when an external MIC is connected to this port 3 USB port Insert a USB flash drive ...

Page 10: ... you to use the AVerVision F50HD as USB camera or transfer the captured images videos from the memory source to computer allowing you to save the images video in the USB flash drive or use a USB mouse to annotate 5 Shuttle Wheel Turn the shuttle wheel clockwise to zoom in and counter clockwise to zoom out the image in Camera and Playback mode only When it reaches the maximum optical zoom level of ...

Page 11: ...CAMERA PC Switch the video signal between camera or computer from the RGB IN port 11 PLAYBACK View playback captured still images and video files 12 AUTO FOCUS Adjust the focus automatically 13 LAMP Turn the overhead light on off 14 CAP DEL Capture picture in Camera mode In continuous capture mode press this button again to stop Delete the selected picture video in Playback mode 15 Built in MIC Re...

Page 12: ... mode press this button again to stop 5 VISOR Call the Visor submenu Visor covers part of the presentation screen and allow presenter to reveal the material as desire In the Visor submenu the following options are available ON OFF select to run cancel the Visor Press to move to the next selection Shade set the opacity level of the covered area The shaded area will completely turns black when it is...

Page 13: ...eset zoom level to 100 12 PLAYBACK View the captured picture video from the memory in 16 thumbnail images 13 PC 1 2 PC mode displays the video signal from the RGB INPUT port of F50HD 14 FREEZE STOP Freeze live images Stop video playback 15 SPOTLIGHT Call the Spotlight submenu Spotlight overlays a box frame on the presentation screen You can adjust the box size and move it around In the Spotlight s...

Page 14: ...ideo from the memory 17 MODE Select from 4 type of modes Sharp adjust the contrast along the edges making text appear more visible Graphics adjust the gradient of image Motion increase frame rate Sufficient lighting is required when using this mode Microscope automatically adjust optical zoom for microscopic viewing Macro set to view when object is only 5 20 cm away from the camera Infinite set to...

Page 15: ...Sw wi it tc ch h S Se et tt ti in ng g The TV RGB switch determines the display output selection Switch it to RGB right to output signal using RGB HDMI connection and TV left to output signal using RCA connection see fig 1 2 3 Switch AVerVision Port Display Device Port RGB RGB OUTPUT To RGB INPUT HDMI OUTPUT HDMI INPUT TV RS232 CVBS use RS 232 CVBS cable Optional VIDEO IN C Co on nn ne ec ct t t t...

Page 16: ...rf fa ac ce e Locate the HDMI input port of the display device and connect it to HDMI out port of AVerVision F50HD Make sure the TV RGB switch is set to RGB C Co on nn ne ec ct t t to o a a T TV V Locate the VIDEO or SCART RGB if applicable input port of the TV or Video equipment i e VCR to record your presentation and connect it to RCA jack of RS 232 CVBS cable optional ...

Page 17: ...m mp pu ut te er r Locate the RGB VGA output port of the computer or laptop and connect it to RGB IN port of AVerVision F50HD The video signal from the RGB IN port is streamed to RGB OUT To display computer image press Camera PC button on the control panel or remote control to switch AVerVision F50HD to computer mode For laptop to output display image use the keyboard command FN F5 to switch betwe...

Page 18: ... the LED on the control panel will light up This enables you to use AVerVision F50HD as a USB Camera or to transfer the captured pictures videos from the memory source and to computer Also see Transfer File from AVerVision F50HD to PC 2 Locate the USB port of the computer or laptop and connect it to PC port of AVerVision F50HD ...

Page 19: ...button on the control panel or remote control to switch AVerVision F50HD to computer mode For laptop to output display image use the keyboard command FN F5 to switch between the display modes For different command please refer to your laptop manual C Co on nn ne ec ct t a an n E Ex xt te er r n na al l M Mi ic cr ro op ph ho on ne e Plug a 3 5mm mono microphone to port The built in microphone on t...

Page 20: ... earphones Adjust the volume down on the remote to prevent hearing damage due to loudness C Co on nn ne ec ct t t to o a a M Mi ic cr ro os sc co op pe e Connect the AVerVision F50HD to a microscope enables you to examine microscopic objects on a big screen 1 Change the image display mode to Microscope Press MENU select IMAGE tab select MODE select microscope and press 2 Aim the camera head at the...

Page 21: ...erVision camera head Then connect it to the AVerVision and microscope Make sure the arrow on the camera head and microscope adapter are on the same side to connect and twist clockwise for the arrows to meet and lock S Se et tt ti in ng g U Up p A AV Ve er rV Vi is si io on n F F5 50 0H HD D This section provides useful tips on how to adjust the AVerVision F50HD to meet your needs S St to or ri in ...

Page 22: ...area of 400x300mm which allows you to show an A4 size portrait paper 300mm 400m m If the camera head is in upright position press ROTATE on the control panel or remote control twice to rotate the image in 180 To mirror the image press MENU select Mirror press and select On ...

Page 23: ...he ea ad d L Li ig gh ht t Press LAMP button on the control panel or remote control to turn on and off light I In nf fr ra ar re ed d S Se en ns so or r Aim the remote control at the infrared sensor to operate the unit ...

Page 24: ...lustration below Use 2 pieces of M4 0 screws for 6 mm holes and secure the F50HD on the flat surface 75mm A An nt ti i g gl la ar re e S Sh he ee et t The anti glare sheet is a special coated film that helps eliminate any glare that maybe encountered while displaying very shiny objects or glossy surfaces such as magazines and pictures To use simply place the anti glare sheet on top of the shiny do...

Page 25: ... the card with the contact facing down until it reaches the end To remove the card push to eject and pull the card out The supported SD card capacity is from 1GB to 32GB FAT32 We recommend using SDHC card with class 6 or above for high quality recording I In ns se er rt t a a U US SB B F Fl la as sh h D Dr ri iv ve e 1 Set the USB switch on the left panel to AVerVision F50HD will then detect the U...

Page 26: ...TING and SYSTEM In Playback mode you can access PLAYBACK OSD menu to enable the Slide Show feature and modify Slide Show interval and transition setting if desire For TV output the RESOLUTION will be disabled in SETTING menu list IMAGE PRESENTATION SETTING SYSTEM PLAYBACK ANNOTATION ...

Page 27: ...d to choose a selection in the menu list 4 Press to make a selection 5 Use and to adjust the setting or make a selection 6 Press to enter submenu 7 Press MENU to close the OSD menu I Im ma ag ge e Menu Screen Function 46BBrightness Adjust brightness level manually between 0 and 63 47BContrast Adjust the contrast level manually between 0 and 255 under bright and dark environments ...

Page 28: ...ed when using this mode Microscope automatically adjust optical zoom for microscopic viewing Macro set to view when object is only 5 20 cm away from the camera Infinite set to view when subject is at least 55cm away from the camera 51BEffect Convert the image into positive true color monochrome black and white or negative 8BMirror Select to flip the image in Camera mode 48BAdvanced Select to set t...

Page 29: ...ically adjust the camera exposure and the amount of light required MANUAL manually adjust the exposure level The exposure can be adjusted up to 100 54BWhite Balance Select the White Balance setting for various light conditions or color temperature AUTO automatically adjust the white balance MANUAL manually adjust the red and blue color level The color level can be adjusted up to 255 50BFocus Manua...

Page 30: ...level of the area outside the box The shaded area will completely turns black when it is set to level 100 Press to move to the next selection Color select the Spotlight frame color Press to move to the next selection OK press for the setting to take effect If you select ON the frame will appear and blink use the buttons to adjust the frame size and press to set the desired size and OFF will close ...

Page 31: ...sed Use the buttons to reveal more of the covered area and OFF will close the submenu 62BPIP Select the thumbnail playback screen location and show the thumbnail playback screen at the corner of the screen to recall the captured image from the memory in Camera mode Select OFF to cancel PIP Lower Left Upper Left Upper Right Lower Right 63BSplit Screen Divide the screen into two parts Half of the sc...

Page 32: ...e elapsed time Even when you switch between Playback PC or Camera modes the timer will continue S Se et tt ti in ng g Menu Screen Function 48BCapture Select to set the capture resolution quality type and interval settings 66BResolution Select the capture size In 5M setting the capture resolution size is 2560 X 1920 67BQuality Select the capture compression setting ...

Page 33: ...eo recording can only be saved in SD memory card or USB flash drive 73BFormat Format to delete all the data in the selected memory 76BUSB to PC Select the status of the AVerVision F50HD when it is connected to the computer via USB Make sure the USB switch on the left panel is set to Camera can be used as a computer webcam or with our bundled software to record video and capture still image Storage...

Page 34: ...le of times as the output is switched to another refresh rate S Sy ys st te em m Menu Screen Function 74BLanguage Change and select different language 75BOutput Display Set the resolution to display the image on screen This selection will be disabled in TV output mode 77BBackup Copy the image from the built in memory to SD card or USB flash drive ...

Page 35: ...cted profile number Only effect mode brightness and contrast settings can be saved Recall Setting Restore the setting back to the selected profile number 80BInformation Display the product information 52BDefault Restore all the settings into original factory default setting ...

Page 36: ...ure The length can be set up to 100 sec 83BSlide Show Effect Select the slide show transition effect Slide image Wipe right Checker down Split Vertical Out Wipe down Split Horizontal In 84BCurrent Storage Select the source of the images 85BDelete All Permanently delete all the data in selected memory source A Warning Message will appear Select YES to continue and NO to stop formatting the storage ...

Page 37: ...ing selections Color Palette Line Thickness Line Freehand Capture Eraser and Hide Show icons Annotation can only be supported in the following resolution setting 1024 x 768 1280 x 720 1280 x 1024 C Co on nn ne ec ct ti in ng g a a U US SB B m mo ou us se e 1 Set the USB switch on the left panel to AVerVision F50HD will then detect the USB mouse and the LED on the control panel will light up 2 Conn...

Page 38: ...se and move the cursor on the item in the annotation panel you want to use Then left click the mouse button to make a selection Name Function Color Palette Select the line color Line Thickness Select the thickness of the line Line Select to draw a straight line Freehand Select to draw freeform line Capture Capture the image with the annotation and save it as a new file Eraser Select to erase any p...

Page 39: ...necting the USB cable 1 Make sure to set the USB switch to for the computer to detect AVerVision F50HD 2 MUST set the USB to PC as STORAGE before connecting the USB cable 3 When Mass Storage Start appears at the lower right corner of the presentation screen you may now connect the USB cable 4 Upon connecting the USB cable the system automatically detects the new removable disk You can now transfer...

Page 40: ...ixel Optics Focusing Auto Manual Shooting Area 400mm x 300mm Zooming Total 200X 8X optical zoom 1 25AVERZOOM 20X Digital zoom Power Power Source DC 12V 100 240V 50 60Hz Consumption 16 8 Watts lamp off 18 Watts lamp on Lighting Lamp Type LED light Input Output RGB Input 15 Pins D sub VGA RGB Output 15 Pins D sub VGA HDMI Output HDMI HDMI Input HDMI CVBS RS 232 Mini DIN Jack use CVBS RS 232 Adapter ...

Page 41: ...ontrolled using a computer or any centralized control panel through RS 232 connection The command code for RS 232 is provided for the system integrator to be able to incorporate it with the system program C Co on nn ne ec ct t t to o t th he e C Co om mp pu ut te er r R RS S 2 23 32 2 Locate the RS 232 port of the computer and connect it to RS 232 jack of RS 232 CVBS cable optional ...

Page 42: ...i io on n F Fo or r m ma at t Send Device Code 1 Byte 0x52 Type Code 1 Byte 0x0B 0x0A Data Length Code 1 Byte 0x03 0x01 Data 0 Code 1 Byte RS 232 Send Command Table RS 232 Get Command Table Data 1 Code 1 Byte RS 232 Send Command Table X Data 2 Code 1 Byte RS 232 Send Command Table X Receive Device Code 1 Byte 0x53 CheckSum Code 1 Byte RS 232 Send Command Table RS 232 Get Command Table Format Send ...

Page 43: ...e Power Off Receive Format 0x51 0xFF 0x01 0x0B 0x51 0xA4 7 StandBy Mode Power On Receive Format 0x51 0x00 0x01 0x0B 0x51 0x5B Function Data 0 Data 1 Data 2 CheckSum POWER OFF 6 0x01 0x00 0x00 0x5a POWER ON 7 0x01 0x01 0x00 0x5b CAMERA MODE 0x02 0x00 0x00 0x59 PLAYBACK MODE 0x03 0x00 0x00 0x58 PC 1 PASS THROUGH 0x04 0x00 0x00 0x5f IMAGE CAPTURE TYPE SINGLE 0x05 0x00 0x00 0x5e IMAGE CAPTURE TYPE CON...

Page 44: ...x0F 0x03 0x00 0x57 EFFECT COLOR 0x10 0x00 0x00 0x4b EFFECT B W 0x10 0x01 0x00 0x4a EFFECT NEGATIVE 0x10 0x02 0x00 0x49 CONTRAST INCREASE 0x11 0x00 0x00 0x4a CONTRAST DECREASE 0x11 0x01 0x00 0x4b CONTRAST VALUE 0x11 0x02 VALUE 0 255 1 BRIGHTNESS INCREASE 0x12 0x00 0x00 0x49 BRIGHTNESS DECREASE 0x12 0x01 0x00 0x48 BRIGHTNESS VALUE 0x12 0x02 VALUE 0 63 1 EXPOSURE AUTO 0x13 0x00 0x00 0x48 EXPOSURE MAN...

Page 45: ... BLUE 0x1B 0x02 0x00 0x42 SPOTLIGHT RESIZE 0x1C 0x00 0x00 0x47 VISOR OFF 0x1D 0x00 0x00 0x46 VISOR ON 0x1D 0x01 0x00 0x47 VISOR SHADE 50 DARK 0x1E 0x00 0x00 0x45 VISOR SHADE 100 DARK 0x1E 0x01 0x00 0x44 PIP OFF 0x1F 0x00 0x00 0x44 PIP ON 0x1F 0x01 0x00 0x45 PIP POSITION BOTTOM LEFT 0x20 0x00 0x00 0x7b PIP POSITION TOP LEFT 0x20 0x01 0x00 0x7a PIP POSITION TOP RIGHT 0x20 0x02 0x00 0x79 PIP POSITION...

Page 46: ...1024x768 0x2F 0x01 0x00 0x75 OUTPUT RESOLUTION 1280x720 0x2F 0x02 0x00 0x76 OUTPUT RESOLUTION 1920x1080 0x2F 0x03 0x00 0x77 OUTPUT RESOLUTION 1280x1024 0x2F 0x04 0x00 0x70 OUTPUT RESOLUTION 1600x1200 0x2F 0x05 0x00 0x71 OUTPUT RESOLUTION 1280x800 0x2F 0x05 0x00 0x72 USB CONNECT USB CAMERA 0x30 0x00 0x00 0x6b USB CONNECT MASS STORAGE 0x30 0x01 0x00 0x6a BACKUP TO SD CARD 0x31 0x00 0x00 0x6a BACKUP ...

Page 47: ...0 0x6d AUTO IMAGE ON 0x36 0x01 0x00 0x6c CAPTURE QUALITY NORMAL 0x37 0x00 0x00 0x6c CAPTURE QUALITY HIGH 0x37 0x01 0x00 0x6d CAPTURE QUALITY FINEST 0x37 0x02 0x00 0x6e AUTO FOCUS 0x40 0x00 0x00 0x1b MENU 0x41 0x00 0x00 0x1a ARROW DOWN 0x42 0x00 0x00 0x19 ARROW UP 0x42 0x01 0x00 0x18 ARROW LEFT 0x42 0x02 0x00 0x1b ARROW RIGHT 0x42 0x03 0x00 0x1a ENTER 0x43 0x00 0x00 0x18 FREEZE 0x44 0x00 0x00 0x1f ...

Page 48: ... Power Off Status Receive Format 0x51 0xFF 0x01 0x0A 0x51 0xA5 Function Data 0 CheckSum ReData 0 RED VALUE 0x02 0x5A VALUE 0 255 BLUE VALUE 0x03 0x5B VALUE 0 255 POWER STATUS 0x04 0x5C OFF 2 1 ON LAMP STATUS 0x05 0x5D 0 OFF 1 ON DISPLAY STATUS 0x06 0x5E 0 CAMERA MODE 1 PLAYBACK MODE 2 PC 1 PASS THROUGH VIDEO OUTPUT STATUS 0x07 0x5F 0 VGA 1 TV FREEZE STATUS 0x08 0x50 0 OFF 1 ON BRIGHTNESS VALUE 0x0...

Page 49: ... to reduce the distortion if applicable 3 If you discover that the image is blurry or out of focus press the Auto Focus button on the control panel or remote control There is no computer signal on presentation screen 1 Check all the cable connections among the display device AVerVision F50HD and your PC 2 Connect your PC to the AVerVision F50HD first before you power on your computer 3 For noteboo...

Page 50: ... original Warranty Period or b thirty 30 days from the date of delivery of the repaired or replaced product Limitations of Warranty AVer makes no warranties to any third party You are responsible for all claims damages settlements expenses and attorneys fees with respect to claims made against You as a result of Your use or misuse of the Product This warranty applies only if the Product is install...

Page 51: ... Law and Your Rights This warranty gives you specific legal rights You may also have other rights granted under state law These rights vary from state to state For warranty period please refer to the warranty card ...

Reviews: