Avenview HDM3D-C6SW-R User Manual Download Page 23

www.avenview.com|23 


Section 3: IR Remote User Guide 


ON 

Power on the matrix switcher 

OFF 

Standby mode 

MUTE 

Hide or Turn off    the selected Output’s 
Video/Audio 

SAVE 

Save current mapping mode 

DEFAULT EDID 

Default EDID selection 

CLEAR 

Clear the previous IR operation 

STATUS 

View Preset output Status 

PRESET 

Preset Mapping mode 

LEARN EDID 

Begin EDID learning from one output 

TAKE 

Trigger the previous setting 

INPUT 

Select the Input 1-8 

OUTPUT 

Select the Outputs 1-8 

F1 

Reserved


F2 

Reserved 

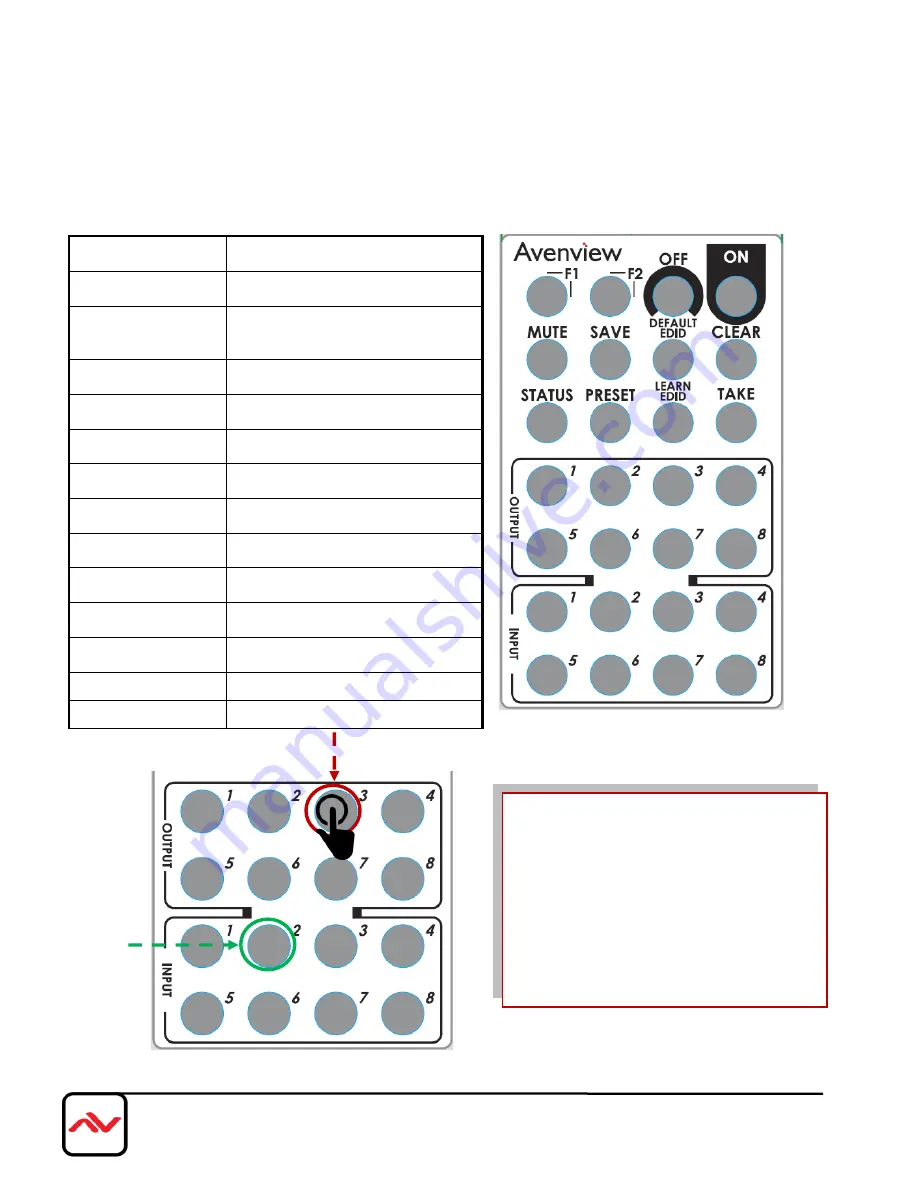
Ex: Select Input 2 to Output 3 

Push the Green circle button as 

illustrated to select Input 2 then push 

the red button to output the source to 

Output 3. 


Summary of Contents for HDM3D-C6SW-R

Page 1: ...without notice No license whether express implied or otherwise to any intellectual property rights is granted by this publication Except as set forth in Avenview Standard Terms and Conditions of Sale...

Page 2: ...n 4 1 5 Package Contents 5 1 6 Before Installation 5 1 7 Panel Description 6 1 7 1 SW HDM3D C6 8x8E Front Panel 6 1 7 2 SW HDM3D C5 8x8E Rear Panel 6 1 7 3 HDM3D C6SW R 7 1 8 IR Control Patch 8 HDM3D...

Page 3: ...enview SW HDM3D C6 8x8E HDMI Matrix Switch over Single CAT6 with Full 3D Support and Ethernet has been tested for conformance to safety regulations and requirements and has been certified for internat...

Page 4: ...the source site each remote module is easily installed without power supply Furthermore the built in IR extension function users can control the HDMI source devices such as Blu ray Disc Player Satell...

Page 5: ...anual x 1 Software CD x 1 1 6 Before Installation Put the product in an even and stable location If the product falls down or drops it may cause an injury or malfunction Don t place the product in too...

Page 6: ...anel push buttons used to select the number of input source LED display for input channels 1 7 2 SW HDM3D C5 8x8E Rear Panel 5 5V DC 5V DC power jack 6 ETHERNET Ethernet control port 7 RS 232 RS 232 c...

Page 7: ...Level Signal Level 0 7 Adjust the 8 level equalization control to the received HDMI signals The HDMI signal level varies from 0 strongest to 7 weakest for respective transmission length from longest...

Page 8: ...hat are setting at respective input channel from 1 to 4 System IR Receives IR commands from remote control HDM3D C6SW R IR BLASTER IR control on individual display device IR RECEIVER IR receiver conne...

Page 9: ...build in IR receiver of the sources 4 Connect the 5V 6A DC power supply to the SW HDM3D C6 8x8E 5 Power on all HDMI sources 6 Power on the SW HDM3D C6 8x8E Receiver 1 Connect each HDMI output to HDMI...

Page 10: ...ration 0 7 which you want to save current input output mapping 3 After you select the desired mapping configuration number the LED will blink twice and the mapping setting will be saved 4 If you push...

Page 11: ...tting is effective 6 The LED will show 0 0 if the setting is success The LED will show F F if the setting is failure 5 EDID Learning Mode 1 Push input learn button to select the input channel which yo...

Page 12: ...2 COM Port Selection 8 Network Button 3 Connection Status 9 Mapping Button 4 Connect Disconnect Button 10 Default Reset Button 5 Power On Off Button 11 In Out Switch Button 6 EDID Button 12 Mute Outpu...

Page 13: ...om 13 2 COM Port Selection Click button to select COM Port 3 Connection Status 1 Connected Status 2 Connecting Status 3 Disconnected Status 4 Connect Disconnect Button Click this button to change conn...

Page 14: ...ew com 14 5 Power On Off Button Click this button to power on off Power on status Blue Click this button to power off device Standby Mode Power off status Red Click this button to power on device 6 ED...

Page 15: ...put c Click Learn button to learn default EDID 2 Load EDID File to Input a Select Input b Click Load button to select the EDID file 3 Learn EDID From Display a Select EDID Port b Select Input c Click...

Page 16: ...avenview com 16 b Select the EDID content c Click Save EDID on Computer to save the generated EDID as a file View EDID Content a Select Input or From File b Click View button to read the EDID and anal...

Page 17: ...EDID as a file on computer 7 Firmware Update Button 1 Click Load File to select the firmware file which you want to update 2 Click Break button 3 Quickly remove and reconnect the power input connecto...

Page 18: ...IP address 2 Select Ethernet and then will be a pop up windows 3 Key in the device IP address to the pop up windows 4 Close the pop up windows 5 Click the connected button to connect 9 Mapping Button...

Page 19: ...ing8 b Click Confirm button to confirm the change 10 Default Reset Button Click this button to do factory default reset The default reset process will take about 80 90 seconds 11 In Out Switch Button...

Page 20: ...www avenview com 20 12 Mute Output Button Click the circle button to turn off output s video and audio Ex Mute Output 2...

Page 21: ...video properly Because the HDMI source devices and displays may have various level of capability in playing audio and video the general principle is that the source device will output the lowest stan...

Page 22: ...socket for IR receiver 1x RJ 45 1x IR socket for IR receiver Output 8x RJ 45 5x IR socket for IR blaster 1x HDMI 1x IR socket for IR blaster HDMI Input Selection Push Button IR Remote RS232 Push Butto...

Page 23: ...ection CLEAR Clear the previous IR operation STATUS View Preset output Status PRESET Preset Mapping mode LEARN EDID Begin EDID learning from one output TAKE Trigger the previous setting INPUT Select t...

Page 24: ...rage site Take Ex Save current mapping to 5 1 Press SAVE button d 2 Press number key 5 to select the storage site 5 d 5 3 Press TAKE button Preset Mapping Preset 1 8 1 8 storage site Take Ex Preset sa...

Page 25: ...ng such products or this documentation for any interruption of service loss or interruption of business loss of anticipatory profits or for punitive incidental or consequential damages in connection w...

Reviews: