background image

www.avenview.com

Page 9

  4.


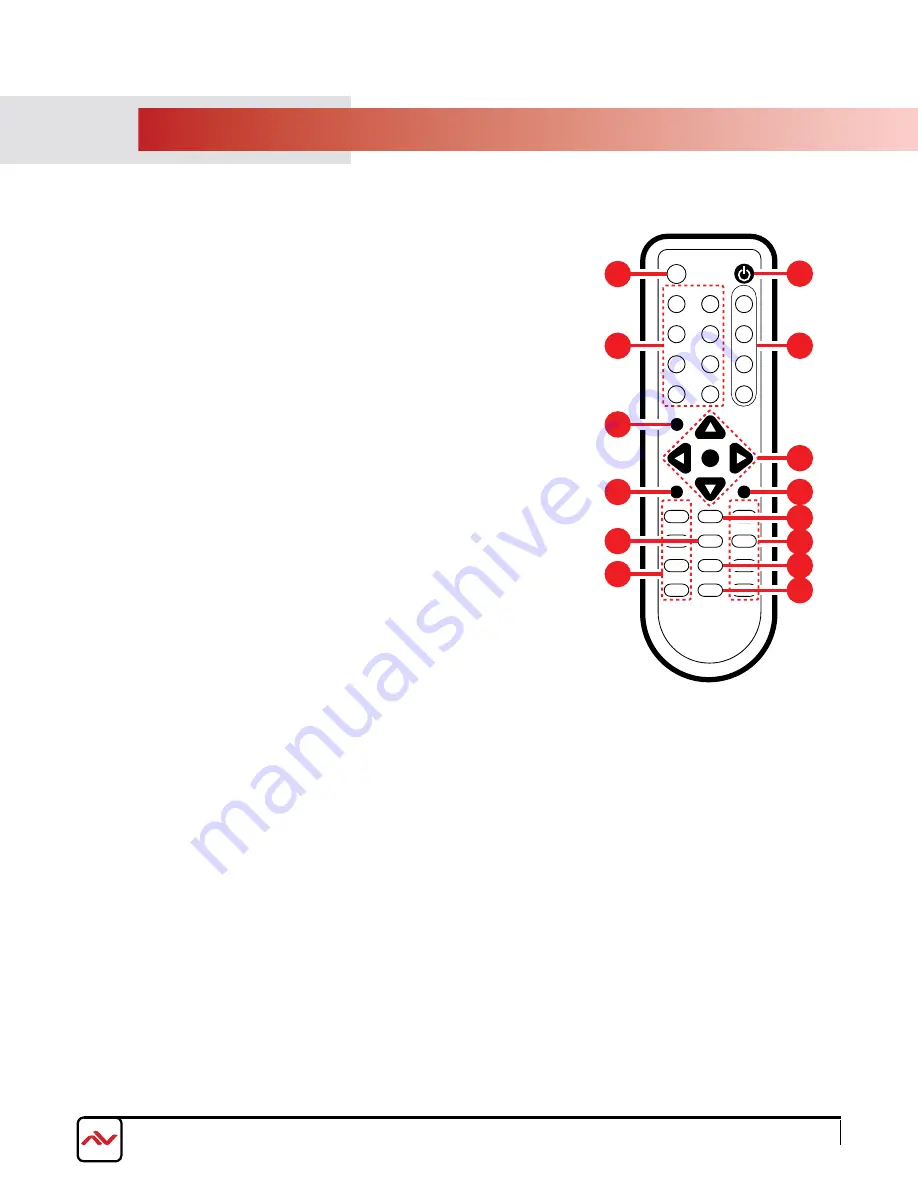
IR REmoTE CoNTRol

1.  POWER BUTTON: 1

st

 press power on the device / 2

nd

 press - Standby 

mode.

2.  INFO BUTTON: To show device firmware version 

3.  CH 1~ CH 4: press to change the HDmI 1~4 input source output order 

on the HD display Example: press CH 1  then press CH 1, ouT1 will 
display Input’s1 image.

4.  HOTKEYS A-H: press these hot keys to select the desired 8 layouts pre-

configured within the machine

5.  MUTE BUTTON: To mute the audio from the HDmI output ports.

6.  NAVIGATION BUTTONS: 

/

/

/

/ok to scroll through the oSD 

mENu. ok to Enter or confirm the settings.

7.  MENU BUTTON: To access the oSD menu.

8.  EXIT BUTTON: To exit the oSD menu or oSD settings.

9.  FAVOURITE BUTTONS 1-4: These buttons quickly recall the user 

custom saved layouts.

10. FADE-IN-OUT: press this button to ToGGlE oN/off the fade-in-out 

function.

11. CHROMAKEY:  This button ToGGlES oN/off the Chroma function 

where CH 1 is the Background and CH 2 is the top image.

12. MIRROR: To change the image to a reflected duplication of the source 

that appears identical but reversed

13. ROTATION: This button rotates the image 90˚ left and right or 180˚ 

14. AUDIO 1-4: These buttons select AuDIo from HDmI input source 1~4. 

* Audio function only work under A to D.
The system will force to switch to Window A when operate under Window 

E~H.

WA

WE

CH 1

WB

WF

CH 2

WC

WG

CH 3

WD

WH

CH 4

Input

Mute

Menu

OK

Exit

Audio 1 Fade In-Out FAV. 1

Audio 2 Chromakey FAV. 2

Audio 3

Mirror

FAV. 3

Audio 4 Rotation

FAV. 4

Info

Power

CR-124

1

3

6
7

9

10

12

13

2

4

5

8

11
14

Summary of Contents for DM-SPLITPRO-4A

Page 1: ...ntations or warranties with respect to the accuracy or completeness of the contents of this publication and reserves the right to make changes to specifications and product descriptions at any time wi...

Page 2: ...egulatory Notices Federal Communications Commission FCC 2 2 Introduction 3 2 1 Package Contents 5 2 2 Before Installation 5 2 3 APPLICATION DIAGRAM 6 3 PANEL DESCRIPTION 7 INPUT PANEL HDM SPLITPRO 4A...

Page 3: ...SPLITPRO 4A 4x1 Quad Multiviewer Scaler with Rotation Chromakey and Audio and audio has been tested for conformance to safety regulations and requirements and has been certified for international use...

Page 4: ...modifications made to this equipment may void the user s authority to operate this equipment Warning symbols Description ONLY USE THE PROVIDED POWER CABLE OR POWER ADAPTER SUPPLIED DO NOT TAMPER WITH...

Page 5: ...ired layout configuration Channel Size and Position The user can easily change the individual channel size and choose different position and layout on the single monitor with the OSD IR Remote Telnet...

Page 6: ...e 4 four HDMI Input Channels 8 Preset Hot keys for easy control and design layouts 4 Custom Favorite saved layout buttons via the IR Remote Input Output resolution supported supports full range of vid...

Page 7: ...stallation Put the product in an even and stable location If the product falls down or drops it may cause an injury or malfunction Don t place the product in too high temperature over 50 C too low tem...

Page 8: ...www avenview com Page 6 2 3 APPLICATION DIAGRAM...

Page 9: ...keys to select the desired Layouts pre configured within the machine A D Buttons when selected displays a full screen of each input channel Windows A D s buttons is corresponding to Channel select No...

Page 10: ...le HDMI HD Monitor Displays to view inputs connected 3 Ethernet Control Connect RJ45 jack to an active network for Telnet control 4 USB Service Only This port is reserved for factory use only 5 RS 232...

Page 11: ...tings 9 FAVOURITE BUTTONS 1 4 These buttons quickly recall the user custom saved layouts 10 FADE IN OUT Press this button to TOGGLE ON OFF the Fade in out function 11 CHROMAKEY This button TOGGLES ON...

Page 12: ...top or Set Top Box or Gaming device 4 Connect your HDMI cables to the single HD Displays LCD or PC Monitors that is receiving the video signals 5 Power on all devices 6 Connect your computer to HDM SP...

Page 13: ...60Hz 1024X768 60Hz 1280X800 60Hz 1280X1024 60Hz 1366X768 60Hz 1440X900 60Hz 1600X900RB Hz 1600X1200 Hz 1680X1050 Hz 1920X1200RB Hz Native AUDIO SUPPORT LPCM 2CH 6CH 8CH AC3 DTS Dolby Digital Plus Dolb...

Page 14: ...www avenview com Page 12 Notes...

Page 15: ...ckaging pertaining equal degree of protection to Avenview s Both Avenview and purchaser are responsible for freight charges and brokerages when shipping the product s to the receiver NOT COVERED BY TH...

Page 16: ...system described herein to improve reliability function or design With respect to Avenview products which this document relates Avenview disclaims all express or implied warranties regarding such prod...

Reviews: