background image

SAFETY WARNINGS

Avaya

t

S9RM UPS Site Preparation, Installation and Operator’s Manual

S

05147387 Rev C

16

Advertencias de Seguridad

INSTRUCCIONES DE SEGURIDAD IMPORTANTES

GUARDE ESTAS INSTRUCCIONES

Este manual contiene instrucciones importantes que debe seguir durante la instalación y el
mantenimiento del SIE y de las baterías. Por favor, lea todas las instrucciones antes de
poner en funcionamiento el equipo y guarde este manual para referencia en el futuro.

P E L I G R O

Este SIE contiene VOLTAJES MORTALES. Todas las reparaciones y el servicio técnico deben
ser efectuados SOLAMENTE POR PERSONAL DE SERVICIO TÉCNICO AUTORIZADO. No hay
NINGUNA PARTE QUE EL USUARIO PUEDA REPARAR dentro del SIE.

A D V E R T E N C I A

S

Este SIE contiene su propia fuente de energía (baterías). Los receptáculos de salida
pueden transportar voltaje activo aun cuando el SIE no esté conectado con una fuente de
CA.

S

Para los modelos 220–240V, es posible que los receptáculos de salida permanezcan
eléctricamente activos. Si la fuente de energía de entrada de su aplicación está
cableada de línea a neutro (como la mayoría de las aplicaciones europeas), el voltaje a
los receptáculos de salida es 0V. Con cableado de entrada de línea a línea, el voltaje
hacia los receptáculos de salida es 110–120V (medido de línea a tierra o de línea a
neutro, lo que dependerá del cableado del SIE).

S

No retire o desenchufe el cable de entrada mientras el SIE se encuentre encendido. Esto
suprime la descarga a tierra de seguridad del SIE y de los equipos conectados al SIE.

S

Para reducir el riesgo de incendio o de choque eléctrico, instale este SIE en un lugar
cubierto, con temperatura y humedad controladas, libre de contaminantes conductores.
La temperatura ambiente no debe exceder los 40°C. No trabaje cerca del agua o con
humedad excesiva (95% máximo).

S

Para cumplir con los estándares internacionales y las normas de instalación, la totalidad
de los equipos conectados a la salida de este SIE no debe tener una intensidad de
pérdida a tierra superior a los 1,5 miliamperios.

Summary of Contents for S9RM

Page 1: ...Avaya S9RM Uninterruptible Power Systems Site Preparation Installation and Operator s Manual www powerware com avaya ...

Page 2: ......

Page 3: ...Avaya S9RM Uninterruptible Power Systems Site Preparation Installation and Operator s Manual www powerware com avaya ...

Page 4: ...36 EEC relating to EMC The EC Declaration of Conformity is available upon request for products with a CE mark For copies of the EC Declaration of Conformity contact Eaton Power Quality Oy Koskelontie 13 FIN 02920 Espoo Finland Phone 358 9 452 661 Fax 358 9 452 665 68 Avaya and the Avaya logo are trademarks of Avaya Inc and may be registered in certain jurisdictions Powerware and ABM are registered...

Page 5: ...ment does cause harmful interference to radio or television reception which can be determined by turning the equipment off and on the user is encouraged to try to correct the interference by one or more of the following measures S Reorient or relocate the receiving antenna S Increase the separation between the equipment and the receiver S Connect the equipment into an outlet on a circuit different...

Page 6: ...EPTACLE For 230V models only this receptacle provides network interface connections Do not plug telephone or telecommunications equipment into this receptacle This symbol indicates that you should not discard the UPS or the UPS batteries in the trash This product contains sealed lead acid batteries and must be disposed of properly For more information contact your local recycling reuse or hazardou...

Page 7: ...7 UPS Rear Panels 29 4 Operation 31 Turning the UPS On 31 Starting the UPS on Battery 31 Turning the UPS Off 32 Initiating the Self Test 32 Operating Modes 33 Normal Mode 34 Battery Mode 35 Bypass Mode 36 Standby Mode 36 5 Configuration 37 Configuration Mode 37 Installing ERM Configurator with a ConnectUPS X Web SNMP Card 40 Placing the Card into Serial Pass Through Mode 40 Exiting Serial Pass Thr...

Page 8: ...toring the UPS and Batteries 49 When to Replace Batteries 50 Replacing Batteries 50 How to Replace Internal Batteries 51 How to Replace Extended Battery Modules 52 Testing New Batteries 54 Recycling the Used Battery or UPS 54 8 Specifications 55 9 Troubleshooting 59 Audible Alarms and UPS Conditions 59 Silencing an Audible Alarm 59 Obtaining Service 62 ...

Page 9: ... effects of power disturbances and guard the integrity of your equipment Figure 1 shows the Avaya S9RM UPS with an optional Extended Battery Module EBM Figure 1 The Avaya S9RM UPS with Optional EBM Providing outstanding performance and reliability the Avaya S9RM s unique benefits include the following S Online UPS design with pure sine wave output The UPS filters and regulates incoming AC power an...

Page 10: ...power management with the ConnectUPS X Web SNMP Card providing SNMP and HTTP capabilities monitoring through a Web browser interface and connection to a twisted pair Ethernet 10 100BaseT network S Network transient protector that guards your network communications equipment from surges Low voltage models can also protect modems fax machines or other telecommunications equipment S Advanced power ma...

Page 11: ... output receptacles may remain electrically live If the input power source in your application is wired line to neutral as in most European applications the voltage to the output receptacles is 0V With line to line input wiring the voltage to the output receptacles is 110 120V measured from line to ground or line to neutral depending on the UPS wiring S Do not remove or unplug the input cord when ...

Page 12: ...ndige dele kan repareres af brugeren ADVARSEL S Denne UPS indeholder sin egen energikilde batterier Udgangsstikkene kan endog være strømførende når UPS en ikke er koblet til en vekselstrømsforsyning S På 220 240V modeller kan udgangsstikkene være strømførende Hvis ledningsføringen til indgangsstrømkilden på din enhed er fase til neutral som på de fleste europæiske enheder er spændingen til udgangs...

Page 13: ... bewaar deze handleiding als naslagwerk GEVAAR Deze UPS bevat LEVENSGEVAARLIJKE ELEKTRISCHE SPANNING Alle reparaties en onderhoud dienen UITSLUITEND DOOR ERKEND SERVICEPERSONEEL te worden uitgevoerd Er bevinden zich GEEN ONDERDELEN in de UPS die DOOR DE GEBRUIKER kunnen worden GEREPAREERD WAARSCHUWING S Deze UPS bevat een eigen energiebron batterijen De uitgangscontactdoos kan onder spanning staan...

Page 14: ...ten te voldoen mag de gehele apparatuur die op de uitgang van deze UPS is aangesloten geen aardlekstroom van meer dan 1 5 milliampère hebben OPGELET S Batterijen leveren gevaar op voor elektrische schokken en kunnen brandwonden veroorzaken door een grote kortsluitstroom Neem de juiste voorzorgsmaatregelen in acht Het onderhoud moet worden uitgevoerd door bevoegde onderhoudsmonteurs die verstand he...

Page 15: ...otuksessa lähtövastakkeiden jännite on 110 120V mitataan linjasta maahan tai linjasta neutraaliin UPS virtalähteen johdotuksesta riippuen S Älä poista tai irrota sisääntulojohtoa kun UPS on kytkettynä Tämä poistaa turvamaadoituksen UPS laitteesta ja siihen liitetystä laitteistosta S Vähentääksesi tulipalon ja sähköiskun vaaraa asenna tämä UPS sisätiloihin joissa lämpötila ja kosteus on säädettävis...

Page 16: ... qui concerne les modèles 220 240 V il est possible que les prises de sortie restent sous tension Si la source d alimentation de votre application est câblée phase et neutre comme dans la majorité des applications européennes la tension vers les prises de sortie est de 0 V Avec un câblage d entrée phase à phase la tension vers les prises de sortie est de 110 120 V mesurée entre phase et terre ou p...

Page 17: ... Handbuches bevor sie mit dem Gerät arbeiten Bewaren Sie das Handbuch zum Nachlesen auf WARNUNG Die USV führt lebensgefährliche Spannungen Alle Reparatur und Wartungsarbeiten sollten nur von Kundendienstfachleuten durchgeführt werden Die USV enthält keine vom Benutzer zu wartenden Komponenten ACHTUNG S Dieses USV Unterbrechungsfreies Stromversorgungssystem enthält eine eigene Energiequelle Batteri...

Page 18: ...artung muss von qualifiziertem Wartungspersonal durchgeführt werden das im Umgang mit Batterien geübt ist und über gute Kenntnisse der erforderlichen Vorsichtsmaßnahmen verfügt Nicht autorisiertes Personal von Batterien fern halten S Die Batterien müssen ordnungsgemäß entsorgt werden Hierbei sind die örtlichen Bestimmungen zu beachten S Batterien niemals verbrennen da sie explodieren können Avvisi...

Page 19: ...l apparecchiatura ad esso collegata S Per ridurre il rischio di incendio o di scossa elettrica installare il gruppo statico di continuità in un ambiente interno a temperatura ed umidità controllata privo di agenti contaminanti conduttivi La temperatura ambiente non deve superare i 40 C Non utilizzare l unità in prossimità di acqua o in presenza di umidità eccessiva 95 max S Per conformità con gli ...

Page 20: ...0V modellene Spenningen til utgangsstikkene vil være 0 V dersom din enhets strømkilde er fase til nøytral som på de fleste europeiske enheter Med ledningsført fase til fase inngang vil spenningen til utgangsstikkene være 110 120V målt fra fase til jord eller fase til nøytral avhenging av UPS ledningsføringen S Strømforsyningskabelen må ikke fjernes eller trekkes ut når UPS en er på slik at ikke si...

Page 21: ...antes de operar o equipamento e guarde este manual para consultá lo futuramente CUIDADO A UPS contém VOLTAGEM MORTAL Todos os reparos e assistência técnica devem ser executados SOMENTE POR PESSOAL DA ASSISTÊNCIA TÉCNICA AUTORIZADO Não há nenhuma PEÇA QUE POSSA SER REPARADA PELO USUÁRIO dentro da UPS ADVERTÊNCIA S Este no break possui sua própria fonte de energia baterias As tomadas de saída podem ...

Page 22: ...anutenção deve ser realizada por pessoal qualificado com conhecimento sobre baterias e ciente das precauções exigidas Mantenha o pessoal não autorizado afastado das baterias S Siga as instruções apropriadas ao desfazer se das baterias Consulte os códigos do local para maiores informações sobre os regulamentos de descarte de produtos S Nunca jogue as baterias no fogo porque há risco de explosão Пре...

Page 23: ...ским током устанавливайте ИБП в закрытом помещении с контролируемыми температурой и влажностью в котором отсутствуют проводящие загрязняющие вещества Температура окружающего воздуха не должна превышать 40 С Не эксплуатируйте устройство около воды или в местах с повышенной влажностью макс 95 S Для обеспечения соблюдения требований международных стандартов и требований к разводке электрических цепей...

Page 24: ...s posible que los receptáculos de salida permanezcan eléctricamente activos Si la fuente de energía de entrada de su aplicación está cableada de línea a neutro como la mayoría de las aplicaciones europeas el voltaje a los receptáculos de salida es 0V Con cableado de entrada de línea a línea el voltaje hacia los receptáculos de salida es 110 120V medido de línea a tierra o de línea a neutro lo que ...

Page 25: ...håll av UPS enheten och batterierna Läs alla instruktioner innan du använder utrustningen och spara den här anvisningen för framtida referens FARA Denna UPS enhet innehåller LIVSFARLIG SPÄNNING ENDAST AUKTORISERAD SERVICEPERSONAL får utföra reparationer eller service Det finns inga delar som ANVÄNDAREN KAN UTFÖRA SERVICE PÅ inuti UPS enheten VARNING S Den här UPS enheten innehåller sin egen energi...

Page 26: ...ensstämma med internationell standard och installationsföreskrifter får inte den totala utrustning som anslutits till uttagen på denna UPS enhet ha läcksström som överstiger 1 5 milliampere VIKTIGT S Batterierna kan innebära en risk för elektrisk stöt eller brännskada från kortsluten starkström Iakttag lämpliga försiktighetsåtgärder Service ska utföras av utbildad servicepersonal med kunskap om ba...

Page 27: ...g shipment keep the shipping cartons and packing materials for the carrier or place of purchase and immediately notify your Avaya service representative NOTE Check the battery recharge date on the shipping carton label If the date has expired and the batteries were never recharged do not use the UPS Contact your Avaya service representative Connecting the UPS Internal Battery To ensure proper batt...

Page 28: ...front cover see Figure 4 Figure 4 Replacing the UPS Front Cover 5 Continue to the following section UPS Setup UPS Setup The Avaya S9RM UPS is designed for flexible configurations and can be installed in a rack or as a standalone cabinet If you are installing the UPS in a rack continue to the following section Rack Mount Setup otherwise continue to Tower Setup on page 22 ...

Page 29: ...lready installed in your rack contact your local distributor to order rail kits To install the UPS and optional EBMs in a rack 1 Place the UPS on a flat stable surface with the front of the UPS facing toward you 2 Attach the supplied mounting handles to the mounting brackets and secure with the supplied screws see Figure 5 3 Align the mounting brackets with the screw holes on the sides of the UPS ...

Page 30: ...ional EBMs Figure 6 Rack Mount UPS with EBMs Tower Setup The tower setup varies depending on the number of cabinets you are installing 1 For one cabinet the pedestals must be installed Continue to Step 2 For two or more cabinets the joining brackets must be installed Skip to Step 6 2 Place the UPS cabinet horizontally so that the left end of the cabinet is accessible see Figure 7 3 Slide and align...

Page 31: ...lly position the cabinet upright with the air vents at the top see Figure 8 5 Continue to Installing the UPS on page 25 to complete the installation Air Vents Figure 8 UPS with Pedestals 6 Carefully position the cabinets upright with the air vents at the top see Figure 9 Air Vents Figure 9 Tower UPS with EBMs ...

Page 32: ...tall the joining brackets Discard the screws 8 Align each joining bracket with the screw holes and secure with the screws provided in the accessory kit 9 If installing additional EBMs repeat Steps 7 and 8 for each cabinet 10 Continue to the following section Installing the UPS to complete the installation Joining Bracket Joining Bracket EBM UPS Figure 10 Installing the Joining Brackets ...

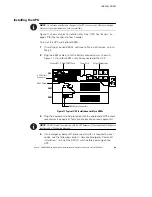
Page 33: ...battery connector s as shown in Figure 11 Up to four EBMs may be connected to the UPS ConnectUPS X Web SNMP Card UPS Battery Connector Power Cord EBM Cable Output Receptacles UPS EBM EBM EBM Battery Connectors Figure 11 Typical UPS Installation with Two EBMs 3 Plug the equipment to be protected into the appropriate UPS output receptacles see page 47 for more information on load segments NOTE DO NO...

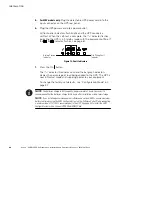
Page 34: ...dicators 7 Press the On button The μ indicator illuminates solid and the bar graph indicators display the percentage of load being applied to the UPS The UPS is now in Normal mode and supplying power to your equipment To change the factory set defaults see Configuration Mode on page 37 NOTE The batteries charge to 80 capacity in approximately 2 hours However it is recommended that the batteries ch...

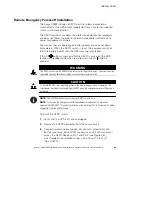
Page 35: ... WARNING The REPO circuit is an IEC 60950 safety extra low voltage SELV circuit This circuit must be separated from any hazardous voltage circuits by reinforced insulation CAUTION To ensure the UPS stops supplying power to the load during any mode of operation the input power must be disconnected from the UPS when the emergency power off function is activated NOTE The REPO function activates when ...

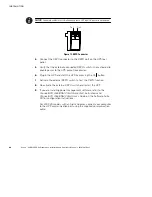
Page 36: ...ble power to the UPS output receptacles 6 Plug in the UPS and start the UPS by pressing the On button 7 Activate the external REPO switch to test the REPO function 8 De activate the external REPO switch and restart the UPS 9 If you are installing power management software refer to the ConnectUPS Web SNMP Card Quick Start Instructions and ConnectUPS Web SNMP Card User s Guide on the Software Suite ...

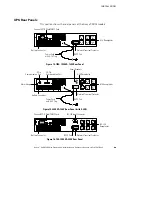
Page 37: ...r ConnectUPS X Web SNMP Card Figure 14 1000 1500 VA 120V Rear Panel REPO Port 5 15 Receptacles Battery Connector Circuit Breakers Power Cord with 5 20 Plug Network Transient Protector 5 20 Receptacles 9 Pin Communication Port 25 Pin Communication Port Alarm Adapter Figure 15 2000 VA 120V Rear Panel with 5 20R REPO Port Battery Connector Network Transient Protector ConnectUPS X Web SNMP Card IEC 32...

Page 38: ...INSTALLATION Avayat S9RM UPS Site Preparation Installation and Operator s Manual S 05147387 Rev C 30 ...

Page 39: ... a self test and enters Standby mode To turn on the UPS press the On button on the front panel The μ indicator illuminates solid and the bar graph indicators display the percentage of load being applied to the UPS Starting the UPS on Battery To turn on the UPS without using utility power press and hold the On button for at least four seconds The UPS starts up in Battery mode and supplies battery p...

Page 40: ... seconds All front panel indicators flash briefly twice prior to shutdown If you do not unplug the UPS it remains in Standby mode Initiating the Self Test NOTE The batteries must be fully charged and the UPS must not be in Battery mode to perform the self test NOTE Load must be applied to the UPS to perform the battery test Apply the following load amounts according to the UPS rating 50 load for 7...

Page 41: ...nel indicates the UPS status through the UPS indicators Figure 17 shows the UPS front panel indicators and controls Flashing Unlit Lit Indicator Legend Test Alarm Reset Button On Button Off Button Bypass Mode Indicator Battery Mode Indicator Normal Mode Indicator Bar Graph Indicators Alarm Indicators see page 59 Figure 17 UPS Front Panel ...

Page 42: ...entage of UPS load capacity being used by the protected equipment see Figure 18 The UPS monitors and charges the batteries as needed and provides power protection to your equipment 10 10 25 26 50 51 75 76 100 100 Figure 18 Load Level Indicators When all of the bar graph indicators are illuminated and the indicator flashes power requirements exceed UPS capacity see page 62 for more information ...

Page 43: ...starts flashing and the alarm becomes continuous This warning is approximate and the actual time to the Shutdown Imminent warning may vary significantly NOTE Depending on the UPS load and number of Extended Battery Modules EBMs the Low Battery warning may occur before the batteries reach 25 capacity See Table 10 on page 58 for estimated runtimes When shutdown is imminent the indicator flashes Imme...

Page 44: ...on S The UPS has an overload condition of 101 to 110 for 2 minutes S The UPS has an overload condition of 111 to 150 for 30 seconds S The UPS detects a fault in the battery or UPS electronics Standby Mode When the UPS is turned off and remains plugged into a power outlet the UPS is in Standby mode The μ indicator flashes and the bar graph indicators are off indicating that power is not available t...

Page 45: ...s the LEDs and Table 1 explains the corresponding options NOTE The UPS can be configured while in Battery mode If the UPS transfers to battery power while in Configuration mode the UPS remains in Configuration mode and indicates Battery mode on the front panel after exiting Configuration mode CAUTION DO NOT press the Off button while the UPS is in Configuration mode pressing the Off button removes...

Page 46: ...nfiguration mode and then perform Step 2 3 Press the button ONCE to select the Voltage option or to toggle the Site Wiring Fault Alarm or AC Input Failure Alarm on or off NOTE The UPS automatically exits Configuration mode after two minutes 4 Press and hold the On button and the button simultaneously for three seconds to exit Configuration mode at any time 1 Press and hold the On and Test Alarm Re...

Page 47: ...ions is selected 127 240V Nominal Input Voltage On Nominal input voltage is 127V for low voltage models and 240V for high voltage models All other nominal input voltages are disabled Flashing default 127 240V is disabled one of the other input voltage options is selected Site Wiring Fault Alarm On default Alarm sounds when the polarity of the outlet is reversed or the ground connection is missing ...

Page 48: ... 20 and higher with RoHS hardware Updates to the ConnectUPS X Web SNMP Card firmware are available at www powerware com avaya To place the ConnectUPS X Web SNMP Card into Serial Pass Through mode 1 Note the current position of DIP switches on the card the default setting for both switches is the 0 off position Write them here for later reference DIP Switch 1 _____ 0 off _____ 1 on DIP Switch 2 ___...

Page 49: ...tor ERM Configurator opens 9 Change the baud setting to 9600 by clicking Port setting the baud rate and clicking Apply 10 Click Connect to establish communication with the UPS The message Connecting UPS Found Done confirms that the UPS is connected and the UPS Connection Status indicator changes from red to green 11 To change the number of EBMs associated with the UPS click ERM The ERM Options scr...

Page 50: ...pletes and the ERM Options screen opens again 15 Click Exit Exiting Serial Pass Through Mode After using the card in Serial Pass Through mode restart the card in Normal mode 1 Disconnect the configuration cable from the card and PC 2 Return the card s switches to the original settings noted in Step 1 on page 40 3 Using a pen or paperclip press the RESET switch on the ConnectUPS X Web SNMP Card to ...

Page 51: ...work drops With the ConnectUPS X card you can monitor the UPS several different ways S Using a Web browser such as MicrosoftR Internet Explorer to monitor and manage the connected UPS S Using your Internet ready cell phone or PDA personal digital assistant S Using SNMP compatible network management software user supplied that monitors the UPS in a method similar to that of other network devices Re...

Page 52: ...functions are described in Table 2 and Table 3 Alarm Adapter 12 10 6 9 8 7 5 3 4 2 11 1 24 22 18 21 20 19 17 15 16 14 23 25 3 8 7 9 1 6 2 4 5 13 Figure 23 The Alarm Adapter Table 2 9 Pin Assignment Pin Number Signal Name Function Direction from the UPS 1 No connection 2 TxD Transmit to external device Out 3 RxD Receive from external device In 4 DTR PnP Plug and Play from external device tied to Pi...

Page 53: ...ypass 24 Normally Open Relay 4 Battery low 25 Common Relay 4 Battery low return NOTE No connection on pins 1 6 9 13 16 17 and 20 23 To establish communication between the UPS and a computer connect your computer to the UPS communication port using the supplied communication cable When the communication cable is installed power management software can exchange data with the UPS The software polls t...

Page 54: ...that provides protection for modems fax machines or other telecommunications equipment As with most modem equipment it is not advisable to use this jack in digital PBX Private Branch Exchange environments NOTE DO NOT connect any telephone or fax modem equipment to the 230V models only network protection is available for 230V models 1 Connect the network or telephone low voltage models only cable t...

Page 55: ...feature allows you to save battery power See your power management software manual for details refer to the Software Suite CD or www powerware com avaya for the latest information NOTE If power management software is not used the individual load segments cannot be controlled Each UPS has two load segments as shown in Figure 25 and Figure 26 Figure 25 shows the load segments for all models except t...

Page 56: ...ADDITIONAL UPS FEATURES Avayat S9RM UPS Site Preparation Installation and Operator s Manual S 05147387 Rev C 48 ...

Page 57: ... steps in Connecting the UPS Internal Battery on page 19 in reverse order NOTE The batteries in the UPS are rated for a 3 5 year service life The length of service life varies depending on the frequency of usage and ambient temperature Batteries used beyond expected service life will often have severely reduced runtimes Replace batteries at least every 5 years to keep units running at peak efficie...

Page 58: ...indicator continues to flash contact your Avaya service representative to order new batteries Replacing Batteries NOTE DO NOT DISCONNECT the batteries while the UPS is in Battery mode With the hot swappable battery feature UPS batteries can be replaced easily without turning the UPS off or disconnecting the load If you prefer to remove input power to change the batteries see Turning the UPS Off on...

Page 59: ...he UPS To replace the UPS internal batteries 1 Remove the UPS front cover see Figure 27 NOTE DO NOT attempt to open the left side Figure 27 Removing the UPS Front Cover 2 Unscrew and set aside the battery retaining bracket see Figure 28 3 Disconnect the battery cable from the UPS battery connector and remove the battery cable from the wire clips Battery Retaining Bracket Wire Clips Battery Connect...

Page 60: ...7 Reinstall the battery retaining bracket and screws removed in Step 2 8 Replace the UPS front cover How to Replace Extended Battery Modules CAUTION The Extended Battery Module EBM is heavy see page 56 A minimum of two people are required to lift the cabinets into the rack To replace the EBMs 1 Unplug the EBM cable from the UPS If additional EBMs are installed unplug the EBM cable from the battery...

Page 61: ...p 2 6 Plug the new EBM into the UPS as shown in Figure 30 For additional EBMs plug the EBM cable into the battery connector on the adjacent EBM UPS Battery Connector Joining Brackets EBM Battery Connectors EBM Cables Figure 30 EBM Connections 120V Model Shown NOTE The battery connectors are designed to ensure proper connection with the correct EBM model use EBM model EBM 24 with 1000 1500 VA UPSs ...

Page 62: ...service representative if the problem persists Recycling the Used Battery or UPS Contact your local recycling or hazardous waste center for information on proper disposal of the used battery or UPS WARNING S Do not dispose of the battery or batteries in a fire Batteries may explode Proper disposal of batteries is required Refer to your local codes for disposal requirements S Do not open or mutilat...

Page 63: ...700 VA 230V UPS Module 1000i Model UPS 700404387 1000 VA 230V UPS Module 1500i Model UPS 700395734 1500 VA 230V UPS Module EBM 24 700404411 Battery Module for the 1000 Model EBM 48 700404429 Battery Module for the 1500 Model Rail Kit 4 Post 700404502 4 Post Rail Kit Rail Kit 2 Post 700404494 2 Post Rail Kit Seismic Kit 3 Slot 700404510 3 Slot Earthquake Kit Seismic Kit 5 Slot 700404528 5 Slot Eart...

Page 64: ...Hz auto sensing Noise Filtering MOVs and line filter for normal and common mode noise Connections 1000 1500 VA 6 ft 5 15P power cord 2000 VA 6 ft 5 20P power cord 10A IEC 320 C14 input connector 208V nominal input voltage is available Contact your Avaya service representative for assistance Table 7 Electrical Output 120V Models 230V Models Power Levels Rated at Nominal Inputs 1000 Model 1000 VA 70...

Page 65: ... than 50 dBA Battery mode Surge Suppression ANSI C62 41 Category B formerly IEEE 587 Safety Conformance UL 1778 UL 497A CSA C22 2 No 107 1 107 2 NOM 019 SCFI UL 1778 UL 497A CSA C22 2 No 107 1 107 2 EN 62040 1 1 and IEC 60950 1 NOM 019 SCFI Agency Markings cULus NOM cULus CE NOM NEMKO EMC Class B FCC Part 15 ICES 003 VCCI EN 50091 2 FCC Part 15 ICES 003 VCCI Table 9 Battery UPS Configuration 700 1...

Page 66: ...A 700W 5 48 104 Runtimes do not apply for 700 VA models 1500 2000 VA Models Load UPS Internal Batteries 1 EBM 2 EBMs 3 EBMs 4 EBMs 400 VA 280W 46 177 331 501 682 700 VA 490W 25 96 180 272 370 850 VA 595W 21 76 142 214 292 1000 VA 700W 16 61 115 174 237 1250 VA 875W 11 46 87 131 179 1500 VA 1050W 8 37 70 106 144 1800 VA 1260W 6 30 57 85 116 2000 VA 1400W 5 26 49 74 100 Runtimes do not apply for 150...

Page 67: ...TE Some alarms such as the Overtemperature and Overload alarms must be cleared by shutting down and restarting the UPS see page 62 for more information Flashing Unlit Lit Indicator Legend Self Test Test Alarm Reset Button Battery Service Site Wiring Fault Overtemperature Overload Figure 31 Alarm Indicators Silencing an Audible Alarm Before silencing an alarm check the alarm condition and perform t...

Page 68: ... that the equipment is plugged into the UPS receptacles on The output receptacle circuit breaker 2000 VA only is open Check the load Disconnect faulty load equipment Wait several minutes before resetting the UPS circuit breaker One of the load segments has been turned off through the power management software Reactivate the segment with the software Output circuit breaker trips 2000 VA only Load f...

Page 69: ...s is not available Input voltage is not within 12 of nominal or input frequency is not within 3 of nominal The UPS is receiving utility power that may be unstable or in brownout conditions The UPS continues to supply power to your equipment If conditions worsen the UPS may switch to battery power Battery Service The battery may be fully discharged Plug the UPS into a power outlet for 36 hours to c...

Page 70: ...S before starting the self test 50 load for 700 VA 35 load for 1000 VA 38 load for 1500 VA or 25 load for 2000 VA UPS fault condition Save your work and turn off your equipment Turn off and unplug the UPS Contact your Avaya service representative The alarm cannot be silenced Obtaining Service The troubleshooting chart covers most of the difficulties you may encounter during normal operations If yo...

Page 71: ......

Page 72: ... 05147387C 05147387 C ...

Reviews: