background image

Calls list

77

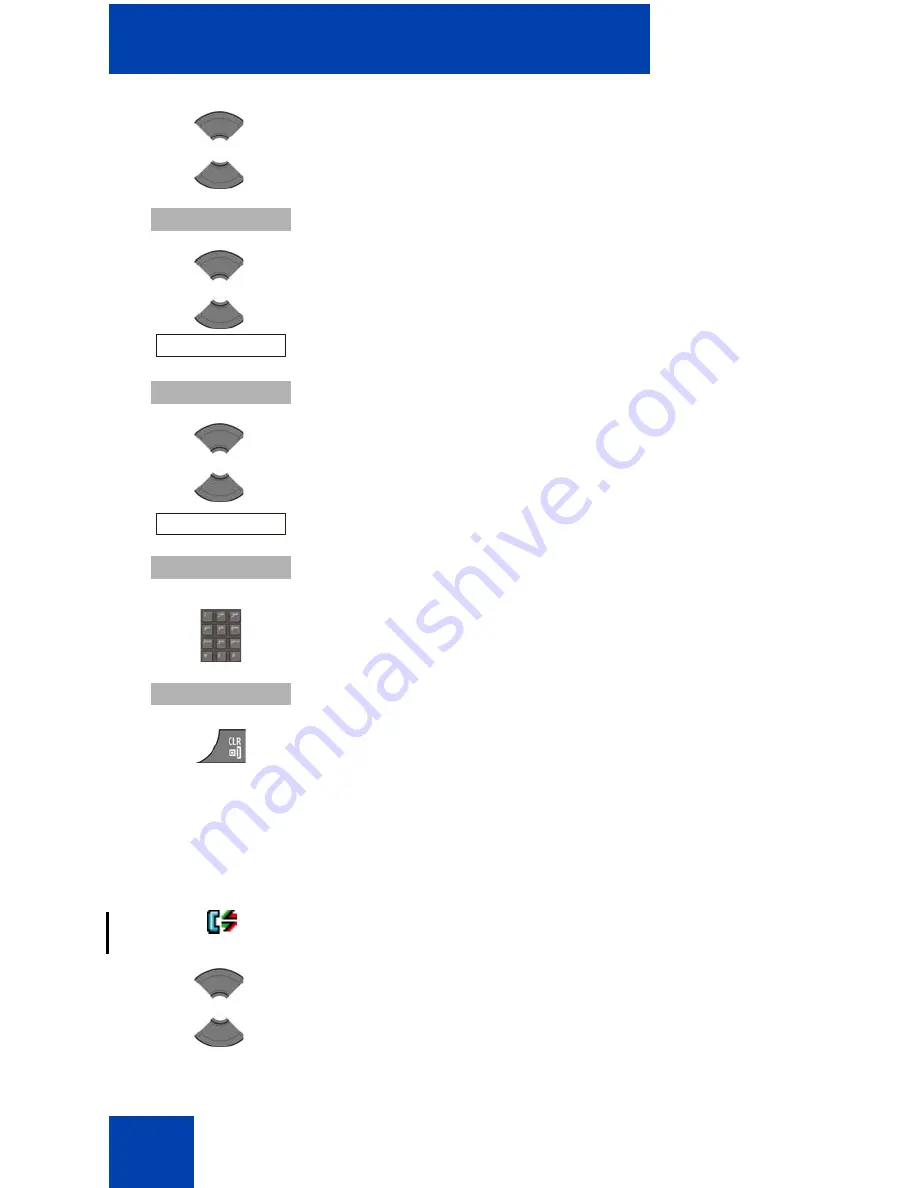
Deleting an entry

To delete an entry from the All calls list, perform the following steps:

2.

Press the 

Up

 or 

Down

 key to highlight the required 

entry. 

3.

Press the 

More

 soft key.

4.

Press the 

Up

 or 

Down

 key to highlight the 

Save


option. 

5.

Press the 

Select

 soft key.

6.

Press the 

Up

 or 

Down

 key to highlight the 

Caller 

Filter

 option. 

7.

Press the 

Select

 soft key.

8.

Use the 

Dialpad

 to edit the number and enter the 

name (if necessary).

9.

Press the 

Save

 soft key.

10. Press the 

Clr 

key one or more times to return to the 

idle display.

1.

Open the 

All calls

 list using the steps in 

“Accessing 

the All calls list” (page 74)

.

2.

Press the 

Up

 or 

Down

 key to highlight the required 

entry. 

More


Save

Select

      Caller filter

Select

Save

Summary of Contents for 4027

Page 1: ...Avaya 4027 4070 and 4075 DECT Handsets User Guide Avaya Communication Server 1000 Document Status Standard Document Version 02 04 Part Code NN43120 122 Date January 2013 ...

Page 2: ...dware products and any upgrades updates bug fixes or modified versions thereto Licenses THE SOFTWARE LICENSE TERMS AVAILABLE ON THE AVAYA WEBSITE HTTP SUPPORT AVAYA COM LICENSEINFO ARE APPLICABLE TO ANYONE WHO DOWNLOADS USES AND OR INSTALLS AVAYA SOFTWARE PURCHASED FROM AVAYA INC ANY AVAYA AFFILIATE OR AN AUTHORIZED AVAYA RESELLER AS APPLICABLE UNDER A COMMERCIAL AGREEMENT WITH AVAYA OR AN AUTHORI...

Page 3: ...esult in substantial additional charges for your telecommunications services Avaya Toll Fraud intervention If you suspect that you are being victimized by Toll Fraud and you need technical assistance or support call Technical Service Center Toll Fraud Intervention Hotline at 1 800 643 2353 for the United States and Canada For additional support telephone numbers see the Avaya Support website http ...

Page 4: ...00 Release 7 5 November 2010 Standard 02 01 This document is up issued to support DECT Release 5 0 and Communication Server 1000 Release 7 5 June 2010 Standard 01 11 This document is up issued to support Avaya Communication Server 1000 Release 7 0 May 2009 Standard 01 10 This document is up issued to support the DECT 4027 4070 and 4075 Handsets Minor corrections April 2009 Standard 01 09 This docu...

Page 5: ...eflect editorial changes February 2008 Standard 01 04 This document is issued to support the DECT 4027 and 4070 Handsets and to reflect editorial changes February 2008 Standard 01 03 This document is issued to support the DECT 4027 and 4070 Handsets and to reflect change to the technical content February 2008 Standard 01 02 This document is issued to support the DECT 4027 and 4070 Handsets and to ...

Page 6: ...e charger 21 Charging the batteries 23 Important battery information 23 Charging guidelines 24 Charging and operating times 25 Charge display 27 Switching the handset on or off 28 Display areas 28 Icon line 29 Dialogue area 30 Soft key line 35 LED indicator 4075 only 35 Handset controls 37 Key functions in Idle mode 38 Key functions in Call mode 40 Key functions in Dialogue mode 42 Key functions i...

Page 7: ...d dial 57 Using Loudspeaker 57 Using the telephone book to dial a number 58 Using the Central Directory to dial a number 59 Making an SOS call 61 Making an Emergency call 61 Answer calls 62 Answering a call in Normal mode 63 Answering a second incoming call 63 Answering a call using any key 64 Auto answering mode 64 Muting the ringer 64 Rejecting a call 64 Change settings during a call 65 Adjustin...

Page 8: ...Transferring a number to your Contacts list 80 Transferring a number to the caller filter list 82 Deleting an entry 83 Deleting all entries 83 Dialled calls list 84 Accessing the Dialled calls list 84 Viewing information about a dialled call 85 Dialling a number 85 Transferring a number to your contacts list 86 Transferring a number to the Caller filter list 87 Deleting an entry 88 Deleting all en...

Page 9: ...your contacts list 108 Messaging 110 Message limitations 111 New messages and drafts 111 Accessing the Messaging menu 111 Saving a new message or editing a draft 112 Sending a message 113 Deleting a draft message 115 Deleting all draft messages 116 Inbox 117 Accessing the Messaging Inbox 117 Reading a message 118 Replying to a message 118 Forwarding a message 119 Saving a number to the contacts li...

Page 10: ...nswer setting 131 Configuring Silent Answer setting 132 Normal and urgent messages 133 Confirming urgent messages 134 Message list full 135 Calendar 136 Accessing the Calendar 137 Changing the calendar format 137 Selecting a date 138 Adding an appointment 139 Viewing an appointment 140 Editing an appointment 141 Copying an appointment 143 Deleting an appointment 144 Calculator Stopwatch and Alarms...

Page 11: ...enu 177 Configuring the ring volume 178 Defining the ring external melody 178 Defining the ring internal melody 179 Defining the Ring unknown call melody 180 Defining the Normal message melody 180 Defining the Urgent message melody 181 Defining the Ring emergency melody 182 Enabling the Increasing ring feature 182 Configuring Alert volume 183 Defining the Alert tone melody 184 Enabling Increasing ...

Page 12: ...figuration 210 Mandown configuration 4075 only 212 Activating the Silent charging feature 219 Connectivity settings 220 Accessing additional features using FFC or SPRE codes 222 Handset accessories 224 Available accessories 224 Belt clip 226 Installing the headset 230 Removing and installing the battery pack 4075 only 230 Charging the battery pack 4075 only 232 MEM card installation and removal 23...

Page 13: ...13 ...

Page 14: ...d an LED Indicator The 4075 DECT Handset also offers IP54 protection and has a changeable battery that uses inductive charging technology Avaya 4027 4070 4075 DECT Handsets are compatible both with traditional DECT system based on DMC cards and with the SIP DECT solution Note This User Guide is applicable to handset software release 2 00 or later On Avaya 4027 and 4070 DECT Handsets with an earlie...

Page 15: ...vidual ring melodies to distinguish between internal and external calls central directory Regulatory and safety information Read the following information before you use your Avaya 4027 4070 and 4075 DECT Handset This device complies with the essential requirements and other relevant provisions of the R TTE Directive 1999 5 EC the Restriction of Hazardous Substances RoHS 2002 95 EC and the WEEE Di...

Page 16: ...New Zealand The grant of a Telepermit for any item of terminal equipment indicates only that Telecom has accepted that the item complies with minimum conditions for connection to its network It indicates no endorsement of the product by Telecom nor does it provide any sort of warranty Above all it provides no assurance that any item will work correctly in all respects with another item of Teleperm...

Page 17: ...afety precautions Observe the following safety precautions before you use your handset Declaration of Conformity Hereby Avaya declares that the Avaya 4027 4070 4075 DECT Handsets are in compliance with the essential requirements and other relevant provisions of Directive 1999 5 EC CAUTION Modifications to this equipment not approved by Avaya can make this equipment noncompliant with the applied re...

Page 18: ...ironments hospitals or vehicles If your interior handset becomes wet do not use a blow dryer or oven to dry it Switch off the handset remove the battery shake out excess liquid from the handset and let it dry for 72 hours at room temperature CAUTION The handset product contains a magnet Do not allow metallic objects to come in contact with the magnet because that can deteriorate audio quality and ...

Page 19: ...ging the batteries page 23 Charge display page 27 Switching the handset on or off page 28 Display areas page 28 Handset controls page 37 Installing the MEM card and Bluetooth wireless module If your handset is supplied with a MEM card or Bluetooth wireless technology module see the following sections MEM card installation and removal page 234 Bluetooth wireless technology module installation page ...

Page 20: ...perform the following steps 1 Place the handset face down on a flat surface 2 Remove the battery compartment cover 3 Push the battery pack into the casing as shown in Figure 2 4 Press the battery pack down until it locks 5 Replace the battery cover BATTER YP AC K Battery Handset pack ...

Page 21: ...ble to the terminal on the bottom of the charger 3 Connect the adapter to an electrical outlet 4 Place the handset on the charger as shown in Figure 3 Note 4075 only The Avaya 4075 DECT Handset charger has a slot that you can use to charge a battery pack without having the battery pack installed in the phone See Charging the battery pack 4075 only page 232 for more details Handset Battery pack ...

Page 22: ...Getting started 22 Figure 3 Installing the charger ...

Page 23: ... infrastructure Maximum battery pack performance is achieved after a few charge discharge cycles If multiple battery packs are supplied with your handset Avaya recommends that each be fully charged upon receipt to prolong battery life Battery packs slowly lose their charge if they are unused To maintain CAUTION The batteries become hot during the charge cycle Attention The handset if switched off ...

Page 24: ...orarily out of service even if the batteries are fully charged Charge the batteries only using the DECT Handset charger supplied with the handset Charging guidelines Observe the following when you charge your handset Overnight charging is best done while the handset is turned off If the handset does not charge clean battery pack charger and handset contacts with an alcohol swab When the handset is...

Page 25: ... the battery you can enable the display For more information about configuring power save see Configuring Power save page 198 Note Extreme temperatures influence the charging capability of the batteries Charging and operating times Discharged batteries require 6 hours to completely recharge Completely charged batteries provide the handset with approximately 8 hours of talk time and 100 hours of st...

Page 26: ...termine if you can use this feature Attention Your handset displays the battery status accurately after charging for at least 6 hours Attention You must have a mains connection to operate the charger CAUTION Do not install the charger handset and accessories in the following locations near water moisture sources of heat or direct sunlight near devices that generate strong magnetic fields including...

Page 27: ...cannot make calls while this message appears The following table shows the battery charge status icons CAUTION Use only the plug in AC adapter and battery type supplied and use only approved accessories Ensure the mains voltage of the adapter matches the local mains voltage Do not use AC adapters that are visibly damaged cracked or broken and keep the ventilation slits on the AC adapters free from...

Page 28: ...ff perform the following step Display areas The Avaya 4027 4070 4075 DECT Handsets include a Liquid Crystal Display LCD and the 4070 and 4075 DECT include a backlit dialpad The Avaya 4075 DECT Handset also includes an LED indicator above the display area to the left of the speaker The display is divided into the following three areas Icon line page 29 Dialogue area page 30 Soft key line page 35 Th...

Page 29: ...orresponding functions are active The following table shows the icons in the icon line Table 2 Icon line icons Icon Description Level of radio signal Bluetooth wireless connection status only for 4070 and 4075 DECT Handsets See Table 18 for Bluetooth wireless connection status icons New text message received Attention This icon if active appears in place of the Bluetooth wireless connection icon I...

Page 30: ...mation appears in the dialogue area Voice message waiting indication Dialpad locked Activated alarm Attention This icon if active appears in place of the Dialpad locked icon Missed calls Ringer deactivated Caller filter only for Avaya 4070 and 4075 DECT Handsets Attention This icon if active appears in place of the Ringer deactivated icon Battery charge status See Table 1 for Battery status icons ...

Page 31: ...e mode Figure 6 Idle mode For more information about key functions see Key functions in Idle mode page 38 Call mode In Call mode the following information appears in the dialogue area the number or name if available of the calling party for an incoming call and the number or name if added to your contacts list or your communication system supports Dialed Name Display feature of the called party fo...

Page 32: ...nistrator The following table shows the icons that can appear in the dialogue area when in Call mode For more information about key functions associated with the icons in the preceding table see Key functions in Call mode page 40 Dialogue mode In Dialogue mode icons or information appear in the Dialogue area according to the operational mode of the handset Table 3 Dialogue area icons Icon Descript...

Page 33: ... page Figure 7 Missed call s page For more information about key functions see Key functions in Dialogue mode page 42 Menu mode In Menu mode menu items entries or menu sections appear in the dialogue area The following figure shows the Main menu Figure 8 Main menu ...

Page 34: ... more information about key functions see Key functions in Menu mode page 42 Edit mode In Edit mode you can use the dialogue area to enter and edit digits numbers date time or PIN and text The following figure shows the Contacts name editing page Figure 10 Contacts name editing page Menu sections Menu items ...

Page 35: ...s see Key functions in Edit mode page 43 Soft key line Soft keys appear below the handset dialogue area The key functions change automatically according to the operational state of the handset For example when the handset is in idle mode you can press the Menu soft key as shown in Figure 5 to access the Main menu LED indicator 4075 only An LED indicator appears to the left of the speaker on the Av...

Page 36: ...hing green to indicate a missed call and a new message arrives the LED indicator continues to flash green because green signal events have a higher priority than orange signal events When the LED indicator is flashing green to indicate a missed call and the battery becomes low on charge the LED indicator flashes red because red signal events have a higher priority than green signal events The LED ...

Page 37: ...D Indicator 4075 only page 167 for more details Handset controls Use the following figure to familiarise yourself with the handset display and keys Figure 13 Handset controls This section describes the following components and functions of your Avaya 4027 4070 or 4075 DECT Handset Key functions in Idle mode page 38 Key functions in Call mode page 40 ...

Page 38: ...y to access the Main menu Up key Press the programmable Up navigation key to access the shortcut assigned to that key The default shortcut assigned is the Contacts menu Down key Press the programmable Down navigation key to access the shortcut assigned to that key The default shortcut assigned is the Central Directory menu Left key Press the programmable Left navigation key to access the shortcut ...

Page 39: ...y to make an emergency call if configured Attention You can make an emergency call using the SOS key even if the dialpad is locked 1 9 Press the 1 9 keys to enter predial mode Long press the 1 9 keys to speed dial a number if configured 0 Press the 0 key to enter predial mode Press the key to enter predial mode Long press the key to enter a comma to indicate a pause when you edit a number Table 5 ...

Page 40: ...eft soft key Press the Spk on or Spk off soft key to turn the loudspeaker on or off during a call Press the Silence soft key to mute the ringer for an incoming call Right soft key Press the Mute soft key to mute the microphone during a call Press the Reject soft key to reject an incoming call Up key Press the Up navigation key to access the Contacts menu Down key Press the Down navigation key to a...

Page 41: ...s a dial tone if only one call is active or to switch between calls if more than one call is active Clear key Press the Clr key to end a call Volume up key Press the Volume up key to increase the handset volume during a call A beep sounds when you reach the Max volume level Volume down key Press the Volume down key to decrease the handset volume during a call A beep sounds when you reach the Min v...

Page 42: ...n Left soft key Press the Left soft key to select the item marked in the display Right soft key Press the Right soft key to select the item marked in the display Clear key Press the Clr key to exit Dialogue mode SOS key Long press the SOS key to make an emergency call if configured Table 8 Key functions in Menu mode Key Description Left soft key Press the Left soft key to select the item marked in...

Page 43: ...ition the cursor Clear key Press the Clr key to cancel the current action and to return to the previous menu Long press the Clr key to return to Idle mode SOS key Long press the SOS key to make an emergency call if configured Table 9 Key functions in Edit mode Key Description Left soft key Press the Left soft key to select the item that is currently highlighted Right soft key Press the Right soft ...

Page 44: ...l the current action and to return to the previous menu Long press the Clr key to return to Idle mode SOS key Long press the SOS key to make an emergency call if configured 1 Press the 1 key one or more times to enter the digit for example to enter a number date time or PIN Press the 1 key one or more times to enter a special character For more information see Key functions in text mode page 46 Ta...

Page 45: ... digit for example to enter a number date time or PIN Press the 0 key one or more times to insert a space or a punctuation mark For more information see Key functions in text mode page 46 Press the key one or more times to enter a special character For more information see Key functions in text mode page 46 Long press the key to enter a comma when you edit a number The comma indicates a pause Tabl...

Page 46: ...enter lowercase characters mode Abc enter an uppercase character followed by lowercase characters mode ABC enter uppercase characters mode 123 enter digits Key Uppercase Lowercase 1 1 1 2 A B C 2 Æ À Á Â Ä Å Ç a b c 2 æ à á ä å ç 3 D E F 3 È É Ê Ë d e f 3 è é ê ë 4 G H I 4 Í Î Ï g h i 4 í î ï 5 J K L 5 j k l 5 6 M N O 6 Œ Ó Ô Ö Ø m n o 6 œ ó ô ö ø 7 P Q R S 7 Š ß p q r s 7 š ß 8 T U V 8 Ù Ú Û Ü t ...

Page 47: ...llowing step To unlock the dialpad perform the following step To configure automatic dialpad Lock see Automatic dialpad lock page 170 0 space 0 _ space 0 _ Attention You can dial 911 or 112 or use the SOS key when the dialpad is locked 1 Press the OK key to toggle between the Calls soft key and the Lock soft key 2 Press the Lock soft key 1 Press the OK key 2 Press the Unlock soft key within three ...

Page 48: ...51 Enabling automatic DECT system selection page 52 Deregistering the handset page 53 Editing the system name and phone number page 53 For more information about using the handset controls see Handset controls page 37 Accessing the Connectivity menu To access the Connectivity menu perform the following steps 1 Press the Menu soft key to access the Main menu 2 Press the Up or Down key to highlight ...

Page 49: ...systems when more than one DECT system is present DECT system name The name of the system to which you subscribe After you enter the system name it appears on the idle display Phone number The local phone number assigned to your DECT handset To subscribe your handset to a DECT system perform the following steps Attention If your supplier preinstalls the handset you need not subscribe your handset ...

Page 50: ...verwrite 5 Press the Select soft key and then press the Yes soft key if you want to overwrite a system The PARK prompt appears 6 Use the Dialpad to enter the PARK code Attention If more than one DECT system overlaps in your location you are sometimes required to enter a PARK code system ID If only one DECT system is available make no entry and press the Skip soft key 7 Press the Save soft key The ...

Page 51: ...ears 12 Use the Dialpad to enter the phone number assigned to your handset 13 Press the Save soft key 14 Press the Clr key one or more times to return to the idle display 1 Open the Connectivity menu using the steps in Accessing the Connectivity menu page 48 2 Press the Up or Down key to highlight the Network select option 3 Press the Select soft key 4 Choose the name of the system from the list 5...

Page 52: ...to connect and log on to another available subscribed DECT system To enable automatic selection of a DECT system perform the following steps 1 Open the Connectivity menu using the steps in Accessing the Connectivity menu page 48 2 Press the Up or Down key to highlight the Network select option 3 Press the Select soft key 4 Highlight Auto select 5 Press the Select soft key The name of the currently...

Page 53: ...nu page 48 2 Press the Up or Down key to highlight the Deregister option 3 Press the Select soft key 4 Press the Up or Down key to highlight the system to deregister 5 Press the Select soft key 6 Choose one of the following Press the Yes soft key to deregister the selected DECT system OR Press the No soft key to exit without making any changes 7 Press the Clr key one or more times to return to the...

Page 54: ...lect soft key 6 Choose the name of the system from the list 7 Press the Edit soft key The name of the currently active system highlights 8 Use the Dialpad to edit the system name and 9 Press the Save soft key 10 Use the Dialpad to edit the local phone number 11 Press the Save soft key 12 Press the Clr key one or more times to return to the idle display Network select Select Select Edit Save Save ...

Page 55: ...ng methods Dialling a number page 56 Predial mode page 56 Using Speed dial page 57 Using Loudspeaker page 57 Using the telephone book to dial a number page 58 Using the Central Directory to dial a number page 59 Making an SOS call page 61 Making an Emergency call page 61 Attention To conserve the battery charge of your handset the display automatically dims during calls Press the OK key to restore...

Page 56: ...ad to enter the phone number You can add additional digits to the number you dial For example in some offices you must add a digit at the beginning of the number to place a call to an outside line 1 Use the Dialpad to enter the phone number You can add additional digits to the number you dial For example in some offices you must add a digit at the beginning of the number to place a call to an outs...

Page 57: ...nter the new digits Press the Clr key to delete individual digits or to cancel predial Long press the key to insert a comma to indicate a pause when you enter a number 3 Press the Call key 4 Press the Clr key to return to the idle display Attention When you predial a number if the input cursor is positioned after the telephone number the new digits are inserted at the end of that telephone number ...

Page 58: ... the telephone book to dial a number To use the handset telephone book to dial a number perform the following steps 1 Make or answer a call 2 Press the Spk on soft key to enable the feature The loudspeaker icon appears 3 Press the Volume up or Volume down key to configure the volume 4 Press the Spk off soft key to disable the feature 1 Press the Menu soft key to access the Main menu 2 Press the Up...

Page 59: ... and press the Select soft key OR If your communication system does not support the Central Directory feature skip this step OR 5 Press the Up or Down keys to select the number you want to dial OR Enter the first characters of the name using the dialpad For example enter B to display the first name in the contacts list starting with the letter B For more information see Table 9 Key functions in te...

Page 60: ...nd press the Up and Down keys to select the user you want to dial OR Enter the first characters of the name using the dialpad For example enter B to display the first name in the contacts list starting with the letter B For more information see Table 9 Key functions in text mode page 46 7 Optionally press the More soft key to learn the number of the selected user Info option 8 Press the Call key t...

Page 61: ... dialpad is locked the only calls you can make are SOS calls or Emergency calls to 911 or 112 To make an emergency call when the handset is locked use the following steps Attention The Messaging feature is available on Avaya 4070 and 4075 DECT Handsets only You must program an SOS number to use the SOS function For more information see Emergency call configuration page 210 1 Long press the SOS key...

Page 62: ...to make the call using the handset or using a wired headset if you have one installed OR Press the OK key or Left soft key to make the call using the loudspeaker Note If you have a Bluetooth wireless technology headset installed the handset makes the emergency call using the Bluetooth headset when you press Call key OK key or Call soft key Attention To conserve the battery charge of your handset t...

Page 63: ...the for SIP DECT or R for Traditional DMC based DECT key The call will be answered in the same way Loudspeaker on or off as the currently established call By means of the SIP DECT or R DMC based DECT key you can toggle between the two calls It behaves in a similar way as having a call on hold Note If you end one of the calls the handset will go on hook and then you will automatically get an incomi...

Page 64: ...pad to answer the call Attention This feature is available only when configured For more information see Answer mode configuration page 201 Attention This feature is available only when configured For more information see Answer mode configuration page 201 1 Press the Silence soft key to mute the ringer during a call alert 1 Press the Reject soft key during a call alert The call diverts to your vo...

Page 65: ...beep sounds at the minimum or maximum volume To adjust the headset or loudspeaker volume perform the following step When you adjust the headset or loudspeaker volume the handset remembers the new setting the next time you use the handset Attention If you reject or do not answer a call or if the call is blocked by Caller Filter 4070 and 4075 only the message Number of missed calls N Show appears on...

Page 66: ... for your use Transferring a call To transfer a call perform the following steps Voice mail Use the Voice mail feature to listen to voice messages left by calling parties You can receive a voice mail in the following situations 1 Press the Mute soft key to deactivate the handset microphone 2 Press the Unmute soft key to activate the handset microphone 1 Press the Call key to place the active call ...

Page 67: ... shows the voice mail display page Figure 14 New voice message page To listen to a New voice message perform the following step Attention The Voice mail feature is available only when configured on the PBX OR 1 Choose one of the following Press the Yes soft key to listen to the new voice message To do so you must first configure a voice mail number See Defining a voice mail number page 69 for more...

Page 68: ...r 4075 only page 167 for more details Use this section to perform the following tasks Accessing voice mail page 68 Defining a voice mail number page 69 Accessing voice mail To access voice mail perform the following steps 1 Press the Menu soft key to access the Main menu 2 Press the Up or Down key to highlight the Messaging icon 3 Press the Select soft key 4 Press the Left or Right key to select t...

Page 69: ...umber Attention Ensure that you configure the voice mail access number in the messaging settings For more information about configuring message settings see Defining a voice mail number page 69 7 Press the Clr key one or more times to return to the idle display 1 Open the Settings menu using the steps in Accessing the message Settings menu page 128 2 Press the Up or Down key to highlight the Voice...

Page 70: ... key Long press the key to insert a comma to indicate a pause Highlight Lookup contact to select the number from your contacts list and then press the Select soft key Press the Up or Down key to choose a contact and press the Select soft key 5 Press the Clr key one or more times to return to the idle display Attention You can also dial the voice mail number directly Select Enter number Lookup cont...

Page 71: ...ht key When you open the list the call information appears The first entry is highlighted the contact name or CLID Calling Line Identification and the time and date appear Attention Some menu items may be locked or unavailable to users Please contact your system administrator for more details Attention The maximum number of entries you can store varies depending on the amount of storage space used...

Page 72: ... 06 2007 or dd mmm yyyy 06 Dec 2007 only the date appears in the lists You can view the time of the call by following the procedures for viewing call information which are found in each Calls list section This section describes the following features All calls list page 73 Answered calls list page 79 Attention Depending on the selected Time and Date format the font size varies as shown in Figure 1...

Page 73: ...nd Missed calls lists The most recent entry appears at the top of the list This section describes the following tasks Accessing the All calls list page 74 Viewing information about a call page 74 Dialling a number page 75 Transferring a number to your Contacts list page 75 Transferring a number to the caller filter list page 76 Deleting an entry page 77 Tab Description All calls Answered calls Dia...

Page 74: ... during calls Press the OK key to restore the display To configure the number of seconds that elapse before the display dims change the first value timer in Power save settings For more information see Configuring Power save page 198 1 Press the Calls soft key 2 Press the Left or Right key to select the All calls list 1 Open the All calls list using the steps in Accessing the All calls list page 7...

Page 75: ...e display 1 Open the All calls list using the steps in Accessing the All calls list page 74 2 Press the Up or Down key to highlight the required entry Attention If you want to predial from the All calls list press the More soft key press the Up or Down key to highlight the Edit before call option and press the Select soft key 3 Press the Call key to dial the number 1 Open the All calls list using ...

Page 76: ...cts option 7 Press the Select soft key 8 Press the Add soft key and use the Dialpad to edit the number and enter the name if necessary 9 Press the Save soft key 10 Press the Yes soft key to confirm the changes 11 Press the Clr key one or more times to return to the idle display Attention The Caller filter feature is available on the Avaya 4070 and 4075 DECT Handsets only 1 Open the All calls list ...

Page 77: ... Select soft key 6 Press the Up or Down key to highlight the Caller Filter option 7 Press the Select soft key 8 Use the Dialpad to edit the number and enter the name if necessary 9 Press the Save soft key 10 Press the Clr key one or more times to return to the idle display 1 Open the All calls list using the steps in Accessing the All calls list page 74 2 Press the Up or Down key to highlight the ...

Page 78: ...e Clr key one or more times to return to the idle display 1 Open the All calls list using the steps in Accessing the All calls list page 74 2 Press the Up or Down key to highlight the required entry 3 Press the More soft key 4 Press the Up or Down key to highlight the Delete all option 5 Press the Select soft key 6 Press the Yes soft key to confirm the changes 7 Press the Clr key one or more times...

Page 79: ...ng a number to the caller filter list page 82 Deleting an entry page 83 Deleting all entries page 83 Accessing the Answered calls list To access the Answered calls list perform the following steps Viewing information about an answered call To view information about an answered call such as time and date perform the following steps 1 Press the Calls soft key 2 Press the Left or Right key to select ...

Page 80: ...ect soft key 6 Press the Clr key one or more times to return to the idle display 1 Open the Answered calls list using the steps in Accessing the Answered calls list page 79 2 Press the Up or Down key to highlight the required entry Attention If you want to predial from the Answered calls list press the More soft key press the Up or Down key to highlight the Edit before call option and press the Se...

Page 81: ... key 6 Press the Up or Down key to highlight the Contacts option 7 Press the Select soft key 8 Press the Add soft key and use the Dialpad to edit the number and enter the name if necessary 9 Press the Save soft key 10 Press the Yes soft key to confirm your changes 11 Press the Clr key one or more times to return to the idle display More Save Select Contacts Select Add Save Yes ...

Page 82: ... Accessing the Answered calls list page 79 2 Press the Up or Down key to highlight the required entry 3 Press the More soft key 4 Press the Up or Down key to highlight the Save option 5 Press the Select soft key 6 Press the Up or Down key to highlight the Caller Filter option 7 Press the Select soft key 8 Use the Dialpad to edit the number and enter the name if necessary 9 Press the Save soft key ...

Page 83: ... Press the Up or Down key to highlight the required entry 3 Press the More soft key 4 Press the Up or Down key to highlight the Delete entry option 5 Press the Select soft key 6 Press the Yes soft key to confirm the changes 7 Press the Clr key one or more times to return to the idle display 1 Open the Answered calls list using the steps in Accessing the Answered calls list page 79 2 Press the Up o...

Page 84: ...sferring a number to your Contacts list page 75 Transferring a number to the Caller filter list page 87 Deleting an entry page 88 Deleting all entries page 89 Accessing the Dialled calls list To access the Dialled calls list perform the following steps 4 Press the Up or Down key to highlight the Delete all option 5 Press the Select soft key 6 Press the Yes soft key to confirm the changes 7 Press t...

Page 85: ... to select the Dialled calls list 1 Open the Dialled calls list using the steps in Accessing the Dialled calls list page 84 2 Press the Up or Down key to highlight the required entry 3 Press the More soft key 4 Press the Up or Down key to highlight the View option 5 Press the Select soft key 6 Press the Clr key one or more times to return to the idle display 1 Open the Dialled calls list using the...

Page 86: ...ess the Up or Down key to highlight the Edit before call option and then press the Select soft key 3 Press the Call key to dial the number 1 Open the Dialled calls list using the steps in Accessing the Dialled calls list page 84 2 Press the Up or Down key to highlight the required entry 3 Press the More soft key 4 Press the Up or Down key to highlight the Save option 5 Press the Select soft key 6 ...

Page 87: ...ss the Yes soft key to confirm the changes 11 Press the Clr key one or more times to return to the idle display Attention The Caller filter feature is available on the Avaya 4070 and 4075 DECT Handsets only 1 Open the Dialled calls list using the steps in Accessing the Dialled calls list page 84 2 Press the Up or Down key to highlight the required entry 3 Press the More soft key 4 Press the Up or ...

Page 88: ...ry 9 Press the Save soft key 10 Press the Clr key one or more times to return to the idle display 1 Open the Dialled calls list using the steps in Accessing the Dialled calls list page 84 2 Press the Up or Down key to highlight the required entry 3 Press the More soft key 4 Press the Up or Down key to highlight the Delete entry option 5 Press the Select soft key 6 Press the Yes soft key to confirm...

Page 89: ...s off See Configuring the LED Indicator 4075 only page 167 for more details The Missed calls list includes the following features 7 Press the Clr key one or more times to return to the idle display 1 Open the Dialled calls list using the steps in Accessing the Dialled calls list page 84 2 Press the Up or Down key to highlight the required entry 3 Press the More soft key 4 Press the Up or Down key ...

Page 90: ...moves from the Missed calls list to the Dialled calls list This section describes the following tasks Accessing the Missed calls list page 91 Viewing information about a missed call page 91 Dialling a number page 92 Transferring a number to your Contacts list page 92 Transferring a number to the Caller filter list page 94 Deleting an entry page 95 Deleting all entries page 95 The following table s...

Page 91: ...m the following steps Viewing information about a missed call To view the information about a missed call such as time and date perform the following steps OR 1 When the message Number of missed calls N Show appears perform one of the following Press the Yes soft key OR Press the Calls soft key and then press the Left or Right key to select the Missed calls list The list of missed calls appears 1 ...

Page 92: ...ct soft key 6 Press the Clr key one or more times to return to the idle display 1 Open the Missed calls list using the steps in Accessing the Missed calls list page 91 2 Press the Up or Down key to highlight the required entry Attention To predial from the Missed calls list press the More soft key press the Up or Down key to highlight the Edit before call option and press the Select soft key 3 Pre...

Page 93: ...t key 6 Press the Up or Down key to highlight the Contacts option 7 Press the Select soft key 8 Press the Add soft key and use the Dialpad to edit the number and enter the name if necessary 9 Press the Save soft key 10 Press the Yes soft key to confirm the changes 11 Press the Clr key one or more times to return to the idle display More Save Select Contacts Select Add Save Yes ...

Page 94: ...Accessing the Missed calls list page 91 2 Press the Up or Down key to highlight the required entry 3 Press the More soft key 4 Press the Up or Down key to highlight the Save option 5 Press the Select soft key 6 Press the Up or Down key to highlight the Caller Filter option 7 Press the Select soft key 8 Use the Dialpad to edit the number and enter the name if necessary 9 Press the Save soft key 10 ...

Page 95: ...ress the Up or Down key to highlight the required entry 3 Press the More soft key 4 Press the Up or Down key to highlight the Delete entry option 5 Press the Select soft key 6 Press the Yes soft key to confirm the changes 7 Press the Clr key one or more times to return to the idle display 1 Open the Missed calls list using the steps in Accessing the Missed calls list page 91 2 Press the Up or Down...

Page 96: ...s the Up or Down key to highlight the Delete all option 5 Press the Select soft key 6 Press the Yes soft key to confirm the changes 7 Press the Clr key one or more times to return to the idle display Delete all Select Yes ...

Page 97: ...act number Each entry can contain up to 4 numbers You can identify each number using one of the following types work mobile home or other If you receive a call from a caller whose number is in the Contact list the caller name appears on the display This section describes the following tasks Accessing the Contacts menu page 98 Adding a new contact page 98 Adding a contact number page 99 Editing a c...

Page 98: ...ps Adding a new contact To add a new contact perform the following steps 1 Press the Menu soft key 2 Press the Up or Down key to highlight the Contacts icon 3 Press the Select soft key Attention If your communication system supports the Central Directory feature press the Up or Down key to highlight the Private option and then press the Select soft key 1 Open the Contacts menu using the steps in A...

Page 99: ...to indicate a pause when you enter a number 5 Press the Save soft key 6 Use the Dialpad to enter the name 7 Press the Save soft key 8 Press the Yes soft key to the save the contact 9 Press the Clr key one or more times to return to the idle display 1 Open the Contacts menu using the steps in Accessing the Contacts menu page 98 2 Press the Up or Down key to choose the contact to edit 3 Press the Mo...

Page 100: ...required number type 9 Press the OK soft key 10 Use the Dialpad to enter the phone number 11 Press the Save soft key 12 Press the Save soft key 13 Press the Yes soft key to confirm the changes 14 Press the Clr key one or more times to return to the idle display 1 Open the Contacts menu using the steps in Accessing the Contacts menu page 98 2 Press the Up or Down key to choose the contact to edit 3...

Page 101: ...t the number you want to edit you cannot restore information once you edit it 7 Press the Edit soft key 8 Press the Up or Down key to highlight the required number type 9 Press the OK soft key 10 Use the Dialpad to edit the phone number 11 Press the Save soft key 12 Press the Save soft key 13 Press the Yes soft key to confirm the changes 14 Press the Clr key one or more times to return to the idle...

Page 102: ...elete the number only if more than one number is stored for the contact you select 6 Press the Up or Down key to highlight the number you want to delete Attention If more than one number is stored for the contact you select select the number you want to delete you cannot restore information once you delete it 7 Press the Edit soft key 8 Press the OK soft key 9 Press the Clear soft key to delete th...

Page 103: ...n key to choose the contact to edit 3 Press the More soft key 4 Press the Up or Down key to highlight the Edit contact option 5 Press the Select soft key 6 Press the Left or Right key to choose the Name menu 7 Press the Edit soft key 8 Use the Dialpad to edit the contact name 9 Press the Save soft key 10 Press the Yes soft key to confirm the changes 11 Press the Clr key one or more times to return...

Page 104: ...Edit contact option 5 Press the Select soft key 6 Press the Left or Right key to choose the Ringtone menu 7 Press the Edit soft key Note The ringtone you assign to a contact applies to all numbers associated with that contact 8 Press the Up or Down key to highlight the required ringtone 9 Press the Select soft key 10 Press the Save soft key 11 Press the Yes soft key to confirm the changes 12 Press...

Page 105: ... the Contacts menu using the steps in Accessing the Contacts menu page 98 2 Press the Up or Down key to choose the contact to delete 3 Press the More soft key 4 Press the Up or Down key to highlight the Delete contact option and press the Select soft key OR Press the Up or Down key to highlight the Delete all contacts option to delete all contacts and press the Select soft key 5 Press the Yes soft...

Page 106: ...u using the steps in Accessing the Contacts menu page 98 2 Press the Up or Down key to choose the required contact 3 Press the More soft key 4 Press the Up or Down key to highlight the Speed dial option 5 Press the Up or Down key to choose a digit for the speed dial 6 Press the Add soft key 7 Press the Clr key one or more times to return to the idle display 1 Open the Contacts menu using the steps...

Page 107: ... highlight the Speed dial option 5 Press the Up or Down key to choose the assigned digit for speed dial 6 Press the Replace soft key 7 Press the Clr key one or more times to return to the idle display 1 Open the Contacts menu using the steps in Accessing the Contacts menu page 98 2 Press the Up or Down key to choose a contact 3 Press the More soft key 4 Press the Up or Down key to highlight the Sp...

Page 108: ...ls list see Transferring a number to your contacts list page 86 To transfer a number from the Missed calls list see Transferring a number to your Contacts list page 92 Transferring numbers to the caller filter list To transfer a number to the Caller filter list from the contacts list perform the following steps 5 Press the Up or Down key to choose the digit assigned for speed dial 6 Press the Dele...

Page 109: ...ey 4 Press the Up or Down key to highlight the Save in caller filter option 5 Press the Select soft key 6 Use the Dialpad to edit the number and name if necessary 7 Press the Save soft key 8 Press the Clr key one or more times to return to the idle display More Save in caller filter Select Save ...

Page 110: ...tasks Message limitations page 111 New messages and drafts page 111 Inbox page 117 Sent messages page 124 Message settings page 128 Configuring Message display setting page 130 Message list full page 135 Attention Some menu items may be locked or unavailable to users Please contact your system administrator for more details Attention The Messaging feature is not available on the Avaya 4027 DECT Ha...

Page 111: ...e while you are dialing the phone number you are dialing is lost and if you receive a message while you are writing a text message the text of the message you are writing is lost New messages and drafts This section describes the following tasks Accessing the Messaging menu page 111 Saving a new message or editing a draft page 112 Sending a message page 113 Deleting a draft message page 115 Deleti...

Page 112: ...owing steps 2 Press the Up or Down key to highlight the Messaging icon 3 Press the Select soft key Table 13 Menu section icons Icon Description Draft message Inbox message Outbox message Message settings 1 Open the Messaging menu using the steps in Accessing the Messaging menu page 111 2 Press the Left or Right key to choose the New and draft option Select ...

Page 113: ...o create or edit the message 5 Press the Clr key 6 Press the Yes soft key to save the message as a draft 1 Open the Messaging menu using the steps in Accessing the Messaging menu page 111 2 Press the Left or Right key to choose the New and draft option 3 Press the Up or Down key to highlight the new message or the existing draft 4 Use the Dialpad to edit the message if necessary New message Yes ...

Page 114: ...ontacts list Enter number to use the Dialpad to enter the number of the addressee Send to many to send the same text message to multiple recipients The Contact list appears choose the contact name and number of the first recipient Central Directory to choose the user from the Central Directory available only if provided by your communication system Note You can use the Send to many option to send ...

Page 115: ... Send to many in step 6 perform the following a Choose another contact name and number b Press the Send soft key c Repeat steps a and b until you have sent the message to all of the recipients 11 Press the Clr key one or more times to return to the idle display 1 Open the Messaging menu using the steps in Accessing the Messaging menu page 111 2 Press the Left or Right key to choose the New and dra...

Page 116: ...ng menu using the steps in Accessing the Messaging menu page 111 2 Press the Left or Right key to choose the New and draft option 3 Press the Up or Down key to highlight the existing draft 4 Press the More soft key 5 Press the Up or Down key to select Delete all messages 6 Press the Select soft key 7 Press the Yes soft key to confirm the changes 8 Press the Clr key one or more times to return to t...

Page 117: ...r to the contacts list page 121 Deleting a message page 121 Deleting all messages from the Inbox page 122 Accessing the Messaging Inbox To access the Messaging Inbox perform the following steps 1 Press the Menu soft key to access the Main menu 2 Press the Up or Down key to highlight the Messaging icon 3 Press the Select soft key 4 Press the Left or Right key to choose the Inbox menu section Menu S...

Page 118: ...message you want to read 3 Press the Select soft key to read the message 4 Press the Up or Down key to scroll through the text of the message 5 Press the Clr key one or more times to return to the idle display 1 Open the Inbox using the steps in Accessing the Messaging Inbox page 117 2 Press the Up or Down key to highlight the message to which you want to reply 3 Press the Select soft key to read ...

Page 119: ... Urgent Attention For more information see Configuring Message display setting page 130 9 Press the Select soft key 1 Open the Inbox using the steps in Accessing the Messaging Inbox page 117 2 Press the Up or Down key to highlight the message you want to forward 3 Press the More soft key 4 Press the Up or Down key to highlight the Forward option 5 Optionally use the Dialpad to edit the message Rep...

Page 120: ...wing options Lookup contact to choose the number from your contacts list Enter number to use the Dialpad to enter the number of the addressee Send to many to choose several numbers from your contact list Central Directory to choose the user from the Central Directory if available 11 Press the Send soft key to send the message 12 Press the Clr key one or more times to return to the idle display Sen...

Page 121: ...7 2 Press the Up or Down key to highlight a message 3 Press the More soft key 4 Press the Up or Down key to highlight the Save to contacts option 5 Press the Add soft key 6 Optionally use the dialpad to edit the number and enter the name 7 Press the Save soft key 8 Press the Yes soft key to confirm the changes 9 Press the Clr key one or more times to return to the idle display 1 Open the Inbox usi...

Page 122: ...elect soft key 6 Press the Yes soft key to confirm the changes 7 Press the Clr key one or more times to return to the idle display 1 Open the Inbox using the steps in Accessing the Messaging Inbox page 117 2 Press the Up or Down key to highlight a message 3 Press the More soft key 4 Press the Up or Down key to select the Delete all messages option 5 Press the Select soft key 6 Press the Yes soft k...

Page 123: ...Messaging 123 7 Press the Clr key one or more times to return to the idle display ...

Page 124: ...sing the Sent Messages menu To access the Sent Messages menu perform the following steps Reading a sent message To read a sent message perform the following steps 1 Press the Menu soft key to access the Main menu 2 Press the Up or Down key to highlight the Messaging icon 3 Press the Select soft key 4 Press the Left or Right key to choose the Sent menu section 1 Open the Sent menu using the steps i...

Page 125: ... through the text of the message 5 Press the Clr key one or more times to return to the idle display 1 Open the Sent menu using the steps in Accessing the Sent Messages menu page 124 2 Press the Up or Down key to highlight the sent message to forward 3 Press the More soft key 4 Press the Up or Down key to highlight the Edit option 5 Use the Dialpad to edit the sent message if necessary 6 Press the...

Page 126: ...ur contacts list Enter number to use the Dialpad to enter the number of the addressee Send to many to choose several numbers from your contacts list Central Directory to choose the user from the Central Directory if available 9 Press the Send soft key to send the message 10 Press the Clr key one or more times to return to the idle display 1 Open the Sent menu using the steps in Accessing the Sent ...

Page 127: ...one or more times to return to the idle display 1 Open the Sent menu using the steps in Accessing the Sent Messages menu page 124 2 Press the Up or Down key to highlight any sent message 3 Press the More soft key 4 Press the Up or Down key to select the Delete all messages option 5 Press the Select soft key 6 Press the Yes soft key to confirm the changes 7 Press the Clr key one or more times to re...

Page 128: ...e 132 Using the Central Directory to dial a number page 59 Accessing the message Settings menu To access the message Settings menu perform the following steps Configuring the Overwrite option Use the Overwrite option to control what happens when the handset receives a new message but there is no room to store more messages 1 Press the Menu soft key to access the Main menu 2 Press the Up or Down ke...

Page 129: ...oes not store it for normal messages the handset rejects the message To configure the overwrite option perform the following steps 1 Open the message Settings menu using the steps in Accessing the message Settings menu page 128 2 Press the Up or Down key to highlight the Overwrite old option 3 Press the Select soft key OR 4 Press the Up or Down key to choose one of the following on OR off 5 Press ...

Page 130: ...ssage display setting Use this setting if you want the text of the message to be displayed on the screen of the handset when the message is received 1 Open the message Settings menu using the steps in Accessing the message Settings menu page 128 2 Press the Up or Down key to highlight the Sent message option 3 Press the Select soft key OR 4 Press the Up or Down key to choose one of the following o...

Page 131: ...all 1 Open the message Settings menu using the steps in Accessing the message Settings menu page 128 2 Press the Up or Down key to highlight the Display option 3 Press the Select soft key OR 4 Press the Up or Down key to choose one of the following on OR off 5 Press the Select soft key 6 Press the Clr key one or more times to return to the idle display 1 Open the message Settings menu using the st...

Page 132: ...er msg option 3 Press the Select soft key OR 4 Press the Up or Down key to choose one of the following on OR off 5 Press the Select soft key 6 Press the Clr key one or more times to return to the idle display 1 Open the message Settings menu using the steps in Accessing the message Settings menu page 128 2 Press the Up or Down key to highlight the Silent answer msg option 3 Press the Select soft k...

Page 133: ...l message during a call Urgent messages You must confirm urgent messages Urgent messages appear immediately on the display If the dialpad on your handset is locked the lock temporarily deactivates when you receive an urgent message so that you can acknowledge the receipt A melody plays when you receive an urgent message unless you disable the ringer The ringer volume increases to the maximum durin...

Page 134: ... All other keys are blocked until you confirm the message by pressing OK or More If you press the More soft key you need to select one of the available options Reply reply to the received message Ok confirm the receipt of the message Reject reject the received message Forward forward the message to another addressee Save to contacts add the sender of the message to Contacts Delete message Delete a...

Page 135: ...if Overwrite is on the handset deletes the oldest message before it stores the new message if Overwrite is off this is the default configuration the handset does one of the following for urgent messages the handset shows the message but does not store it for normal messages the handset rejects the message For more information about configuring Overwrite see Configuring the Overwrite option page 12...

Page 136: ...e following tasks Accessing the Calendar page 137 Changing the calendar format page 137 Selecting a date page 138 Adding an appointment page 139 Viewing an appointment page 140 Editing an appointment page 141 Copying an appointment page 143 Attention Some menu items may be locked or unavailable to users Please contact your system administrator for more details Attention The maximum number of entri...

Page 137: ...ime and date information you must manually reset it after you reinstall the battery pack or switch the handset off and on If your system provides the date and time information to DECT handsets the date and time settings update automatically when you switch on the handset Contact your system administrator to determine if you can use this feature 1 Press the Menu soft key to access the Main menu 2 P...

Page 138: ...alendar menu using the steps in Accessing the Calendar page 137 2 Press the More soft key to highlight the Go to date option 3 Press the Select soft key 4 Use the Dialpad to enter the required date 5 Press the Select soft key 6 To return to the current date press the More soft key and highlight the Go to today option 7 Press the Select soft key 8 Press the Clr key one or more times to return to th...

Page 139: ...nter the required date 5 Press the Select soft key 6 Press the Select soft key 7 Use the Up or Down key to highlight the New appointment option 8 Press the Add soft key 9 Use the Dialpad to enter the start date 10 Press the Continue soft key 11 Use the Dialpad to enter the start time 12 Press the Continue soft key 13 Press the Up or Down key to highlight the required duration 14 Press the Select s...

Page 140: ...e soft key 19 Press the Up or Down key to highlight the required reminder 20 Press the Select soft key 21 Press the Clr key one or more times to return to the idle display 1 Open the Calendar menu using the steps in Accessing the Calendar page 137 2 Press the More soft key to highlight the Go to date option 3 Press the Select soft key 4 Use the Dialpad to enter the date of the appointment 5 Press ...

Page 141: ...s to return to the idle display 1 Open the Calendar menu using the steps in Accessing the Calendar page 137 2 Press the More soft key to highlight the Go to date option 3 Press the Select soft key 4 Use the Dialpad to enter the date of the appointment 5 Press the Select soft key 6 Press the Select soft key and then press the Up or Down key to highlight the appointment to edit 7 Press the More soft...

Page 142: ...ss the Continue soft key 14 Press the Up or Down key to highlight the required duration 15 Press the Select soft key 16 Use the Dialpad to edit the subject of the appointment 17 Press the Continue soft key 18 Press the Up or Down key to highlight the required reminder 19 Press the Select soft key 20 Press the Clr key one or more times to return to the idle display Edit Select Continue Continue Sel...

Page 143: ... the Select soft key 6 Press the Select soft key and then press the Up or Down key to highlight the appointment to copy 7 Press the More soft key 8 Press the Up or Down key to highlight the Copy option 9 Press the Select soft key 10 Optionally use the Dialpad to enter the start date of the new appointment press the Continue soft key 11 Optionally use the Dialpad to enter the start time of the new ...

Page 144: ...ter the location of the appointment and press the Continue soft key 16 Press the Up or Down key to highlight the required reminder 17 Press the Select soft key 18 Press the Clr key one or more times to return to the idle display 1 Open the Calendar menu using the steps in Accessing the Calendar page 137 2 Press the More soft key to highlight the Go to date option 3 Press the Select soft key 4 Use ...

Page 145: ...t the appointment to delete 7 Press the More soft key 8 Press the Up or Down key to highlight the Delete option 9 Press the Select soft key 10 Press the Yes soft key to confirm the deletion 11 Press the Clr key one or more times to return to the idle display Select More Delete Select Yes ...

Page 146: ...148 Alarms page 150 Using the Calculator Use the calculator to perform basic mathematical calculations To use the calculator perform the following steps Attention Some menu items may be locked or unavailable to users Please contact your system administrator for more details 1 Press the Menu soft key to access the Main menu 2 Press the Up or Down key to highlight the Accessories icon 3 Press the Se...

Page 147: ... you can press the key to choose the required operation and then press the OK key To enter a decimal point press the key 9 Use the Dialpad to enter a second value of up to 9 digits 10 Press the Left or Right key to choose the equal sign icon 11 Press the Select soft key The result appears 12 Optionally perform either of the following To perform calculations using the result repeat steps 7 to 11 OR...

Page 148: ...tart the stopwatch perform the following steps 13 Press the Clr key one or more times to return to the idle display Attention Invalid calculations result in an error message Table 14 Calculator icons Symbol Description Addition sign Division sign Dot sign Equal sign Multiplication sign Percentage sign Subtraction sign 1 Press the Menu soft key to access the Main menu Menu ...

Page 149: ... Lap soft key to save the current elapsed time and start timing again Attention You can store two lap values in your handset If you press the Lap soft key after two Lap values are already stored the handset overwrites the oldest stored value 8 Press the Stop soft key to stop measuring 9 Choose one of the following Press the Continue soft key to continue measuring OR Press the Reset soft key to res...

Page 150: ...re the handset time and date Each time you remove the battery pack or switch the handset off it loses the time and date information you must manually reset it after you reinstall the battery pack or switch the handset off and on If your system provides the date and time information to DECT handsets the date and time settings update automatically when you switch on the handset Contact your system a...

Page 151: ...t the Accessories icon 3 Press the Select soft key 4 Press the Up or Down key to highlight the Alarms option 5 Press the Select soft key 6 Press the Up or Down key to highlight the Alarm option 7 Press the Select soft key 8 Use the Dialpad to enter the alarm time 9 Press the Save soft key 10 Press the Clr key one or more times to return to the idle display Menu Select Alarms Select Alarm Select Sa...

Page 152: ...e Accessories icon 3 Press the Select soft key 4 Press the Up or Down key to highlight the Alarms option 5 Press the Select soft key 6 Press the Up or Down key to highlight the Alarm option 7 Press the Select soft key 8 Use the Dialpad to edit the alarm time 9 Press the Save soft key 10 Press the Clr key one or more times to return to the idle display Menu Select Alarms Select Alarm Select Save ...

Page 153: ...a recurrent alarm page 156 1 Press the Menu soft key to access the Main menu 2 Press the Up or Down key to highlight the Accessories icon 3 Press the Select soft key 4 Press the Up or Down key to highlight the Alarms option 5 Press the Select soft key 6 Press the Up or Down key to highlight the Alarm option 7 Press the Select soft key 8 Press the Turn off soft key 9 Press the Clr key one or more t...

Page 154: ...ress the Up or Down key to highlight the Alarms option 5 Press the Select soft key 6 Press the Up or Down key to highlight the Recurrent alarm option 7 Press the Select soft key 8 Use the Dialpad to enter the alarm time 9 Press the Continue soft key 10 Press the Up or Down key to highlight the required days of the week 11 Press the Mark soft key 12 Press the OK soft key to confirm the settings Men...

Page 155: ...cess the Main menu 2 Press the Up or Down key to highlight the Accessories icon 3 Press the Select soft key 4 Press the Up or Down key to highlight the Alarms option 5 Press the Select soft key 6 Press the Up or Down key to highlight the Recurrent alarm option 7 Press the Select soft key 8 Use the Dialpad to edit the alarm time 9 Press the Continue soft key Menu Select Alarms Select Recurrent alar...

Page 156: ...k soft key to unmark a marked day of the week if necessary 13 Press the OK soft key to confirm the settings 14 Press the Clr key one or more times to return to the idle display 1 Press the Menu soft key to access the Main menu 2 Press the Up or Down key to highlight the Accessories icon 3 Press the Select soft key 4 Press the Up or Down key to highlight the Alarms option 5 Press the Select soft ke...

Page 157: ...urrent alarm option 7 Press the Select soft key 8 Press the Turn off soft key 9 Press the Clr key one or more times to return to the idle display Attention If the alarm or the recurrent alarm is off when you open the time editor the current time appears Recurrent alarm Select Turn off ...

Page 158: ...vity settings page 220 General settings The following table describes the telephone setting icons on the display This section describes the following tasks Attention Some menu items may be locked or unavailable to users Please contact your system administrator for more details Table 15 Telephone setting icons Icon Description General settings Sound settings Display settings Calls settings Connecti...

Page 159: ... Password page 172 Resetting the handset page 174 Resetting the MEM card page 175 Viewing information page 176 Accessing the General settings menu To access the General settings menu perform the following steps Profile configuration Use the profile option to personalise your handset 1 Press the Menu soft key to access the Main menu 2 Press the Up or Down key to highlight the Settings icon 3 Press ...

Page 160: ... page 159 2 Press the Up or Down key to highlight the Profiles option 3 Press the Select soft key 4 Press the Up or Down key to highlight any of the following options Select profile to select a profile and press the Select soft key Edit profile to edit a profile and press the Select soft key Reset profile to return to the default values of the settings and press the Select soft key 5 Press the Clr...

Page 161: ...s Ring melody for internal calls Ring melody for unknown calls Normal message alert Urgent message alert Ring melody for emergency calls Increasing ring feature Alert volume Alert tone Increasing alert Vibrator Key sound Confirmation sound Coverage warning Charger warning For more information about audio settings see Audio settings page 176 Editing a profile To edit a selected profile perform the ...

Page 162: ...ofile option 5 Press the Select soft key 6 Press the Up or Down key to highlight the required option 7 Press the Select soft key OR 8 Make the required changes and perform one of the following Press the Select soft key OR Press the OK soft key 9 Press the Clr key one or more times to return to the idle display Profiles Select Edit profile Select Select Select OK ...

Page 163: ...all the battery pack or switch the handset off and on If your system can provide the date and time information to DECT handsets the date and time settings update automatically when you switch on the handset Contact your system administrator to determine if you can use this feature 1 Open the General settings menu using the steps in Accessing the General settings menu page 159 2 Press the Up or Dow...

Page 164: ...alls list with normal text size page 72 If you choose am pm time format in combination with dd mm yyyy mm dd yyyy or dd mmm yyyy date format the entries in the Calls list contain information about date only 10 Press the Save soft key to save the changes 11 Press the Clr key one or more times to return to the idle display 1 Open the General settings menu using the steps in Accessing the General set...

Page 165: ...Down key to highlight the required date format 9 Press the Select soft key Attention Depending on the Time and Date format you choose the font size in the Calls list changes see Calls list with normal text size page 72 If you choose am pm time format in combination with dd mm yyyy mm dd yyyy or dd mmm yyyy date format the entries in the Calls list contain information about date only 10 Press the S...

Page 166: ...t allow you to access handset menus or features by pressing a single button 1 Open the General settings menu using the steps in Accessing the General settings menu page 159 2 Press the Up or Down key to highlight the Language option 3 Press the Select soft key 4 Press the Up or Down key to highlight the required language 5 Press the Select soft key 6 Press the Clr key one or more times to return t...

Page 167: ...ttings menu using the steps in Accessing the General settings menu page 159 2 Press the Up or Down key to highlight the Shortcuts option 3 Press the Select soft key 4 Press the Up or Down key to highlight the key to which you want to assign a shortcut 5 Press the Select soft key 6 Press the Up or Down key to choose the option you want to assign as a shortcut 7 Press the Select soft key 8 Press the...

Page 168: ...t soft key 4 Press the Up or Down key to select the LED colour to configure Red LED Green LED Orange LED 5 Press the Select soft key 6 Press the Up or Down key to highlight the option to associate with the selected LED colour Missed calls Text messages Voice messages Text and voice messages Mandown Low Battery Off 7 Press the Select soft key to apply the setting 8 Press the Clr key one or more tim...

Page 169: ...the phone lock perform the following steps 1 Open the General settings menu using the steps in Accessing the General settings menu page 159 2 Press the Up or Down key to highlight the Security option 3 Press the Select soft key 4 Press the Up or Down key to highlight the Phone lock option 5 Press the Select soft key 6 Use the Dialpad to enter your PIN code 7 Press the OK soft key 8 Press the Up or...

Page 170: ...nable Automatic dialpad lock perform the following steps 10 Press the Clr key one or more times to return to the idle display 1 Open the General settings menu using the steps in Accessing the General settings menu page 159 2 Press the Up or Down key to highlight the Security option 3 Press the Select soft key 4 Press the Up or Down key to highlight the Automatic keylock option 5 Press the Select s...

Page 171: ...y 1 Press the OK key 2 Press the Unlock soft key Note The Unlock soft key is available for three seconds after you press the OK key Attention When you receive a call with key lock active the dialpad lock temporarily suspends and you can use all keys The key lock reactivates when you terminate the call 1 Open the General settings menu using the steps in Accessing the General settings menu page 159 ...

Page 172: ...ss the Up or Down key to highlight the Change PIN code option 5 Press the Select soft key 6 Use the Dialpad to enter the current PIN code 7 Press the OK soft key 8 Use the Dialpad to enter a new PIN code 9 Press the OK soft key 10 Use the Dialpad to verify the new PIN code 11 Press the OK soft key 12 Press the Clr key one or more times to return to the idle display 1 Open the General settings menu...

Page 173: ...ey to highlight the Proxy password option 5 Press the Select soft key 6 If a Proxy password is configured use the Dialpad to enter the current Proxy password and press the OK soft key 7 Use the Dialpad to enter a new Proxy password 8 Press the OK soft key 9 Use the Dialpad to verify the new Proxy password 10 Press the OK soft key 11 Press the Clr key one or more times to return to the idle display...

Page 174: ...enu page 159 2 Press the Up or Down key to highlight the Handset name option 3 Press the Select soft key 4 Use the Dialpad to enter or edit the handset name Attention Depending on system configuration handset name can be used for authentication on SIP DECT In this case changing the handset name will cause authentication failure so that no calls can be made or received 5 Press the Save soft key 6 P...

Page 175: ...y 5 Use the Dialpad to enter the current PIN code 6 Press the OK soft key 7 Press the Clr key one or more times to return to the idle display 1 Open the General settings menu using the steps in Accessing the General settings menu page 159 2 Press the Up or Down key to highlight the Reset memory card option 3 Press the Select soft key 4 Press the Yes soft key 5 Use the Dialpad to enter the current ...

Page 176: ...o configure the following Accessing the Sounds and alerts menu page 177 7 Press the Clr key one or more times to return to the idle display 8 Switch off the handset 9 Switch on the handset 1 Open the General settings menu using the steps in Accessing the General settings menu page 159 2 Press the Up or Down key to highlight the Status option 3 Press the Select soft key 4 Press the Up or Down key t...

Page 177: ... volume page 183 Defining the Alert tone melody page 184 Enabling Increasing alert page 184 Enabling the Vibrator page 185 Enabling the Key sound page 186 Enabling Confirmation sound page 187 Enabling the Coverage warning page 188 Enabling the Charger warning page 189 Configuring Missed call time page 190 Configuring Cadence Mode page 190 Accessing the Sounds and alerts menu To access the Sounds a...

Page 178: ... Open the Sounds and alerts menu using the steps in Accessing the Sounds and alerts menu page 177 2 Press the Up or Down key to highlight the Ring volume option 3 Press the Select soft key 4 Press the Left or Right key to select the volume level 5 Press the OK soft key to apply the changes 6 Press the Clr key one or more times to return to the idle display WARNING If your handset is subscribed to ...

Page 179: ...the Up or Down key to highlight the Ring external option 3 Press the Select soft key 4 Press the Up or Down key to select a melody 5 Press the Play soft key to listen to the melody or the Select soft key to apply it 6 Press the Clr key one or more times to return to the idle display WARNING This feature is available only for handsets subscribed to SIP DECT system 1 Open the Sounds and alerts menu ...

Page 180: ...o select a melody 5 Press the Play soft key to listen to the melody or the Select soft key to apply it 6 Press the Clr key one or more times to return to the idle display Attention Avaya DECT systems do not support the Ring unknown call melody feature Attention The Normal message alert melody feature is available on the Avaya 4070 and 4075 DECT Handsets only 1 Open the Sounds and alerts menu using...

Page 181: ... or Down key to select a melody 5 Press the Play soft key to listen to the melody or the Select soft key to apply it 6 Press the Clr key one or more times to return to the idle display Attention The Urgent message alert melody feature is available on the Avaya 4070 and 4075 DECT Handsets only 1 Open the Sounds and alerts menu using the steps in Accessing the Sounds and alerts menu page 177 2 Press...

Page 182: ...form the following steps 4 Press the Up or Down key to select a melody 5 Press the Play soft key to listen to the melody or the Select soft key to apply it 6 Press the Clr key one or more times to return to the idle display Attention Avaya DECT systems do not support the Ring emergency call melody feature 1 Open the Sounds and alerts menu using the steps in Accessing the Sounds and alerts menu pag...

Page 183: ...e Clr key one or more times to return to the idle display 1 Open the Sounds and alerts menu using the steps in Accessing the Sounds and alerts menu page 177 2 Press the Up or Down key to highlight the Alert volume option 3 Press the Select soft key 4 Press the Left or Right key to select the volume level 5 Press the OK soft key to apply the changes 6 Press the Clr key one or more times to return t...

Page 184: ...the Sounds and alerts menu using the steps in Accessing the Sounds and alerts menu page 177 2 Press the Up or Down key to highlight the Alert tone option 3 Press the Select soft key 4 Press the Up or Down key to select a melody 5 Press the Play soft key to listen to the melody or the Select soft key to apply it 6 Press the Clr key one or more times to return to the idle display 1 Open the Sounds a...

Page 185: ...Down key to highlight the Increasing alert option 3 Press the Select soft key 4 Press the Up or Down key to select On or Off 5 Press the Select soft key to apply the changes 6 Press the Clr key one or more times to return to the idle display Attention The Vibrator feature is available on the Avaya 4070 and 4075 DECT Handsets only 1 Open the Sounds and alerts menu using the steps in Accessing the S...

Page 186: ... highlight the Vibrator option 3 Press the Select soft key 4 Press the Up or Down key to select Off Vibrate then ring Vibrate only Vibrate and ring 5 Press the Select soft key to apply the changes 6 Press the Clr key one or more times to return to the idle display 1 Open the Sounds and alerts menu using the steps in Accessing the Sounds and alerts menu page 177 Vibrator Select Off Vibrate then rin...

Page 187: ...ct soft key 4 Press the Up or Down key to select Silent disabled Click or Tone different types of sounds 5 Press the Select soft key to apply the changes 6 Press the Clr key one or more times to return to the idle display 1 Open the Sounds and alerts menu using the steps in Accessing the Sounds and alerts menu page 177 2 Press the Up or Down key to highlight the Confirmation sound option 3 Press t...

Page 188: ... or Down key to select On or Off 5 Press the Select soft key to apply the changes 6 Press the Clr key one or more times to return to the idle display Attention The default volume of the Confirmation sound is 1 1 Open the Sounds and alerts menu using the steps in Accessing the Sounds and alerts menu page 177 2 Press the Up or Down key to highlight the Coverage warning option 3 Press the Select soft...

Page 189: ...On or Off 5 Press the Select soft key to apply the changes 6 Press the Clr key one or more times to return to the idle display 1 Open the Sounds and alerts menu using the steps in Accessing the Sounds and alerts menu page 177 2 Press the Up or Down key to highlight Charger warning 3 Press the Select soft key 4 Press the Up or Down key to select On or Off 5 Press the Select soft key to apply the ch...

Page 190: ...on of the on and off phases of a ringing cycle You can use the Tones and Cadences feature on the Avaya Communication Server 1000 Avaya CS 1000 system to configure ring cadences to identify different types of incoming calls For more 6 Press the Clr key one or more times to return to the idle display 1 Open the Sounds and alerts menu using the steps in Accessing the Sounds and alerts menu page 177 2...

Page 191: ...espective of the Tones and Cadences configuration on your CS 1000 system To activate Cadence Mode on your handset perform the following steps Attention Cadence Mode is applicable to traditional DECT systems only based on DMC cards If you enable or disable Cadence Mode for a SIP DECT solution there is no impact 1 Open the Sounds and alerts menu using the steps in Accessing the Sounds and alerts men...

Page 192: ...his section to customise the handset display as follows Accessing the Display settings menu page 192 Wallpaper customisation page 193 Selecting a theme page 195 Startup customisation page 196 Configuring Power save page 198 Accessing the Display settings menu To access the Display settings menu perform the following steps 1 Press the Menu soft key to access the Main menu 2 Press the Up or Down key...

Page 193: ...o select wallpaper from a source other than the current theme perform the following steps 1 Open the Display menu using the steps in Accessing the Display settings menu page 192 2 Press the Up or Down key to highlight the Wallpaper option 3 Press the Select soft key 4 Press the Up or Down key to select the Theme option 5 Press the Select soft key 6 Press the Clr key one or more times to return to ...

Page 194: ...ey to select the Picture option 5 Press the Up or Down key to select an image from the list 6 Perform one of the following Press the Show soft key to view the selected image OR Press the Select soft key to use the selected image as your wallpaper 7 Press the Clr key one or more times to return to the idle display 1 Open the Display menu using the steps in Accessing the Display settings menu page 1...

Page 195: ...aper option 3 Press the Select soft key 4 Press the Up or Down key to select None 5 Press the Clr key one or more times to return to the idle display 1 Open the Display menu using the steps in Accessing the Display settings menu page 192 2 Press the Up or Down key to highlight the Themes option 3 Press the Select soft key 4 Press the Up or Down key to select a theme from the list 5 Press the Selec...

Page 196: ...m the following steps 6 Press the Clr key one or more times to return to the idle display 1 Open the Display menu using the steps in Accessing the Display settings menu page 192 2 Press the Up or Down key to highlight the Startup screen option 3 Press the Select soft key 4 Press the Up or Down key to select the Theme option 5 Press the Select soft key 6 Press the Clr key one or more times to retur...

Page 197: ...2 Press the Up or Down key to highlight the Startup screen option 3 Press the Select soft key 4 Press the Up or Down key to select the Picture option 5 Press the Up or Down key to select a picture from the list 6 Perform one of the following Press the Show soft key to view the selected image OR Press the Select soft key to use the selected image as your startup image 7 Press the Clr key one or mor...

Page 198: ...t the Startup screen option 3 Press the Select soft key 4 Press the Up or Down key to select the None option 5 Press the Clr key one or more times to return to the idle display 1 Open the Display menu using the steps in Accessing the Display settings menu page 192 2 Press the Up or Down key to highlight the Power save option 3 Press the Select soft key Startup screen Select None Power save Select ...

Page 199: ... before the display becomes dim the second value from 1 to 59 seconds defines the time before the display switches off after the display becomes dim If you configure the second value as 0 the display never switches off and the handset battery discharges faster Attention To conserve the battery charge of your handset the display automatically dims during calls Press the OK key to restore the displa...

Page 200: ...Units menu To access statistics information perform the following steps 1 Press the Menu soft key to access the Main menu 2 Press the Up or Down key to highlight the Settings icon 3 Press the Select soft key 4 Press the Left or Right key to choose the Calls menu 1 Open the Calls menu using the steps in Accessing the call settings menu page 200 2 Press the Up or Down key to highlight the Units opti...

Page 201: ...ng Any key Answer mode To activating Any key Answer mode perform the following steps 4 Press the Up or Down key to highlight the Call time option or the Message count option Attention The message count option is available on the Avaya 4070 and 4075 DECT Handsets only The Call time and Message count options reflects statistics for outgoing calls and messages 5 Optionally press the Reset soft key to...

Page 202: ...ny key option 5 Press the Select soft key 6 Press the Clr key one or more times to return to the idle display 1 Open the Calls menu using the steps in Accessing the call settings menu page 200 2 Press the Up or Down key to highlight the Answer mode option 3 Press the Select soft key 4 Press the Up or Down key to highlight the Auto answer option 5 Press the Select soft key Answer mode Select Any ke...

Page 203: ... numbers using the caller filter list 6 Press the Clr key one or more times to return to the idle display 1 Open the Calls menu using the steps in Accessing the call settings menu page 200 2 Press the Up or Down key to highlight the Answer mode option 3 Press the Select soft key 4 Press the Up or Down key to highlight the Normal option 5 Press the Select soft key 6 Press the Clr key one or more ti...

Page 204: ...he Caller filter list page 206 Deleting all entries in the Caller filter list page 207 Activating Caller filter page 208 Accessing the Caller filter menu To open the Caller filter menu perform the following steps Attention The Caller filter feature is available on the Avaya 4070 and 4075 DECT Handsets only The Caller filter functions only when the caller number transmits through Integrated Service...

Page 205: ...e the Dialpad to enter the telephone number and the name and press the Save soft key OR Press the Up or Down key to highlight the Lookup contact option press the Select soft key use the Up or Down key to highlight the required contact and press the Select soft key Attention Numbers can consist of a maximum of 32 characters Names can consist of a maximum of 16 characters You can use one asterisk at...

Page 206: ...ess the Up or Down key to highlight the List option 3 Press the Select soft key 4 Press the Up or Down key to highlight the required entry 5 Press the More soft key 6 Press the Up or Down key to highlight the Edit option 7 Press the Select soft key 8 Use the Dialpad to edit the telephone number and name 9 Press the Save soft key 10 Press the Clr key one or more times to return to the idle display ...

Page 207: ...ight the required entry to delete 5 Press the Up or Down key to highlight the Delete option 6 Press the Select soft key 7 Press the Yes soft key to confirm the changes 8 Press the Clr key one or more times to return to the idle display 1 Open the Caller filter menu using the steps in Accessing the Caller filter menu page 204 2 Press the Up or Down key to highlight the List option 3 Press the Selec...

Page 208: ...ges 9 Use the Dialpad to enter the PIN code 10 Press the OK soft key 11 Press the Clr key one or more times to return to the idle display Attention If you activate the Caller filter and configure the accept list the handset accepts calls only from the numbers in the caller filter list If you configure the block list the handset blocks all calls from the numbers in the caller filter list 1 Open the...

Page 209: ...ect soft key 6 Press the Clr key one or more times to return to the idle display 1 Open the Caller filter menu using the steps in Accessing the Caller filter menu page 204 2 Press the Up or Down key to highlight the Mode option 3 Press the Select soft key 4 Press the Up or Down key to highlight the Filter off mode 5 Press the Select soft key 6 Press the Clr key one or more times to return to the i...

Page 210: ...l number To configure an emergency call number perform the following steps Attention The Emergency call feature is available on the Avaya 4027 4070 4075 DECT Handsets but the message can be sent from the Avaya 4070 and 4075 DECT Handsets only You can send text messages only if your system supports this feature Contact your system administrator to determine if you can use this feature After you sen...

Page 211: ...e Select soft key press the Up or Down key to highlight the required number from your contacts list and press the Select soft key OR Press the Up or Down key to highlight Enter Number press the Select soft key use the Dialpad to enter or edit the number and press the Save soft key 7 Press the Clr key one or more times to return to the idle display 1 Open the Calls menu using the steps in Accessing...

Page 212: ... or text message as follows If you do not enter a message when configuring the Mandown feature the handset dials the Mandown call number 2 Press the Up or Down key to highlight the Emergency call option 3 Press the Select soft key 4 Press the Up or Down key to highlight the Message option 5 Press the Select soft key 6 Use the Dialpad to enter the text of the emergency message 7 Press the Save soft...

Page 213: ...Configuring the LED Indicator 4075 only page 167 for more details Note 3 The Mandown feature is separate from the Emergency Call feature and you must configure it separately Activating or deactivating Mandown To activate or deactivate the Mandown feature perform the following steps Attention You can configure Mandown to send text messages only if your system supports this feature Contact your syst...

Page 214: ...tion 5 Press the Select soft key 6 Press the Up or Down key to select the required option on to activate mandown feature off to deactivate Mandown feature 7 Press the Select soft key to apply the changes 8 Press the Clr key one or more times to return to the idle display 1 Open the Calls menu using the steps in Accessing the call settings menu page 200 2 Press the Up or Down key to highlight the M...

Page 215: ...t press the Select soft key press the Up or Down key to highlight the required number from your contacts list and press the Select soft key OR Press the Up or Down key to highlight Enter Number press the Select soft key use the Dialpad to enter or edit the number and press the Save soft key 7 Press the Clr key one or more times to return to the idle display 1 Open the Calls menu using the steps in...

Page 216: ... option 3 Press the Select soft key 4 Press the Up or Down key to highlight the Message option 5 Press the Select soft key 6 Use the Dialpad to enter the text of the emergency message 7 Press the Save soft key 8 Configure the emergency call number to which to send the message 9 Press the Clr key one or more times to return to the idle display Attention If you configure a text message for Mandown t...

Page 217: ... or Down key to highlight the Auto answer option 5 Press the Select soft key 6 Press the Up or Down key to select the required option on to activate auto answer feature off to deactivate auto answer feature 7 Press the Select soft key to apply the changes 8 Press the Clr key one or more times to return to the idle display 1 Open the Calls menu using the steps in Accessing the call settings menu pa...

Page 218: ...ighlight the Delay option 5 Press the Select soft key 6 Press the Up or Down key to select the required option off to disable the delay 5s 240s to define a delay period in seconds 7 Press the Select soft key to apply the changes 8 Press the Clr key one or more times to return to the idle display 1 Open the Calls menu using the steps in Accessing the call settings menu page 200 2 Press the Up or Do...

Page 219: ...ealarm time option 5 Press the Select soft key 6 Press the Up or Down key to select the required option off to disable the prealarm 5s 240s to define a delay period in seconds 7 Press the Select soft key to apply the changes 8 Press the Clr key one or more times to return to the idle display CAUTION If you configure your handset to use Silent charging any Alarms you configure cannot provide an aud...

Page 220: ...on 3 Press the Select soft key 4 Press the Up or Down key to select the required option Off to disable silent charging Discon to disconnect from the CS 1000 system while in the charger Silent to turn off the vibrator and ringer while in the charger Attention Auto answer mode remains active when you select the Silent option Even if you choose Silent charging the handset continues to ring when you p...

Page 221: ... Bluetooth wireless technology For more information about configuring Bluetooth wireless technology see Bluetooth wireless technology module installation page 237 Bluetooth wireless technology headset installation page 241 Attention Support for Bluetooth wireless technology is available on the Avaya 4070 and 4075 DECT Handsets only ...

Page 222: ...use You can use the two types of codes as follows FFC codes dial an FFC to access some of your handset features To use an FFC enter the FFC and press the Call key SPRE codes dial a SPRE code plus a one or two digit number to access some of your handset features The SPRE codes are unique to your system however the digits that follow the SPRE are fixed For example dial SPRE 74 to forward all your ca...

Page 223: ...s available on your system based on the information provided by your system administrator 1 Use the Dialpad to enter the FFC or SPRE code while the handset is idle 2 Press the Call key Attention Contact your system administrator for the specific FFC and SPRE code numbers Table 16 FFCs and SPRE codes FFC or SPRE code Feature Call Forward to activate Call Forward to deactivate ...

Page 224: ...on page 237 Bluetooth wireless technology headset installation page 241 Available accessories The following table lists the accessories available for the Avaya 4027 4070 and 4075 DECT Handsets Table 17 List of accessories Item Description Order code Multi Charger for 4027 and 4070 Multi Charger allows you to charge up to eight Avaya 4027 and 4070 DECT Handsets Universal AC Adapter included N016295...

Page 225: ...4070 Carry case for Avaya 4027 and 4070 DECT Handsets N0162964 Multi Charger for 4075 Multi Charger allows you to charge up to six Avaya 4075 DECT Handsets Universal AC Adapter included N0206073 Desktop Charger for 4075 Desktop Charger for Avaya 4075 DECT Handsets N0206072 AC Adapter Universal for 4075 AC Adapter for Desktop Charger universal mains plug N0206074 Battery Pack for 4075 Extra handset...

Page 226: ... fastening of the belt clip compartment cover as shown in Figure 17 The plastic tool is shipped in the box with the handset 4 Slide out the belt clip compartment cover 5 Remove the plastic tool 6 Install the swivel belt clip as shown in Figure 18 or the executive clip as shown in Figure 19 Vertical Handset Carry Case for 4075 To carry the Avaya 4075 DECT Handset vertically N0206789 MEM Card Replac...

Page 227: ...Handset accessories 227 Figure 17 Using plastic tool only for 4027 and 4070 Handset Plastic tool Belt clip compartment cover ...

Page 228: ...Handset accessories 228 Figure 18 Installed swivel belt clip only for 4027 and 4070 Figure 19 Installed executive clip Handset Swivel belt clip Executive Handset clip ...

Page 229: ...tall the belt clip compartment cover and tighten the screws If you have an Avaya 4027 or 4070 DECT Handset go to step 3 3 Use the plastic tool to unlock the belt clip fastening The plastic tool is shipped in the box with the handset 4 Slide out the belt clip 5 Remove the plastic tool 6 Install the belt clip compartment cover as shown in Figure 20 Figure 20 Belt clip compartment cover Belt clip com...

Page 230: ...et jack is covered by a protective plug Remove it before installing the headset Figure 21 Installing the headset Removing and installing the battery pack 4075 only Use the following steps to remove and install the battery pack and cover 1 Place the handset face down on a flat surface 2 Unlock the battery cover as shown in Figure 22 3 Remove the battery compartment cover Headset connector Headset ...

Page 231: ...ogy module see Bluetooth wireless technology module installation page 237 to charge the battery pack refer see Charging the battery pack 4075 only page 232 5 Install the battery pack pushing it into the casing as shown in Figure 23 6 Press the battery pack down until it locks 7 Install the battery cover and lock it Figure 22 Unlocking the battery cover ...

Page 232: ...vaya 4075 DECT Handset without having the battery installed in the handset Use the following steps to charge the battery pack 1 If the battery pack is installed in the handset remove it See Removing and installing the battery pack 4075 only page 230 for more information 2 Remove the plastic cover that protects the battery charger slot ...

Page 233: ...he protective plastic cover over the battery charger slot 5 Install the battery pack in the handset See Removing and installing the battery pack 4075 only page 230 for more information Figure 24 Charging the battery pack Attention Insert the battery pack in the same orientation as it is shown in the figure otherwise the battery pack cannot charge When the battery pack is correctly inserted the ind...

Page 234: ...et memory Once you have installed the MEM card all configuration changes contacts messages call entries calendar items and new call filter entries are stored on the MEM card only not in the handset memory The parameters that are stored in the handset memory remain intact but are not accessible unless you remove the installed MEM card from the handset Attention You can operate your handset without ...

Page 235: ...hown in the following figure Figure 25 Extracting the MEM card from the frame Installing the MEM card To install the MEM card in the handset perform the following steps 1 Place the handset face down on a flat surface 2 Remove the battery compartment cover and the battery Note For information about removing the Avaya 4027 or 4070 DECT Handset battery compartment cover see Installing the battery pac...

Page 236: ...rescents and press it as shown in Figure 26 4 Ensure that you have inserted the MEM card completely Figure 26 Installing the MEM card Removing the MEM card To remove the MEM card from the handset perform the following steps 1 Place the handset face down on a flat surface 2 Remove the battery compartment cover and the battery 3 Slide out the MEM card under the two small crescents as shown in Figure...

Page 237: ... wireless technology module installation Your Avaya 4070 and 4075 DECT Handsets are equipped with a radio system to support Bluetooth wireless technology enabled headsets Ensure that you are familiar with the operation of the navigation keys Memory card Handset Pull ...

Page 238: ...e Avaya 4027 or 4070 DECT Handset battery compartment cover see Installing the battery pack 4027 and 4070 only page 19 Note For information about removing the Avaya 4075 DECT Handset battery compartment cover see Removing and installing the battery pack 4075 only page 230 3 Slide the Bluetooth wireless technology module into the compartment as shown in Figure 28 Note On the Avaya 4075 DECT Handset...

Page 239: ...wn on a flat surface 2 Remove the battery compartment cover and the battery Note For information about removing the Avaya 4070 or 4075 DECT Handset battery compartment cover see Installing the battery pack 4027 and 4070 only page 19 Note For information about removing the Avaya 4075 DECT Handset battery compartment cover see Removing and installing the battery pack 4075 only page 230 3 Pull the Bl...

Page 240: ...less technology compartment is oriented 90 degrees clockwise in comparison to Avaya 4070 DECT Handset 4 Reinstall the battery pack as shown in Figure 2 5 Replace the battery cover Figure 29 Bluetooth wireless technology module removed Handset Bluetooth wireless technology module ...

Page 241: ... Bluetooth wireless technology connectivity page 243 Adding a Bluetooth wireless technology headset page 243 Connecting and disconnecting a paired Bluetooth wireless technology headset page 244 Deleting a Bluetooth wireless technology headset page 245 Accessing the Bluetooth wireless technology configuration menu To access the Bluetooth wireless technology configuration menu perform the following ...

Page 242: ...Down key to highlight the Settings icon 3 Press the Select soft key 4 Press the Left or Right key to choose the Connectivity option 5 Press the Up or Down key to highlight the Bluetooth option 6 Press the Select soft key Select Bluetooth Select ...

Page 243: ...ect soft key and then press the Yes soft key to enable Bluetooth wireless technology OR If the first menu option is Enabled press the Select soft key and then press the Yes soft key to disable Bluetooth wireless technology 3 Press the Clr key one or more times to return to the idle display 1 Open the Bluetooth configuration menu using the steps in Accessing the Bluetooth wireless technology config...

Page 244: ... perform the following steps 4 Press the Up or Down key to highlight the Search for devices option Attention If the search process is successful proceed to step 5 If the search is unsuccessful repeat steps 3 to 4 5 Press the Pair soft key and add the headset 6 Use the Dialpad to enter the PIN code of your Bluetooth wireless technology headset see the headset documentation 7 Press the Connect soft ...

Page 245: ...Connect or Discon soft key to connect or disconnect the headset 6 Press the Clr key one or more times to return to the idle display 1 Open the Bluetooth configuration menu using the steps in Accessing the Bluetooth wireless technology configuration menu page 241 2 Press the Up or Down key to highlight the Paired devices option 3 Press the Select soft key 4 Press the Up or Down key to highlight the...

Page 246: ...et accessories 246 6 Press the Up or Down key to highlight the Delete option 7 Press the Yes soft key to confirm the deletion 8 Press the Clr key one or more times to return to the idle display Delete Yes R ...

Page 247: ...Handset accessories 247 ...

Page 248: ...e Also known as an extension number Flexible Feature Code FFC Specialised codes entered using the dialpad that enable features for example Ring Again Key lock A feature used to disable key input and prevent accidental operation Long Press Press and hold a key for 2 seconds and then release it MEM card A removable memory card storage device for contacts messages call logs and subscriptions SIP DECT...

Page 249: ...have different functions and labels depending on the current operational mode of the handset System or Switch Your office communication system Traditional DECT Avaya DECT system based on DMC cards Voice mail A system that allows you to exchange spoken messages with other users ...

Page 250: ...ency melody 182 ring unknown call melody 180 urgent message melody 181 all calls list 73 accessing 74 deleting all entries 78 deleting an entry 77 dialling a number 75 transferring a number to the caller filter list 76 transferring a number to your contacts list 75 viewing information about a call 74 answer mode any key 201 autoanswer 202 normal 203 answer mode configuration 201 answered calls lis...

Page 251: ...nd disconnecting a headset 244 deleting a headset 245 enabling and disabling a head set 243 headset installation 241 module installation 237 Bluetooth wireless technology headset Installing the module on Avaya 4070 DECT Handset 238 Bluetooth wireless technology module removing the module 239 C calculator 146 calculator icons 148 calculator stopwatch and alarms 146 calendar 136 accessing 137 changi...

Page 252: ...ting 151 editing 152 turning off 153 date configuring 164 DECT system configuration 48 DECT system name 49 dialled calls list 84 accessing 84 deleting all entries 89 deleting an entry 88 dialling a number 85 transferring a number to the caller filter list 87 transferring a number to your contacts list 86 viewing information about a call 85 dialogue mode 32 42 directory number 248 display 28 dialog...

Page 253: ...9 dial using the telephone book 58 dialling 56 loudspeaker 57 predialling 56 SOS 61 speed dial 57 Mandown activating or deactivating 213 Mandown call auto answer 216 delay 217 number 214 prealarm time 218 text message 215 Mandown configuration 212 Manually selecting the DECT system 51 MEM card extracting from the frame 235 installation and removal 234 installing 19 235 removing 236 resetting 175 m...

Page 254: ...sent messages 124 messaging 109 110 missed calls list 89 accessing 91 deleting all entries 95 deleting an entry 95 dialling a number 92 transferring a number to the caller filter 94 transferring a number to your contacts list 92 viewing information about a call 91 mute during a call 66 muting the ringer 64 N normal answer mode configuration 203 O on off switch 28 P PARK code 49 phone lock 169 prof...

Page 255: ...the handset 53 editing the system name and phone number 53 enabling automatic DECT sys tem selection 52 manually selecting the DECT system 51 subscribing the handset to a DECT System 49 T telephone settings 158 theme selecting 195 time configuring 163 time and date 163 transfer a call 66 transferring a call 66 Transferring phone numbers to the caller filter list 210 transferring phone numbers to t...

Reviews: