background image


15

7. Place the pulp cup (7) under the left spout (5a) to collect the 

pulp.

8. Place the juice cup (6) under the juicer spout (5b) on the right.

9. Slide the food pusher (1) down through the food chute on top 

of the hopper (2). 

10. Prepare the food to be processed by cutting it into suitably 

sized  pieces  so  they  can  be  inserted  into  the  chute  on  the 

hopper (2). Other fruits or vegetables can be to be put into the 

pusher hole.

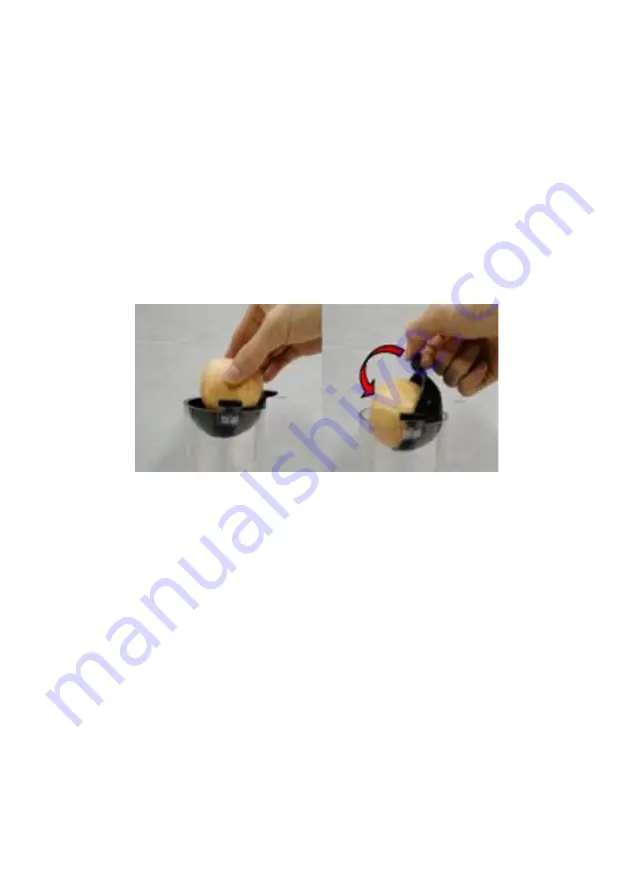
Apples or other fruit with diameter less than 70mm can be pro

-

cessed directly by put them in the flipper and then turn over it.

OPERATING INSTRUCTIONS

1.  Connect  the  juicer  to  the  mains  socket,  ensuring  that  the 

mains data matches that shown on the data plate on the juicer.

2. Start the juicer pressing the starting switch (8) to “ON” position.

3. Insert freshly prepared or cut food through the hopper (2) inlet.

4. To start juicing operation, use the food pusher (1) if necessary 

to gently press the food against the auger in the filter basket.

5. Check that the cap (5c) is open.


Summary of Contents for KS-1507

Page 1: ...M y p ch m Model KS 1507 H NG D N S D NG Vui l ng c k h ng d n tr c khi s d ng...

Page 2: ...g 6 Kh ng th o r i th n m y Vui l ng li n h v i nh cung c p ho c c s b o h nh kh c ph c s c 7 ng n ch n ch p i n v s c kh ng ng m d y ph ch c m v ng c th n m y trong n c ho c b t k ch t l ng n o kh c...

Page 3: ...p tr i c y n y C NH B O 1 C m t c ng t c b o v an to n m b o ng ti p nguy n li u tr n c ng c l p t ng v tr ng ti p nguy n li u tr n c ng c n c xoay n v tr ho n to n ng n u kh ng ng c kh ng th c b t 2...

Page 4: ...u n m y m y p tr i c y n i kh r o v th ng tho ng n u n kh ng c s d ng trong m t th i gian d i TH NG S K THU T i n p 220 240V 50HZ C ng su t 150W CHI TI T NG G I 1 Thanh y 2 ng ti p nguy n li u 2a N p...

Page 5: ...t ng v tr Mi ng ch n s ng n n c p r r v o ng c 2 t khay ch a 5 v o th n m y 9 m b o khay ch a c t v a kh t v o th n m y 3 t l i l c 4 v o khay ch a 5 m b o r ng tr n l i l c 4 c c n ch nh c ng bi u t...

Page 6: ...ng d ng click 5 t ng ti p nguy n li u 2 l n khay ch a 5 C n ch nh bi ut ng m u tr n ng ti p nguy n li u 2 v i c ng m t bi u t ng tr n khay ch a 5 Xoay ng ti p nguy n li u theo chi u kim ng h n v tr b...

Page 7: ...i c y ho c rau qu kh c c th c a qua l tr n n p T o ho c c c lo i tr i c y kh c c ng k nh d i 70mm c th c xay tr c ti p b ng c ch t ch ng v o n p v sau l t l i H NG D N V N H NH M Y 1 K t n i m y p tr...

Page 8: ...n 2 Kh ng ho t ng v i b n tay t 3 Tr c khi s d ng m y p tr i c y h y m b o r ng l i l c 4 kh ng b h h ng 4 Kh ng bao gi n th c n xu ng b ng ng n tay ho c c c d ng c kh c th a n a v v Lu n lu n s d ng...

Page 9: ...p d ng nhi u l c Nh nh ng s d ng thanh y y khi th c n b m c k t ho c h tr i qua ng cho th c ph m nh rau c n t y 3 N u s d ng nhi u lo i tr i c y ho c rau qu t t nh t l xen k gi a c c nguy n li u c ng...

Page 10: ...rau r t x nh c n t y ho c c i xo n c c s i c th qu n quanh tr c p v ngb ng m y p tr i c y N u i u n y x y ra ch c n r t m y p tr i c y c a b n lo i b ch t x v ti p t c ho t ng C NG TH C B n d i l m t...

Page 11: ...Slow Juicer Model KS 1507 INSTRUCTION MANUAL Please read the instructions carefully before using...

Page 12: ...e the motor base Please contact service provider for troubleshooting 7 To prevent electrical short circuit and shocks do not immerse cord plug motor housing motor base in water or any other liquids 8...

Page 13: ...is a safety protective switch to ensure top hopper is secured the top hopper needs to be rotated to the fully close position with a click otherwise the motor cannot be powered on 2 Do not put in any...

Page 14: ...perating 6 Please store the juicer extractor in dry and ventilated place if it is not used for a long time TECHNICAL DETAILS Voltage 220 240V 50HZ Power 150W PACKAGE CONTENTS 9 8 1 Pusher 2 Hopper 2a...

Page 15: ...ent the juice from leaking into the motor 2 Place the Bowl 5 on the shaft of the motor unit 9 Ensure the base is fully inserted into the shaft 3 Place the basket 4 into the Bowl 5 Ensure that the red...

Page 16: ...er alignment You should hear the stop click 5 Place the hopper 2 onto the Bowl 5 Align the red symbol on the hopper 2 with the same symbol on the Bowl 5 Turn it clockwise to the locked position The co...

Page 17: ...ut into the pusher hole Apples or other fruit with diameter less than 70mm can be pro cessed directly by put them in the flipper and then turn over it OPERATING INSTRUCTIONS 1 Connect the juicer to th...

Page 18: ...uicer make sure that the basket 4 is not damaged In such case replace with original spares 4 Never press the food down with ngers or other tools spoon fork etc Always use the food pusher provided 1 TI...

Page 19: ...rovided a sample list below to make it easy to determine the nature of the items Soft Cucumber leafy greens parsley mint watermelon mango wheat grass pineapple Hard Carrot apple beets celery ginger 4...

Page 20: ...the ber and resume operations JUICING RECIPES Below are some delicious recipes for your reference ABC Apple Beetroot Carrot Lemon Ginger Apple Crisp Apple Orange Celery Blackberry Pop Pineapple Pear...

Reviews: