background image


AVY16-ES100 User’s Manual 

AuviTran 

15

14.2.7


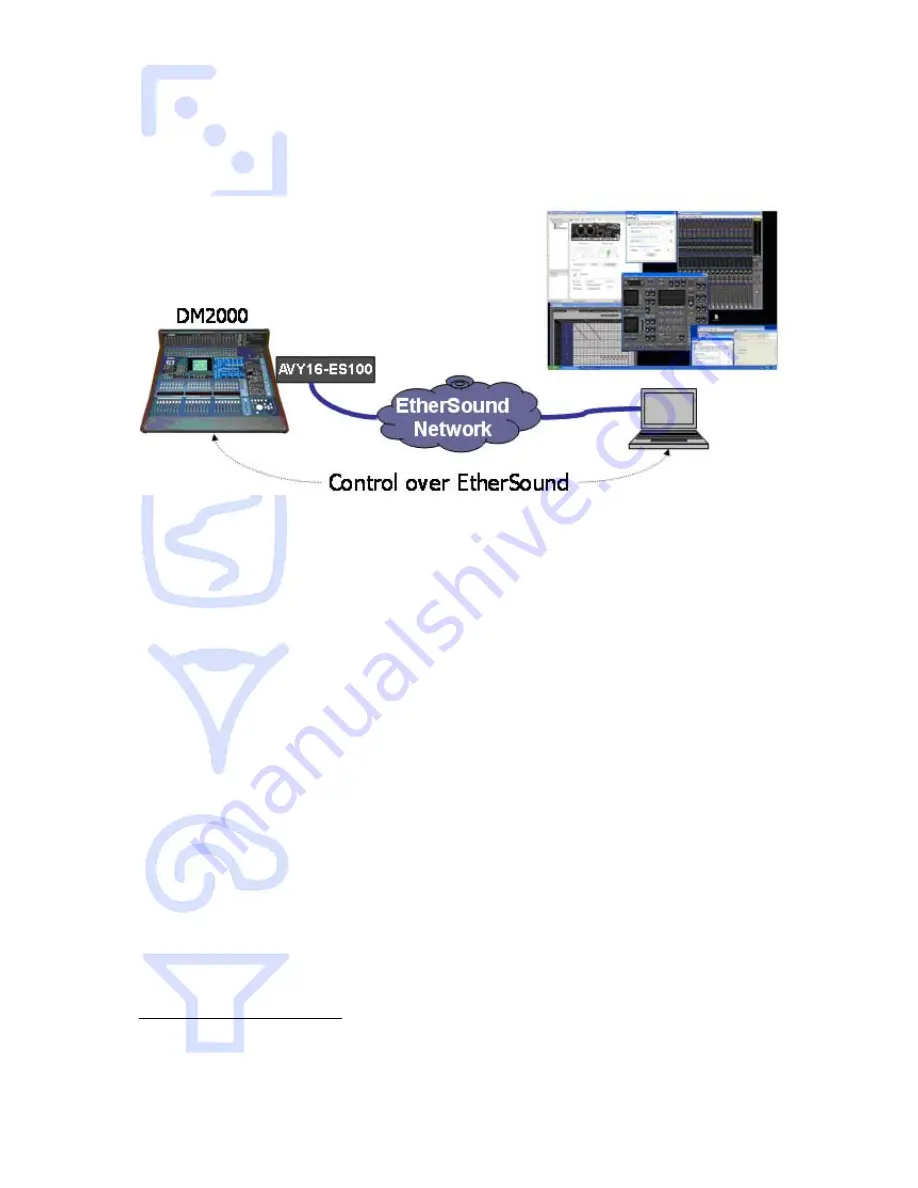
Remote Control over EtherSound via YGDAI Midi  


The AVY16-ES100 provides a local YGDAI midi interface to its host console which can be 
remotely link to a build-in ESMonitor midi driver. 
 

Today, the local YGDAI midi interface is working on the following Yamaha devices: 
DM2000, DM1000, 02R96, 01V96. 


Before using remote control over EtherSound few conditions must be respected: 


1.


The host console must been set

1

 properly to be controlled via a slot where an 

AVY16-ES100 has been connected to.  

 
2.


The midi parameters in EtherSound control panel must be set

2

3.


The specific application

3

 which manages your digital console such as Yamaha 

Studio manager must be installed first. 

 
If the 2 first conditions are respected, ESMonitor will display the console name in the field 

“AVY16-ES100 hosted by” and a button “Launch Manager” appears on the control page 
for the AVY16-ES100. This means that the AVY16-ES100 selected is in the slot defined by 

the console to be the “midi to host” and that you can remotely control the console.  
 
ESMonitor will display “Not configured” for an AVY16-ES100 if the YGDAI slot in which 

the AVY16-ES100 is put, does not support midi interface or has not been defined in the 
host console to be “midi to host”.  

 
Notice: Even if a console could accept multi AVY16-ES100, only one AVY16-ES100 can 

be defined to control the console 
 

If ESMonitor displays a button “Launch Manager” on the control page, you can click on it 
to launch the Yamaha application which will remotely control the host device.  
 

If it is the first time, ESMonitor will ask you to provide the link to the application (i.e. the 
access to the Yamaha application software such as Studio Manager).  


1

  Please  refer  to  your  Yamaha  Console  User’s manual for further information about the 

use of Yamaha console features and settings.  

2

 Please refer to your ESMonitor User’s manual for further information about the use of 

ESMonitor functions and settings 

3

 Please refer to your application User’s Manual for installing the application software. 


Summary of Contents for AVY16-ES100

Page 1: ...AVY16 ES100 User s Manual AuviTran 1 A A AV V VY Y Y1 1 16 6 6 E E ES S S1 1 10 0 00 0 0 U US SE ER R S S M MA AN NU UA AL L Version 1 2 September 2008 ...

Page 2: ...ENT 8 13 SOFTWARE DOWNLOAD AND INSTALLATION 8 14 GETTING START WITH AVY16 ES100 IN ESMONITOR SOFTWARE 8 14 1 AVY16 ES100 Properties Page in ESMonitor 9 14 2 AVY16 ES100 Control Page in ESMonitor 10 14 2 1 YGDAI Mode 11 14 2 2 Lock Routing function 11 14 2 3 Emergency Clock function 12 14 2 4 3rd Port function 12 14 2 5 Synchro Status 12 14 2 6 Hardware RS232 Tunnelling function 13 14 2 7 Remote Co...

Page 3: ...eral purpose Serial port allows connection and control of the mixer s parameters or other 3rd party external equipment Native ES100 kernel allows AVY16 ES100 to build ring architectures for network redundancy purposes and point to point RS232 tunnelling communication between equipments You will find herewith the necessary instructions to install your board Please read them carefully as misuse of t...

Page 4: ...t guarantee that interference will not occur in all installations If this product is found to be the source of interference which can be determined by turning the unit OFF and ON please try to eliminate the problems by using one of the following measures Relocate either this product or the device that is being affected by the interference Utilize power outlets that are on different branch circuit ...

Page 5: ...cribed therein 5 TRADEMARKS All trademarks listed in this manual are the exclusive property of their respective owners They are respected as is by AuviTran Any use of these trademarks must receive prior approval of their respective owners For any question please contact the trademark s owner directly 6 COPYRIGHT The information in this manual is protected by copyright Therefore reproduction distri...

Page 6: ...al mode 44 1kHz or 48kHz Audio Specifications Synchronization 44 1 kHz to 48kHz 5 from EtherSound Audio Format 24 bit Synchronization External clock synchronisation Automatic from EtherSound network at 44 1kHz or 48kHz or manually from mini YGDAI standard tools configuration Other I O RS232 serial interface 9 pin D Sub MIDI interface Internal port in mini YGDAI interface Development and Integratio...

Page 7: ...led 1 Switch off and unplug your device 2 Remove the two fixing screws and the protection plate as shown below Make sure you keep the protection plate and the fixing screws in a safe place for further use 3 Insert your board following the inside tracks and push it in as shown below You might need to push your board firmly inside the slot to make sure the connector inside is properly plugged 4 Fix ...

Page 8: ...e you are connecting several AVY16 ES100 boards into the same Yamaha device your device must be synchronised on the first card into the daisy chain The other cards will synchronise automatically on the clock 13 SOFTWARE DOWNLOAD AND INSTALLATION Please visit our website to download the latest version of our EtherSound Monitor Software called ESMonitor http www AuviTran com and save the file on you...

Page 9: ...itor and displayed in the left part of the ESMonitor Window When a device is selected you can access to 3 specific pages via tab selection on the right part of the screen These pages are The Properties page The Net patch or I O Patch page The Control page 14 1 AVY16 ES100 Properties Page in ESMonitor If the properties page is selected ESMonitor will display the following information Here you can d...

Page 10: ...or will display the following information Live vu meter are displayed for each input or output of your selected AVY16 ES100 All standard parameters of the AVY16 ES100 can be handled in this control page and you can use the vu meters to control remotely the audio sent and received by the AVY16 ES100 to your Yamaha device ...

Page 11: ...commend muting first all outputs before installing the AVY16 ES100 for the first time Even if the AVY16 ES100 is not recognised by the host device you can manage and then program it with ESMonitor First action in such device is to set the AVY16 ES100 in 8 channels mode and then reset the device 14 2 2 Lock Routing function Lock Routing is disabled by default The lock routing function allows to dis...

Page 12: ...formation about the use of Yamaha console features and settings 14 2 4 3rd Port function The 3rd Port function allows user to turn on or off the 3rd port of AVY16 ES100 This is useful to decrease power consumption of the card and so increase compliance with multi slots Yamaha consoles Simply check or uncheck the box to respectively turn on or turn off 3rd port Be aware that if your control PC is c...

Page 13: ...sent over the EtherSound network Data received from the EtherSound network are redirected to the Yamaha internal slot This mode must be used on LS9 to remotely control over EtherSound AD8HR connected to AVB32 ES or NAI48 ES device Mode 3 Data incoming to the AVY16 ES100 serial port are sent over the EtherSound network Data from the EtherSound network are output on the AVY16 ES100 serial port This ...

Page 14: ...g not the PC software AVB32 ES must have a firmware greater than or equal to 0x603 Upgrade it if it is not the case check for new firmware on AuviTran web site www auviTran com AVKit ES must have a firmware greater than or equal to 0x201 Upgrade it if it is not the case check for new firmware on AuviTran web site www auviTran com Example of use Remotely control 4xAD8HR connected to an AVB32 ES fro...

Page 15: ...t the AVY16 ES100 selected is in the slot defined by the console to be the midi to host and that you can remotely control the console ESMonitor will display Not configured for an AVY16 ES100 if the YGDAI slot in which the AVY16 ES100 is put does not support midi interface or has not been defined in the host console to be midi to host Notice Even if a console could accept multi AVY16 ES100 only one...

Page 16: ... the Application midi link to Midi Yoke NT 2 for input port and Midi Yoke NT 1 for output port if you let the default configuration Sample below shows a working setting in Control Panel and Yamaha System Setup You can now start the configuration of your network and enjoy the functionalities of AuviTran s AVY16 ES100 ...

Page 17: ...00 products AD8HR AES EBU AD8HR AES EBU AD8HR AES EBU AD8HR AES EBU RS232 RS422 RS422 RS422 NAI48 AVY16 ES100 AVY16 ES100 Mixing control Remote monitoring PC Stage Front Of House Public Address In this configuration control PC can be plugged on any AVY16 ES100 3rd port It allows you to monitor the whole network no matter where you are on stage and without any architecture modification e g cable di...

Page 18: ...nstream and extract upstream Loopback is also automatically activated on each device when ring mode is turned on When a link is broken the device which has its In port open becomes automatically primary master and audio is not interrupted more than few milliseconds This system is safer than a classic daisy chain as a dead link will interrupt audio and data transmission only few ms before recovery ...

Page 19: ...the ring and others classic daisy chain networks AVY16 ES100 1 is set as Preferred Primary Master clock source when ring closed Third port of AVY16 ES100 2 is used to monitor the ring 32 channels can be handled by the Yamaha console 32 channels remains that can be handled by AVM500 ES If a purple link is broken audio transmission is recovery few ms after broken link ...

Reviews: