AuviTran AVY16-ES User Manual Download Page 8


AVY16-ES User’s Manual 

AuviTran 

8

12-


SYNCHRONISATION MANAGEMENT 

 
Your AVY16-ES board must be synchronised with the related equipment. If this is not the 

case, or if the board is not properly synchronised, the audio data it will send or receive 
will be void.  

 
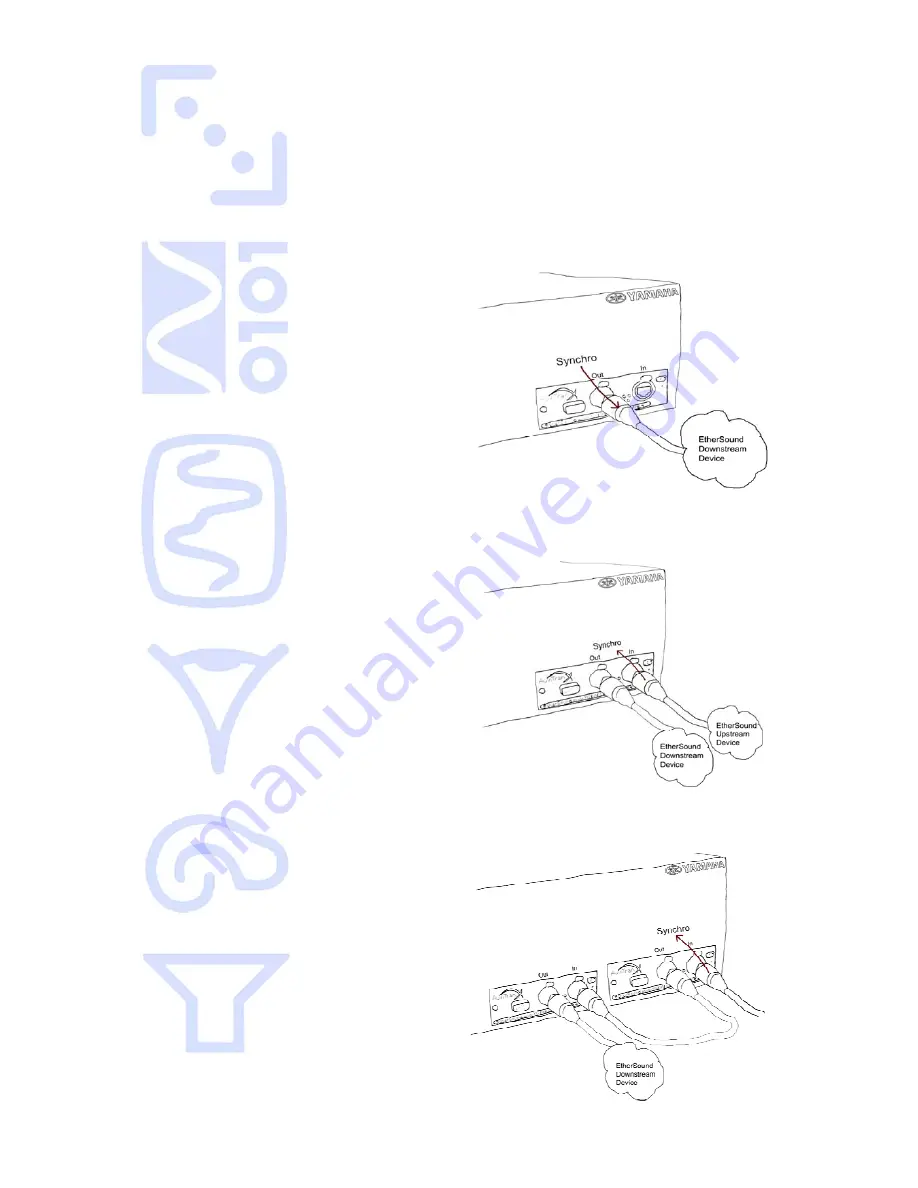
In case your AVY16-ES board is the first element of an EtherSound-based network, it will 

provide the clock to the network. The board will automatically connect on your Yamaha 
device. Your device must be internal clock configured or synchronised on the external 
wordclock (Fig 3). Please refer to your Yamaha user’s manual for more details about 

synchronisation. 

Fig. 3 : AVY16-ES Board starting a network 


In  case  your  AVY16-ES  board  is  part  of,  or  ends  the  EtherSound  network,  your  device 
must be synchronised on the EtherSound network. Therefore you should synchronise it 
on the YGDAI slot, where your AVY16-ES board is inserted (Fig 4).  

Fig. 4 : AVY16-ES Board in the middle of a 

network


In case you are connecting several AVY16-ES boards into the same Yamaha device, your 

device must be synchronised on the upstream board clock (see up). The other 
downstream boards will synchronise automatically on the clock (Fig 5).  


Fig. 5: several AVY16-ES boards plugged on the 

same Yamaha device 


Summary of Contents for AVY16-ES

Page 1: ...AVY16 ES User s Manual AuviTran 1 A A AV V VY Y Y1 1 16 6 6 E E ES S S U US SE ER R S S M MA AN NU UA AL L Version 2 4 March 2006 ...

Page 2: ...ONS 5 10 TECHNICAL SPECIFICATIONS OF THE BOARD 6 11 PLUGGING THE BOARD 6 12 SYNCHRONISATION MANAGEMENT 8 13 SOFTWARE DOWNLOAD AND INSTALLATION 9 14 GETTING START WITH AVY16 ES IN ESMONITOR SOFTWARE 9 14 1 AVY16 ES Properties Page in ESMonitor 10 14 2 AVY16 ES Control Page in ESMonitor 11 14 2 1 YGDAI Mode 12 14 2 2 Lock Routing function 12 14 2 3 Emergency Clock function 12 14 2 4 Hardware RS232 T...

Page 3: ... professional audio applications The general purpose Serial port allows connection and control of the mixer s parameters or other 3rd party external equipment You will find herewith the necessary instructions to install your board Please read them carefully as misuse of this device might cause serious damage to you and your environment 2 WARNING CONCERNING SERIAL PORT CONNECTION TO NOT DAMAGE THE ...

Page 4: ...s does not guarantee that interference will not occur in all installations If this product is found to be the source of interference which can be determined by turning the unit OFF and ON please try to eliminate the problems by using one of the following measures Relocate either this product or the device that is being affected by the interference Utilize power outlets that are on different branch...

Page 5: ...cribed therein 5 TRADEMARKS All trademarks listed in this manual are the exclusive property of their respective owners They are respected as is by AuviTran Any use of these trademarks must receive prior approval of their respective owners For any question please contact the trademark s owner directly 6 COPYRIGHT The information in this manual is protected by copyright Therefore reproduction distri...

Page 6: ...External clock synchronisation Automatic from EtherSound network at 48 kHz or 44 1 kHz or manually from mini YGDAI standard tools configuration OTHER I O RS232 serial interface 9 pin D Sub DEVELOPMENT AND INTEGRATION ENVIRONMENT OS Supported Windows 2000 XP and Linux ESMonitor AuviTran s ESMonitor is a Windows XP application which can run on a remote PC and can control and monitor all AVY16 ES inf...

Page 7: ... shown below You might need to push your board firmly inside the slot to make sure the connector inside is properly plugged Fig 2 Fix the board to the Yamaha device with the fixing screws furnished with the board Make sure the fixing screws are tightly fixed if not the board will not be ground connected ...

Page 8: ...ernal wordclock Fig 3 Please refer to your Yamaha user s manual for more details about synchronisation Fig 3 AVY16 ES Board starting a network In case your AVY16 ES board is part of or ends the EtherSound network your device must be synchronised on the EtherSound network Therefore you should synchronise it on the YGDAI slot where your AVY16 ES board is inserted Fig 4 Fig 4 AVY16 ES Board in the mi...

Page 9: ...nd device management such as Enumeration of EtherSound devices and I O routing 14 GETTING START WITH AVY16 ES IN ESMONITOR SOFTWARE Below is an example of architecture using AVY16 ES The computer on which ESMonitor was installed should now be connected to the IN Port of a primary master of an EtherSound network A primary master is the first EtherSound based device of an EtherSound network which ha...

Page 10: ...VY16 ES Here is where you could select a device in the list Here is displayed the EtherSound device type For Audio routing part AVY16 ES is seen by default as a bidirectional EtherSound device with 16 inputs and 16 outputs but could be set as 8 inputs and 8 outputs using the YGDAI mode buttons in the Control page You must refer to ESMonitor documentation for Net patch or I O routing management 102...

Page 11: ...hannel management by default 16 channels If the device selected is Primary Master you can set the remote device to link to the local RS232 and start the virtual tunnelling Here you can set the mode of your YGDAI Here you can check your AVY16 ES synch If your console host port is set to manage your AVY16 ES you will see its name and you could click on Launch Manager to run the Yamaha studio manager...

Page 12: ...te software modification of EtherSound routing for the board This is useful to prevent wrong patching during live event When the lock routing is set the Hardware configuration Flag of the property page is set to ON which simulates an EtherSound hardware setting routing done only by hardware dip switch When the lock routing is disabled the Hardware configuration Flag of the property page is set to ...

Page 13: ...top the tunneling on your Primary Master AVY16 ES if it is working 3 Select the remote device in the combo box of the Hardware RS232 tunneling area on your Primary Master AVY16 ES 4 Press the Start button of the Hardware RS232 tunneling area 5 The red light on the left of Start button becomes Green to specify that the tunnelling is working and the Start Button becomes a Stop Button Notices Hardwar...

Page 14: ... to AVY16 ES board serial port using serial cable following this schematic 2 3 4 6 5 2 3 6 4 5 Remote console AVY16 ES Serial Port Serial link schematic TO NOT DAMAGE THE AVY16 ES BOARD THE SERIAL CABLE connecting the AVY16 ES serial port to the remote control of a YAMAHA mixing console or to any other device serial port MUST SATISFY THE FOLLOWING REQUIREMENTS 1 PINS 1 7 8 AND 9 MUST STAY UNCONNEC...

Page 15: ...control page for the AVY16 ES This means that the AVY16 ES selected is in the slot defined by the console to be the midi to host and that you can remotely control the console ESMonitor will display Not configured for an AVY16 ES if the YGDAI slot in which the AVY16 ES is put does not support midi interface or has not been defined in the host console to be midi to host Notice Even if a console coul...

Page 16: ...figuration of your network and enjoy the functionalities of AuviTran s AVY16 ES 15 WARNING ON LOOP CONFIGURATION The Ethernet IN port of very first EtherSound device is reserved for computer remote plug in with AVS ESMonitor software TO NOT CREATE A DEAD LOOP DO NOT CONNECT TO THIS ETHERNET IN PORT AN ETHERNET OUT PORT FROM THE LAST DEVICE OF THE SAME ETHERSOUND NETWORK This kind of architecture i...

Reviews: