background image

4

Tech Support 770-844-4200

www.productivity2000.com

QR Code

Use any QR Code reader application to 

display the module’s product insert.

Important Hot-Swap Information

The Productivity2000 PAC supports hot-swap! 

Individual modules can be taken offline, removed, and 

replaced while the rest of the PAC system continues 

controlling your process. Before attempting to use the 

hot-swap feature, be sure to read the hot-swap topic in 

the programming software’s help file or our online docu-

mentation at AutomationDirect.com for details on how to 

plan your installation for use of this powerful feature.

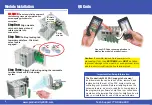
Align

with slot

2

 rotate

to seated

position

Module Installation

WARNING:


Do not apply field power until 

the following steps are completed. See 

hot-swapping procedure for  

exceptions.

WIRE STRIP

LENGTH

WIRE STRIP

LENGTH

Step One: 

Align module 

catch with base slot and 

rotate module into  

connector.

Locked

Unlocked

Step Two: 

Pull top locking tab 

toward module face. Click indi-

cates lock is  

engaged.

Step Three: 

Attach field wiring using the removable 

terminal block or ZIPLink wiring  

system.

Caution: 

If possible, remove field power prior to  

proceeding. If not, then 

EXTREME

 care 

MUST 

be taken 

to prevent damage to the module, or even personal injury 

due to a short circuit from the live terminal block.

Summary of Contents for Productivity2000 P2-16ADL-1

Page 1: ...ave any questions concerning the installation or operation of this equipment or if you need additional information please call Technical Support at 770 844 4200 This publication is based on informatio...

Page 2: ...1010 2 201 Safety Input Specifications Input Channels 16 Module Signal Input Range 0 20 mA Signal Resolution 13 bit Resolution Value of LSB least significant bit 0 20 mA 2 44 A per count 1 LSB 1 count...

Page 3: ...ower User Supplied Transmitter Power AC or DC 032A fuse COM I 3 Wire Current Transmitter 3 Wire Transmitter 24VDC User Supplied Power COM Wiring Diagram Schematic 1 2 3 4 5 6 7 8 9 10 11 12 13 14 15 1...

Page 4: ...your installation for use of this powerful feature 1 Align with slot 2 rotate to seated position Module Installation WARNING Do not apply field power until the following steps are completed See hot s...

Page 5: ...24 1P ZL P2 CBL24 2P 3Accessories ZL RTB COM TW SD SL 1 TW SD MSL 1 Module Configuration Using the Hardware Configuration tool in the Productivity Suite programming software drag and drop the P2 16ADL...

Page 6: ...2 3 4 5 6 6 5 7 0 0 0 0 0 0 0 Level Transmitter Tank Level 7 0 0 0 0 0 0 0 Enter values for each breakpoint in the table Each breakpoint will define a segment of the non linear scaling 7 6 5 4 3 2 1...

Page 7: ...7 Sales 800 633 0405 www productivity2000 com...

Page 8: ...vision Date P2 16ADL 1 DS 2nd Ed Rev A 2 11 2022 Copyright 2015 AutomationDirect com Incorporated All Rights Reserved Worldwide Diagnostic Status Under Range Error 1 bit per channel Over Range Error 1...

Reviews: