background image

P a g e

 | 

3


Overview of System 

Please read this entire manual before attempting to install this system. 
This system should only be installed by a professional automatic gate installer or access control 
specialist dealer. 
It is recommended that the system be set up, configured, commissioned and tested on a 
workshop bench 

before

 taken to site for installation. 


Site Survey 


Before installing this system, you need to be sure that there is good mobile GSM cell coverage in 
the area it is to be installed. It is recommended that you conduct a site survey, and check 
reception on the site for a GSM network. If reception is poor in the area, then this system is not 
recommended. 
 

SIM Card 


You will need a SIM card in order to use this system. It should be a regular voice and SMS text 
SIM card. Do not use a data only SIM, as this is only for tablets and will not work in the unit.  


Power 

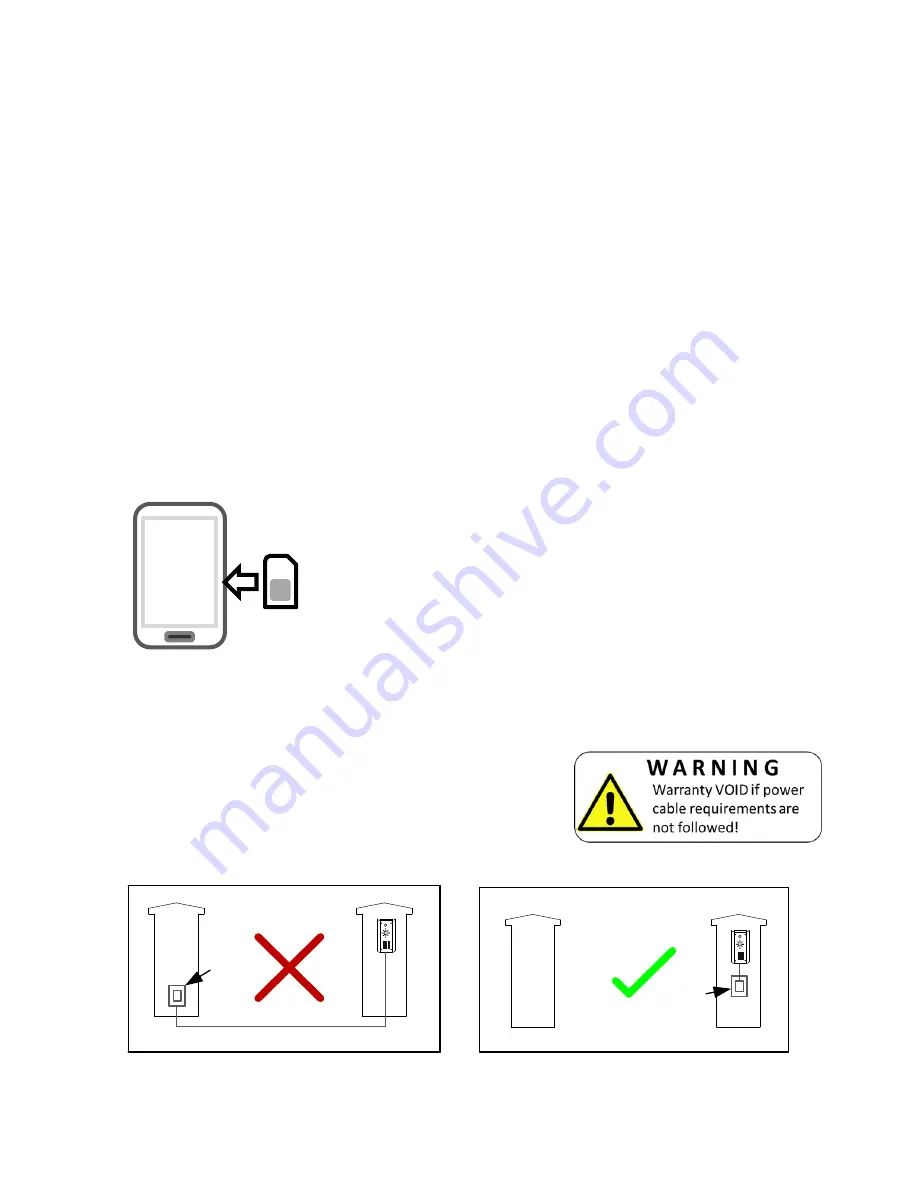
TIP: Most technical calls received are due to installers using CAT5 or alarm cable to power 
the unit. Neither are rated to carry enough power (1.2 amp peak). Please use following 
cable

… 

Up to 2 metres (6 feet) 

– Use minimum 0.75mm

2

 (18 gauge) 

Up to 4 metres (12 feet) 

– Use minimum 1mm

2

 (16 gauge) 

Up to 8 metres (24 feet) 

– Use minimum 1.5mm

2

 (14 gauge) 


Using insufficient power cable thickness will cause excessive stress on electronic components, 
and therefore void the manufacturer’s warranty. 

15v Power 
adaptor


15v 

Power 

adaptor


To avoid such problems it is recommended (and is good practice) to locate the power supply as 
close to the transmitter as possible. This avoids power cable noise and interference and enhances 
the lifetime of the product. 

1) Ensure the SIM has calling credit, and can make and 
receive calls on a mobile cell phone. 
2) Check that the SIM is not locked to a phone and can be 
used in other devices. 
3) Check that the SIM does not have a PIN code request. 

4) You are now ready to begin programming

Summary of Contents for AB

Page 1: ...P a g e 1 Installation User Manual For C e l l C O M GSM Intercom System Models AB ABK HB HBK FB FBK Version 6 ...

Page 2: ...SM controller Pg 5 Codelock Keypad Connections Pg 5 Wiring Tips Pg 6 Powering Up Pg 6 Programming Pg 7 Complete list of GSM parameters Pg 9 Keypad Overview Pg 10 Basic Keypad Programming Pg 10 Full Keypad Programming Pg 10 Using the Keypad Pg 12 Using the Intercom Pg 12 Control by SMS Pg 13 Check if door gate is open closed Pg 13 Using optional App Pg 13 Maintenance of the intercom Pg 14 Troublesh...

Page 3: ...ets and will not work in the unit Power TIP Most technical calls received are due to installers using CAT5 or alarm cable to power the unit Neither are rated to carry enough power 1 2 amp peak Please use following cable Up to 2 metres 6 feet Use minimum 0 75mm2 18 gauge Up to 4 metres 12 feet Use minimum 1mm2 16 gauge Up to 8 metres 24 feet Use minimum 1 5mm2 14 gauge Using insufficient power cabl...

Page 4: ...ide View Flush Panels Call Button Optional keypad module Remove Side View Flush with surface Tip Use appropriate fixings to ensure the intercom cannot be removed from the wall Do not remove the protective film until the system is fully installed and working Protective coverings are there to protect the intercom from scratches and marks during installation Antenna height is best higher than interco...

Page 5: ...Codelock Keypad connections Keypad versions only N C COM N O N C COM N O egress OUT1 OUT2 OUT3 N C COM N O K or A DU out GND Sense INT Lock Tamper N C O P1 inhib 12v from GSM unit Please ensure the SIM card is a 2G compatible SIM card The SIM may also be 3G and 4G capable as well as long as both the SIM and the network also support 2G Do not use a SIM card for a tablet as these only support data a...

Page 6: ...GSM output Optional keypad output Lock Separate PSU Connecting automatic gates Start Com Gate controller GSM output Optional keypad output Powering Up Perform a final check of wiring and ensure the antenna is connected before switching on the power Once the power is switched on the power LED should illuminate GSM modem Power LED GSM LED CPU LED open close Searching Network found Standby Busy TIPS ...

Page 7: ...987654321 Pass code Function code Data TIP 11 Telephone number 1 12 Telephone number 2 13 Telephone number 3 E g 12 1234 11telephonenumber1 12telephonenumber2 13telephonenumber3 Send the SMS 20 as shown to the SIM card number of the intercom The unit should reply with a reception level between 1 and 31 20 Signal level 19 1 12 Poor 13 20 Medium 21 31 Good Note Reception levels below 14 can give pro...

Page 8: ...stored in memory Any of these numbers can call the intercom It will recognise the number end the call without answering and activate the output relay all within a few seconds Now you may add numbers which can call the unit to trigger the relay by sending the following SMS up to 3 phone numbers can be sent in a single SMS 12 1234 72telephonenumber 72telephonenumber 72telephonenumber Just send the c...

Page 9: ...king time 005 999 seconds Must be 3 digits 60 secs 55 Max monitoring time for listen in mode when calling the intercom 00 60 mins 00 no limit 10 mins Scheduled service calls 77number Store a service number to receive a scheduled call or SMS from the unit and prevent inactive SIM being turned off by provider N A 57 Set the time schedule for the intercom to make a scheduled call or SMS to the servic...

Page 10: ... a security precaution the keypad cannot be programmed for 60 seconds Once this time elapses you may begin TIP Flashing amber LED is normal standby mode Basic Keypad Programming 0 0 0 0 Quick start guide 1 Enter programming mode amber LED should be ON 1 0 2 0 0 0 2 Enter a new user code 3 Exit programming mode 4 Enter the new user code to check the relay clicks Full Keypad programming Enter progra...

Page 11: ... code 4 8 digits Validate Example Add user 31 to have access code 5555 operating relay 2 2 0 2 0 3 5 5 5 5 1 Group 2 Add code Location 31 Pin code 5555 Validate Programming relay output times and modes 0 1 0 start stop toggle mode latching 1 99999 seconds momentary operation 9 9 9 9 9 or 51 relay1 52 relay2 53 relay3 Validate Delete a user code even if you don t know the code 5 10 relay1 20 relay2...

Page 12: ...ited out of programming mode simply enter the user code Using super user codes 1 Activate output 1 2 Activate output 2 3 Activate output 3 Using the intercom This cellular intercom can dial up to 4 numbers in sequence for any call button when pressed Any user receiving the call can answer speak to the visitor and press the following digits on their mobile or fixed line telephone to control the rel...

Page 13: ... example shows that the input sensor is in OPEN state and the relay is OFF If the relay is latched then the status will change to ON If the input limit witch is closed the status shown will change to CLOSED TIP If there is not a physical limit switch fitted to the door or gate then the status input will always show OPEN 22 Status OPEN Relay OFF Trigger Gates Hold Open Unhold Close Main Trigger but...

Page 14: ...and standards 850 900 1800 1900 MHz Check the reception is good Poor reception is not sufficient Check that the cable from power supply to intercom is less than 15 feet and that the cable thickness is 1 5mm or 14 gauge if longer than 15 feet Alarm or CAT5 cable is not sufficient Power off remove the SIM use fine sand paper to lightly sand the SIM pads and contacts on the GSM unit lightly bend the ...

Page 15: ...tly is also a symptom of low reception or insufficient power cabling Check steps above on improving reception or addressing the power problem Some iphone users may experience trouble using the key to trigger the gates In this case refer to your distributor on how to change the trigger key to any other key Also check that the relays are not already latched with the 22 command If they are latched th...

Page 16: ...P a g e 16 ...

Page 17: ...service area it may be possible to book a local technician to look at your installation Wait times will vary dependent on local workloads The cost is a service fee which includes the first half hour and the hourly rate thereafter If any Automatic Solutions provided parts are found to be defective and within warranty these will be provided free of charge NOTE If you suspect that any parts are defec...

Reviews: