AutoExtra ARA-HD2 User Manual Download Page 20

20 


c.  Brief 

1.  Press [EXIT]/[MENU] to return to 

“Schedule” screen. 


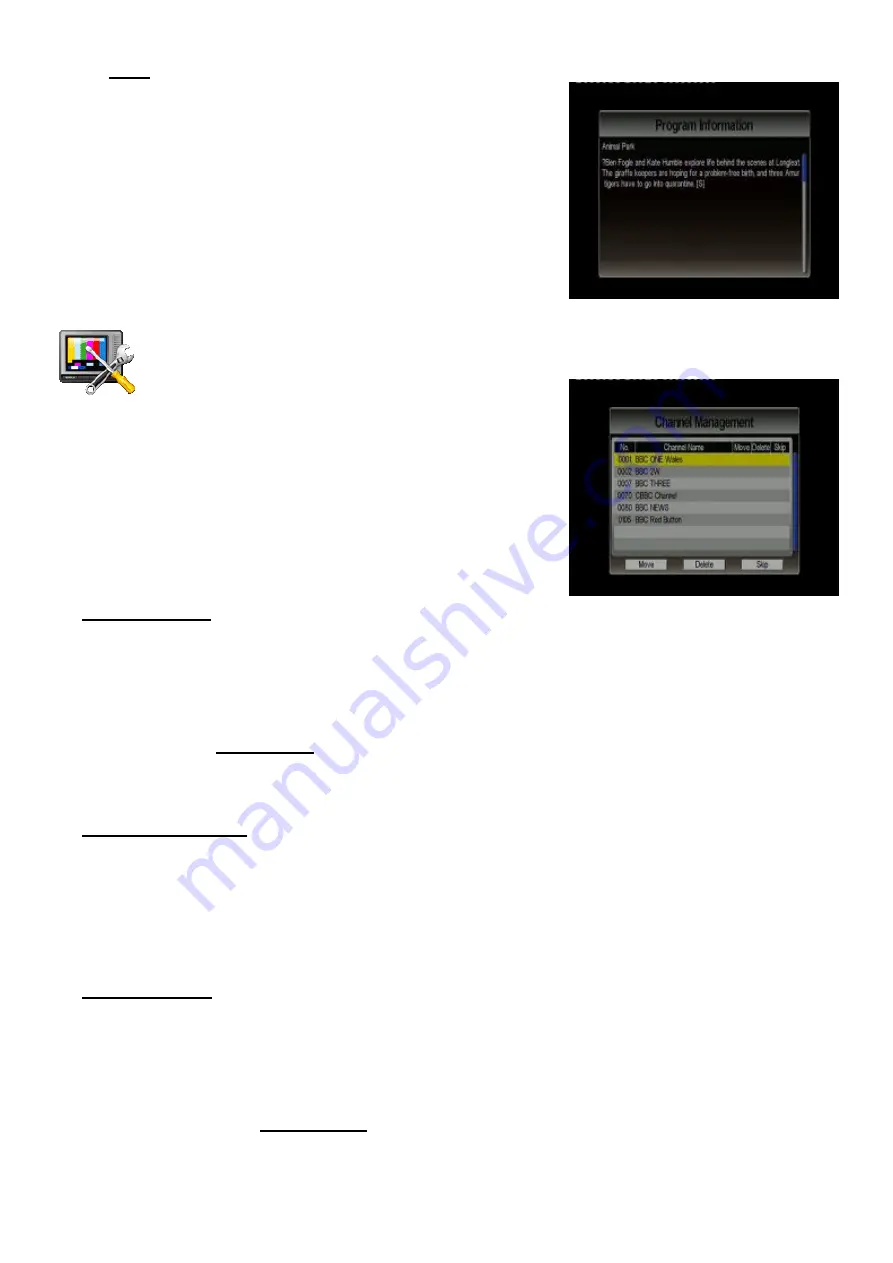
III.1.2 Channel Management 

To rearrange and to edit the TV channel list by skip, move, and delete functions. 


1. 

Select  “Channel  Management”  in  the  TV 

Menu and press [OK] button. The management  screen 

will appear as on the picture on the right. 

2.  Press  [CH

]/[CH

]  buttons  to  scroll  up/down  the 

channel list. Press [OK] button to enter the editing menu 

for a chosen channel. 

3.  Press [EXIT]/[MENU] button to exit anytime. 


Skip a Channel 

1. 

After  entering  the  channel  editing  menu,  select  the  “SKIP”  visual-button  on  screen  by 

pressing [VOL

]/[VOL

] buttons. 

2.  Press [OK] button to activate or deactivate it. 


NOTE: this function 

temporarily

 removes the channel from the program list. Users can restore the 

channels by deactivating this function. 


Channel Movement 

1.  After  entering  the  channel  edit

ing  menu,  select  the  “MOVE”  visual-button  on  screen  by 

pressing [VOL

]/[VOL

] buttons. 

2.  Use [CH

]/[CH

] buttons to move the channel up or down in the list. 

3.  Press [OK] button to save the new listing. 


Channel Delete


1.  After  entering  the  channel  editing  menu, 

select  the  “DELETE”  visual-button  on  screen by 

using [VOL

]/[VOL

] buttons. 

2.  Press [OK] button to delete the channel. 


NOTE:  this  function  will 

permanently

  delete  the  channel  from  the  current  program  list.  Users 

restore the channels only by performing auto search. 


Summary of Contents for ARA-HD2

Page 1: ...ARA HD2 Car use HD DVB T Diversity Receiver User Manual...

Page 2: ...equipment and the automotive accessories may be dangerous and could lead into the risk of the electric shock or the other hazards If the receiver does not work properly please disconnect the power plu...

Page 3: ...l List 19 III 1 2 Channel Management 20 III 1 3 Auto Search 21 III 1 4 DVB T Audio Settings 21 III 1 5 Channel Information 22 III 1 6 Aspect Ratio 22 III 1 7 Subtitle 23 III 1 8 Teletext 23 III 1 9 AF...

Page 4: ...ED indicates if the 12V or 24V power supply has been successfully applied to the device 4 Conax Slot extension port Extension port for external Conax smart card slot to enable pay TV service 5 USB por...

Page 5: ...5 Back Side 6 Ant In antenna connection port NOTE this unit provides 5V antenna power through this connection port 7 HDMI Port HDMI output port 6 Ant in 7 HDMI port...

Page 6: ...the vehicle Please refer to the diagram below for some recommended locations 1 Behind the Front Bumper Note Please make sure the bumper is not made of metal 2 Top of the Front Windscreen but at least...

Page 7: ...7 Antenna Cable Routing Once a suitable position of antenna placement is found carefully route the antenna cables to the receiver unit and then connect to the Antenna Inputs on DTV receiver...

Page 8: ...AUDIO L output 8 Audio R output 9 UART Rx input 10 UART Tx input 11 IR data intput 12 LED_EN 13 IR power output 14 PWR_GND 15 12V input 16 ACC input AV I O Ports Definition B out G out GND Audio L out...

Page 9: ...e volume down or move the cursor left 13 OK Select the highlighted item or select play pause 14 FR Fast Rewind 15 REC Start to record the TV Radio program or exit the recording Subtitle key in the nor...

Page 10: ...to select it DVB T TV Mode To enter DVB T TV mode DVB T Radio Mode To listen to DVB T radio broadcasting Movie Playback Mode To enter movie playback mode and watch movie files Music Playback Mode To e...

Page 11: ...LED indicator will be illuminated in RED as shown below 3 When the system is activated the Operating LED on the unit will be illuminated in Green Step 2 Highlight the TV option and press OK to enter t...

Page 12: ...anged Step 4 Perform auto search to find available TV channels 1 Select Start on Setup Wizard and press OK to active it 2 The device will show Scan screen as below and perform searching the available...

Page 13: ...Radio Listening 1 Press CH CH buttons to select the Ratio item and then press OK button to enter the radio mode 2 Press CH CH buttons to select your preferred radio channel 3 The radio service will st...

Page 14: ...ack in Music mode Important notes i A recorded program will be stored in a default folder named Recorded_Program The file types will be TSV file for TV program and TSA file for Radio ii The file is na...

Page 15: ...Use CH and CH buttons to scroll up and down through files and then select the desired file by pressing OK button The video file will instantly start playing NOTE Users can only choose video files unde...

Page 16: ...Use CH and CH buttons to scroll up and down through files and then select the desired file by pressing the OK button The audio file will instantly start playing NOTE users can only choose music files...

Page 17: ...ppear on screen Use CH CH VOL VOL buttons to browse the folder and then select the desired one by pressing OK button Note users can only choose photo files under this mode If users choose music or vid...

Page 18: ...and press VOL button to rotate it counterclockwise Slideshow Press PLAY PAUSE to start stop photo slideshow Zoom 1 When viewing a picture press OK to enter zoom mode 2 Press FF to zoom in or press FR...

Page 19: ...st will appear on screen NOTE you can also press EPG button on remote controller to enter Channel List while enjoying DVB T TV Radio 2 Press CH CH buttons to scroll up down the channel list to preview...

Page 20: ...by pressing VOL VOL buttons 2 Press OK button to activate or deactivate it NOTE this function temporarily removes the channel from the program list Users can restore the channels by deactivating this...

Page 21: ...Audio Settings To select either master or secondary language as well as the audio channel of current service 1 Browse the TV menu screen using CH CH buttons to highlight the Audio option Press OK butt...

Page 22: ...the channel information 3 Press EXIT MENU button to exit III 1 6Aspect Ratio To adjust image aspect ratio into full screen letter box and none 1 Browse TV menu using CH CH button and press OK button...

Page 23: ...to highlight the Teletext option Press OK button to enter Teletext menu 2 Press CH button to view next page or CH to view previous teletext page 3 Press MENU EXIT to leave III 1 9AFS Setting To set up...

Page 24: ...ving between 2 cities areas where the channel is broadcasted in different frequencies For example channel ABC in city A is broadcasted in frequency 474MHz In city B this channel ABC is broadcasted in...

Page 25: ...gional settings 1 Press CH CH buttons to highlight the item you want to adjust 2 Press VOL button and use CH CH to scroll up and down the options 3 Select one by pressing the OK button or exit the set...

Page 26: ...ss CH CH buttons to highlight the item you want to adjust 2 Press VOL button and use CH CH to scroll up and down the options 3 Select one by pressing the OK button or exit the setting by pressing the...

Page 27: ...ade file into the card slot 2 After entering the Version Upgrade menu press OK button to start the upgrade III 2 7Reset Default To reset all settings to factory default 1 Press CH CH buttons to highli...

Page 28: ...t the setting by pressing the EXIT MENU button 4 After adjusting press EXIT MENU button to exit III 4 Music Menu On entering Music service press MENU button to invoke music menu Through this menu user...

Page 29: ...and subtitle III 5 1 Menu 1 Press MENU to enter Menu 2 Press CH CH buttons to highlight the item you want to adjust 3 Press VOL button and use CH CH to scroll up and down the options 4 Select one by...

Page 30: ...ssive antennas for better reception quality The antennas are not properly connected Please check the connection of the antennas No DVB T service is provided in the area Check your country DVB T covera...

Page 31: ...land Turkish Czech Greece Danish Arabic Thai Traditional Chinese Hungarian Simplified Chinese Vietnamese Indonesian Features DVB T TV Radio Auto Channel Search Multi Language EPG Teletext Subtitle Aut...

Page 32: ...32 Dimension and Weight Dimension 80 x 28 5x 137 5 mm Weight 242 g...

Reviews: