background image

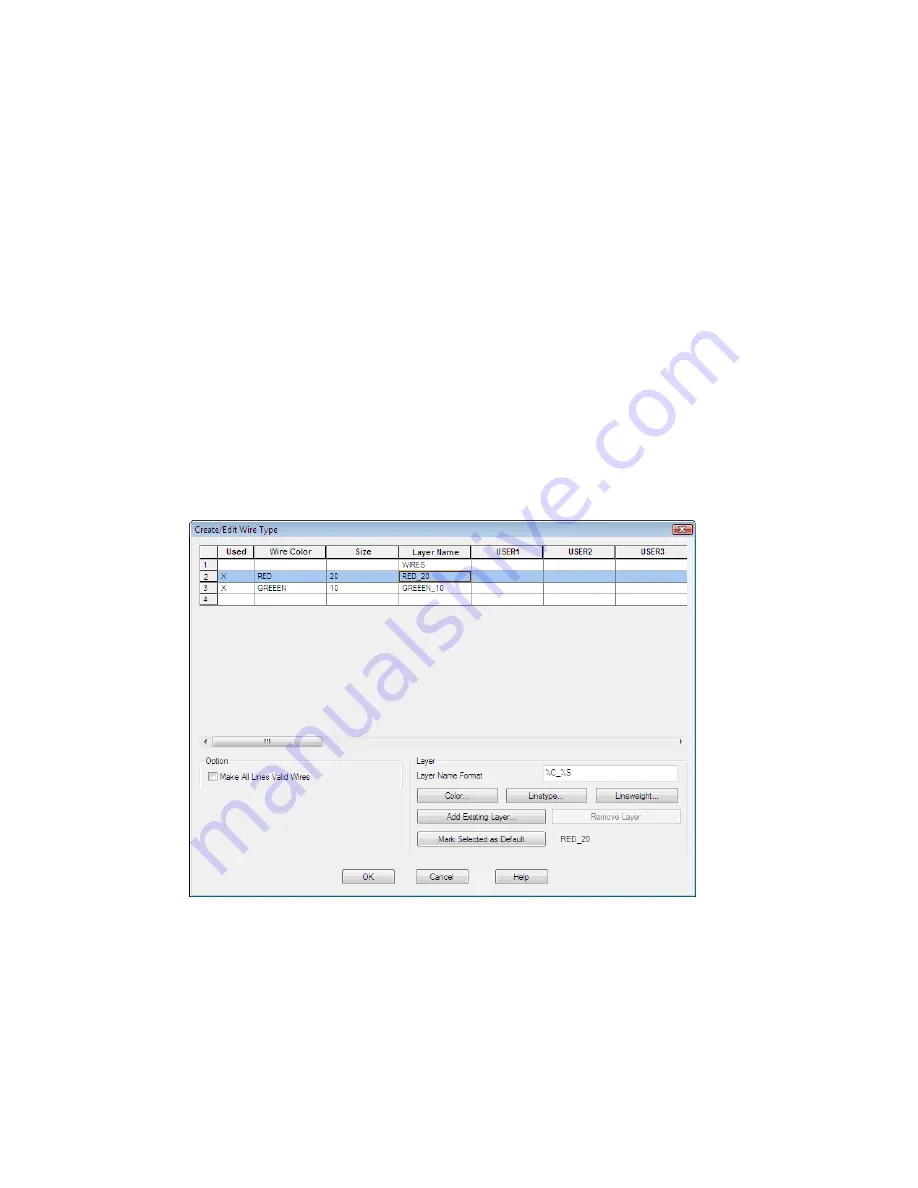
Size:

20

The Layer Name is automatically created. The name RED_20 is assigned
to the wire layer you are creating.

3

Click Color.

4

In the Select Color dialog box, select red and click OK.

5

Click Linetype.

6

In the Select Linetype dialog box, select Continuous and click OK.

7

In the Create/Edit Wire Type dialog box, specify:

Wire Color:

GREEN

Size:

10

Color:

Green

Linetype:

Hidden2

8

Select RED_20 in the grid and click Mark Selected as Default.

9

Click OK.

Creating Pipes | 195

Summary of Contents for 225A1-05A111-1001 - AutoCAD Electrical 2009

Page 1: ...AutoCAD Electrical 2010 Getting Started January 2009 Part No 225B1 050000 PM01A ...

Page 2: ...er i drop ImageModeler iMOUT Incinerator Inferno Inventor Inventor LT Kaydara Kaydara design logo Kynapse Kynogon LandXplorer LocationLogic Lustre Matchmover Maya Mechanical Desktop Moonbox MotionBuilder Movimento Mudbox NavisWorks ObjectARX ObjectDBX Open Reality Opticore Opticore Opus PolarSnap PortfolioWall Powered with Autodesk Technology Productstream ProjectPoint ProMaterials RasterDWG React...

Page 3: ...andards 3 Performing Exercises 3 Prerequisites 4 Help 4 Command Summary 5 Chapter 2 Projects 7 Working with Projects 7 Working with Drawings 10 Ladder Style Diagrams 17 Chapter 3 Wires 19 About Wires 19 Inserting Wires 20 Trimming Wires 21 Chapter 4 Schematic Components 23 iii ...

Page 4: ...ved Circuits Using WBlock 91 Inserting a One line Motor Circuit 93 Inserting a Dual One line Power Feed Circuit 98 Referencing an Existing Circuit 101 Chapter 6 PLC 105 Inserting Ladders into Drawings 105 Inserting PLC Modules 107 Using Multiple Insert Component 111 Annotating PLC I O Descriptions 116 Inserting I O Based Wire Numbers 118 Resequencing Ladders 121 Chapter 7 Wire Numbers 123 About Wi...

Page 5: ...ng Up P ID Drawings 206 Inserting P ID Schematic Symbols 210 Creating Pipes 213 Generating Reports 217 Chapter 11 Report Generation 219 Generating Bill of Material Reports 219 Inserting BOM Tables into Drawings 220 Editing BOM Tables on Drawings 221 Changing Formats of BOMs 224 Exporting BOMs to Spreadsheets 225 Migrating AutoCAD Data 227 Chapter 12 Migration of AutoCAD Data 229 About Tagging and ...

Page 6: ...Index 245 vi Contents ...

Page 7: ...AutoCAD Electrical Environment Part 1 of this manual provides information about access to AutoCAD Electrical commands and how to set up a project 1 ...

Page 8: ...2 ...

Page 9: ...al you can perform the following exercises using the IEC demo drawing set however your components and wire numbering will display differently Performing Exercises All of the AutoCAD commands and features are available while working on AutoCAD Electrical drawings All intelligence is carried directly on the drawing using AutoCAD blocks with attributes and XDATA AutoCAD Electrical does not require an...

Page 10: ...st screen 6 Select AB and Siemens on the Manufacturer Contents Selection screen 7 Click Next on the Symbol Libraries screen 8 Click Next to continue Prerequisites It is assumed that you have a working knowledge of the AutoCAD interface and tools If you do not review the AutoCAD online documentation It is recommended that you have a working knowledge of Microsoft Windows 2000 or Windows XP and a wo...

Page 11: ...mmand Summary You can access commands in AutoCAD Electrical through the command line the ribbon and toolbars AutoCAD Electrical provides three predefined workspaces ACADE 2D Drafting Annotation ribbons that provide the AutoCAD Electrical tools and the AutoCAD 2D Drafting and Annotation tools ACADE 3D Modeling ribbons that provide the AutoCAD Electrical tools and the AutoCAD 3D Modeling tools AutoC...

Page 12: ...6 ...

Page 13: ... can be active at a time NOTE Install the JIC symbol library for these exercises to function properly Use the Project Manager to add new drawings reorder drawing files and change project settings You cannot have two projects open in the Project Manager with the same project name By default the Project Manager is open and docked on the left hand side of your screen You can dock the Project Manager ...

Page 14: ...o open an existing project In the Project Manager click the project selection arrow and select Open Project 3 In the Create New Project dialog box specify Name AEGS A name must be entered to define any of the project properties The wdp extension is not required in the edit box 4 Make sure wddemo wdp is specified in the Copy Settings from Project File edit box 8 Chapter 2 Projects ...

Page 15: ...the same family are located at the same reference location When reference based tagging is used a suffix variable is required to keep components of the same family type unique For example three push buttons on line reference 101 could be labeled PB101 PB101A and PB101B Click Suffix Setup to change the suffix variable 3 Click the Wire Numbers tab 4 In the Wire Number Format section verify that Line...

Page 16: ...unning the Add Drawing command is saved as Drawing Custom Properties 6 Click OK Working with Drawings A single project file can have drawings located in many different directories There is no limit to the number of drawings in a project You can add drawings to your project at any time When you create a drawing using the New Drawing tool it is automatically added to the active project Many of the d...

Page 17: ...ing as a template You can save a drawing at any stage of completion as a template file When you use a drawing as a template the settings in that drawing are used in the new drawing The changes you make to a drawing that is based on a template do not affect the template file AutoCAD Electrical fully supports the use of AutoCAD template files To make an AutoCAD drawing compatible with AutoCAD Electr...

Page 18: ... Add 3 When asked whether to apply the project default values to the drawing settings click Yes The Project Manager lists the files under the AEGS folder New drawings that you add from this point on are added at the end of the drawing order You now have access to the files required for the exercises in this book NOTE Two projects can reference the same drawing file However it can lead to conflicts...

Page 19: ...e which file you are working in You can add descriptions for each drawing to the project file You can reuse drawing descriptions in title block attributes and associate them with AutoCAD Electrical reports Add the description of a drawing you add 1 In the Project Manager right click AEGS10 dwg and select Properties Drawing Properties 2 In the Drawing Properties Drawing Settings dialog box Drawing ...

Page 20: ...1 In the Project Manager select AEGS04 dwg 2 In the Project Manager Details section click Preview 3 Continue to click the drawing name you want to preview or use the up and down arrow keys to scroll through the drawing files 4 When you finish viewing the drawings click Details to return to the drawing details view If a project drawing is currently open and you want to move to the previous or next ...

Page 21: ...ther Tools panel Previous DWG or Click Project tab Other Tools panel Next DWG A new window opens and the original window closes when you click the navigation tools unless you hold the Shift key while clicking the tools Working with Drawings 15 ...

Page 22: ...16 ...

Page 23: ...Ladder Style Diagrams Part 2 of this manual provides information about how to set up and work with ladder style diagrams 17 ...

Page 24: ...18 ...

Page 25: ...ment This connection can be at the end of the other wire or anywhere along the length of the other wire AutoCAD Electrical considers a wire connected to a component if the wire end falls within a trap distance from the wire connection point attribute of a component The wire layer for a new wire segment is determined by Wires that begin or end in space or begin and end at a component connection poi...

Page 26: ...n angled wire connection Insert wiring 1 In the Project Manager Project Drawing List double click AEGS04 dwg 2 Zoom in on the upper left corner of the drawing Make sure the hot and neutral vertical wires are displayed 3 Click Schematic tab Edit Wires Wire Numbers panel Modify Ladder drop down Add Rung 4 Respond to the prompts as follows Add rung passing through this location or wiretype T Select a...

Page 27: ...mporary graphics changes for a new wire when AutoCAD Electrical can connect the wire to an existing wire Each component wire connection point is displayed as a green x at the wire connection when you enter X ENTER during wire insertion If you pan or zoom repeat the command to view the wire connection points 3 Insert another wire to the right of the new wire 4 Press ENTER to exit the command The in...

Page 28: ...to TRIM Specify the wire segment at line reference 404 between the two vertical wires 1 right click Wire segments are trimmed back to a connecting dot a component or completely if neither is encountered along the segment Any connection dots that are no longer needed are removed The trimmed wire resembles the following image 22 Chapter 3 Wires ...

Page 29: ...odes AutoCAD Electrical supplies a schematic symbol dialog box for finding and inserting schematic components It also triggers some additional features Automatic wire breaks Component tagging Real time cross referencing Component annotation Inserting Components AutoCAD Electrical employs a parent child relationship for schematic components A relay coil with a certain number of contacts is represen...

Page 30: ...ng ladder wire and reconnects if you select directly on the wire or near to it You did not select close enough to the wire if the underlying wire did not break To try again click Cancel on the Insert Edit Component dialog box Right click or press ENTER to repeat the command Turning on Snap helps 0 125 is a good setting to use This tool inserts components into alignment with underlying wires it doe...

Page 31: ...rer code and catalog number These values are carried as invisible attributes on the symbol You can type in values for each or select the BOM information from an on line catalog database file 7 In the Catalog Data section click Lookup There are three search criteria pull down lists across the top of the Parts Catalog dialog box You can easily change the search criteria to get a different set of val...

Page 32: ...e values transfers to the symbol NOTE Sample catalog information is provided with AutoCAD Electrical in Access Database format mdb If your company uses its own internal coding system instead of manufacturer catalog numbers substitute those numbers into catalog database files of AutoCAD Electrical If you use your own system and reference a number of a vendor extra user fields are available in all t...

Page 33: ...ing file and returns a list of all location codes used so far 15 In the All Locations Drawing dialog box select MCAB5 and click OK NOTE You can also include an external LOC location list in the project LOC list to help with consistency To use this feature create a file called default loc and put it in an AutoCAD Electrical search directory The format for this text file is each location on its own ...

Page 34: ... wire number and slide it back and forth along the wire while keeping everything connected You can select a wire or a whole rung of circuitry and scoot it to a new position If there are any parent components among the scooted items you are asked if you want to retag the scooted components The Scoot tool works on wire numbers components terminals PLC I O modules jogs in dashed link lines signal arr...

Page 35: ...ght and click right click to exit the command The component moves to its new location You can use the Scoot tool to grab a component or a wire number and slide it back and forth along a wire You can grab a wire or a whole rung of circuitry and scoot it to a new position while keeping everything connected The steps to insert a parent component and a child component are the same except when you anno...

Page 36: ... is just a generic CR in the edit box Determine the relay contact tag name A relay contact is a child component that must link to a parent relay coil on a drawing in the active project The child gets the same tag name that is found on the parent relay coil Assign the tag name by clicking Parent Sibling and picking the parent in the drawing Or click Drawing or Project to select from a list of compo...

Page 37: ...ntact 8 In the Insert Edit Child Component dialog box verify that the following options are specified Component Tag CR403 Description Line 1 MASTER CONTROL Description Line 2 RELAY Cross reference 403 Location code MCAB5 Pins Pin 1 A1X Pins Pin 2 A1Y Relocating Components 31 ...

Page 38: ...ew child contact and the child contact gets annotated with the line reference location of the parent coil Aligning Components Align the normally open relay contact with an existing component After you insert a component you can align or edit it as necessary Align a component 1 Click Schematic tab Edit Components panel Modify Components drop down Align 32 Chapter 4 Schematic Components ...

Page 39: ...4 2 right click The aligned component is placed Inserting Components Now you insert a system reset push button pilot light and an emergency stop push button to make up the circuit Insert a system reset button 1 Click Schematic tab Insert Components panel Insert Components drop down Icon Menu 2 In the Insert Component JIC Schematic Symbols dialog box click Push Buttons 3 In the JIC Push Buttons dia...

Page 40: ... 2 RESET 7 In the Location code section click Drawing 8 In the All Locations Drawing dialog box select OPSTA3 and click OK 9 In the Insert Edit Component dialog box click OK Insert a pilot light 1 Click Schematic tab Insert Components panel Insert Components drop down Icon Menu 2 In the Insert Component JIC Schematic Symbols dialog box click Pilot Lights 3 In the JIC Pilot Lights dialog box click ...

Page 41: ... Location code section click Drawing 8 In the All Locations Drawing dialog box select OPSTA3 and click OK 9 In the Insert Edit Component dialog box click OK Insert a push button for emergency stop 1 Click Schematic tab Insert Components panel Insert Components drop down Icon Menu 2 In the Insert Component JIC Schematic Symbols dialog box click Push Buttons 3 In the JIC Push Buttons dialog box clic...

Page 42: ...NCY STOP 7 In the Location code section click Drawing 8 In the All Locations Drawing dialog box select OPSTA3 and click OK 9 In the Insert Edit Component dialog box click OK Your finished schematic should resemble the following Editing Components You can go back to a component at any time and make changes You can change description tag catalog number location code terminal numbers and rating value...

Page 43: ...y insertion point Position the selector switch at line reference 410 near the left side of the ladder and click 1 7 In the Insert Edit Child Component dialog box click OK Insert a pilot light 1 Click Schematic tab Insert Components panel Insert Components drop down Icon Menu 2 In the Insert Component JIC Schematic Symbols dialog box click Pilot Lights 3 In the JIC Pilot Lights dialog box click Blu...

Page 44: ...t Component dialog box click OK Edit a child contact 1 Press F9 to turn off SNAP 2 Click Schematic tab Edit Components panel Edit Components drop down Edit NOTE You can also right click on a component and select Edit Component from the context menu 3 Respond to the prompts as follows Select component cable location box to EDIT Select the selector switch on line reference 410 4 In the Insert Edit C...

Page 45: ...ws Select component Select the bottom sibling contact 3 of the existing switch on line reference 408 AutoCAD Electrical reads the sibling contact and transfers the appropriate annotation to your new switch contact Editing Components 39 ...

Page 46: ... Components In this exercise you link the selector switch you inserted to the existing RAM MODE selector switch residing on line reference 406 through 408 using dashed link lines Connect components using wires 1 Click Schematic tab Insert Wires Wire Numbers panel Insert Wires drop down Wire 40 Chapter 4 Schematic Components ...

Page 47: ...t hand vertical bus wire The wire automatically ends on the bus and inserts a wire connection dot 3 Repeat the process to connect the right hand side of the blue pilot light to the vertical bus wire 4 Right click and select Enter to finish creating the wire connections If you lay a wire over the top of a series of components AutoCAD Electrical automatically breaks and reconnects to the underlying ...

Page 48: ...s both links to update automatically You can even scoot the horizontal jog in the dashed link line up or down Editing Catalog Information Sample catalog information is supplied with AutoCAD Electrical The information is held in tables in an Access Database file mdb that is populated with sample vendor data You can use filter criteria in the catalog lookup to display catalog numbers selectively for...

Page 49: ... Catalog dialog box select Manufacturer AB Type 30 5mm Voltage 120VAC XFMR 4 Change the catalog assignment to 800T PT16E Add a catalog entry 1 In the Parts Catalog dialog box click Add Editing Catalog Information 43 ...

Page 50: ...o be the same are the same in both spelling and capitalization The list box beside each field helps you maintain consistency as you add new catalog items 3 Click List next to the Description field AutoCAD Electrical does a quick scan of the existing catalog file It collects and displays a list of all the different description field values found in the catalog 4 In the Field Description existing va...

Page 51: ...entries with a subassembly To link a subassembly with the main the catalog part numbers share the same codes In the Edit Catalog Record dialog box select As main sub enter the ASSYCODE and click OK The ASSYCODE must be unique since it links the main catalog item with subassembly items To add the subassembly item in the Add Catalog Record dialog box create a catalog entry select As sub enter an ASS...

Page 52: ... Between Symbols Use the AutoCAD Electrical Surf utility to move from component reference to reference across the project drawing set quickly 1 Zoom on the upper left hand portion of the first ladder column 2 Click Projects tab Other Tools panel Surfer drop down Surfer 3 Click anywhere on relay coil CR407 46 Chapter 4 Schematic Components ...

Page 53: ...of CR407 appear in the Surf dialog box 4 Select the reference on sheet 6 5 Click Go To The instance of CR407 on sheet 6 is surfed to and displayed in the drawing next to the Surf dialog box Moving Between Symbols 47 ...

Page 54: ...lick Close NOTE Drawing files are saved while surfing if AutoCAD Electrical senses that a change has been made to the drawing Swapping Components Use the Swap Block tool to swap one component for another such as swapping a proximity switch with a limit switch in a single drawing or project wide Swap switches while keeping wire connections 1 Zoom in on the limit switch on line reference 406 48 Chap...

Page 55: ...g Use Same Attribute Names default Click OK 4 In the Insert Component JIC Schematic Symbols dialog box click Miscellaneous Switches 5 In the JIC Other Switch Types dialog box click Proximity Switch NO 6 Respond to the prompts as follows Select component type to swap out Select the limit switch LS406 The limit switch symbol disappears and the proximity switch symbol inserts All existing text annota...

Page 56: ...sk easier because you quickly pick and place attributes It tracks what attributes are present and checks your work to make sure that any required attributes are not omitted NOTE If you exit out of the Symbol Builder restart it On the Select Symbol Objects dialog box click Select objects and select any graphics and attributes you added so far You can then start from where you left off Create a pare...

Page 57: ... section click Select objects select the rectangle and press ENTER 7 Select OK Adding Attribute Symbols In this example you add the attributes TAG1 DESC1 LOC INST FAMILY MFG CAT and ASSYCODE You are not limited to these attributes and you can include your own user defined attributes on the AutoCAD Electrical block files NOTE The TAG1 attribute is the only one required for a parent schematic symbol...

Page 58: ...u can insert and define as part of the symbol Once an attribute is inserted on the symbol a check mark is displayed next to it and you cannot insert it again AutoCAD Electrical allows only one insertion of each attribute 2 In the Symbol Builder Attribute Editor select TAG1 and click the Properties tool Enter Value PS It is the default code used as the F value of the tag format such as CR PB LT Hei...

Page 59: ... the Symbol Builder Attribute Editor select DESC1 Click the Insert Attribute tool 5 Insert the attribute below TAG1 6 Insert the LOC and INST attributes as indicated 7 Insert the FAMILY attribute near the center of the rectangle 8 With FAMILY still highlighted in the Symbol Builder Attribute Editor select the Properties tool Enter Value PS Click OK This assigns the F value to the FAMILY attribute ...

Page 60: ...roperties Drawing Format dialog box NOTE Components with closely spaced wire connection points may not be processed properly if the connection points fall within the AutoCAD Electrical trap distance of one another A wire connection attribute can have a related terminal text attribute TERMxx and terminal description attribute TERMDESCxx The xx is a two digit number starting at 01 that is used to ma...

Page 61: ...t Connection direction Left Top It determines the direction the wire attaches to the component 6 Enter L as the value for TERM01 in Pin Information 7 Select X2TERMDESC01 in Pin Information and click Delete 8 Click Insert 9 Select the Insert Wire Connection tool and insert the terminal in the upper left hand corner as shown NOTE Always use AutoCAD Snap to insert the wire connection point 10 Back on...

Page 62: ...he terminals as follows TERM03 Right Insertion Point below TERM02 TERM04 Bottom Insertion Point in the lower right hand corner TERM05 Bottom Insertion Point to the left of TERM04 TERM06 Bottom Insertion Point to the left of TERM05 TERM07 Bottom Insertion Point to the left of TERM06 13 Press Enter if necessary to return to the command prompt 14 On the Symbol Builder Attribute Editor expand the Pins...

Page 63: ...he symbol for this drawing file only Save and insert the symbol onto a drawing 1 Click Symbol Builder tab Edit panel Done 2 On the Close Block Editor Save Symbol dialog box in the Base point section click Pick point Select a point in line with the top terminals so that it is easy to place on a wire later 3 Select WBlock 4 Enter a file name or accept the default Saving Symbols 57 ...

Page 64: ...ts and the wires connect to the symbol NOTE New symbols you create can also be inserted with the AutoCAD Electrical Insert Component command You can add your new symbol to the icon menu Or you can select it from the Type it or Browse dialog box file selection options in the icon menu 8 In the Insert Edit Component dialog box click OK 58 Chapter 4 Schematic Components ...

Page 65: ...omatically retag since the drawing is set up for reference based component tagging In the process of moving the circuit you change the reference locations of the moved components Related child components update to match the new parent tags including references on other drawings in the project NOTE Tagging updates vary depending on your default tagging configurations Move the location of a circuit ...

Page 66: ...5 to capture the connection wire and dots that tie in to the vertical bus right click Press F9 to turn on SNAP Specify base point or displacement Select a base point and then select a point on line reference 214 The circuitry is moved the affected components are retagged and cross references are updated based on the new line reference Each of the listed parent component tags decrement by one For e...

Page 67: ... sheet 2 and one reference on sheet 9 10 Double click the reference on Sheet 9 Surfer goes to the panel layout drawing and zooms in on the physical representation of this 3 pole fuse Notice that the physical representation of the fuse block tag updated because the circuit was moved 11 Double click the first entry in the dialog box to return to the original AEGS02 dwg drawing 12 Click Close Moving ...

Page 68: ...tical or horizontal 3 phase wiring Three phase wiring automatically breaks and reconnects to any underlying components that it finds in its path If it crosses any existing wiring wire crossing gaps are inserted 3 Click Schematic tab Insert Wires Wire Numbers panel Multiple Bus 4 In the Multiple Wire Bus dialog box select Horizontal Spacing 0 5 Vertical Spacing 0 5 Starting at Another Bus Multiple ...

Page 69: ...connection Select the bottom corner of the left most vertical bus on line reference 214 as shown Select existing wire to begin multi phase bus connection to Pull the cursor down to line reference 218 Temporary graphics show the proposed routing of the extended bus Moving an Existing Circuit 63 ...

Page 70: ... are inserted on the drawing Creating a New Motor Circuit You now construct a new motor circuit on the extended 3 phase bus Insert and configure the circuit 1 Click Schematic tab Insert Components panel Circuit Builder drop down Circuit Builder 2 The Circuit Selection dialog box displays 64 Chapter 5 Circuitry ...

Page 71: ...3 Expand 3ph Motor Circuit 4 Select Horizontal FVNR non reversing 5 Change the Rung Spacing Horizontal to 0 5 6 Select Configure 7 Specify insertion point at rung 217 Creating a New Motor Circuit 65 ...

Page 72: ...isconnecting Means in the circuit Various options for the Disconnecting Means are presented in the dialog box The option selected for this circuit element is inserted at the location of the marker block Circuit Builder dynamically builds the complete circuit based on the selections you make on this dialog box 1 In the Circuit Elements section select Motor symbol In the Select section select Motor ...

Page 73: ...e Browse button to access a lookup table Select an entry from the lookup table to obtain values for the individual settings The catalog lookup is opened if the circuit option is a component 3 In the Circuit Elements section select Control transformer and circuit non reversing In the Select section select Include control circuit None Creating a New Motor Circuit 67 ...

Page 74: ...4 In the Circuit Elements section select Power Factor correction In the Select section select Include power factor correction capacitor None 68 Chapter 5 Circuitry ...

Page 75: ...5 In the Circuit Elements section select Overloads In the Select section select Overload elements Thermal Include N O auxiliary contact No Creating a New Motor Circuit 69 ...

Page 76: ...6 In the Circuit Elements section select Motor terminal connections In the Select section select Motor connection terminals Round 70 Chapter 5 Circuitry ...

Page 77: ...7 In the Circuit Elements section select Cable marker In the Select section select Cable None Creating a New Motor Circuit 71 ...

Page 78: ...8 In the Circuit Elements section select Safety disconnect at the load In the Select section select Safety disconnect Disconnect switch Include N O auxiliary contact No 72 Chapter 5 Circuitry ...

Page 79: ...r inserts each of the selected circuit elements 10 Select Done NOTE See the Circuit Builder topics later in this section for more examples Multi level terminals 1 In the Project Manager Project Drawing List double click AEGS02 dwg Creating a New Motor Circuit 73 ...

Page 80: ...the terminal properties and associations 4 In the Insert Edit Terminal Symbol dialog box Project List section select Tag Strip TB 5 Enter Location MCAB5 and Number 10 6 Click Details 7 In the Catalog Data section click Catalog Lookup 8 On the Parts Catalog dialog box select Manufacturer SIEMENS Type MULTI LEVEL Rating 20 AMPS 9 Select part 8WA1 011 3JF16 and click OK 74 Chapter 5 Circuitry ...

Page 81: ...een rungs 217 and 218 The Insert Edit Terminal Symbol dialog box displays 13 In the Insert Edit Terminal Symbol dialog box Project List section select Tag Strip TB 14 Enter Location MCAB5 and Number 11 Modify multi level terminal associations 1 On the Insert Edit Terminal Symbol dialog box Modify Properties Associations section click Add Modify 2 On the Add Modify Association dialog box Select Ass...

Page 82: ...nthesis For example 1 21 GND 3 If a level is not represented on the schematic it is represented by empty space 1 GND 3 If a terminal has been assigned to the level but the terminal does not have a number assignment it is represented by 1 GND 3 NOTE The grid to the right populates with the definition for the selected terminal Level 1 has Label TOP Number 10 Reference 2 217 4 Select Level 2 in the g...

Page 83: ...ection of the dialog box 5 Click OK The level assignments display in the Properties Associations section of the Insert Edit Terminal Symbol dialog box Notice that the terminal is three levels and levels 1 and 2 are now assigned 6 On the Insert Edit Terminal Symbol dialog box click OK Creating a New Motor Circuit 77 ...

Page 84: ... 12 On the Add Modify Association dialog box Select Association section expand the active project node 13 Select the terminal block node you inserted on line reference 217 10 11 3 Notice that the node properties updated to reflect that levels 1 and 2 are assigned and that level 3 is still blank available 14 Select Level 3 in the grid and click Associate Once you click Associate the bottom level up...

Page 85: ...nts display in the Properties Associations section of the Insert Edit Terminal Symbol dialog box Notice that levels 1 2 and 3 are now assigned 16 On the Insert Edit Terminal Symbol dialog box click OK Creating a New Motor Circuit 79 ...

Page 86: ...nd or Continue Move the cursor down past the bottom pole left click pull the wire to the left and down then left click to insert the wire press ESC to exit the command 3 Click Schematic tab Insert Components panel Copy Component 4 Respond to the prompts as follows Select component to copy Select the ground symbol from the circuit on line reference 214 Specify insertion point Select the end of the ...

Page 87: ...WBlocked circuits into the active drawing Save your circuit for use in the future 1 Zoom around the circuit so that it fills your screen 2 Click Schematic tab Edit Components panel Circuit drop down Save Circuit To Icon Menu 3 On the Save Circuit to Icon Menu dialog box click Add New circuit 4 On the Create New Circuit dialog box specify Name Motor Circ Fusible DS Image file Active and Create PNG ...

Page 88: ... folder and can be quickly accessed from the Insert Component icon menu or from the Insert Saved Circuit tool The new motor has a 3 pole motor contactor child reference but there is not a parent motor starter relay coil to operate it The motor start coil circuit must be added on a control schematic in the project drawing set and linked back to the new motor circuit Insert motor start coil circuit ...

Page 89: ...ge File name UserCirc2 Click OK 6 Respond to the prompts as follows Base point Select the left most wire connection point at line reference 422 Select objects Window around the circuit from left to right to capture all the components and wiring but exclude the vertical bus press ENTER 7 On the Save Circuit to Icon Menu dialog box click OK Insert a circuit you saved for re use 1 Pan to display the ...

Page 90: ...d relationships defined inside of the circuit update accordingly 6 Right click the M427 coil symbol and select Edit Component 7 In the Insert Edit Component dialog box specify Description Line 2 MOTOR NO 2 Click OK 8 In the Update Related Components dialog box click Yes Update Linking the parent coil to the child contactor 1 Open AEGS02 dwg and zoom on the untagged 3 pole motor contact overloads o...

Page 91: ...g edit box Notice that the description cross reference and location code boxes have also updated 5 In the Insert Edit Child Component dialog box click OK 6 In the Update linked components dialog box click OK The components are now linked If you go back to drawing AEGS04 dwg and look at the motor starter coil it shows references to these three child contacts plus one seal contact around PB427 Savin...

Page 92: ...g AEGS02 dwg and zoom to the blank area at line references 204 206 9 Repeat the steps for inserting a saved circuit but this time insert the Motor Circ Fusible DS circuit 10 In the Circuit Scale dialog box click OK 11 Respond to the prompts as follows Specify insertion point Position the motor circuit so that the insertion point lands on the left hand vertical bus at line reference 204 left click ...

Page 93: ...stallation Location in terminal strip Tag ID match Starting Terminal Number 1 3 In the Tag ID section click Drawing 4 On the Terminal Tag ID List dialog box select Tag ID TB and click OK 5 On the Project wide Schematic Terminal Renumber dialog box click OK 6 On the Select Drawings to Process dialog box click Do All and click OK 7 If asked to save the drawing click OK You can modify an existing ter...

Page 94: ...nal Block Properties dialog box specify Levels 3 Level 1 Level Description Top Wires Per Connection 2 PinL 1 PinR 2 Level 2 Level Description Middle Wires Per Connection 2 PinL 3 PinR 4 Level 3 Level Description Bottom Wires Per Connection 2 PinL 5 PinR 6 Click OK 88 Chapter 5 Circuitry ...

Page 95: ... dialog box click OK 6 On the Update other drawings dialog box click OK 7 If asked to save the drawing click OK Associate terminals 1 Click Schematic tab Edit Components panel Associate Terminals 2 Respond to the prompts as follows Select Master terminal Select terminal 4 on line reference 211 Pick terminal Select terminal 5 Pick terminal Select terminal 6 right click Saving and Inserting Standard...

Page 96: ...log box Properties Associations section all three levels have been assigned You can now move a terminal to another level using the Add Modify Association dialog box 4 On the Insert Edit Terminal Symbol dialog box Modify Properties Associations section click Add Modify 5 On the Add Modify Association dialog box Active Association section highlight level 3 in the grid and click Move Up 90 Chapter 5 ...

Page 97: ...n point Select the connection points at the vertical 3 phase bus for each wire 4 Insert dot tee markers for the circuit on line reference 204 5 Right click to exit the command Inserting Saved Circuits Using WBlock Another method for saving and inserting circuits is to use the AutoCAD WBlock command to save the circuit to disk A separate Insert Circuit command is used to browse to a selected saved ...

Page 98: ...cal bus with the upper horizontal wire at line reference 207 5 In the Write Block dialog box click Select objects 6 Respond to the prompts as follows Select objects Window from left to right around the full circuit right click 7 In the Write Block dialog box enter a name for the saved circuit Take note of the location where the drawing file is being saved 8 Click OK Inserting a WBlocked circuit 1 ...

Page 99: ... It is like the behavior when inserting a circuit using the icon menu method 6 Delete the circuit Inserting a One line Motor Circuit In this exercise you insert and configure a one line motor control circuit using Circuit Builder 1 Start a new blank drawing and save it as One Line dwg 2 In Project Manager right click on the project name and select Add Active Drawing 3 Using the Insert Wire tool ad...

Page 100: ...4 Click Configure 5 Specify an insertion point on the one line bus The Circuit Configuration dialog box displays 6 In the Circuit Elements section select Motor Setup 94 Chapter 5 Circuitry ...

Page 101: ...efault MOTOR table 8 Select Use default table The Select Motor dialog box displays 9 Select Type Induction Voltage V 480 and Frequency HZ 60 10 Select the row that shows Load 15 Units HP Phase 3 Speed RPM 3600 FLA A 18 6 NOTE The values used to populate this dialog box are defined in the MOTOR tables in the electrical standards database file ace_electrical_standards mdb 11 Click OK Inserting a One...

Page 102: ...option directs Circuit Builder to use a de rating factor for an elevated ambient temperature These values are defined in the electrical standards database file 15 Select 36 40C from the drop down list The de rating factor is extracted from the electrical standards database file and entered in the dialog box The wire size grid is adjusted based on the new total de rating factor Based on this de rat...

Page 103: ...r section select the Browse button The Parts catalog dialog box displays 23 Select a catalog value and click OK NOTE Circuit Builder does not preselect the catalog based on the parameters entered previously 24 Continue selecting Circuit Elements Disconnecting means Disconnect switch and fuses Motor starter Yes Power factor correction No Overloads None Terminal strip or connector None Cable marker ...

Page 104: ... box enter FIELD for the Location code and MY MOTOR for Description Line 1 30 Save the drawing Inserting a Dual One line Power Feed Circuit In this part of the exercise you insert a dual power feed circuit A dual circuit has two distinct circuits running off the same bus tap Each circuit can be independently configured 98 Chapter 5 Circuitry ...

Page 105: ...fy an insertion point on the one line bus The Circuit Configuration dialog box displays Notice that some circuit elements have a 2 prefix These elements make up the second circuit in the dual circuit 6 In the Circuit Elements section select Load Setup 7 In the Setup Annotations Load Setup section select the Browse button The Select Load dialog box displays Inserting a Dual One line Power Feed Circ...

Page 106: ...elect 2 Load Setup 12 In the Setup Annotations Load Setup section select the Browse button The Select Load dialog box displays 13 Select Type Transformer Voltage V 480 and Phase 3 14 Select an entry from the grid and click OK 15 Continue selecting Circuit Elements for the second circuit 2 Load Source arrow 2 Disconnecting means Disconnect switch and fuses 2 Terminal strip or connector None 2 Cable...

Page 107: ...nts from the selected circuit become defaults for the new circuit Tags are recalculated if the option Retag new components is selected In this exercise you insert a 3 phase motor control circuit referencing the one line motor control circuit inserted earlier 1 Start a new blank drawing and save it as Three Line dwg 2 In Project Manager right click on the project name and select Add Active Drawing ...

Page 108: ...T1 12 Click OK The default circuit element options are controlled by both the CODE value and the UI_VAL from the circuit codes sheet of the circuit builder spreadsheet For example the one line circuit used the Disconnect switch and fuses option with a UI_VAL of 4 When the 3 phase circuit references this one line circuit the disconnecting means option with a UI_VAL of 4 becomes the default If a mat...

Page 109: ...he same circuit elements as the referenced one line motor circuit are selected The default options are based on the referenced circuit Select Circuit Elements Motor 3ph motor Motor symbol Ground PE wire connection No Main Disconnect Disconnect switch and Fuses Disconnecting means Include N O Auxiliary contact No Include control circuit None Control transformer and circuit non re versing Referencin...

Page 110: ...y disconnect at the load Include N O auxiliary contact No 17 Click to insert all circuit elements 18 Click Done The circuit is inserted and the component values from the one line circuit are applied The motor symbol receives the same catalog value and horsepower rating The main disconnect switch receives the same rating values for the switch and the fuses The motor symbol receives the values modif...

Page 111: ... Ladders into Drawings You can insert a ladder into a drawing at any time A drawing can have multiple ladders as well as single phase and three phase ladders The ladders can have different parameters such as rung spacing number of rungs and ladder width Insert a single phase ladder 1 Open AEGS05 dwg 2 Click Schematic tab Insert Wires Wire Numbers panel Insert Ladder drop down Insert Ladder 3 In th...

Page 112: ...ence 519 represents Page 5 Reference 19 4 Click OK 5 Respond to the prompts as follows Specify start position of first rung or wireType Enter 16 21 press ENTER NOTE You can also specify the start position of the first rung by left clicking a location on the drawing with your mouse A single phase ladder is inserted in the drawing 106 Chapter 6 PLC ...

Page 113: ...e stretched or broken into two or more pieces at insertion time To insert a PLC module you select the module and pick a location AutoCAD Electrical builds and inserts the module using a small set of library symbols Insert a PLC module 1 Click Schematic tab Insert Components panel Insert PLC drop down Insert PLC Parametric 2 In the PLC Parametric Selection dialog box select Manufacturer Allen Bradl...

Page 114: ...Respond to the prompts as follows Specify PLC module insertion point or Z zoom P pan Pick a point on wire line reference 520 closer to the right side ensure the X is near the horizontal wire click 108 Chapter 6 PLC ...

Page 115: ... It multiplies the rung spacing by the number of wire connections specified by the module you selected Temporary graphics display a representation of the module with the spacing defined to help position the module on the ladder 6 In the I O Point dialog box specify Rack Number 1 Slot Number 1 NOTE Specify the values by either entering text into the edit boxes or by clicking the arrows 7 Click OK I...

Page 116: ...n I O module into as many pieces as you want at insertion time It is great for high density modules that do not fit into a single ladder column Use the Allow spacers breakers option in the Module Layout dialog box at insertion time to do it You can also add extra space between adjacent I O points using the Stretch Block tool This feature leaves extra room when you know ahead of time that a certain...

Page 117: ...e Insert Component You can insert components into wires that are tied to the PLC module Use the Multiple Insert Component tool to insert a string of normally open limit switches Insert a limit switch 1 Click Schematic tab Insert Components panel Multiple Insert drop down Multiple Insert Icon Menu 2 In the Insert Component JIC Schematic Symbols dialog box click Limit Switches 3 In the JIC Limit Swi...

Page 118: ...nsert Edit Component dialog box specify Component Tag LS520 Description Line 1 PALLET ENTERING Description Line 2 STATION Location code MACHINE Click OK NOTE In the Insert Edit Component dialog box Component Tag section you can use the Use PLC Address button to add the I O Address as the component tag 7 In the Keep dialog box select Keep this one Show edit dialog box after each Click OK 8 In the I...

Page 119: ...nt Tag LS522 Description Line 1 PALLET LEAVING Description Line 2 STATION Location code MACHINE Click OK The normally open limit switches are inserted into the drawing Insert terminals 1 Click Schematic tab Insert Components panel Multiple Insert drop down Multiple Insert Icon Menu 2 In the Insert Component JIC Schematic Symbols dialog box click Terminals Connectors Using Multiple Insert Component...

Page 120: ...lect above wire at line reference 520 1 Component Fence From Point to Select below wire at line reference 535 2 left click to end command right click to add terminal 5 In the Keep dialog box select Keep this one Click OK 6 In the Insert Edit Terminal Symbol dialog box Terminal section specify Location MCAB5 Tag Strip TS1 Number 1 114 Chapter 6 PLC ...

Page 121: ...7 Click OK 8 In the Keep dialog box select Keep all don t ask Clear Show edit dialog box after each Click OK The terminals are automatically added to your drawing Using Multiple Insert Component 115 ...

Page 122: ...e the descriptions at any time However edit each split PLC piece separately Add description text 1 Click Schematic tab Edit Components panel Edit Components drop down Edit 2 Respond to the prompts as follows Select component cable location box to EDIT Select anywhere on the top portion of the PLC module 116 Chapter 6 PLC ...

Page 123: ...ptions 3 In the Edit PLC Module dialog box click Wired Devices AutoCAD Electrical immediately follows each I O point s connected wire backwards If it finds a connected component the component description text is retrieved Each description is displayed in a dialog box list 4 For the first I O address I 11 00 select the first description PALLET ENTERING STATION in the extracted device list The Confi...

Page 124: ... then select the component whose text you want to copy AutoCAD Electrical reads the existing DESC text values on the component and transfers a copy to the DESC boxes in the Edit PLC Module dialog box 9 In the Edit PLC Module dialog box click OK Your descriptions appear on the module NOTE If your PLC description is not where you want it use the Scoot tool to scoot the description to a new location ...

Page 125: ...mbers drop down PLC I O The PLC I O Wire Numbers dialog box displays The default format is N the address number The wire number is the same as its connected I O address number 3 Click I n to change the wire number format It adds an I prefix to each wire number that ties to the input module 4 Click OK 5 Respond to the prompts as follows Select I O module to process Select anywhere on the PLC module...

Page 126: ...The wire numbers are inserted with the specified format If some of the I O points short circuit to other I O points the last point wire number prevails for that common wire network 120 Chapter 6 PLC ...

Page 127: ...of the drawing do not conform to the project requirements Resequence ladder line reference numbers 1 Click Schematic tab Edit Wires Wire Numbers panel Modify Ladder drop down Revise Ladder The Modify Line Reference Numbers dialog box displays a list of ladders in the drawing 2 Change the beginning line reference numbers for each ladder Change the first ladder to 101 column 1 line 01 and the second...

Page 128: ...122 ...

Page 129: ...etwork and assigning a source code name to it On the wire network that is to be a continuation of the same wire number whether on the same drawing or a different drawing in the project insert a destination arrow Give it the same code name that you gave to its source AutoCAD Electrical reprocesses your drawing set for wire numbering update It matches source code names with destination names and cop...

Page 130: ...al Arrows drop down Source Arrow 3 Respond to the prompts as follows Select wire end for Source Select the end of the hot wire on the schematic on the right side of the drawing at line reference 332 1 4 In the Signal Source Code dialog box specify Code 24 VDC Signal Arrow Style 1 124 Chapter 7 Wire Numbers ...

Page 131: ... Destination Code dialog boxes 5 Click OK 6 In the Source Destination Signal Arrows dialog box click No NOTE Click No to insert the signal arrows on the next drawing Click OK to insert the signal arrows on the current drawing 7 To access AEGS04 dwg Click Project tab Other Tools panel Next DWG Now you are ready to insert a destination signal arrow Attaching Destination Signal Arrows After the sourc...

Page 132: ...Respond to the prompts as follows Select wire end for Destination Select the top of the hot wire on the schematic on the left side of the drawing at line reference 402 2 3 In the Insert Destination Code dialog box click Project 4 In the Signal codes Project wide Source dialog box select the following 126 Chapter 7 Wire Numbers ...

Page 133: ...w Style 1 Click OK Update Source The cross references for your signal insert into the drawing above the hot wire Attach source and destination signals to the neutral wires 1 To return to AEGS03 dwg Click Project tab Other Tools panel Previous DWG Attaching Destination Signal Arrows 127 ...

Page 134: ...the bottom of the neutral wire at line reference 332 3 4 In the Signal Source Code dialog box specify Code 24 VDC NEUTRAL Click OK 5 In the Source Destination Signal Arrows dialog box click No NOTE Click No to insert the signal arrows on the next drawing Click OK to insert the signal arrows on the current drawing 6 To open AEGS04 dwg 128 Chapter 7 Wire Numbers ...

Page 135: ...own Destination Arrow 8 Respond to the prompts as follows Select wire end for Destination Select the top of the neutral wire at line reference 402 4 9 In the Insert Destination Code dialog box click Project 10 In the Signal codes Project wide Source dialog box select the following Attaching Destination Signal Arrows 129 ...

Page 136: ...log box verify Code 24 VDC NEUTRAL Signal Arrow Style 1 Click OK Update Source NOTE If asked to change the destination wire layer click Yes The cross references for your signal insert into the drawing above the neutral wire 130 Chapter 7 Wire Numbers ...

Page 137: ...stinations on one or many drawings A wire can carry both a destination signal and a source signal pointing to the next daisy chained destination Inserting Wire Numbers You can process and tag wires with sequential wire numbers or with wire numbers based upon the line reference location start of the wire network When wire numbers are automatically inserted into a drawing the numbers are not duplica...

Page 138: ...g box click the Wire Numbers tab Insert wire numbers automatically 1 Zoom in on the top portion of the wire network on the left side of the drawing 2 Click Schematic tab Insert Wires Wire Numbers panel Insert Wire Numbers drop down Wire Numbers 3 In the Sheet 4 Wire Tagging dialog box click Pick Individual Wires 4 Respond to the prompts as follows Select objects Select the wire segment between the...

Page 139: ...s are assigned to each segment in your drawing Add wire numbers project wide 1 Click Schematic tab Insert Wires Wire Numbers panel Insert Wire Numbers drop down Wire Numbers 2 In the Sheet 4 Wire Tagging dialog box click Project wide 3 In the Wire Tagging Project wide dialog box verify Wire tag mode Reference based tags To do Tag retag all Freshen database for Signals 4 Click OK Inserting Wire Num...

Page 140: ...llows Select objects Enter all press ENTER The wires in the network change to dashed lines representing the wires from which the wire numbers will be erased 3 Press ENTER again to erase the wire numbers Working with Wire Layers When a wire is inserted the wire ends up on the first valid wire layer as defined in the Drawing Properties dialog box It may be more appropriate to place some wires on dif...

Page 141: ... wire type highlights in blue in the dialog box indicating that it is the wire type to change 4 Click OK 5 Respond to the prompts as follows Select Objects Window from left to right around the wires as shown and press ENTER Before you press ENTER the wires display as dashed lines to indicate that they have been selected Once you press ENTER the lines display in red indicating that they have been m...

Page 142: ...136 ...

Page 143: ...quirements on mechanical footprint symbols You can use footprint symbols supplied by vendors in AutoCAD format with AutoCAD Electrical Inserting Panel Components Using the AutoCAD Electrical Panel Layout tools you can select from a list of schematic components Place the footprint component directly into a panel layout The footprint remains linked to the original schematic component so you can perf...

Page 144: ...wing to Process section and click OK 7 In the Schematic Components active project dialog box click Mark Existing An x marks the footprints that are already placed in the project You cannot insert the same component multiple times If you select an item with an x the Insert button is disabled NOTE An o next to a component in the list indicates that a panel component with a matching component tag was...

Page 145: ...the Schematic Components active project dialog box Display section select Hide Existing The schematic component footprints not yet inserted into the panel layout are displayed Inserting Panel Components 139 ...

Page 146: ...sert schematic component footprints manually on the panel layout Insert the system reset footprint manually 1 In the Schematics Components active project dialog box select PB403 OPSTA3 SYSTEM RESET 140 Chapter 8 Panel Layouts ...

Page 147: ...r the automatic footprint 3 In the Footprint dialog box Choice A section click Catalog lookup NOTE Use Choice B to enter a graphic without selecting a catalog number 4 In the Parts Catalog dialog box select MANUFACTURER AB TYPE 30 5mm FLUSH STYLE ALL 5 Change the catalog assignment to 800T A2A 1 NO 1 NC BLACK PUSH BUTTON MOMENTARY NEMA 4 13 and click OK Inserting Panel Components 141 ...

Page 148: ...fy Manufacturer AB Catalog 800T A2A Click OK 7 Respond to the prompts as follows Select Location for PB403 Select to the left of PB414A 1 Select Location for PB403 Ortho on select ROTATION Right click to place the push button 142 Chapter 8 Panel Layouts ...

Page 149: ... matching component was already inserted use one of the Find buttons to look through the drawing or project If no matching component is found click Next to assign an item number to this footprint This button updates each time you insert a footprint and assign an item number This item or detail number is used for BOM and component reporting and can be referenced by optional balloon labels tied to t...

Page 150: ... footprint representation 8 In the Panel Layout Component Insert Edit dialog box click OK The Schematics Component active project dialog box redisplays You can continue inserting components from the schematic list of the project Insert the emergency stop footprint manually 1 In the Schematic Components active project dialog box select PB403A OPSTA3 EMERGENCY STOP 144 Chapter 8 Panel Layouts ...

Page 151: ...the catalog assignment to 800T D6A 1NO 1NC PUSH BUTTON MUSHROOM NEMA 4 13 and click OK 6 In the Footprint dialog box Choice A section verify Manufacturer AB Catalog 800T D6A Click OK 7 Respond to the prompts as follows Select Location for PB403A Select to the left of Conveyor Motor Start 2 Select Location for PB403A Ortho on select ROTATION Inserting Panel Components 145 ...

Page 152: ...ush button 8 In the Panel Layout Component Insert Edit dialog box click OK Insert the light footprint manually 1 In the Schematic Components active project dialog box select LT404 OPTSTA3 CONVEYOR ON 146 Chapter 8 Panel Layouts ...

Page 153: ...ialog box select MANUFACTURER AB TYPE 30 5mm VOLTAGE ALL 5 Change the catalog assignment to 800H QRT24G PLASTIC LENS 24VAC VDC FULL VOLT GREEN PILOT and click OK NOTE To sort the Catalog list easily select Show list sorted by catalog part number in the Parts catalog dialog box Inserting Panel Components 147 ...

Page 154: ...ufacturer AB Catalog 800H QRT24G Click OK 7 Respond to the prompts Select Location for LT404 Select to the left of the Conveyor Running light 3 Select Location for LT404 Ortho on select ROTATION Right click to place the pilot light 148 Chapter 8 Panel Layouts ...

Page 155: ...lities between the schematics and the panel layout drawings it is possible to introduce some inconsistencies between the two during edit AutoCAD Electrical alerts you to check other drawings first and then update any affected drawings 10 In the Update other drawings dialog box click OK 11 If asked to save the drawing click OK Modifying Attributes You can align the inserted footprints with existing...

Page 156: ... align with Horizontal Vertical Select the power on button on the top left of the layout 1 Select objects Select the three components that were just inserted 2 4 right click The components are aligned vertically Align footprints horizontally 1 Click Schematic tab Edit Components panel Align 2 Respond to the prompts as follows Select component to align with Horizontal Vertical 150 Chapter 8 Panel L...

Page 157: ...ribute to Move or pick on block graphics for list W Window move Select tag LT404 1 Select object Right click to select Base point Select the base point 2 drag to the new location right click The attribute is placed 3 Repeat for PB403 and PB403A then right click to exit the command Very little of the information held on panel footprints is visible since only specific attributes are used when assign...

Page 158: ...ect XData to Change to a Block Attribute dialog box displays All Xdata related to LT 404 are shown 3 Select DESC1 and click Insert 4 Respond to the prompts as follows Specify location for attribute DESC1 Select the location for the attribute The attribute is displayed on the drawing and the dialog box reopens 5 Select DESC2 and click Insert 6 Respond to the prompts as follows Specify location for ...

Page 159: ...Symbols dialog box click Nameplates 3 In the Panel Nameplates dialog box click Nameplate Catalog Lookup 4 In the Nameplate dialog box Choice A section click Catalog Lookup 5 In the Parts Catalog dialog box select MANUFACTURER AB TYPE 800T Automotive COLOR_AND_ ALL 6 Change the catalog assignment to 800T X701 Red Blank Name Plate and click OK 7 In the Nameplate dialog box Choice A section verify Ma...

Page 160: ...e name Changing the tag name of any of these three representations triggers a prompt for permission to update the other related instances Insert a half round nameplate 1 Click Panel tab Insert Component Footprints panel Insert Footprints drop down Icon Menu 2 In the Insert Footprint Panel Layout Symbols dialog box click Nameplates 3 In the Panel Nameplates dialog box click Nameplate Catalog Lookup...

Page 161: ...Text Name Plate and click OK 7 In the Nameplate dialog box Choice A section verify Manufacturer AB Catalog 800T X59E Click OK 8 Respond to the prompts as follows Select objects Select PB403A 2 right click to place the nameplate Adding Nameplate Footprints 155 ...

Page 162: ... Editor easily and quickly defines the locations for these connected devices during the system design process Terminal strip editing is primarily used towards the end of the control system design cycle to expedite the labeling numbering and rearranging of terminals on a terminal strip Copy and paste terminal properties 1 Open AEGS09 dwg The terminal strip to edit TB is already placed on the drawin...

Page 163: ... Footprints panel Editor 3 On the Terminal Strip Selection dialog box select Terminal Strip TB and click Edit 4 On the Terminal Strip Editor dialog box Terminal Strip tab select terminal 1 in the grid Editing Terminal Strips 157 ...

Page 164: ...k Properties button Notice that when you click Copy Terminal Block Properties terminals 5 and 6 also highlight It is because terminals 4 5 and 6 are associated If you copy the properties from one of these terminals you also copy the properties from the associated terminals The Copy Terminal Block Properties tool then copies the properties from the terminals to one or many terminals within the same...

Page 165: ...terminals 7 and 10 Notice that both terminals are now 3 tiered terminals with level 1 assigned for both Associate terminals 1 Select terminals 8 and 9 in the grid 2 In the Multi Level section click the Associate Terminals button 3 On the Associate Terminals dialog box select terminal 7 3 and click Associate Editing Terminal Strips 159 ...

Page 166: ...inals resulting from the Associate 5 On the Terminal Strip Editor dialog box select terminals 11 and 12 in the grid 6 In the Multi Level section click the Associate Terminals button 7 On the Associate Terminals dialog box select terminal 10 3 and click Associate Click OK 160 Chapter 8 Panel Layouts ...

Page 167: ...box by clicking Catalog Lookup You can then select the part from the Parts Catalog dialog box if needed Click Insert Above Now you insert accessories end barriers into the terminal strip one at the top and one at the bottom of the terminal strip 4 Select terminal 1 in the grid 5 In the Spare section click the Insert Accessory button 6 On the Insert Accessory dialog box specify Number EB1 Quantity ...

Page 168: ... box specify Number EB2 Quantity 1 Click Insert Below Insert the terminal strip into the drawing 1 On the Terminal Strip Editor dialog box click the Layout Preview tab 2 Select Graphical Terminal Strip as the terminal type to insert into the drawing 3 Enter 2 0 in Scale on Insert 4 Click Rebuild 162 Chapter 8 Panel Layouts ...

Page 169: ...5 On the Terminal Strip Editor dialog box click OK 6 On the Terminal Strip Selection dialog box click OK Editing Terminal Strips 163 ...

Page 170: ...164 ...

Page 171: ...nt to Point Diagramming Part 3 of this manual provides information on creating point to point diagrams using connector tools You can also create drawings for hydraulic pneumatic and P ID style diagrams 165 ...

Page 172: ...166 ...

Page 173: ...a large library of schematic connector symbols each symbol is generated parametrically on the fly per user input and at user defined orientation A connector toolbar contains tools for creating and editing connectors Inserting Connectors The Insert Connector tool generates a connector symbol from user defined parameters The symbol is created on the fly and inserted as a block insert into your activ...

Page 174: ...K Add connectors to the drawing 1 Click Schematic tab Insert Components panel Insert Connector drop down Insert Connector 2 On the Insert Connector dialog box specify Pin Spacing 1 0 Pin Count 15 Fixed Spacing Pin List 1 Insert All 3 Click the Flip button to flip the connector about its long axis The preview should look like the following image 168 Chapter 9 Connector Diagrams ...

Page 175: ...g the connector outline to the drawing press TAB to flip the connector through four different orientations Or press the V key to switch between vertical and horizontal orientations 5 Respond to the prompts as follows Specify insertion point or Z zoom P pan X wire crossing V horizontal vertical TAB flip Select to place the connector in the middle of the right hand border of Black Box 1 The connecto...

Page 176: ... follows Specify insertion point or Z zoom P pan X wire crossing V horizontal vertical TAB flip Select to place the connector in the middle of the left hand border of Black Box 2 The connector was automatically assigned a component tag of PJ2 11 Repeat steps 6 10 to place connectors on Black Box 3 and Black Box 4 The connectors are assigned tags PJ3 and PJ4 respectively 170 Chapter 9 Connector Dia...

Page 177: ...ther The easiest way to do it is to use the Insert Wire and Multiple Wire Bus tools Wire the connectors together 1 Click Schematic tab Insert Wires Wire Numbers panel Insert Wires drop down Wire 2 Respond to the prompts as follows Specify wire start or wireType X show connections Click PJ1 at pin 1 on Black Box 1 Specify wire end or Continue Click PJ2 at pin A on Black Box 2 Wiring Connectors 171 ...

Page 178: ...Wire tool drew the wire between the connectors while avoiding any existing geometry on the screen 4 Click Schematic tab Insert Wires Wire Numbers panel Multiple Bus 5 On the Multiple Wire Bus dialog box specify Horizontal Spacing 0 75 Vertical Spacing 0 50 Starting at Component Multiple Wires 172 Chapter 9 Connector Diagrams ...

Page 179: ...ox 1 1 and right click to T wiretype Drag the wires to the right past the three wires you inserted to Point Continue Flip Drag the wires up towards PJ2 on Black Box 2 enter C and press ENTER to continue and lock the drag to Continue Flip Drag the wires to the right and connect to pins B D on PJ2 2 Wiring Connectors 173 ...

Page 180: ...follows Window select starting wire connection points Select pins 9 11 on Black Box 1 and right click to T wiretype Drag the wires to the right to Point Continue Flip Drag the wires up towards PJ3 on Black Box 3 enter C and press ENTER to continue and lock the drag to Continue Flip Drag the wires to the right and connect to pins B D on PJ3 174 Chapter 9 Connector Diagrams ...

Page 181: ...s as follows Window select starting wire connection points Select pins 13 15 on Black Box 1 and press ENTER to T wiretype Drag the wires to the right to Point Continue Flip Drag the wires down towards PJ4 on Black Box 4 press C and press ENTER to continue and lock the drag to Continue Flip Drag the wires to the right and connect to pins B D on PJ4 Wiring Connectors 175 ...

Page 182: ... panel Insert Connector drop down Insert Connector 2 On the Insert Connector dialog box specify Pin Spacing 1 0 Pin Count 3 At Wire Crossing Pin List 1 Insert All 3 Click Details 4 On the Type section clear the Add Divider Line box 5 On the Display section set Plug to Right and Pins to Both Sides 6 On the Size section set the Plug to 0 325 176 Chapter 9 Connector Diagrams ...

Page 183: ... Count 9 At Wire Crossing Pin List 1 Allow Spacers Breaks 11 Click Insert 12 Respond to the prompts as follows Specify insertion point or Z zoom P pan X wire crossing V horizontal vertical TAB flip Select to place the connector starting on the line at PJ1 Pin 5 Notice how the connector expands when you cross the wires 13 On the Custom Pin Spaces Breaks dialog box click Insert Next Connection The d...

Page 184: ...l Now 15 Respond to the prompts as follows Specify insertion point or Z zoom P pan X wire crossing V horizontal vertical TAB flip Select to place the connector starting on the line at PJ1 Pin 13 16 On the Connector Layout dialog box select Insert All 17 Click OK 178 Chapter 9 Connector Diagrams ...

Page 185: ... existing connector 18 Click Schematic tab Insert Components panel Dashed Link Line drop down Link Components with Dashed Line 19 Respond to the prompts as follows Component to link from Select the bottom portion of PJ6 1 component to link to Select the top portion of PJ6 2 right click Grouping Wires 179 ...

Page 186: ...the connector Stretch existing connectors 1 Click Schematic tab Edit Components panel Modify Connectors drop down Stretch Connector 2 Respond to the prompts as follows Specify which end of connector to stretch Select the bottom of PJ1 Specify second point of displacement Pull the connector down towards the bottom of Black Box 1 180 Chapter 9 Connector Diagrams ...

Page 187: ...it Components panel Modify Connectors drop down Add Connector Pins 2 Respond to the prompts as follows Select connector Select PJ1 Specify where to insert new pin or Reset 16 Select 4 spaces down from pin 15 on PJ1 right click and select Enter The next available pin number 16 inserts at the selected point Modifying Connectors 181 ...

Page 188: ... new pin 16 on PJ1 to insert pin 10 in line with it right click and select Enter NOTE You can delete pins using the Delete Connector Pins tool Select the pin you want to delete and it is automatically removed from the connector Modify connector pins 1 Click Schematic tab Edit Components panel Modify Connectors drop down Move Connector Pins 2 Respond to the prompts as follows 182 Chapter 9 Connecto...

Page 189: ... Click Schematic tab Edit Components panel Modify Connectors drop down Swap Connector Pins 4 Respond to the prompts as follows Select connector pin Select pin 16 on PJ1 Select connector pin swap with Select pin 12 on PJ1 right click 5 Click Schematic tab Edit Components panel Modify Connectors drop down Reverse Connector 6 Respond to the prompts as follows Select connector to Reverse Select the to...

Page 190: ...lay section set Pins to Plug Side 12 Click Insert 13 Respond to the prompts as follows Specify insertion point or Z zoom P pan X wire crossing V horizontal vertical TAB flip Select to place the connector on the top of Black Box 1 14 Click Schematic tab Edit Components panel Modify Connectors drop down Rotate Connector 15 Respond to the prompts as follows Select connector to Rotate or Hold Select t...

Page 191: ...ers 1 Click Schematic tab Insert Wires Wire Numbers panel Insert Wire Numbers drop down Wire Numbers 2 On the Wire Tagging dialog box specify Wire Tag Mode Sequential Start 100 3 Click Drawing Wide The wire numbers are automatically inserted into the drawing starting with number 100 4 Click Schematic tab Edit Wires Wire Numbers panel Move Wire Number 5 Respond to the prompts as follows Specify new...

Page 192: ... click List 3 On the Connector Pin Numbers In Use dialog box connector pin grid click in the Description column for Pin 1 4 On the Pin Descriptions section enter POWER B2 for the Receptacle 5 On the connector pin grid click in the Description column for Pin 2 6 On the Pin Descriptions section enter POWER B3 for the Receptacle 7 On the connector pin grid click in the Description column for Pin 3 8 ...

Page 193: ... Component dialog box click OK 11 Repeat to add the description POWER IN for Pins A on Black Box 2 Black Box 3 and Black Box 4 Your finished point to point diagram should look like the following image Adding Connector Descriptions 187 ...

Page 194: ...188 ...

Page 195: ...Project Manager to manage your hydraulic drawings From here you can create a new drawing and modify any drawing properties Create a new drawing 1 Click Project tab Project Tools panel Manager 2 In the Project Manager right click the project name and select Properties 3 In the Project Properties Project Settings dialog box click Default to switch on all paths for pneumatic hydraulic and P ID schema...

Page 196: ...t the feature scale multiplier is set to 1 0 inch 12 Click OK NOTE For metric unit the following settings are recommended so that the wire connection points will be placed on the grids for easier drafting Grid and Snap Size 2 5mm Feature scale multiplier 20 scale factor 20 Inserting Hydraulic Schematic Symbols The hydraulic symbol library in AutoCAD Electrical includes filters valves cylinders pre...

Page 197: ...hut Off Valve Open 5 Respond to the prompts as follows Specify insertion point Select to place the valve in the upper left corner of your drawing 6 In the Insert Edit Component dialog box specify Component Tag VAL2 Click OK 7 Repeat steps 1 3 8 In the Hydraulic General Valves dialog box click Checkvalve Flow Left 9 Respond to the prompts as follows Specify insertion point Select to place the check...

Page 198: ...Displacement 14 In the Hydraulic Fixed Displacement dialog box click Uni Directional Pump 15 Respond to the prompts as follows Specify insertion point Select to place the pump below the check valve 16 In the Insert Edit Component dialog box specify Component Tag Hydraulic Oil Pump Click OK 17 Insert another Shut Off Valve Open below the Hydraulic Oil Pump 192 Chapter 10 Pneumatic Hydraulic and P I...

Page 199: ...low the shut off valve 22 In the Insert Edit Component dialog box specify Component Tag FI2 Description Line 1 Filter Click OK 23 Click Schematic tab Insert Components panel Insert Hydraulic Components 24 In the Insert Component Hydraulic Symbol dialog box click Miscellaneous 25 In the Hydraulic Miscellaneous dialog box click Reservoir 26 Respond to the prompts as follows Specify insertion point S...

Page 200: ...type of running pipes that allows water or oil flows from one instrument to another Let s start by setting up the type of wires for pipe runs Insert wires as pipes 1 Click Schematic tab Edit Wires Wire Numbers panel Create Edit Wire Type 2 In the Create Edit Wire Type dialog box specify Wire Color RED 194 Chapter 10 Pneumatic Hydraulic and P ID Diagrams ...

Page 201: ...the Select Color dialog box select red and click OK 5 Click Linetype 6 In the Select Linetype dialog box select Continuous and click OK 7 In the Create Edit Wire Type dialog box specify Wire Color GREEN Size 10 Color Green Linetype Hidden2 8 Select RED_20 in the grid and click Mark Selected as Default 9 Click OK Creating Pipes 195 ...

Page 202: ... Specify wire start or wireType X show connections Select the bottom of the shut off valve Specify wire end or Scoot T wiretype X show connections Select the top of the check valve 12 Continue inserting wires connecting the components together Right click to exit the command Your drawing should look like the following 196 Chapter 10 Pneumatic Hydraulic and P ID Diagrams ...

Page 203: ... onto the pipe one at a time 13 Click Schematic tab Insert Components panel Insert Hydraulic Components 14 In the Insert Component Hydraulic Symbol dialog box select the check box for Vertical 15 In the Insert Component Hydraulic Symbol dialog box click Pressure Relief Valves Creating Pipes 197 ...

Page 204: ...e 20 Respond to the prompts as follows Specify wire start or wireType X show connections Enter X press ENTER Specify wire start or wireType X show connections Press SHIFT right click and select Midpoint from the menu then select the midpoint on the pipe between the pump and the shut off valve above it Specify wire end or V start Vertical H start Horizontal Continue Drag the pipe to the right so th...

Page 205: ... Horizontal Continue Drag the pipe down and to the left click the connection point at the bottom of the pump right click Completing the Hydraulic Drawing The rest of the hydraulic drawing consists of inserting a Pressure Gauge and Check Valve at the left side of the pump and then inserting devices Cylinder Restrictors Filter Check valve and 2 ways valve along the top of the drawing NOTE During ins...

Page 206: ...sure gauge to the far left and slightly above of the pump 5 In the Insert Edit Component dialog box specify Component Tag MTR1 Description Line 1 Pressure Gauge Click OK 6 Click Schematic tab Insert Components panel Insert Hydraulic Components 7 In the Insert Component Hydraulic Symbol dialog box click General Valves 8 In the Hydraulic General Valves dialog box click Shut Off Valve Open 9 Respond ...

Page 207: ...pecify wire start or wireType X show connections Select the right connection point on the pressure gauge Specify wire end or Continue Drag the pipe to the right and click the left connection point on the valve Specify wire start or Scoot wireType X show connections Select the right connection point on the valve Specify wire end or Continue Drag the pipe to the right and click the vertical pipe rig...

Page 208: ...ng illustration In the Insert Edit Component dialog box click OK after each insertion NOTE You can also insert the vertical or horizontal pipes first and then insert the components onto the pipe one by one Symbol to Insert Icon 2 Way Valves Solenoid Spring Return 1 insert as Vertical symbol 202 Chapter 10 Pneumatic Hydraulic and P ID Diagrams ...

Page 209: ...ert as a Vertical symbol Filters Filter insert as a Vertical symbol Restrictors Restrictor with Variable Output Flow Restrictors By Pass Flow Regulator with Variable Output Flow Cylinders Single Acting Single Ended Piston Rod Completing the Hydraulic Drawing 203 ...

Page 210: ...ematic tab Insert Wires Wire Numbers panel Wire 17 Connect the pipes from one control device to another as illustrated 18 Click Schematic tab Insert Components panel Insert Hydraulic Components 19 In the Insert Component Hydraulic Symbol dialog box click General Valves 204 Chapter 10 Pneumatic Hydraulic and P ID Diagrams ...

Page 211: ...pond to the prompts as follows Specify insertion point Select to place the valve below the restrictor 22 In the Insert Edit Component dialog box click OK 23 Click Schematic tab Insert Wires Wire Numbers panel Wire 24 Connect the pipes as shown Completing the Hydraulic Drawing 205 ...

Page 212: ...atic demo drawing file Demo03 dwg in the Extra Library Demo project Setting Up P ID Drawings Use the Project Manager to manage your P ID drawings From here you can create a new drawing and modify any drawing properties Create a new drawing 1 Click Project tab Project Tools panel Manager 2 In the Project Manager click the New Drawing tool 206 Chapter 10 Pneumatic Hydraulic and P ID Diagrams ...

Page 213: ...et the size of both to 0 125 6 Click OK 7 Click Schematic tab Other Tools panel Drawing Properties 8 In the Drawing Properties Drawing Format dialog box Scale section make sure that the feature scale multiplier is set to 1 0 inch 9 Click OK NOTE For metric unit the following settings are recommended so that the wire connection points will be placed on the grids for easier drafting Grid and Snap Si...

Page 214: ...Select Lineweight dialog box select 0 30 and click OK For this example you need to create three more wire types two yellow wire layers and one green wire layer using the Create Edit Wire Type dialog box 9 In the Create Edit Wire Type dialog box specify Wire Type 3 Wire Color YELLOW Size 15 Color Yellow Linetype Continuous Lineweight default Wire Type 4 Wire Color YELLOW Size 10 Color Yellow Wire T...

Page 215: ...Reload Linetypes dialog box click File 13 In the Select Linetype File dialog box select acade lin and click Open NOTE The default location for the acade lin file is Documents and Settings username Application Data Autodesk AutoCAD Electrical version release number country code Support or Users username AppData Roaming Autodesk AutoCAD Electrical version release number country code Support on a Win...

Page 216: ...w and flow arrows The P ID symbol library consists of all the piping and instrumentation symbols and is found at Documents and Settings All Users Documents Autodesk Acade version Libs Pid or Users Public Documents Autodesk Acade version Libs Pid on a Windows Vista installation Insert P ID Symbols 1 Click Schematic tab Insert Components panel Insert P ID Components 2 In the Insert Component Piping ...

Page 217: ...on Line 1 BALL MILL Click OK 6 Follow steps 1 2 above 7 In the PID Equipment dialog box click Conveyors 8 In the PID Conveyors dialog box click Conveyor 1 9 Respond to the prompts as follows Specify insertion point Select to place the conveyor to the right and diagonally below the ball mill 10 In the Insert Edit Component dialog box specify Component Tag N 100 Description Line 1 CONVEYOR Click OK ...

Page 218: ...n Line 1 MIXER Click OK 15 Click Schematic tab Insert Components panel Insert P ID Components 16 Insert and place the devices listed below as shown in the following illustration In the Insert Edit Component dialog box click OK after each insertion Symbol to Insert Icon Valves Gate Valve In the Insert Edit Component dialog box clear the Component Tag Equipment Dryer Component Tag C 200 Description ...

Page 219: ...asier Creating Pipes In AutoCAD Electrical we use different types of wires to represent the type of running pipes that allow water or oil flows from one instrument to another Insert wires as pipes 1 In the AutoCAD Layers toolbar change the wire layer to RED_25 2 Click Schematic tab Insert Wires Wire Numbers panel Wire 3 Connect the pipes as shown Right click to exit the command Creating Pipes 213 ...

Page 220: ... panel Wire 6 Respond to the prompts as follows Specify wire start or wireType X show connections Select the bottom of the discrete instrument Specify wire end or Continue Drag the wire down a few spaces press ENTER 7 Click Schematic tab Insert Components panel Insert P ID Components 214 Chapter 10 Pneumatic Hydraulic and P ID Diagrams ...

Page 221: ...x click Flow Arrow Down 10 Respond to the prompts as follows Specify insertion point Select to place the flow arrow at the bottom of the new wire The P ID diagram is complete If you want to see how to expand the P ID drawing refer to the P ID demo drawing file Demo01 dwg in the Extra Library Demo project Creating Pipes 215 ...

Page 222: ...216 ...

Page 223: ...Generating Reports Part 4 of this manual includes information on generating reports modifying the format of the reports and inserting report tables 217 ...

Page 224: ...218 ...

Page 225: ...database matched with standard entries in the catalog database and then additional fields are pulled from the catalog files You can format this data into various report configurations and output to report files export to a spreadsheet or database program or place in an AutoCAD Electrical drawing Generate a bill of material BOM report 1 Open AEGS11 dwg 2 Click Reports tab Schematic panel Reports 3 ...

Page 226: ...r dialog box 6 In the Report Generator dialog box select Header Time Date Header Column Labels Add blanks between entries Inserting BOM Tables into Drawings Insert a BOM into the drawing in tabular format 1 With the BOM report displayed in the dialog box click Put on Drawing 2 In the Table Generation Setup dialog box select Column Labels Include column labels Title Include time date Column Width C...

Page 227: ...n click to place the table The BOM table is built where you placed it 4 In the Report Generator click Close Editing BOM Tables on Drawings You can use the Edit Component tool together with the Report Generator s Edit Mode to modify a report that has already been placed on a drawing Edit the BOM report 1 Click Schematic tab Edit Components panel Edit 2 Select the report on the drawing Editing BOM T...

Page 228: ...gs 3 In the Report Generator dialog box click Edit Mode 4 In the Edit Report dialog box select FU307 5 Click Move Up The lines that make up a single BOM entry are kept together and moved up one space in the report dialog box 222 Chapter 11 Report Generation ...

Page 229: ...ort 6 Click OK Return to Report 7 In the Report Generator dialog box click Put on Drawing The report on the drawing updates to reflect the changes you made 8 In the Table Generation Setup dialog box click OK 9 In the Report Generator dialog box click Close Editing BOM Tables on Drawings 223 ...

Page 230: ...click Change Report Format In the Bill of Materials Data Fields to Report dialog box Fields to report section the fields that format the BOM are displayed 3 Select TAGS in the Fields to report list 4 Click Remove The TAGS field is moved out of Fields to report and into Available fields NOTE You can also select a field in the Available fields list to add it to the report or rearrange columns using ...

Page 231: ...rmat Export the BOM to an Excel spreadsheet 1 In the Report Generator dialog box click Save to File 2 In the Save Report to File dialog box select Excel spreadsheet format xls and click OK 3 In the Select file for report dialog box enter an output file name or click OK to accept the default name BOM xls Click Save 4 In the Optional Script File dialog box click Close No Script 5 In Excel click File...

Page 232: ...d The first six columns of the spreadsheet are shown in the previous image The first column is the tallied quantity followed by subassembly quantity catalog number and manufacturer code The remaining fields are the fields extracted from the mfg cat combo query on the external catalog look up file 226 Chapter 11 Report Generation ...

Page 233: ...Migrating AutoCAD Data Part 5 of this manual includes information on migrating AutoCAD data to make it AutoCAD Electrical smart 227 ...

Page 234: ...228 ...

Page 235: ...generic non graphical block insert Wire connection attributes can also be merged into this generic block insert The process to convert it from dumb text circle and line entities takes only moments to complete and the result appears as a fully functional AutoCAD Electrical aware block insert Exploding Block and Attributes The Special Explode tool in AutoCAD Electrical explodes attributes and blocks...

Page 236: ... 03 dwg 7 Zoom in on the components in the upper left hand corner of the drawing 8 Click Conversion Tools tab Tools panel Special Explode Use the Special Explode tool to explode attributes and blocks to geometry and text entities while maintaining the value previously defined in the attributes You can take advantage of the tagging tools to modify the text entities to attributes and the linking too...

Page 237: ...u have control over which attributes are inserted and visible All necessary attribute definitions are automatically placed During the tagging process the text entity is removed and replaced with a template block file that contains multiple attributes used in AutoCAD Electrical Tagging Results The selected text entities are replaced with a template block file The TAG attribute takes on the value of...

Page 238: ... If asked to save the drawing click Yes In the Report Generator dialog box notice that 9PB 12PB are listed in the TAGNAME column of the report 6 In the Report Generator dialog box click Close Linking Schematic Attributes Use the AutoCAD Electrical Linking tools to associate non blocked text to previously placed template blocks Through the modification of a template block you have control over whic...

Page 239: ...e description attribute up to 3 Link descriptions 1 Click Conversion Tools tab Attributes panel Link Descriptions 2 Respond to the prompts as follows Select objects Select 9PB right click Select text to fill in next available DESC attribute Select LIGHT A right click Select objects Select 10PB right click Select text to fill in next available DESC attribute Select LIGHT B right click Select object...

Page 240: ...to QSave the drawing click Yes In the Report Generator dialog box notice that 9PB 12PB are still listed in the TAGNAME column of the report 6 In the Report Generator dialog box click Change Report Format 7 In the Component Data Fields to Report dialog box select Desc1 from the Available Fields list Desc1 moves into the Fields to report list These are the fields that will display in the Component r...

Page 241: ...ged block file Select line endpoints or geometry to add the appropriate wire connection attributes to A new block definition is created with the newly added wire connections You can subsequently create a new block file if the block is exploded Wire Connection Results Visual indicators x appear where the wire connection attributes have already been applied Wire connection attributes terminal attrib...

Page 242: ...of the first wire on line 401 In the Wire Direction dialog box select from left Select TERM01 text object Select 22 underneath 9PB TAG NOTE Visual indicators x appear where the wire connection attributes have been applied Select location W Wire Press SHIFT right click to select Endpoint from the Snap options select the end point of the second wire on line 401 In the Wire Direction dialog box selec...

Page 243: ...5 In the Create Edit Wire Type dialog box select Make all Lines Valid Wires and click OK 6 Click Conversion Tools tab Tools panel Convert Text to Wire Number 7 Respond to the prompts as follows Select LINE near wire number text Select the left endpoint of the wire with the text 13 above it line 401 Select existing wire number text to convert Select text 13 8 While you are still in the command repe...

Page 244: ...fied The geometry s color changes by layer to visually distinguish what has been already converted as defined in the WD_M block Add geometry to the block 1 Click Conversion Tools tab Tools panel Add Geometry 2 Respond to the prompts as follows Select block for additional geometry Select 9PB Select objects Select the graphics for the push button right click Specify insertion point Select the middle...

Page 245: ...way they work on schematic components Tag and link panel components 1 Open Convert 04 dwg 2 Zoom in on the components in the middle of the drawing 3 Click Conversion Tools tab Tools panel Special Explode 4 Respond to the prompts as follows Select objects Select push button lights A D including all graphics and text use either single picks or window select right click Tagging and Linking Panel Comp...

Page 246: ...PB 11PB and 12 PB right click NOTE You may have to right click several times to exit the command The text changes color to indicate that it has been tagged The color of the PTAG attribute is by layer The attribute is the same layer as defined on the WD_M block 7 Click Conversion Tools tab Attributes panel Link Descriptions 8 Respond to the prompts as follows Select objects Select 9PB right click S...

Page 247: ...er the schematic or panel component prompt an update to the related component Surf to the related schematic component 1 Click Project tab Other Tools tab Surfer 2 Respond to the prompts as follows Select tag for Surfer trace or Enter to type it Select 9PB 3 In the Surf dialog box double click the component marked with type p Updating Panel or Schematic Components 241 ...

Page 248: ...k OK The Update Other Drawings dialog box displays This dialog alerts that other drawings in the project set may include child components or related panel components 7 If asked to save the drawing click Yes 8 In the Update Other Drawings dialog box click OK 9 Click Project tab Other Tools tab Surfer 10 Respond to the prompts as follows Select tag for Surfer trace or Enter to type it Select 9PB 242...

Page 249: ...r goes to the panel layout drawing and zooms on the physical representation of the push button Notice that the description for 9PB updated to reflect the change you made to the schematic component 12 In the Surf dialog box click Close Updating Panel or Schematic Components 243 ...

Page 250: ...244 ...

Page 251: ...cuit Builder 64 insert saved circuits 84 insert WBlocked circuits 92 save 81 save to icon menu 83 command summary 5 Component Data Fields to Report dialog box 234 component fence 112 component tag 24 components aligning 32 child 29 parent 24 scooting 29 swap 48 Connector Layout dialog box 178 connector pin descriptions 186 connector pins add 181 move 182 swap 183 connectors insertion 167 pin descr...

Page 252: ... Select Template 11 Sheet 4 Insert Destination Code 126 129 Signal Codes Proj wide Source 126 Signal Source Code 124 Source Destination Signal Arrows 125 128 Surf 241 Symbol Builder 51 Table Generation Setup 220 Terminals 114 Wire Tagging 132 Wire Tagging Project wide 133 dot tee markers 91 drafting settings 190 207 drawing details 14 drawing properties 13 drawings add 12 descriptions 13 in projec...

Page 253: ...ove connector pins 182 multi level terminals 74 75 78 multiple wire bus 62 Multiple Wire Bus dialog box 62 172 174 175 N name plates 153 insertion 153 154 New Drawing tool 11 New Project tool 8 O one line circuit 93 98 P P ID drawing 206 p id symbols 210 ball mill 211 conveyor 211 dryer 212 equipment 210 field mounted instruments 213 flow arrow down 215 flow arrows 215 gate valve 212 mixer2 212 Pa...

Page 254: ...ctors 113 scooting components 29 Select Color dialog box 195 208 Select Linetype dialog box 195 208 Select Linetypes File dialog box 209 Select Lineweight dialog box 208 Select Template dialog boxes 11 Sheet 4 Insert Destination Code dialog box 126 129 Signal Codes Proj wide Source dialog box 126 Signal Source Code dialog box 124 signals destination 125 show 131 source 123 Source Destination Signa...

Page 255: ...move 185 projects 133 Wire Tagging Project wide dialog box 133 Wire Tagging dialog box 132 185 wires 19 multiple wire bus 62 single phase 20 59 73 trimming 21 62 X xdata 152 Index 249 ...

Reviews: