background image

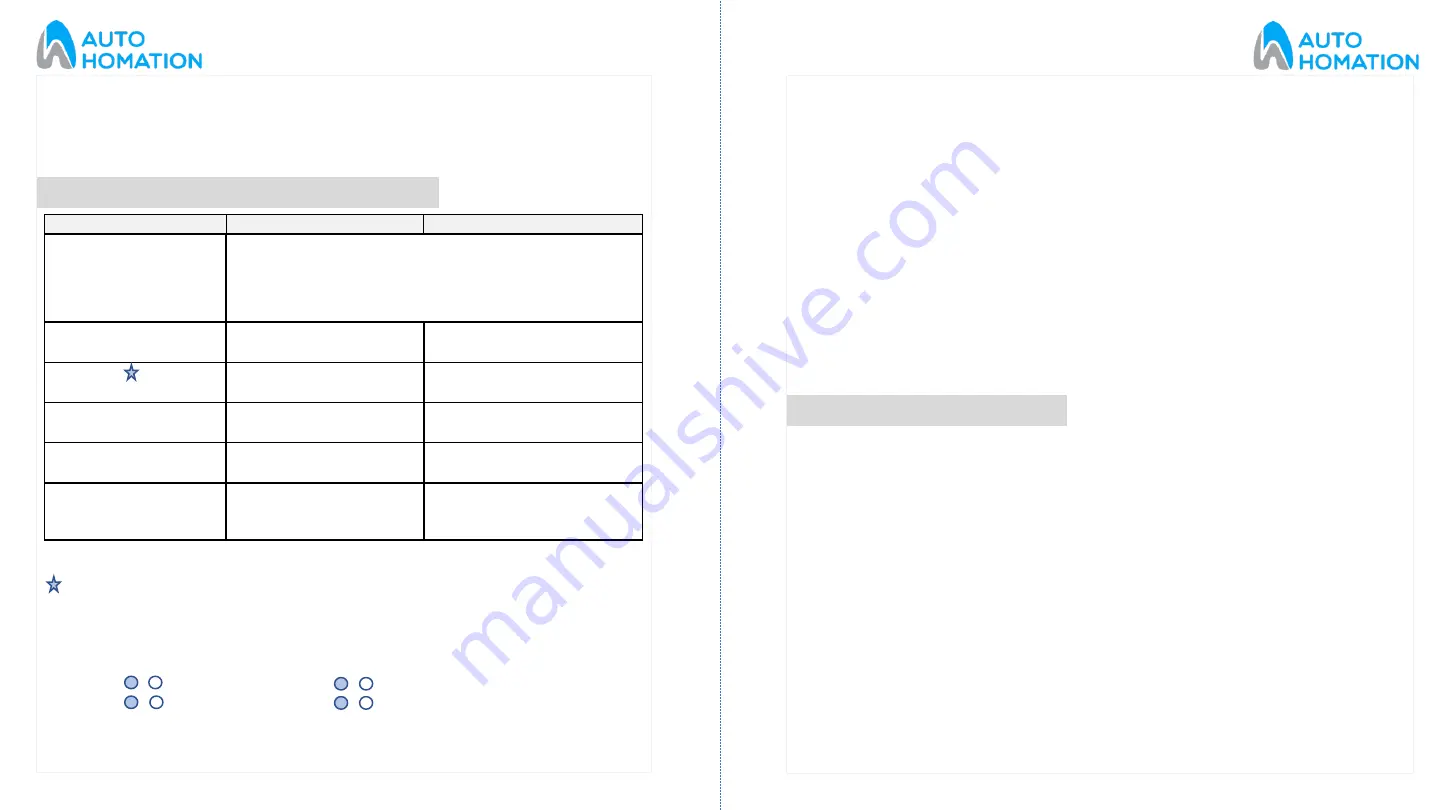
DIP FUNCTION INTRODUCTION AND SETTING

DIP Switch

ON (back)

OFF (forward)

1. Direction

ON 

Left opening, OFF 

Right opening. Toggle (back 

and forth)  to erase memory and re-learn open/close 
cycle. Lights will blink  and system will self-calibrate
again

2. Toggle mode

Activate to open/close

Normal Mode

3. Beeper

Beeper enabled

Beeper disabled

4. Door/Window 

Mode

Window Mode

Door Mode

5. Lock Mode

Automatic Lock after 

fully closed

Lock only with full lock 

signal.

7. Slam Shut

Helps overcome 

weather seals, with 

rubber

Normal operation

DIP Switch 1 and 4 must be power off and restart can switch mode.

This dip switch can only turn off the voice of remote. If needed turn off the

voice of wireless push button, it should press learning button, then switch on or
off.
Pet mode to half open mode:
Turn to close signal (A)

Turn to open signal (B)

Photocell

Outside

Inside

Pet

Active any terminal of A and B at same time, will work active to open or active to
close. (Attention: Must be one terminal from A and B active at same time)

b. The desired mode is selected by successive presses of the Mode button, to the

right of the LED display. The modes will cycle in the order shown above

(although the pet mode will be omitted if no pet opening width has been set).

The selected mode will engage after a short delay.

a. Toggle DIP switch for pet learn.
b. The door will begin to close slowly. If the door is already closed there will be a

short delay.

c. After a short delay, the door will begin to open slowly. When the door reaches

the desired pet opening width stop the door preferably with your foot.

Be

careful to not get

anything caught in the opening door!

d. After a short delay, the door will begin too slowly close. Once fully closed the

Multi-Controller Lock will return to Automatic mode, indicated by a green LED on
the display, and pet options will be available.

e. Test the pet opening width by pressing the

‘pet sensor’

button. If the width is

incorrect then return to step

‘a’

.

SETTING PET OPENING WIDTH 

Learning Process:
Turn on the power switch, ensure dip 1 is correct, if direction is wrong. Please
switch the dip to opposite direction, turn off the power and make sure
door/window is fully closed. Then, power on.

Opening width learning (pet):
Pet mode indicator will flash, door will start to open slowly. Have an obstacle at
the position you need, after short pause, door will close slowly. The learning
process will be done after the door/window is fully closed, standard opening
width learning.

All Mode indicator flash, door:
Will open and close slowly. When the door is fully closed, automatic mode
indicator flashes, indicating the learning process is done. Controller is with
memory of opening width

Congratulations, you should now have a fully functioning 

Multi-Controller automatic door!!

18

17

Summary of Contents for MULTI CONTROLLER

Page 1: ... installation video at If you have any questions please email our technical team at support autohomation com Call for immediate assistance from our technical support team 1800 XXX XXXX Visit us at www autohomation com www autohomation com INSTALLATION MANUAL MULTI CONTROLLER ...

Page 2: ...oller is produced by AutoHomation and is subject to the following warranty and conditions of operation apply The product is warranted against failure due to faulty material or workmanship for a period of 12 months from date of purchase Such warranty will cover repair or replacement of any defective parts at AutoHomation premises and subjected to the following conditions provided that Multi Control...

Page 3: ...dance with the original factory settings If defects are caused by fair wear and tear If purchaser alters Multi Controller adds or removes and parts or materials from the unit Fails to notify AutoHomation immediately if there is a failure of any component Delivery of all items to and from AutoHomation will be at the purchaser s expense The purchaser will be responsible for inspecting the package to...

Page 4: ...all mounting wireless push button Power pack Cover Drive unit Mounting bracket Belt Idler pulley Motor Controller Belt connector Screws 3mm Allen key 6 key remote optional Wireless sensor optional Wired sensor optional 6 5 ...

Page 5: ... programmable variable speeds HIGHLIGHTS Easy to install for without changing existing door structure Sleek and Compact design Comes with Sensors Remote Control Push button Pet Switch Photocell Card Reader Lock and so on Sliding Glass Door UPVC Aluminum Door Sliding Glass Window French Window APPLICABILITY TECHNICAL PARAMETERS Input 100 240V Output 24V DC Power Supply 176 3 lbs 80 Kg Maximum Door ...

Page 6: ...APPLICATION OF MOUNTING BRACKET INSTALLATION Single open Double open Two install methods of belt connector are detailed Default installation is Method 1 Installation of Belt Connector 10 9 ...

Page 7: ...lt connector Move the operator to ensure the distance between the door leaf and belt is around 0 5in 17 mm Tighten the screw on the install plate Move the belt connector to the middle of the door leaf Connect the door with belt connector Loosen the fix screw adjust the belt tension by tightening the adjustment screw clockwise Fixing screw Adjusting screw 12 11 ...

Page 8: ...ator Fixing screw Adjusting screw Place the cover after adjustment and testing CONTROLLER INSTALLATION METHOD 2 TOP MOUNTING Position the controller on top of the door leaving 5cm on left side Right side of the controller would be close to the door The distance between belt and door leaf should be around 0 5in 17mm 14 13 ...

Page 9: ...the controller c The open time control sets the time the door will stay open for when in the auto or pet mode the dwell time d Configure wireless control devices Note Following will be applicable only when the door is powered on and operational i Press the Remote learn button and release the red light should illuminate once the button is released ii Wave your hand in front of each of the sensors a...

Page 10: ...delay a Toggle DIP switch for pet learn b The door will begin to close slowly If the door is already closed there will be a short delay c After a short delay the door will begin to open slowly When the door reaches the desired pet opening width stop the door preferably with your foot Be careful to not get anything caught in the opening door d After a short delay the door will begin too slowly clos...

Page 11: ... 1 to the opposite position leave power on the door will then change direction to the closing position During self calibration process once the door has fully closed the door will then slowly slide to the open position then close slowly back to the closed position with a small increase in speed The door will then open in a fast speed once then closed Once the lights on the control panel stop blink...

Page 12: ... INTRODUCTION Add Press the learning button for few seconds till the indicator turns blue then press any button of the remote learning is done after indicator flashes 3 times Delete Press learning button for few seconds till the indicator turns blue after the indicator flashes 3 times all remote learning is deleted Please verify carefully the DIP switching selection is same as during learning proc...

Page 13: ... CAUSE 2 Heavy weather seals or excess friction in the door SOLUTION 2 Investigate excessive door friction and or turn on DIP switch 2 to increase Multi Controller starting power TROUBLESHOOTING SYMPTOM Door tries to open but does not CAUSE Door is locked by E Lock SOLUTION Check the engagement of the gears and adjust if necessary Remove the external cover if already fitted Turn the Multi Controll...

Reviews: