Austroflamm Pallas Back Operating Manual Download Page 36

13 | Maintenance

EN

Operating manual Pallas Back

36

13

Maintenance

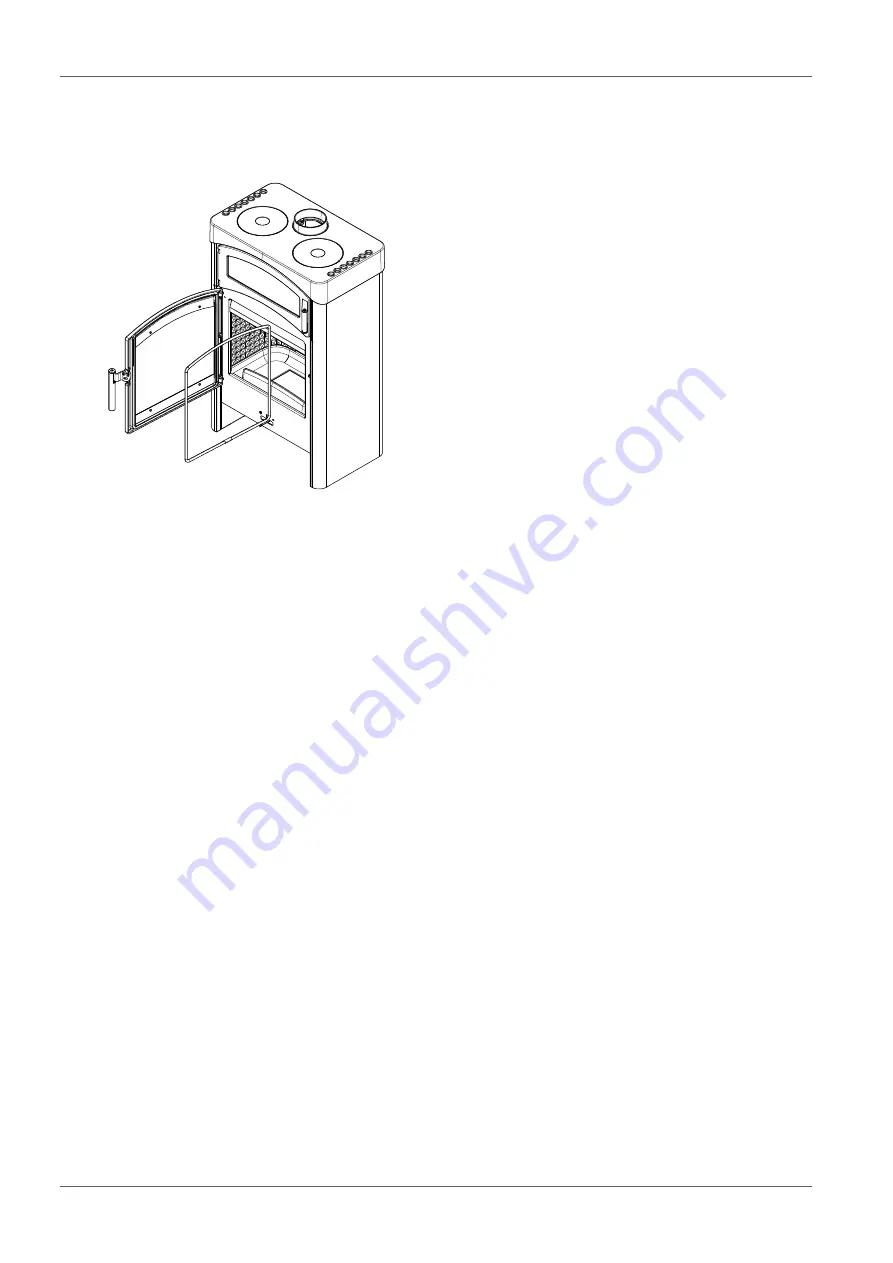
13.1 Changing the seal on the door

Fig. 34: 

Changing the seal

1) Remove old seal from the door.

2) Glue in new seal with a suitable adhesive (e.g. silicon

B310).

ð

Repeat these steps for the baking compartment
door as well

Summary of Contents for Pallas Back

Page 1: ...Operating manual Pallas Back www austroflamm com...

Page 2: ...7249 46 443 www austroflamm com info austroflamm com Edited by Olivera Stojanovic Illustrations Konstruktion Text Technical department Austroflamm Copyright All Rights reserved The contents of these...

Page 3: ...nical data 13 5 1 Technical data according to Regulation EU 2015 1185 and delegated Regulation EU 2015 1186 13 5 2 General specifications 15 5 3 Data for the chimney flue dimensioning 15 6 Transport h...

Page 4: ...ting in the transition period 35 13 Maintenance 36 13 1 Changing the seal on the door 36 14 Cleaning 37 14 1 Cleaning the stove flue gas ducts and flue pipe 37 14 2 Removing ashes 37 14 3 Emptying the...

Page 5: ...h the dealer and the customer Personally hand over this manual to the owner of the stove together with an introduction to the system heating operations In the following list we give you an overview of...

Page 6: ...2 Structure of the manual The table of contents can be found on page 3 Illustrations in this manual may differ from the delivered product 2 3 Representations used The following representations are us...

Page 7: ...Operating manual Pallas Back EN 2 Purpose of the manual 7 2 5 Abbreviations Abbreviation Meaning HMS Heat Memory System ST Stoves...

Page 8: ...pproved transport aids with sufficient load bearing capacity may be used to transport your stove Caution varnish is not an anti rust protection Burn only the fuel listed and approved in the section It...

Page 9: ...r quantity of fuel than the quantity given in these instructions either during its initial commissioning or every time you sub sequently light it up again Your stove is not suitable for use as a ladde...

Page 10: ...and tested with a type A1 self closing and locking door under EN test EN 13240 NOTICE Operation is only permissible with closed bolted door 4 2 Identification of the product In the following illustra...

Page 11: ...g 2 Safety distances a b c air control ler 1 Open and closed primary secondary air control ler 4 3 Energy label I II A A B C D E F G A 2015 1186 9 0 kW ENERGIA ENERGIJA ENERGY ENERGIE ENERGI A A A A A...

Page 12: ...Pallas Back 12 4 4 Positioning of the nameplates Here we show where you can find the nameplate You can find a copy of the nameplate of your stove on the back of this manual Fig 4 Nameplate The type la...

Page 13: ...40 Other standards technical specifications applied Indirect heating function no Direct heat output 9 0 kW Indirect heat output1 Properties for operation with the preferred fuel Space heating annual u...

Page 14: ...ure control yes At minimum heat output elmin kW two or more manually adjustable levels no room temperature control no In standby condi tion elSB kW Room temperature control with mechanical ther mostat...

Page 15: ...s per EN test EN 13240 9 Heat output minimum kW 4 5 Maximum heat output kW 13 Space heating capacity at least depending on the building insulation m 114 Maximum room heating capacity depending on the...

Page 16: ...rate The crate facilitates transport of the stove using a lifting truck or forklift Remove the crate and dispose of it appropriately 6 2 Storage The stove must be stored in a dry room warehouse Protec...

Page 17: ...upply of combustion air must be provided Your Austroflamm specialist dealer will be happy to advise you TIP Ensure that combustion air openings are not closed 7 3 Chimney requirements When connecting...

Page 18: ...loor condition In the radiation area of the pane in front of the stove the floor must not be combustible 7 6 Room of installation Note that the room in which the stove is installed must have at least...

Page 19: ...ample beechwood reduces this effect The size of your heat producing appliance s combustion chamber will dictate whether your firewood is 25cm 33cm or 50cm in length 50cm pieces of log should preferabl...

Page 20: ...t producing appliances with a low placement quantity often have little fire heaps occur leading one to wonder whether a fire can burn at all with so little fuel Nevertheless you must never exceed the...

Page 21: ...he recommended fuel Clean combustion The firewood must be dry rel wood moisture 15 and untreated Furthermore the correct quantity of firewood must be burnt in order to achieve a clean low emission com...

Page 22: ...tions we will give you information on the integration or attachment of appliance parts the rearrangement of the flue pipe connection The connection of the combustion air supply and on other important...

Page 23: ...en the door of the baking compartment 4 Remove the prefitted screw from the inside of the bak ing compartment left and right with an Allen key SW 2 5 Fig 10 Mounting the side cladding 5 Use the cross...

Page 24: ...ted Proceed as described in the section Removing the steel side cladding on page 47 4 mm Fig 11 Undoing the bolts 2 Undo all six hexagonal head bolts to 4 mm Fig 12 Hanging the lower part of the ceram...

Page 25: ...om 5 Repeat the last three stages on the other side of the stove to mount the ceramic side cladding 6 Reattach rear panel and lid 9 2 3 Mounting the soapstone side cladding 1 If the steel cladding is...

Page 26: ...and attaching the top cover 2 4 Repeat the stages on the other side of the stove to mount the soapstone side cladding 5 Reattach rear panel and cover 9 2 4 Installing the HMS 1 First the lid must be...

Page 27: ...on the holders Fig 18 Mounting HMS brick 4 To mount the HMS brick on the left hand side of the stove repeat the last two stages Fig 19 Mounting HMS brick at the rear 5 Fix the HMS holders as shown on...

Page 28: ...0 Keramott Numbering installation sequence 9 2 6 Rearranging the flue pipe connection Fig 21 Removing the cover and rear panel 1 First remove the lid 2 Then press the rear panel upwards and remove it...

Page 29: ...9 Fig 23 Detaching the bracket and seal from the lid 4 Detach the bracket and the seal from the lid Fig 24 Removing the cover 5 Remove cover at the rear Fig 25 Fitting the bracket at the rear 6 Fit th...

Page 30: ...ating manual Pallas Back 30 Fig 26 Hanging the rear panel 7 Hang the rear panel from top to bottom Fig 27 Mounting the cover on the lid 8 Mount the cover from the rear on to the lid Fig 28 Attaching t...

Page 31: ...31 9 2 7 Installing the log drawer 2 2 1 1 Fig 29 Installing the log drawer 1 Glue the two bump stops 1 from inside to the rear wall Only fix the two stop plates 2 with two screws each if necessary 2...

Page 32: ...10 Settings EN Operating manual Pallas Back 32 10 Settings 10 1 Adjusting the door lock Fig 30 Adjusting the door lock 1 Open door 2 The door lock can be adjusted using the marked screws...

Page 33: ...ectly Removing the ash box cover This step is only necessary if you have ordered your stove with the ash box accessory Otherwise this step can be skipped Before the stove is operated for the first tim...

Page 34: ...wind is strong If there is insufficient required draft then paper or softwood chips can first be burnt in order to bring stove and chimney flue to temperature The air inlet of the stove must not be c...

Page 35: ...on doe not totally close the air supply danger of deflagration 12 3 Heating in the transition period In the transition period i e during high external temperatures a sudden temperature rise can disrup...

Page 36: ...las Back 36 13 Maintenance 13 1 Changing the seal on the door Fig 34 Changing the seal 1 Remove old seal from the door 2 Glue in new seal with a suitable adhesive e g silicon B310 Repeat these steps f...

Page 37: ...ase note that when removing the ashes embers may still be present Only remove the ashes from the firebox when the stove is in the cold state On a regular basis and in good time at least 1 x per week r...

Page 38: ...ied cover and use it to cover the ash box 4 Turn the handle of the cover clockwise until the handle engages Fig 38 Emptying the ash box 5 Remove the ash box from the stove and empty it 6 Reinsert the...

Page 39: ...indow cleaner Prevent door or window seals from coming into contact with water or cleaner since these will oth erwise harden and in doing so lose their function Only intact seals ensure that your stov...

Page 40: ...cess The stove surface is dusty soiled Keep the surfaces of the stove clean Keep the floor area clean around the stove Flue gas escapes when stoking up and during the heating phase Chimney draft too l...

Page 41: ...eplacement of such parts is not required 15 2 What to do in the event of a chimney fire If fuel used is incorrect or too moist then due to deposits in the chimney this may lead to a chimney fire 1 Cal...

Page 42: ...ment This baking compartment is heated from 4 sides left right back and bottom TIP To achieve the most even possible cooking process halfway through the cooking time you should turn the food being coo...

Page 43: ...8 Item no Quantity Item Item no 1 1 Ash pan set 350035 2 1 HMS complete 051011 3 1 Log drawer complete 051012 29 4 1 Ceramic cladding complete 051016 XX 5 1 Pallas Back complete 051014 6 1 Soapstone...

Page 44: ...y Item Item no 1 1 Keramott floor plate middle 712760 2 1 Keramott back left 712761 A 3 1 Keramott back right 712761 B 4 1 Keramott left 712762 5 1 Keramott right 712763 6 1 Keramott floor left 712766...

Page 45: ...Operating manual Pallas Back EN 17 Spare parts 45 HMS 4 3 2 1 Item no Quantity Item Item no 1 6 HMS holder 712784 95 2 6 HMS sheet 45998 94 3 1 HMS rear 770074 4 2 HMS side 770075...

Page 46: ...2712 93 2 2 Gasket 8x2x120 710096 3 4 Mushroom head blind rivet 4 0x7 6 718358 91 4 6 Head nut M5 pattern 718215 91 5 6 Large diameter washer M5 718214 91 6 4 Running wheel complete 712794 7 1 Log dra...

Page 47: ...ct uninstallation and dismantling of the stove contact your Austroflamm specialist dealer 18 1 Removing the steel cladding Fig 39 Detaching the cover 1 Detach cover if mounted Fig 40 Lifting the rear...

Page 48: ...rear 3 Use a cross point screwdriver to unscrew the screws at the rear from the steel side cladding Fig 42 Removing the front four screw 4 The front four screws must be removed The top two screws are...

Page 49: ...c ling is not possible Local disposal options must be observed Steel sheet Disassemble steel sheet components of the appliance by mechanical crushing If present remove seals beforehand Dispose of stee...

Page 50: ...ing manual Pallas Back 50 Handles and decorative elements made of metal If present disassemble or remove handles and decorative elements made of metal and dispose of as metal scrap Local disposal opti...

Page 51: ...es not constitute a warranty claim and do not constitute a warranty claim The territorial scope of validity of our guarantee covers Austria Germany and France In all other countries separate condition...

Page 52: ...additional information usually requires the consent of the data subject You may voluntarily grant such consent in the following section If you consent to the appropriate handling of your personal dat...

Page 53: ...nt Chimney flue Approved by chimney sweep yes no External air supply conduit yes no Controlled living space ventilation yes no Length Instructions for Operator Customer Instructions for handling the a...

Page 54: ...23 Service Report EN Operating manual Pallas Back 54 23 Service Report Date Technicians Notes Work carried out replacement parts installed...

Page 55: ...Operating manual Pallas Back EN 23 Service Report 55 Date Technicians Notes Work carried out replacement parts installed...

Page 56: ...56 Notizen notes appunti remarques...

Page 57: ...57 Notizen notes appunti remarques...

Page 58: ...olle Final inspection Controllo finale Contr le final Technische Funktion technical function funzione tecnica fonction technique Lackierung paint vernice peinture Sauberkeit cleanliness pulizia propre...

Reviews: