background image

Dexter 

6


english


Combustion air 

Being the user of the stove you must take care of a sufficient 
combustion  air  supply.  Sealed-up  windows  and  doors  may 
not  allow  a  sufficient  combustion  air  supply  or  disturb  the 
draught  behaviour  of  your  stove.  Please  ensure  the 
additional  supply  of  fresh  combustion  air  if  necessary.  For 
details please consult your specialist retailer. Make sure that 
the combustion air intakes are not blocked!


Stove pipe connection 

For  your  own  safety  stringent  laws  apply  for  connecting 
the stove pipes to the chimney. Your professional dealer 
or  distributor  knows  these  laws.  Please  have  your 
certified retailer carry out the connection of your stove


3. 

CORRECT OPERATION OF YOUR STOVE 


Approved fuels 

Dry,  well  cured  and  natural  wood  (hardwood  preferred), 
wood briquettes. 
 

Maximum amount of fuel


Maximum  amount  of  fuel  to  be  added:  1,6  kg  wood. 
Larger  amounts  of  fuel  can  lead  to  overheating  and  thus 
damage the stove. 
 

Clean burning


The wood  must be dry  (relative wood  moisture < 15%)  and 
untreated  and  the  right  amount  of  wood  must  be  burned  in 
order to ensure a clean fire that releases only small amounts 
of emissions. 
 

Startup procedures


During  the  first  3-4  operations  -  at  nominal  heat  output  - 
there may be some odour development and the varnish has 
not yet hardened. 
 

Making a fire 

For the correct and safe operation of your stove please pay 
attention  of  the  chimney  developing  the  necessary  feed 
pressure.  This  must  especially  be  considered  before  the 
initial operation (or e.g. after the summer heating break) and 
during the mid-season heating periods (e.g. at strong wind, 
etc.). 
If there is not enough feed pressure, please light only some 
paper or small kindling first, in order to “warm up” the stove 
and the chimney. 
The air inlet must not be covered or closed. 
 
Clean  grate,  empty  ash  drawer  if  necessary  (watch  out  for 
ambers!). 


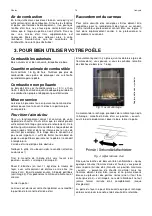
Position the lever for the combustion air to the open (“AUF”) 
position (see fig. 3). 


Place  2-3  logs  (approx.  1,1  kg  in  total)  crossways  in  the 
combustion chamber with sufficient distance from each other 
(min.  2  cm),  on  top  of  that  place  some  softwood  chippings 
(0,5 kg) and some ignition aid and light.


Close the door! 
 
We recommend to let the first load burn down without 
changing the air lever position. 
 

.


Fig. 3: before lighting 

 
As soon as no visible flames are left (only embers left in 
the  combustion  chamber),  you  can  put  another  load  of 
logs   (approx.  1,6  kg)  in  the  combustion  chamber  if 
desired.  
 
When  reloading  the  stove  please  repeat  the  procedure 
as  mentioned  under  “first  lighting”:  air  lever  position  on 
“AUF”  (=  open),  open  door  carefully,  place  logs,  close 
door. 


Fig. 4: air knob 

 
After a few minutes, when the logs burn well on all sides 
(bright, high flames), you can adjust the heat output with 
the  air  lever  (lever  on  max.  position  “AUF”  =  maximum 
heat output), the flames should be yellow and never look 
blueish or have black tips (otherwise add more air) – see 
fig.  4.  Never  close  air  supply  completely  during 
operation. Danger of flash-fire! 
 
The  stove  door  may  be  opened  only  for  refuelling  or 
disposing of ashes and is to be closed again afterwards.


sy

m

bo

l f

ig

ur

es


Summary of Contents for Dexter

Page 1: ...Dexter Benutzerhandbuch user instructions Istruzioni per l uso manuel d instructions...

Page 2: ...aire deutsch english italiano fran ais Inhalt Contents Indice sommaire 1 Techn Daten 1 1 Techn data 5 1 Dati tecnici 9 1 Caract ristiques 13 2 Wichtige Informationen 1 2 Important information 5 2 Info...

Page 3: ...e Ben tzung des Schutzhandschuhs Machen Sie Kinder auf diese Gefahren aufmerksam und halten Sie sie w hrend des Betriebes von der Feuerst tte fern Achtung Lack ist kein Rostschutz Verbrennen Sie aussc...

Page 4: ...nahme z B nach der Sommerzeit und in der bergangszeit z B bei starkem Wind kontrolliert werden Wenn nicht gen gend F rderdruck vorhanden ist dann k nnen zun chst Papier oder Weichholzsp ne verbrannt w...

Page 5: ...ikelnr Dexter R Keramott Zugplatte 2 1 720429 720474 Keramott Boden vorne 2 720421 Keramott Boden links rechts 3 720422 720471 Keramott Boden rechts links 4 720423 720472 Keramott Boden hinten 5 72042...

Page 6: ...sen ist verru t die Glasscheibe sehr schnell zu gro e Holzscheite Menge lt Bedienungsanleitung einhalten Betriebstemperatur wurde nicht erreicht Mehr Brennstoff trockenes Holz 15 Restfeuchte verwenden...

Page 7: ...n stove varnish is no rust prevention Make your children aware of this particular danger and keep them at a distance from the heating unit whenever it is in operation Only burn approved fuels and mate...

Page 8: ...especially be considered before the initial operation or e g after the summer heating break and during the mid season heating periods e g at strong wind etc If there is not enough feed pressure please...

Page 9: ...corner l r 3 720422 720471 Inside base Keramott corner r l 4 720423 720472 Rear Keramott base 5 720427 Vertical Keramott outside 6 720424 Vertical Keramott corner 7 720425 Vertical Keramott rear 8 720...

Page 10: ...quantity according to user s instruction operating temperature was not reached more fuel use dry wood 15 residual moisture attend air regulation stove does not get enough combustion air chimney draug...

Page 11: ...onsigliamo l utilizzo di un apposito guanto durante il funzionamento Istruite i vostri bambini su questi inconvenienti e teneteli lontani dalla stufa quando accesa Attenzione questa vernice non antiru...

Page 12: ...le stagioni transitorie di primavera e autunno per esempio sotto condizioni di forte vento questo controllo molto importante Se il tiraggio insufficiente potete usare carta o trucioli di legno dolce p...

Page 13: ...alegna 2 720421 Keramott basamento angolare esterno sx dx 3 720422 720471 Keramott basamento angolare interno sx dx 4 720423 720472 Keramott basamento posteriore 5 720427 Keramott verticale esterna 6...

Page 14: ...chiusa il vetro si annerisce pi rapidamente i ceppi sono troppo grandi rispettate le quantit di carico combustibile indicate sul manuale non stata raggiunta la temperatura interna necessaria aggiunge...

Page 15: ...nement Nous recom mandons d utiliser le gant de protection Expliquez bien le risque de br lures vos enfants et tenez les loin de l appareil lorsque celui ci fonctionne Attention la peinture n est pas...

Page 16: ...tr l chaque d but de saison apr s l t et dans les intersaisons en cas de vent fort par exemple Si le tirage dans le conduit n est pas assez important il suffit de br ler tout d abord du papier ou du p...

Page 17: ...2 720471 Keramott de sol angle interne 4 720423 720472 Keramott de sol l arri re 5 720427 Keramott paroi externe 6 720424 Keramott paroi d angle 7 720425 Keramott paroi arri re 8 720426 Keramott d fle...

Page 18: ...grosses Respecter la quantit de bois recommand e Temp rature de fonctionnement non atteinte Utiliser plus de combustible du bois bien sec 15 d humidit ne pas fermer compl tement l arriv e d air Le po...

Page 19: ...he stove carcass for 6 years and all stove components made of steel or cast iron for a full two years from the date of purchase Steel and cast iron components which show defect in materials or workman...

Page 20: ...antie Nous garantissons le fonctionnement irr prochable du corps de l appareil de votre po le AUSTROFLAMM pendant 6 ans toutes les autres pi ces en acier et en fonte tant garanties 2 ans Les pi ces en...

Reviews: