background image

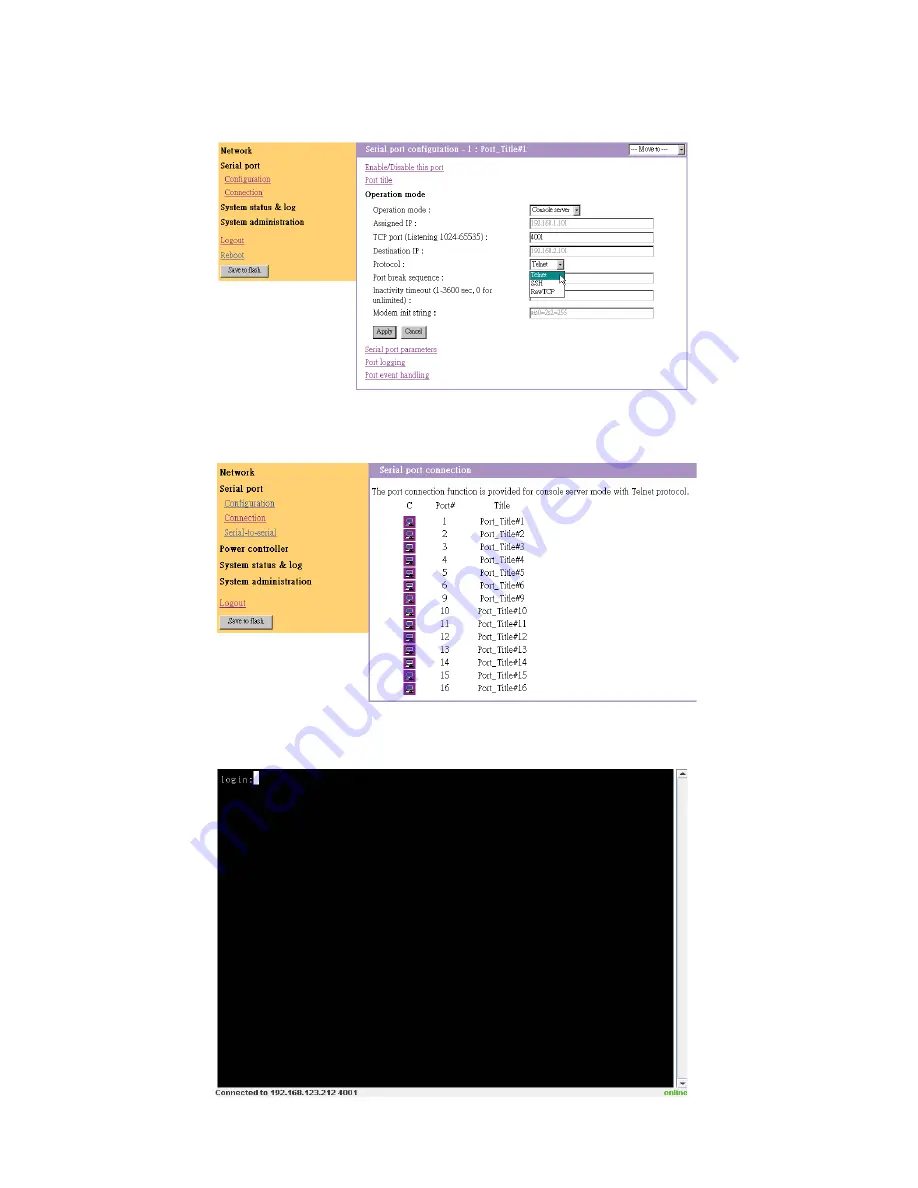
      4.2.1      Telnet Java Applet

                       1.   Select Telnet protocol under Serial port > Configuration > Operation mode.  


       2.   Select the Serial port > connection menu item, click the terminal icon at C column. If connect success, 


        the terminal emulation will pop up login prompt.


       3.   Enter user name and password to log in, so can start to use it as if running a Telnet client program 


       (e.g., Telnet DOS program, PuTTY).

4.2   Connection                                                                          

Chapter 4

P.40

Summary of Contents for Cyberview NCP-1716

Page 1: ...User Manual NCP 1716 16 port Console Terminal LCD Keyboard Drawer 1U 17 screen size Designed for SUN all headless servers ...

Page 2: ......

Page 3: ...pter 2 How to Connect Console Terminal LCD Keyboard Drawer 2 1 Connection Diagram 11 2 2 Membrane 12 2 3 Configuring the Local Console 13 15 2 4 Changing Operating Parameters 16 23 2 5 Local Keyboard Commands in Native Mode 24 2 6 Connector Pin Assignment 25 2 7 Command Guide 26 2 8 Device Setup 27 28 Chapter 3 IP Setting 3 1 IPConfiguration 29 3 2 IP Filtering 30 31 3 3 Web Server Configuration 3...

Page 4: ...and Time 45 6 3 Fireware Upgrade 46 47 Chapter 7 Operation 7 1 On screen Display Operation 48 7 2 On screen Menu 49 Chapter 8 Standard Specification 8 1 Specifications 50 8 2 Keyboard 51 Chapter 9 Optional Specification 9 1 DC Power Options 51 Chapter 10 FAQ 52 53 Chapter 11 Dimensions 54 Contents ...

Page 5: ...ire water lightning or other acts of nature unauthorized product modifi cation or failure to follow instructions supplied with the product Repair or attempted repair by anyone not authorized by us Any damage of the product due to shipment Removal or installation of the product Causes external to the product such as electric power fluctuation or failure Use of supplies or parts not meeting our spec...

Page 6: ...ng time disconnect it from the power outlet to prevent being damaged by transient over voltage Keep all liquids away from the equipment to minimize the risk of accidental spillage Liquid spilled on to the power supply or on other hardware may cause damage fire or electrical shock Only qualified service personnel should open the chassis Opening it yourself could damage the equip ment and invalidate...

Page 7: ...5 DB9 female adapter x 1 pc RJ45 DB9 male adapter x 1 pc Fasteners for rear L bracket x 4 pcs 330mm rear mounting L bracket x 1 pair NCP 1716 mounting depth adjustable from 320 to 920mm User manual x 1 pc CD disc x 1 pc Power cord x 1 pc 5 4 2 1 3 1 2 3 User Manual 4 5 6 6 7 7 6 8 8 ...

Page 8: ...hown on the package contents Check and make sure they are included and in good condition If anything is missing or damage contact the supplier immediately 1 5 Unpacking 1 4 Before Installation Chapter 1 1 RJ45 DB9 adapter 1 1 SG 100F RJ45 DB9 female adapter 1 2 SG 100M RJ45 DB9 male adapter 2 Cat5 Cable 2 1 CU 3 3 feet Cat5 cable 2 2 CU 6 6 feet Cat5 cable 2 3 CU 10 10 feet Cat5 cable 2 4 CU 15 15...

Page 9: ...rear mounting L bracket Micro switch for screen auto power off Serial port status LED Keyboard interchangeable module kit Carry handle to release the 2 pt lock 2 point lock LCD interchangeable module kit LCD membrane 1 3 2 4 3 5 6 6 7 7 8 8 1 2 4 5 ...

Page 10: ...r L bracket to a suitable length and tighten the fasteners shown in Figure 2 Fix the the LCD keyboard drawer into the rack Hardware screws and cage nuts for fixing the mounting bracket to the rack is not provided Figure 2 Aligning the rear L brackets to a suitable length for the rack Figure 1 Installing the rear L bracket to the LCD keyboard drawer Figure 3 Fixing the LCD keyboard drawer into the ...

Page 11: ...ly pull the tab toward the front of the LCD shown in Figure 4 Figure 4 Pulling the tab toward the front of LCD Operate the LCD keyboard drawer shown in Figure 6 Figure 5 Flipping up the LCD to a suitable angle Flip up the LCD to a suitable angle shown in Figure 5 ...

Page 12: ... 9 Pushing the LCD keyboard drawer into the rack Figure 8 Pushing the white arrow button Push the white arrow button on either side of the LCD keyboard drawer to unlock shown in Figure 8 Avoid pressing the red button located on either side A white arrow release button is located on the outside of each slide shown in Figure 7 Figure 7 White arrow button ...

Page 13: ...le the standard front mounting ears carefully Install the optional front mounting ears with M3 2 4 5mm screw x 8 pcs 4 5 6 7 Mounting bracket x 2 pcs Front mounting ear left right x 2 pcs Support bracket x 4 pcs M6 cage nut x 8 pcs M6 washer x 8 pcs M6 15mm screw x 8 pcs M3 2 4 5mm screw x 14 pcs 5 4 2 6 1 3 7 1 2 3 4 5 6 7 Model No NBK 01 ...

Page 14: ...s Leaving the screws slightly loose Attach support brackets to chassis with M3 2 4 5mm screw x 6 pcs Pickup the unit Insert inner members of slides into the already mounted internal slide members in the rack Attach left and right front mounting ears to vertical mounting rails Tighten the screws Installation completed 4 5 Model No NBK 01 ...

Page 15: ...r 2 NCP 1716 Ethernet Console Hub Router Switch PDU UPS Power module Serially managed device SG 100F RJ45 DB9 female adapter SG 100M RJ45 DB9 male adapter Cat5 cable Cat5 cable Cat5 cable Internet Hub for remote access Headless servers ...

Page 16: ...ion Link Orange 10BaseT Etherent connection Green 100BaseT Ethernet connection Ready Green Blinking per second when system is busy Port LED Green Traffic activity Reset button Press reset button to reboot the unit P 12 Front Panel Port LED Indications Warning Press Shift Esc sets default it will change the pre set operating parameters and local access Per sonality Please refer to FAQ page 29 30 fo...

Page 17: ...ebar to change the save field at the right side of the screen from NO to YES before exiting SETUP Depress F12 to exit SETUP mode and return to the normal display mode Entering SETUP Hold down the Alt key and then depress the Esc key to enter SETUP mode When you enter SETUP mode any text on the screen temporarily disappears and the main SETUP directory appears When you leave the SETUP mode the main...

Page 18: ...IPCS Version 1 0 06 11 20 StoS Serial to serial Configuration Connect to 1 Inactivity timeout 0 Baud rate 9600 Data bits 8bits Parity None Stop bits 1bits Flow controls None Press Space to select TAB ENTER netx field left right q or ESC abort FDX 11 59 IPCS Version 1 0 06 11 20 StoS Serial to serial Configuration Serial to serial Configuration Connect to 1 Inactivity timeout 0 Baud rate confirm 96...

Page 19: ...onsole Chapter 2 4 Type in user name and password The default login name password are root User Default Name Password root root 5 Press Ctrl and C keys to get out of Serial to Serial function and back to main console screen P 15 ...

Page 20: ...display memory to 1 x Lines Equal to the number of lines selected in the lines parameter 2 x Lines Two times the value of the lines parameter 4 x Lines Four times the value of the lines parameter or Equal to the value of the lines parameter with a second page containing the rest of the lines remaining in memory Cursor Sets the cursor display to blink or steady block or underline Background Sets th...

Page 21: ...end of the page Page Xmt Limit Causes the terminal to send data through the HOST port as fast as the baud rate allows None or at a maximum rate of 60 cps or 150 cps In older systems limiting character rate is necessary to prevent loss of data Language Sets correct terminal operation for the language of the keyboard connected to it US UK Danish German Spanish Swedish Norwegian Italian French Belgia...

Page 22: ...5 Misc SETUP Menu Wprt Intensity Normal blank dim blank dim Block End Causes the terminal to send a block of data to the computer with a line terminator as an ASCII US character and block terminator as an ASCII CR character US CR or with line terminators as ASCII CR and LF characters and the block terminator as an ASCII ETX character CRLF ETX Wprt Reverse Sets the write protected characters to app...

Page 23: ...eys that are not programmed will send a default sequence which is determined by the personal ity selected Below table lists the programmable keys To redefine a key 1 Select the key to be redefined by pressing that key together with This highlights the key s definition field 2 Press to select the shifted or unshifted key definition field 3 Enter the key definition up to 62 characters at the cursor ...

Page 24: ...ar the message CONCEAL hides the answerback message so it is not displayed in SETUP mode To save the message in nonvolatile memory exit SETUP mode with the YES option F8 Ansbk SET UP Menu F9 Lan Setup Menu Home This setting is not support in this model Note For configuring the ehternet port for remote access pls refer to page xx for details 2 4 Changing Operating Parameters Chapter 2 P 20 ...

Page 25: ...lected holding the Ctrl key down and depressing either the 0 1 9 or period keys in the numeric pad change the assignment of color on the screen Each selection is called a palette and is described in Color Palette Table ASCII NOT WY325 WY325 VTXXX ANSI CONSOLE Background The whole data area of the screen will be displayed in this color when the application hasn t entered character or spaces with th...

Page 26: ...ty 2 Intensity 2 and reverse or blank 1 Underline Underline and reverse or blank 1 Underline and intensity 2 3 Underline intensity 2 and reverse or blank 1 Cyan Black White Black Magenta Black Yellow Black Black Blue Black White Black Magenta Black Yellow 4 Normal Reverse or blank 1 Intensity 2 Intensity 2 and reverse or blank 1 Underline Underline and reverse or blank 1 Underline and intensity 2 ...

Page 27: ...lack Black White Black Yellow Black Blue Black Cyan 10 Soft Palette Normal Reverse or blank 1 Intensity 2 Intensity 2 and reverse or blank 1 Underline Underline and reverse or blank 1 Underline and intensity 2 3 Underline intensity 2 and reverse or blank 1 Green Black Blue Black Cyan Black Red Black Black Yellow Black Blue Black Cyan Black Red 1 Whether the reverse or blank attribute is mapped to ...

Page 28: ...play next page or active other window 4 PAGE DOWN Display previous page or active other window 5 PAGE UP Toggle between split screen 5 and full screen format CTRL SHIFT kpd Toggle Session 0 6 ALT F1 Toggle Session 1 6 ALT F2 Toggle Session 2 6 ALT F3 Toggle Session 3 6 ALT F4 Toggle Session 4 6 ALT F5 Toggle Session 5 6 ALT F6 Toggle Session 6 6 ALT F7 Toggle Session 7 6 ALT F8 Toggle Session 8 6 ...

Page 29: ...P 25 2 6 Connector Pin Assignment Chapter 2 Console port serial port pin assignment Pin Signal Direction 1 DSR In 2 RTS Out 3 GND 4 TxD Out 5 RxD In 6 DSR 7 CTS In 8 DTR Out Pin 1 Pin 8 ...

Page 30: ...ng to the following notations Same Same as native code code is native to other terminal also Wyse Same as native code Wyse enhancement code not native to other terminal ENH Same as native code when enhance mode is on Wyse enhancement code not native to other terminal A code listed under a nonnative personality indicates that the related terminal s native code is supported A blank in any column ind...

Page 31: ...e Then click Update Device The new settings will be save to the IP serial console unit then the unit will be reboot automatically Access IP serial console Using the HTTP protocol and entering the configured IP address of IP KVM switch into the web browser to remote access the IP KVM switch With successful connection to IP KVM the login page will show as below then key in the default user name pass...

Page 32: ...en Selecting an item on the menu bar opens a tree view of all the submenus available under each grouping Selecting a submenu item will allow the user to modify parameter settings for that item Every page will allow the user to Save to flash Apply or Cancel their actions To apply all changes made the user must select Apply Only when the user selects Apply will the new parameter values be applied to...

Page 33: ...3 211 The onfiguration setting will not go into effect until clicking the button Save to flash reboot 3 1 2 SMTP Configuration The IP serial console IPCS can send an email notification when the number of system log messages reaches to certain value and or when an alarm message is created due to an issue with serial port data The user must configure a valid SMTP server to send these automatically g...

Page 34: ...8 1 254 192 168 1 0 255 255 255 0 192 168 0 1 192 168 255 254 192 168 0 0 255 255 0 0 192 168 1 1 192 168 1 126 192 168 1 0 255 255 255 128 192 168 1 129 192 168 1 254 192 168 1 128 255 255 255 128 The Port is a port or port range of the IP serial console which hosts try to access to Chain rule The chain rule determines whether the access from the hosts is allowed or not It can be one of the these...

Page 35: ... rule 2 So only the hosts which elong to the subnet 192 168 1 x or 192 168 2 x can access to the IPCS through http by the 1 2 and 3 rules The IP serial consoloe Web server supports both HTTP and HTTPS HTTP over SSL services simulta neously Users can select user authentication method for the IPCS web pages login The IP serial console currently provides authentication methods of Local and RADIUS 3 3...

Page 36: ...on Center http members dyndns org The user may then add a new Dynamic DNS Host link after logging in to their Dynamic DNS Network Services Members NIC After enabling the Dynamic DNS service in the Dynamic DNS Configuration menu the user must enter the registered Domain Name User Name and Password After applying the configuration change users can accessthe IPCS using only the Domain Name The DNS Do...

Page 37: ...s who access the serial port When the authentication is set to Local the IPCS will use its own user list to authenticate a user If configured otherwise the IPCS will request authentication from the external authentication servers i e RADIUS Figure below shows conceptually the user authentication process when using an external authentication server Radius server configuration 3 3 Web Server Configu...

Page 38: ...tication is set to Local the IP serial console will use its own user list to authenticate a user If configured otherwise the IPCS will request authentication from the external authentication servers i e RADIUS Figure below shows conceptually the user authentication process when using an external authentication server 4 1 2 Port Enable Disable Each serial port can be enabled or disabled A disabled ...

Page 39: ...s can enter descriptive information for each port based on the device attached to it We can use the shortcut Move to on the up right corner to go to the wished port page directly P 35 4 1 Serial Port Configuration Chapter 4 ...

Page 40: ... in the following sections P 36 4 1 Serial Port Configuration Chapter 4 Note The Power Control Mode is available in port 1 only The last port e g Port 16 of IPCS 16 can also be used as External ESP Entry Serial Port in Serial to Serial operation mode Refer to the section Serial to Serial Function for details ...

Page 41: ...ata activity in the serial port the existing TCP session will automatically be closed If the user wants to maintain the connection indefinitely configure the inactivity timeout period to 0 TCP Keep alive no configuration required In order to avoid TCP connection lockup the IP serial console will continue to check the connection status between the Telnet SSH client and the IP serial console by send...

Page 42: ...e data receiving from the tracking serial port will be buffered in IPCS memory The user can also define keywords for each serial port that will trigger an email notification if the keyword is found in the logged data This will enable the user to monitor the data from the attached device The Port logging feature is valid and visible only if the operation mode of the serial port is configured to con...

Page 43: ...web pages provide a web based serial port connection which enables the user to access the serial ports without using the Telnet client program A Java applet is used to provide the text based user interface to access the serial port This Java applet supports only Telnet in Console Server mode The user cannot access the serial port via the web when the host mode of the port is set to Raw TCP connect...

Page 44: ...ect the Serial port connection menu item click the terminal icon at C column If connect success the terminal emulation will pop up login prompt 3 Enter user name and password to log in so can start to use it as if running a Telnet client program e g Telnet DOS program PuTTY 4 2 Connection Chapter 4 P 40 ...

Page 45: ...ower control of servers and network appliances When used in conjunction with IP Console Servers the SPC provides comprehensive management capabilities and quick problem resolution by integrating console access with power control into a single interface The SPC support both RS232 and RS485 interface With RS485 mode the SPC can be located up to 1 2km away from the controlling master and has the Dais...

Page 46: ...s page will be automatically refreshed every 10 seconds to show the system current time 5 1 2 System Logging The user may configure the IP serial console to enable or disable the system logging process and set the storage location The system log buffer is pre allocated at 300K bytes size If the logging data grows larger than the pre allocated size the new data will overwrite the old data 5 1 Syste...

Page 47: ...efine only can access to Serial Port and System Status log 6 1 2 Add User To add a user Check the users at the User administration screen Click the button Add Figure below shows the Add User screen You will see the new user is on the user list now 6 1 System Administration Chapter 6 P 43 Note The first character of User name must be alphabet The password should be at least 3 characters long The us...

Page 48: ...articular port may only allow the authorized users to access To edit the ACL Check the users at the User administration screen Click the Edit icon Enter user name password Select the port to access to Click the button Submit 6 1 5 Change password To change the parameters of the user account open the edit user screen by selecting the user name at the user administration screen and then edit the par...

Page 49: ...l battery backup By convention weather scientists use one time zone Greenwich Mean Time GMT This time is also known as Universal Time UTC The user may also need to set the time zone and the time offset from UTC depending on the user location to set system date and time exactly and the time offset from UTC It allows the IPCS to calculate the exact system time The Time offset value x could be positi...

Page 50: ...06 6 3 2 Upgrade from web page Key in TFTP server IP address and image file name then click Apply After a few seconds the message Flash program finished successfully will be shown meaning the new firmware has been upgraded into the Flash memory 6 3 Fireware Upgrade Chapter 6 P 46 Warning During this upgrading process we should not disconnect the power or the Ethernet cable since it may cause upgra...

Page 51: ...y green LED will blink every second P 47 6 3 Fireware Upgrade Chapter 6 Warning A new firmware release version may need one two or up to three images to upgrade You have to up grade all to be upgraded images before rebooting the system Otherwise may cause inconsistency be tween kernel and application firmware and the system may not be able to start up successfully In this case we have to upgrade t...

Page 52: ...rane Exit the OSD screen Shortcut key to auto adjustment by pressing the button for 5 seconds Scrolls through menu options and adjusts the displayed control Display the OSD menu Power on off LCD Power light Green On Orange Power saving Membrane Switch Function ...

Page 53: ...ock To enter into the phase clock sub menu H V POSITION H V Position Align the screen image left or right and up or down MISC Information Display the current resolution refresh rate and frequency information on the screen OSD Timer Set the time duration in seconds that the OSD is visible after the last button is pressed The factory default is 10 seconds Color Select the screen color 5500K 6500K 95...

Page 54: ...e RADIUS PAP CHAP for modem dial in Protocols TCP UDP IP ARP ICMP HTTP HTTPS DHCP BOOTTP Telnet PPP SMTP DNS NTP Dynamic DNS Protocols Relative Function Port monitoring Serial TCP inactivity time Management Local console web pages HTTP HTTPS SSH telnet port buffering and logging system statistics Email notification according to the equipment alarm message Compatibility SUN Solaris IBM RS 6000 AIX ...

Page 55: ... 1 DC Power Options Chapter 9 Remarks Package does not include power cord and AC power adapter Model 12V 24V 48V Input rating Input voltage 12 Volt 24 Volt 48 Volt Input range 9 18V 18 36V 36 75V Input current No load 50 mA 50mA 50 mA Full load 4950 mA 2450 mA 1220 mA Output rating Output voltage 12 Volt 12 Volt 12 Volt Output current 4 16A 4 16A 4 16A Efficiency 84 85 85 ...

Page 56: ...eyboard drawer is based on the RS 232 C protocol standard supported on most terminals PCs servers as well as many manageable devices which equipped with at least one RS 232 serial port that is used as a console port when no keyboard is present 5 What operating systems does the NCP1716 16 port console terminal drawer support There is no software to install on attached servers so the console termina...

Page 57: ...value the pre set operating parameters are changed You need to change the setting as below In SETUP menu 1 Press F1 Disp Display change the CRT to LCD press SpaceBar to change 2 Press F2 Genrl Personality change the Wyse 120 to VT100 3 Press F4 Comm Baud rate change 38400 to 9600 Parity None unchange Data Stop Bits 8 1 unchange Rcv Hndshake change Xon Xoff to None Xmt Hndshake change Xon Xoff to N...

Page 58: ...imensions Chapter 11 Model Product Dimension W x D x H Packing Dimension W x D x H Net Weight Gross Weight NCP 1716 442 x 650 x 44 mm 17 4 x 25 6 x 1 73 589 x 856 x 168 mm 23 2 x 33 7 x 6 6 16 kg 35 lb 22 kg 48 lb ...

Page 59: ......

Page 60: ...pecifications without prior notice and assumes no reponsibility for any error which may appear in this publication All brand names logo and registered trademarks are properties of their respective owners Copyright 2007 Austin Hughes Electronics Ltd All rights reserved ...

Reviews: