background image

25

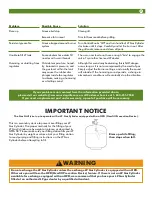
Problem

Flare up

Persistent grease fire

Unable to fill LP tank

Humming or whistling from 
regulator

Possible Cause

Grease build-up

Excessive fat in meat

Grease trapped around burner 
system

Some dealers have older fill 
nozzles with worn threads

Outside temperature, humid-
ity, barometric pressure, and 
the gas level within the tank 
may cause the rubber dia-
phragm inside the regulator 
to vibrate, making a humming 
or whistling sound.

Solution

Clean grill.

Trim fat from meat before grilling.

Turn Control Knobs “Off” and turn handle of LP Gas Cylinder 
clockwise until it stops. Carefully and let fire burn out. After 
the grill cools, remove and clean all parts.

The worn nozzles do not have enough “bite” to engage the 
valve. Try another licensed LP dealer.

Although this sound may be alarming, this is NOT danger-
ous as long as it is not accompanied by the smell of gas. 
Simply adjust the Burner settings, and usually the sound 
will subside. If the humming sound persists, a change in 
atmospheric conditions will eventually stop the vibration.

The Gas Grill is set up to operate with a LP Gas Cylinder equipped with an OPD (Overfill Prevention Device).

IMPORTANT NOTICE

Do not exchange the LP Gas Cylinder unless the exchange LP Gas Cylinder is equipped with an OPD. 
Otherwise you will lose the OPD (Overfill Prevention Device) feature. If there is not an LP Gas Cylinder 
available for exchange equipped with an OPD, we recommend that you have your LP Gas Cylinder 
filled at an authorized LP gas dealer by a qualified attendant.

WARNING

!

Rises up while filling, 
then stops when full.

This is a secondary device to prevent overfilling your LP 
Gas Cylinder. The proper methods for the filling of your 
LP Gas Cylinder are by weight or volume, as described in 
NFPA 58. Please make sure your filling station fills your LP 
Gas Cylinder by weight or volume. Ask your filling station 
to read purging and filling instructions on the LP Gas 
Cylinder before attempting to fill. 

If your problem is not resolved from the information provided above, 

please visit our website @ www.aussiegrills.com or call Customer Service at 1-800-251-7558.                      

If you need a replacement part under warranty, a proof of purchase will be necessary.

Summary of Contents for 69F6U00KS1

Page 1: ...urpose than which it is intended These instructions must be kept with the user SAVE THESE INSTRUCTIONS If you smell gas 1 Shut off gas to the appliance 2 Extinguish any open flame 3 Open lid 4 If odor continues keep away from the appli ance and immediately call your gas supplier or your fire department WARNING DANGER LP Gas Grill Assembly and Use Manual Do not store or use gasoline or other flamma...

Page 2: ... as noted for First Time Use leak test as detailed on pages 12 13 Do not store or use gasoline or other flammable vapors and liquids in the vicinity of this or any other appliance An LP cylinder not connected for use shall not be stored in the vicinity of this or any other appliance Always have a type BC or ABC fire extinguisher readily available WARNING Phillips Screwdriver Tools Required for Ass...

Page 3: ... Burners 20 Bottom Body Panel Removal 21 Storage and Transportation 22 Emergencies 23 Troubleshooting 23 Important Notice LP Cylinder with OPD 25 Replacement Parts Parts Illustrations 26 Parts List 27 Limited Warranty 28 Register your grill and retain your receipt Preparation for Assembly Remove Grill Body the Folding Cart and all the packaging from the carton and place on floor Make sure there ar...

Page 4: ...le near the end of the Axle Snap the Hubcap on to the Wheel Repeat for other Wheel Axle Axle Pin Hubcap Step 2 Attaching Cylinder Bracket Attach the Cylinder Bracket to the end of the Cart with 2 1 4 20 x 47 Bolts oriented as shown Step 3 Attaching the Firebox Handles Place the Handle between the brackets on the end of the firebox and align the slot with the hole For each side of the Handle insert...

Page 5: ...ebox Gripping Portion of Handle A B Push down here when Handle is all the way up Leg Lock Bracket Leg Lock Bracket in locked position Top of Leg Frame Grip here to open Push Down B Step 1 Unfolding Cart To avoid being pinched by hinges or moving parts only open the cart by gripping the top of each leg frame Gripping at the top lift up and outwards until the leg frames are straight up Press down fi...

Page 6: ... risk of bodily injury from lifting the following assembly step will require two people CAUTION Step 3 Placing the Grill Body on the Cart With one person at each end grasp the Gripping Portion of the Tubular Handles and place the Grill Body on Cart Corners of Firebox will fit INSIDE brackets on top of legs IMPORTANT Be sure to engage latches at all four corners before moving grill Latch Latch Catc...

Page 7: ... it is straight up C Fold out the side windscreens and snap the tabs at the front into notches in the firebox Push gently at the top front edge of the side windscreen to help lock in position The lip on the outside bottom of the side windscreen should rest on top of the side of the firebox C A Windscreen Windscreen Step 5 Flavor Activator Cooking Grid Assembly A Place a Flavor Activator over each ...

Page 8: ...e Pan and Foil Pan Empty and clean then place in the grill body under the cooking grids 4 Fold the side windscreens against the back then fold all flat to the cooking grids 5 Close the side tables First the right with the drain channel then the left 6 Route the regulator hose straight back under the fire box and hang the regulator on the hook on the back of the firebox 7 Unlock the latches grasp t...

Page 9: ...r forms of visual external damage it may be hazardous and should be checked by a liquid propane supplier Do not use an LP Gas Cylinder with a damaged valve Use only an LP Gas Cylinder equipped with an OPD Overfill Prevention Device Do not store a spare LP Gas Cylinder under or near the LP gas grill When grill is not in use turn off all grill Control Knobs LP Gas Cylinder valve and disconnect LP Ga...

Page 10: ...m tube of cart base If you need a replacement part under warranty a proof of purchase will be nec essary You will be asked to forward your proof of purchase via e mail or to fax your proof of purchase to 423 639 1055 and reference your model and serial number It is important to register your grill and retain your receipt Connecting LP Gas Cylinder 1 Fill empty OPD LP Gas Cylinder at your local gas...

Page 11: ...le and flammable material Locate your LP gas grill at least 10 feet away from your house or any building Maintain minimum clearances of 36 from back and sides of grill to any combustible construction Do not locate this appliance under overhead unprotected combustible construction This outdoor cooking appliance is not intended to be used in or on boats or installed in or on recreational ve hicles N...

Page 12: ... of dish washing liquid 4 If already in place remove the cooking grids and flavor activators Open the Control Panel from the Grill Body Firebox by removing the four bolts from that attach the top of the control panel to the top of the firebox Fig 1 Carefully lower Control Panel away from the Body until Valves disengage from the Tubular burner ends The bolts in the bottom ends of the control panel ...

Page 13: ...he handle on the LP Gas Cylinder clockwise until it stops Disconnect LP Gas Cylinder by turning coupling nut on regulator in a counterclockwise direction until regulator is released from threaded LP Gas Cylinder nozzle 9 Place the protective cap over LP Gas Cylinder nozzle 10 Replace Control Panel and retighten all bolts Fig 1 6 Check for leaks by brushing the soap solution on all gas valves hose ...

Page 14: ...ylinder valve open counterclockwise until it stops Fig 8 Fig 7 Control Knob in Off position Control Knob in High position large flame symbol Igniter Button Left Main Burner Control Knob Fig 9 To reduce the risk of death or serious injury from an explosion or a fire beneath the grill Regularly inspect and clean Burner Venturi Tubes for insects or insect nests Spiders or small insects can build nest...

Page 15: ...If a Burner goes out during operation turn all Control Knobs to the Off position and close the LP Gas Cylinder valve to dissipate any accumulated gas Wait five minutes before attempting to relight the grill If any or all Burners fail to light after three to four attempts following Steps 3 4 turn all Control Knobs to the Off posi tion and close the LP Gas Cylinder valve to dissipate any accumulated...

Page 16: ... light refer to the Troubleshooting Section 6 After ignition turn the Control Knobs to High for 3 5 minutes to preheat the grill Preheat the grill before every cooking session If a Burner goes out during operation turn all Control Knobs to the Off position and close the LP Gas Cylinder valve to dissipate any accumulated gas Wait five minutes before attempting to relight the grill Fig 11 View of in...

Page 17: ...e Foil Pan and Grease Pan for build up Empty excess grease to avoid a grease fire in the pan If you notice grease or other hot material dripping from the grill onto the valve hose or regulator turn off the gas supply immediately After the grill has cooled determine the cause and correct it After cleaning the valve hose and regulator assembly perform a leak test before continuing use See Performing...

Page 18: ...r cook food like eggs that can not be cooked on a grill They can also be used to heat pans CAUTION Do not preheat Cooking Grids over 5 minutes The cooking surface coatings could be destroyed Use only long handled heat resistant plastic or wooden utensils to avoid scratching the non stick surface End of Cooking Session To reduce the risk of serious bodily injury or death from fire or burn hazard Al...

Page 19: ...y water and a cloth or nylon bristled brush only Do not immerse the Gas Controls or Manifold in water Avoid getting water in the Burner holes Burners Burning off the residue after cooking will keep the Burners clean with normal usage provided the Burners are op erating correctly Clean the Burners annually or whenever heavy build up is found to ensure that there are no signs of blockage debris inse...

Page 20: ...Burner from the grill To completely remove the burner from the grill disconnect the electrode wire from the back of the igniter box behind the control panel and carefully pull the wire through the inside of the firebox In order to prevent flashbacks the Burner s should be removed from the grill and cleaned periodically especially if the grill has been stored for an extended period of time Valve no...

Page 21: ...14 Replace the screws that fasten the burner flange to back wall 9 If the grill is to be stored wrap burners in a protective cover such as aluminum foil to keep insects out 10 Check burner operation after re assembly 11 Replace Flavor Activators and Cooking Grids Fig 15 Non metallic Brush Pipe Cleaner Open up Burner holes with a small nail or wire Fig 16 3 16 gap Electrode Wire Burner Make sure th...

Page 22: ...inder valve with the Safety Cap 2 Remove Burners and wrap with aluminum foil to prevent insects from entering the Burner holes Store wrapped Burners in body of grill 3 You may wrap the Cooking Grid and Flavor Activators in aluminum foil and place inside the grill body or store inside your dwelling 4 Place a grill cover over the grill and store outdoors if possible It may be stored indoors only if ...

Page 23: ... Burner s and inspect for blockage from spider webs insect nests or rust See How to Clean Burners section Replace any damaged parts Turn off Control Knobs and LP Gas Cylinder valve Once fire is out and grill has cooled off Clean residual food particles and excess grease from inside firebox area grease cup and other surfaces If you can safely reach the Control Panel turn Control Knobs to Off then c...

Page 24: ... Burners See How to Clean Burners in Care and Maintenance Dry Electrode with clean cloth Air dry or use blow dryer Reconnect the wire Replace Igniter Wire Electrode assembly Call the Customer Service Department See re assembly after cleaning in Care and Maintenance Take LP Gas Cylinder to licensed LP gas supplier to be refilled Turn Control Knobs to Off position and turn LP Gas Cyl inder handle cl...

Page 25: ...ons will eventually stop the vibration The Gas Grill is set up to operate with a LP Gas Cylinder equipped with an OPD Overfill Prevention Device IMPORTANT NOTICE Do not exchange the LP Gas Cylinder unless the exchange LP Gas Cylinder is equipped with an OPD Otherwise you will lose the OPD Overfill Prevention Device feature If there is not an LP Gas Cylinder available for exchange equipped with an ...

Page 26: ...26 Parts Illustration 1 3 8 6 7 5 13 12 10 9 14 11 16 17 15 29 21 20 22 18 19 28 23 27 25 2 4 30 24 26 31 ...

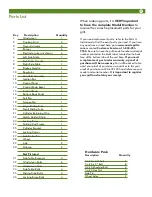
Page 27: ...4 Burner 6 5 Electrode wire not shown 6 6 Left Side Table 1 7 Side Table Handle 2 8 Right Side Table 1 9 Firebox Handle 2 10 Regulator 1 11 Manifold Assembly 1 12 Ignition Box 1 13 Control Panel 1 14 Control Knob Bezel 6 15 Control Knob 6 16 Bottom Body Panel 1 17 Foil Pan 1 18 Grease Pan 1 19 Large Sliding Tube 2 20 Small Sliding Tube 2 21 Cylinder Retaining Wire 1 22 Match Holder Chain 1 23 Lock...

Page 28: ...on of MECO CORPORATION without charge This warranty does not include the cost of any inconvenience or property damage due to failure of the product and does not cover damage due to misuse abuse accident damage arising out of transportation of the product damage incurred through commercial use or failure to perform normal and routine maintenance LIABILITY FOR CONSEQUENTIAL PROPERTY OR COMMERCIAL DA...

Reviews: