background image

EN


13

It depends on what voltage the country uses. 60Hz systems usually 

use 110V – 120V while 50Hz systems tend to use 220V – 240V.

Values: 50Hz/60Hz

Frequency

LCD OFF

Value:Off/On

Format the memory card.   Values: OK/Cancel

Format

Set the current date and time. Use              buttons to switch Y/M/D/H/M 

and click      button to confirm/save the settings.

Date/Time

Enable or disable the sound of the buttons located on the unit
Values: On/Off

Beep Sound

Set PAL mode or NTSC mode.

PAL → a frame rate of 25 frames per second (fps) at an aspect ratio 

of 720x576.

NTSC → a frame rate of 30 frames per second (fps) at an aspect ratio 

of 720x480.
Values: PAL / NTSC

TV mode

Set the auto-off time without any operation and recording upon continuous 

power supply.
Values: Off/1 minute/3 minutes

Auto Power Off

Set the language displayed on the screen. 

Values:English/French/Spanish/Portuguese/Germany/Italian/Simplified 

Chinese/Traditional Chinese/Russian/Japanese

Language

Summary of Contents for AD250

Page 1: ...FHD 1080P Car DVR Dash Cam Instruction Manual AD250 ...

Page 2: ...t the mounting location About backing up data Mounting the Unit Inserting the Memory Card Connecting to Power LED Charging LED Indicators Power the Unit On and Off Power Indication Video Recording Taking Photos Video Menu Configurations Still Menu Configurations Specifications 2 2 2 3 4 4 4 4 4 5 6 6 7 7 8 8 9 11 14 16 ...

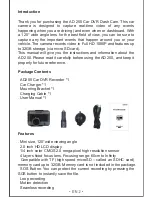
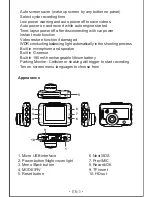
Page 3: ...tructions and information about the AD 250 Please read it carefully before using the AD 250 and keep it properly for future reference AD250 Car DVR Recorder 1 Car Charger 1 Mounting Bracket 1 Charging Cable 1 User Manual 1 Mini size 120 wide viewing angle 2 0 inch HD LCD display 1 4 inch color CMOS 2 0 mega pixel high resolution sensor 4 layers fixed focus lens Focusing range 60cm to Infinity Comp...

Page 4: ...ower off to save videos Auto power on and record while auto engine started Time lapse power off after disconnecting with car power Instant mute function Video restore function if damaged WDR conducting balancing light automatically in the shooting process Built in microphone and speaker Built in G sensor Built in 180 mAh rechargeable lithium battery Parking Monitor Collision or shaking will trigge...

Page 5: ...turned off or idled Unplug the unit to reduce unnecessary power consumption and avoid any unexpected problems About the car charger Only use the car charger or adapter provided with the camera to avoid malfunction Avoid damage please do not constantly plug in and remove the car charger Do not touch the car charger with wet hands About the mounting location Mount the unit with constantly in the ran...

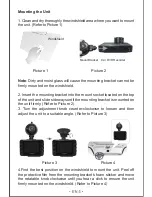
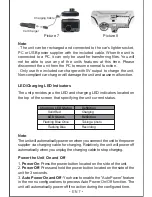
Page 6: ... is mounted on the unit firmly Refer to Picture 2 3 Turn the adjustment knob counter clockwise to loosen and then adjust the unit to a suitable angle Refer to Picture 3 4 Find the best position on the windshield to mount the unit Peel off the protective film from the mounting bracket s foam sticker and move the rotatable knob clockwise until you hear a click to ensure the unit firmly mounted on th...

Page 7: ...the recordings 3 To remove the memory card push to eject memory card out of the slot Note Make sure the memory card has been formatted before using Do not remove the memory card during recording You have to insert the memory card into the camera before connecting the camera to the power supply For best results use the format function of the car camera to prepare your memory card Inserting the Memo...

Page 8: ...On Press the power button located on the side of the unit 2 Power Off Press and hold the power button located on the side of the unit for 3 seconds 3 Auto Power On and Off You have to enable the Auto Power feature in the menu configurations to process Auto Power On Off function The unit will automatically power off if no action during the configured time Note The unit will automatically power on w...

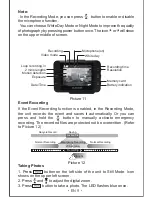
Page 9: ...t the charging When the battery is running out of power low power status the unit will show Low Battery warning message on the screen and power off immediately Refer to Picture 10 Power Indication Video Recording Normal Recording Picture 9 Picture 10 After the car engine is starting the unit will automatically power on and start recording Or you can press button to start recording and press once t...

Page 10: ...ess button to take a photo The LED flashes blue once Picture 11 Battery indication Memory card Resolution Recording time White day Microphone on Recording Video mode Loop recording in 2 mins lengths Motion detection Exposure Date Time Picture 12 Recycle Record Event Saving Emergency Recording 20 Secretary Recording Normal Recording Normal Recording Locked File If the Event Recording function is en...

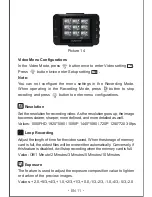
Page 11: ... the video clip 2 Select to protect the photo or the video clip from overwritten 3 Select to start slide show of all the photos and the video clips 4 Select to adjust the volume of the video clips 5 Select to start the Thumbnail function displaying up to 9 photos or video clips simultaneously to browse quickly Refer picture 14 Playback Mode When play backing a video When delete protect slide show ...

Page 12: ...ecoding and press button to enter menu configurations Video Menu Configurations Picture 14 Set the resolution for recording video As the resolution goes up the image becomes clearer sharper more defined and more detailed as well Values 1080FHD 1920 1080 1080P 1440 1080 720P 1280 720 30fps Resolution Adjust the length of time for the video saved When the storage of memory card is full the oldest fi...

Page 13: ...Values Off On Note This feature required to be connected to a constant power supply Motion Detection Enable or disable microphone during video recording Values Off On Recording Audio Adding the current date time of the event to the video being recorded and they will be displayed at the bottom right corner of videos Values Off On Date Stamp When the car is detected vibration and collision the built...

Page 14: ... sound of the buttons located on the unit Values On Off Beep Sound Set PAL mode or NTSC mode PAL a frame rate of 25 frames per second fps at an aspect ratio of 720x576 NTSC a frame rate of 30 frames per second fps at an aspect ratio of 720x480 Values PAL NTSC TV mode Set the auto off time without any operation and recording upon continuous power supply Values Off 1 minute 3 minutes Auto Power Off ...

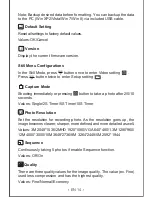
Page 15: ... Values 3M 2048 1536 2MHD 1920 1080 VGA 640 480 1 3M 1280 960 12M 4000 3000 10M 3648 2736 8M 3264 2448 5M 2592 1944 Shooting immediately or pressing button to take a photo after 2 5 10 seconds Values Single 2S Timer 5S Timer 10S Timer Capture Mode Continuously taking 5 photos if enable Sequence function Values Off On Sequence There are three quality values for the image quality The value ex Fine u...

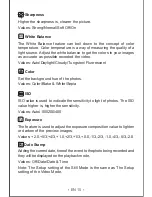
Page 16: ...ound hue of the photos Values Color Blake White Sepia Color ISO value is used to indicate the sensitivity to light of photos The ISO value higher is higher the sensitivity Values Auto 100 200 400 ISO The feature is used to adjust the exposure composition value to lighten or darken of the preview images Values 2 0 5 3 4 3 1 0 2 3 1 3 0 0 1 3 2 3 1 0 4 3 5 3 2 0 Exposure Adding the current date time...

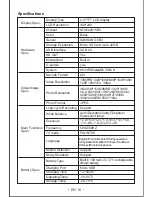
Page 17: ... System Decode Format Video Resolution Photo Resolution Photo Format Support Loop cycle Recording 50HZ 60HZ Frequency PAL NTSC TV mode Language Support Motion Detection Support Delay Shutdown Auto Daylight Cloudy Tungsten fluorescent lamp White Balance 2 0 5 3 4 3 1 0 2 3 1 3 0 0 1 3 2 3 1 0 4 3 5 3 2 0 Exposure Hardware Spec Video Image Spec Main Functions Spec Battery Spec Built in 180 mAh 3C 3 ...

Page 18: ...For more information please visit our official website www ausdom com Your valuable comments and suggestions on improving AUSDOM products are welcomed ...

Reviews: