background image

110

IT

UTILIZZO E FUNZIONI

RADIO FM

1. 

Premere STANDBY 

 2) sul dispositivo o (1) sul telecomando per 

accendere il dispositivo.

2. 

Premere FUNZIONI (4) sul dispositivo o MODE (7) sul telecomando per 

selezionare la modalità FM. La frequenza FM viene mostrata sul display.

3.  Per impostare manualmente un’emittente, premere ripetutamente su 

 AVANTI o 

 INDIETRO sul dispositivo o sul telecomando. Utilizzare 

l’impostazione manuale per emittenti con segnale più debole, che sono 

state saltate durante la ricerca automatica.

4. 

Per impostare automaticamente l’emittente disponibile successiva, 

tenere premuto per 1-2 secondi 

 AVANTI o 

 INDIETRO sul 

dispositivo o sul telecomando, fino a quando l’indicazione della 

frequenza sul display comincia la scansione e poi lasciare il tasto. Il 

Tuner interrompe la scansione quando riceve l’emittente successiva con 

un’intensità di segnale sufficiente.

5.  Utilizzare /- (17/18) sul dispositivo o (4/11) sul telecomando 

per impostare il volume sul valore desiderato.

Ricezione FM e FM-Stereo

• 

Quando si ascolta la radio FM, premere ST./MONO sul telecomando 

per selezionare la modalità stereo o mono.

•  Il simbolo FM Stereo “ST” compare sul display, quando il dispositivo è in 

modalità stereo.

•  Si consiglia l’ascolto in modalità mono per emittenti con segnale radio 

debole.

Consigli per una migliore ricezione

•  Il ricevitore ha un’antenna a cavo FM integrata, agganciata sul retro 

dell’alloggiamento. Questo cavo deve essere srotolato ed esteso 

completamente per ottenere la migliore ricezione.

NOTA: 

la ricerca automatica delle emittenti dipende dall’intensità del 

segnale delle emittenti e quindi le emittenti con segnale debole potrebbero 

essere tralasciate. Tuttavia, è possibile impostare manualmente le emittenti 

con segnale debole che vengono trovate. In caso di segnale forte, può 

capitare che il Tuner si fermi prima di aver raggiunto l’effettiva frequenza 

dell’emittente ed è quindi necessario impostare manualmente la migliore 

ricezione.

Summary of Contents for Wallie Series

Page 1: ...w w w a u n a m u l t i m e d i a c o m W allie M icrosystem M icrosystem M icrosistem a M icrosystèm e M icrosistem a 10033227 10033228 ...

Page 2: ......

Page 3: ...aftung Scannen Sie den folgenden QR Code um Zugriff auf die aktuellste Bedienungsanleitung und weitere Informationen rund um das Produkt zu erhalten INHALTSVERZEICHNIS Technische Daten 4 Sicherheitshinweise 5 Geräteübersicht 6 Fernbedienung 9 Installation 10 Stromanschluss und Batteriebetrieb 11 Erste Schritte 12 Bedienung und Funktionen 14 FM Radio 14 CD 15 BT 18 USB 19 AUX IN 20 Mit Kopfhörern 2...

Page 4: ... und CBI Protokoll Unterstützt die Dateien MPEG 1 Layer 3 WMA nicht DRM Bitraten Unterstützung MP3 32 320 kbps WMA 64 160 kbps Allgemeines Lautsprecher 7 6 cm 3 0 Zoll Membran x 2 Lautsprecherimpedanz 8 Ω Ausgangsleistung 1 2 W pro Kanal min RMS betrieben an 8 Ω bei 1 kHz mit nicht mehr als 10 Klirrfaktor Eingangsklemme AUDIO IN Φ 3 5 x 1 Energiequellen AC DC Adapter im Lieferumfang enthalten Eing...

Page 5: ...ine Gegenstände aus Metall in dieses Gerät fallen Stellen Sie keine schweren Gegenstände auf dieses Gerät Reinigen Sie das Gerät nur mit einem trockenen Tuch Blockieren Sie keine Belüftungsöffnungen Verwenden Sie ausschließlich vom Hersteller oder vom qualifizierten Fachhandel empfohlenes Zubehör Die Gewährleistung verfällt bei Fremdeingriffen in das Gerät Kleine Objekte Verpackungsteile Plastikbe...

Page 6: ...6 DE GERÄTEÜBERSICHT ...

Page 7: ...9 FERNBEDIENUNGSSENSOR 3 ÜBERSPRINGEN SUCHEN VORWÄRTS TUNER TASTE 10 LCD DISPLAY 4 FUNKTION TASTE 11 SLEEP SNOOZE TASTE SCHLAF SCHLUMMERTASTE 5 PLAY PAUSE FM SCAN TASTE 12 AL SET EQ TASTE 6 RANDOM TASTE 13 REPEAT TASTE WIEDERHOLEN TASTE 7 STOP TASTE BT VERBINDEN TASTE 14 ZEITEINSTELLUNGSTASTE ...

Page 8: ...HER TRAGRAHMEN 17 LAUTSTÄRKE TASTE 26 AUFHÄNGELÖCHER 18 LAUTSTÄRKE TASTE 27 AUDIO IN BUCHSE 19 L LAUTSPRECHER 28 TELEFONBUCHSE 20 CD FACH 29 L LAUTSPRECHERAUSGANG 21 R LAUTSPRECHER 30 R LAUTSPRECHERAUSGANG 22 R LAUTSPRECHER TRAGRAHMEN 31 STROMBUCHSE DC IN 23 GERÄTERAHMEN 32 USB BUCHSE ...

Page 9: ...5 REPEAT WIEDERHOLEN RANDOM ZUFALL PRESET TASTE 6 NUMERISCHE TASTEN 7 MODE TASTE 8 MUTE TASTE STUMM TASTE 9 ÜBERSPRINGEN SUCHEN VORWÄRTS TUNER TASTE 10 ÜBERSPRINGEN SUCHEN RÜCKWÄRTS TUNER TASTE 11 LAUTSTÄRKE TASTE 12 PROG PRESET TASTE HINWEIS Für den Betrieb der Fernbedienung ist eine CR2025 Batterie erforderlich ...

Page 10: ...10 DE INSTALLATION Montage der Lautsprecher Wandmontage ...

Page 11: ...tante ungeschaltete Stromversorgung hat Das System ist auch mit einem Batterie Backup System für die Uhr ausgestattet das mit 2 Stück Batterien der Größe AA UM 3 betrieben wird nicht im Lieferumfang enthalten HINWEIS Die Batterien können als Notstromversorgung eingesetzt werden damit die Uhrzeit bei Stromausfall auch weiterhin funktioniert Im Falle eines Stromausfalls wird die Uhrzeit nicht angeze...

Page 12: ... CR2025 Lithiumbatterie 1 Schieben Sie den Batteriefachdeckel aus dem Gehäuse der Fernbedienung heraus 2 Legen Sie die 3V CR2025 Batterie ein Vergewissern Sie sich dass die Batterie richtig eingesetzt ist Die Fernbedienung funktioniert nicht wenn die Batterie falsch eingelegt wurde 3 Setzen Sie den Batteriefachdeckel wieder ein WARNUNG Batterie nicht verschlucken Verbrennungsgefahr Die mitgeliefer...

Page 13: ...des CD USB und BT Players sowie des Radios Richten Sie die Fernbedienung auf den Fernbedienungssensor IR auf der Vorderseite des Systems 9 Die Funktionen der Fernbedienungstasten sind die gleichen wie die entsprechenden Bedienelemente am Gerät Die Leistung des Infrarotsensors kann beeinträchtigt werden und einen unzuverlässigen Betrieb verursachen wenn sich im selben Raum eine starke Umgebungslich...

Page 14: ...stärke empfängt 5 Verwenden Sie die LAUTSTÄRKE Tasten 17 18 am Gerät oder 4 11 auf der Fernbedienung um den Lautstärkepegel auf den gewünschten Wert einzustellen FM und FM Stereo Empfang Wenn Sie FM Radio wiedergeben drücken Sie die ST MONO Taste auf der Fernbedienung um zwischen dem Stereo Modus und dem Mono Modus zu wählen Das FM Stereo Symbol ST erscheint auf dem Display wenn sich das Gerät im ...

Page 15: ...ätigen 7 Wiederholen Sie die vorherigen Schritte 3 6 um bis zu 30 FM Sender abzuspeichern Abruf voreingestellter Speicherplätze Im Radiomodus rufen Sie die voreingestellten Sender durch wiederholtes Drücken der Tasten PRESET 12 oder PRESET 5 auf der Fernbedienung auf CD CD abspielen 1 Drücken Sie die STANDBY Taste 2 am Gerät oder 1 auf der Fernbedienung um das Gerät einzuschalten 2 Drücken Sie die...

Page 16: ...iedergabe Pause Modus befindet Der Wiedergabe Pause Modus wird beim ersten Titel des ausgewählten Ordners fortgesetzt Wiedergabemodus Wiederholen 1 Wenn die Taste REPEAT WIEDERHOLEN einmal gedrückt wird 13 auf dem Gerät oder 5 auf der Fernbedienung erscheint auf dem LCD Display die Meldung REPEAT 1 Der aktuelle Titel wird wiederholt abgespielt Alle wiederholen Wenn die REPEAT Taste zweimal gedrück...

Page 17: ...s aktuellen Titels zurückzukehren 2 Halten Sie während der Wiedergabe die Tasten SUCHEN VORWÄRTS oder SUCHEN RÜCKWÄRTS 1 3 am Gerät oder 9 10 auf der Fernbedienung gedrückt um innerhalb des aktuellen Titels mit einer hörbaren hohen Wiedergabegeschwindigkeit zu suchen Programmeinstellung nur mit der Fernbedienung Der Benutzer kann bis zu 32 Titel im CD Modus oder 99 Titel im MP3 Format in beliebige...

Page 18: ...UNKTION Taste 4 am Gerät oder die MODE Taste 7 auf der Fernbedienung um in einen anderen Modus zu wechseln oder die Funktion von Ihrem BT Gerät zu trennen Hinweise zur BT Nutzung Wenn die Signalstärke schwach ist kann es sein dass Ihr BT Empfänger die Verbindung unterbricht aber er wechselt automatisch wieder in den Pairing Modus Für einen besseren Signalempfang sollten Sie die Hindernisse zwische...

Page 19: ...L erscheint auf dem Display Alle Dateien werden wiederholt abgespielt REP_FOLDER Drücken Sie die REPEAT Taste zweimal im Display erscheint REPEAT FOLDER Der aktuelle Ordner wird wiederholt wiedergegeben REPEAT OFF Drücken Sie die REPEAT Taste erneut die Wiederholungsfunktion wird ausgeschaltet Hinweise zur USB Nutzung Das Gerät kann nur im USB Betrieb MP3 Dateien wiedergeben Wenn Ihr USB Gerät mit...

Page 20: ...elen Wenn die Lautstärke des angeschlossenen Gerätes zu hoch ist kann es zu einer Klangverzerrung kommen Verringern Sie in diesem Fall die Lautstärke des angeschlossenen Gerätes Wenn die Lautstärke zu niedrig ist erhöhen Sie die Lautstärke am angeschlossenen Gerät HINWEIS Um Störungen zu vermeiden stellen Sie das Gerät nicht in der Nähe des Fernsehers auf MIT KOPFHÖRERN Nicht im Lieferumfang entha...

Page 21: ...en möchten CD USB Summer oder Radio Drücken Sie dann erneut die AL SET Taste 12 zur Bestätigung Anschließend blinkt die Alarmlautstärke auf dem Display HINWEIS Die Einstellung der Alarmlautstärke ist in der piependen Alarmfunktion nicht möglich 5 Drücken Sie die VOR oder RÜCK Tasten um die Alarmlautstärke einzustellen Drücken Sie dann die AL SET Taste 12 um die Weckereinstellung abzuschließen Hinw...

Page 22: ...m wird für den nächsten Tag zurückgesetzt Um den Alarm des folgenden Tages zu deaktivieren tippen Sie einmal auf die AL SET Taste 12 das ALARM Symbol erlischt Schlummerfunktion Snooze Drücken Sie einmal die SNOOZE Taste 11 am Gerät um den Alarmmodus vorübergehend zu unterbrechen Der Alarm wird nach 9 Minuten bei jeder Betätigung erneut ausgelöst Schlaffunktion Sleep Mit dieser Funktion können Sie ...

Page 23: ...ermäßiger Feuchtigkeit fern Halten Sie die CDs immer an den Rändern Fingerabdrücke Schmutz oder Wasser auf den CDs können Geräusche oder Verzerrungen verursachen Wenn eine CD verschmutzt ist oder nicht richtig abgespielt werden kann reinigen Sie sie mit einem weichen trockenen Tuch und wischen Sie sie direkt von der Mitte entlang des Radius ab Reinigung des Gehäuses Wischen Sie das Gehäuse regelmä...

Page 24: ...kt Ist die Polarität der verwendeten Batterien korrekt Ist die Batterie leer Ist der Abstand bzw Winkel ungünstig Fällt viel Licht auf den Fernbedienungssensor Die CD Wiedergabe startet nicht Die Disc Wiedergabe stoppt mittendrin oder wird nicht richtig abgespielt Ist die Disc mit der Vorderseite nach unten eingelegt Entspricht die CD den Vorschriften Ist die CD deformiert oder verkratzt Die Disc ...

Page 25: ...er BT ist unterbrochen oder verzerrt Ist das Gerät zu nah an einem Gerät das elektromagnetische Strahlung erzeugt Gibt es ein Hindernis zwischen der Anlage und dem BT Stereo Audiogerät Es ist kein Ton zu hören Ist die Lautstärke auf Min eingestellt Sind die Kopfhörer angeschlossen Ist das Gerät zu weit von der BT Stereo Audioquelle entfernt Ist das Gerät mit dem BT Stereo Audioquellengerät gekoppe...

Page 26: ...chen negativen Konsequenzen geschützt Materialrecycling hilft den Verbrauch von Rohstoffen zu verringern Das Produkt enthält Batterien die der Europäischen Richtlinie 2006 66 EG unterliegen und nicht mit dem normalen Hausmüll entsorgt werden dürfen Bitte informieren Sie sich über die örtlichen Bestimmun gen zu gesonderten Entsorgung von Batterien Durch regelkonforme Entsorgung schützen Sie die Umw...

Page 27: ...eaning and Care 47 Troubleshooting 48 Hints on Disposal 50 Declaration of Conformity 50 Dear Customer Congratulations on purchasing this equipment Please read this manual carefully and take care of the following hints to avoid damages Any failure caused by ignoring the items and cautions mentioned in the instruction manual is not covered by our warranty or any liability Scan the QR code to get acc...

Page 28: ...s Support Bulk only and CBI protocol Support file MPEG 1 Layer 3 WMA Non DRM Bitrate support MP3 32 320 kbps WMA 64 160 kbps General Speakers 7 6 cm 3 0 in cone x 2 Speaker impedance 8 Ω Output power 1 2 W per channel min RMS driven into 8 Ω at 1 kHz with no more than 10 total harmonic distortions Input terminal AUDIO IN Φ 3 5 x 1 Power sources AC DC adapter included Input AC 100 240 V 50 60 Hz Ou...

Page 29: ...at Do not allow metal objects to fall into this unit Do not place heavy objects on this product Clean only with a dry cloth Do not block ventilation openings Only use accessories recommended by the manufacturer or a qualified dealer The warranty is void in the event of foreign intervention on the device Small objects Keep small objects i e screws mounting material memory cards etc and packaging ou...

Page 30: ...30 EN DEVICE OVERVIEW ...

Page 31: ...OG BUTTON 2 STANDBY BUTTON 9 REMOTE SENSOR 3 SKIP SEARCH FORWARD TUNER BUTTON 10 LCD DISPLAY 4 FUNCTION BUTTON 11 SLEEP SNOOZE BUTTON 5 PLAY PAUSE FM SCAN BUTTON 12 AL SET EQ BUTTON 6 RANDOM BUTTON 13 REPEAT BUTTON 7 STOP BUTTON BT PAIR BUTTON 14 TIME SET BUTTON ...

Page 32: ...N 25 L SPEAKER SUPPORT FRAME 17 VOLUME BUTTON 26 HANGER HOLES 18 VOLUME BUTTON 27 AUDIO IN JACK 19 L SPEAKER 28 PHONE JACK 20 CD DOOR 29 L SPEAKER OUT JACK 21 R SPEAKER 30 R SPEAKER OUT JACK 22 R SPEAKER SUPPORT FRAME 31 DC IN JACK 23 MAIN UNIT SUPPORT FRAME 32 USB JACK ...

Page 33: ... MEM BUTTON 4 VOL BUTTON 5 REPEAT RANDOM PRESET BUTTON 6 NUMERIC BUTTONS 7 MODE BUTTON 8 MUTE BUTTON 9 SKIP SEARCH FORWARD TUNING BUTTON 10 SKIP SEARCH BACKWARD TUNING BUTTON 11 VOL BUTTON 12 PROG PRESET BUTTON NOTE The remote control unit is designed to operate on 1 x CR2025 battery ...

Page 34: ...34 EN INSTALLATION Installing the speakers Wall mounting ...

Page 35: ...t into is working and receives constant unswitched power The system is also equipped with a battery backup system for the clock that is powered by 2 AA UM 3 size batteries not included NOTE The batteries may be installed as a backup option to maintain the clock time if electrical power fails In the event of power outage the clock time will not be displayed however the clock will continue to operat...

Page 36: ... with a new CR2025 lithium battery 1 Slide out the battery holder from the remote control case 2 Replace the 3V CR2025 battery Be sure the battery is installed correctly The remote will not work if the battery is installed with the wrong polarity 3 Insert the battery holder back into the battery slot WARNING Do not ingest battery Chemical burn hazard The remote control supplied with this product c...

Page 37: ...erating the CD USB BT player and radio Point the remote control at the REMOTE SENSOR IR located on the front of the system 9 The functions of the remote buttons are the same as the corresponding controls on the main unit The performance of the infrared SENSOR may be degraded causing unreliable operation if there is strong ambient light source in the same room The recommended effective distance for...

Page 38: ...sting station of adequate signal strength 5 Press the VOLUME buttons 17 18 on main unit or 4 11 on remote control to adjust the volume control to the desired volume level FM FM Stereo reception When listening to the FM radio press the ST MONO button on the remote control to switch between stereo mode and mono mode The FM stereo icon ST will appear on the display if the unit is in stereo mode It is...

Page 39: ... on the unit The next available preset memory number will flash on the LCD DISPLAY 10 Note P01 will blink on the display if you are programming preset for the first time 5 Tap the buttons PRESET 12 or PRESET 5 on the remote control to select the preset number you want to assign the station to 6 Tap the MEM button 3 on the remote control to confirm the setting 7 Repeat above steps 3 6 to preset up ...

Page 40: ...WMA disc 2 Press the PRESET FOLDER or button 15 16 on the main unit or 5 12 on the remote control to select desired playback folder 3 Select the desired file to be played back by pressing the buttons SKIP FORWARD or SKIP BACKWARD 1 3 on the main unit or 9 10 on the remote control 4 Press the PLAY PAUSE button 5 on the main unit or 2 on the remote control Playback will start and file name will be d...

Page 41: ...s Skip and search mode 1 During Play or Pause mode tap the SKIP FORWARD or SKIP BACKWARD buttons 1 3 on the main unit or 9 10 on remote control to go to the next track or go back to the beginning of the current track 2 During playback press and hold the SEARCH FORWARD or SEARCH BACKWARD buttons 1 3 on the main unit or 9 10 on remote control to search within the current track with audible high spee...

Page 42: ...function press the FUNCTION button 4 on the main unit or the MODE button 7 on the remote control to switch to another mode or disconnect the function from your BT device Notes on using BT If the signal strength is weak your BT receiver may disconnect but it will re enter pairing mode automatically For a better signal reception remove the obstacles between the unit and the BT device This unit suppo...

Page 43: ...tton three times REPEAT ALL will show on the display It will play all files repeatedly REP_FOLDER Press the REPEAT button twice REPEAT ALL will show on the display It will play the current folder repeatedly REPEAT OFF Press the REPEAT button once more again the repeat function will turn off Notes on using USB The unit can only play the MP3 file format in USB operation If your USB device is loaded ...

Page 44: ...nected equipment If volume level of the connected device is too high sound distortion may occur Should this happen lower the volume of the connected device If volume level is too low increase the volume of the connected device NOTE To prevent noise interference place the unit away from the television USING HEADPHONES Not included Inserting the plug of your headphones into the system s PHONE JACK 2...

Page 45: ...USB Buzzer or radio and then press the AL SET button again to confirm Alarm volume level will be flashing NOTE Alarm volume level setting is not available in beeping alarm setting 5 Press the FORWARD or BACK buttons to preset the wake up alarm volume level and then press the AL SET button to finish alarm setup Notes on the alarm function 1 If Wake to CD USB is selected but a CD or USB is not inser...

Page 46: ...ontrol It will reset itself for the following day To cancel the following day s alarm tap the AL SET button once The ALARM icon goes off Snooze function Press the SNOOZE button 11 on the main unit once to terminate the alarm mode temporarily and the alarm will restart again after 9 minutes on each press Sleep operation This function allows you to program the system to switch itself off after a set...

Page 47: ...ace Keep your discs away from direct sunlight heat and excessive moisture Always hold the CDs by the edges Fingerprints dirt or water on the CDs can cause noise or mistracking If a CD is dirty or does not play properly clean it with a soft dry cloth wiping straight out from the centre along the radius Cleaning the cabinet Periodically wipe the cabinet with a soft cloth and a diluted soap solution ...

Page 48: ...incorrect Is the remote control sensor receiving strong light Disc playback does not start Disc playback stops in the middle or is not performed properly Is the disc loaded face down Does the disc satisfy the standards Is the disc distorted or scratched Disc playback sounds are skipped or stopped in the middle of a track Is the unit located near excessive vibrations Is the disc very dirty Has cond...

Page 49: ...tromagnetic radiation Is there any obstacle between the unit and the BT stereo audiosource device No sound is heard Is the volume level set to Min Are the headphones connected Is the unit too far from the BT stereo audio source device Is the unit paired with the BT stereo audio source device When a button is pressed the unit does not respond Set the unit to the power stand by mode and then turn it...

Page 50: ...ore detailed information about recycling of this product please contact your local council or your household waste disposal service Your product contains batteries covered by the European Directive 2006 66 EC which cannot be disposed of with normal household waste Please check local rules on separate collection of batteries The correct disposal of batteries helps prevent potentially negative conse...

Page 51: ...Escanee el código QR para obtener acceso al manual de usuario más reciente y otra información sobre el producto ÍNDICE DE CONTENIDOS Datos técnicos 52 Indicaciones de seguridad 53 Vista general del aparato 54 Mando a distancia 57 Instalación 58 Conexión y funcionamiento con pilas 59 Primeros pasos 60 Puesta en marcha y funciones 62 Radio FM 62 CD 63 BT 66 USB 67 Entrada AUX 68 Uso de auriculares 6...

Page 52: ...nto masivo 2 0 Compatible con bulk y protocolo CBI Archivos compatibles MPEG 1 Layer 3 WMA no DRM Velocidad de bits soportada MP3 32 320 kbps WMA 64 160 kbps General Altavoz Carcasa de 7 6 cm 3 0 pulgadas x 2 Impedancia del altavoz 8 Ω Potencia de salida 1 2 W por canal RMS mín impulsado en 8 Ω a 1 kHz con 10 máx de distorsiones armónicas totales Terminal de entrada AUDIO IN Φ 3 5 x 1 Fuente de en...

Page 53: ...er objetos de metal sobre el aparato No coloque objetos pesados encima del aparato Limpie el aparato utilizando solamente un paño seco No bloquee las ranuras de ventilación Utilice exclusivamente los accesorios recomendados por el fabricante o por un proveedor cualificado La garantía expirará si abre el aparato sin autorización Piezas pequeñas partes del embalaje bolsas de plástico cartón etc Mant...

Page 54: ...54 ES VISTA GENERAL DEL APARATO ...

Page 55: ...N STANDBY 9 SENSOR DEL MANDO A DISTANCIA 3 BOTÓN SIGUIENTE REBOBINAR HACIA DELANTE SINTONIZADOR 10 DISPLAY LCD 4 BOTÓN FUNCIONES 11 BOTÓN SLEEP SNOOZE 5 BOTÓN PLAY PAUSE ESCANEO FM 12 BOTÓN AL SET EQ 6 BOTÓN RANDOM 13 BOTÓN REPEAT REPETICIÓN 7 BOTÓN STOP CONEXIÓN BT 14 BOTÓN AJUSTES ...

Page 56: ...STIDOR ALTAVOZ I 17 BOTÓN VOLUMEN 26 ORIFICIOS DE MONTAJE 18 BOTÓN VOLUMEN 27 ENTRADA AUDIO 19 ALTAVOZ I 28 ENTRADA TELÉFONO 20 UNIDAD LECTORA DE CD 29 SALIDA ALTAVOZ I 21 ALTAVOZ D 30 SALIDA ALTAVOZ D 22 BASTIDOR ALTAVOZ D 31 ENTRADA ALIMENTACIÓN DC IN 23 BASTIDOR APARATO 32 PUERTO USB ...

Page 57: ...ÓN VOLUMEN 5 BOTÓN REPEAT REPETIR RANDOM ALEATORIO PRESET 6 TECLAS NUMÉRICAS 7 BOTÓN MODE 8 BOTÓN MUTE SILENCIO 9 BOTÓN SIGUIENTE REBOBINAR HACIA DELANTE SINTONIZADOR 10 BOTÓN ATRÁS REBOBINAR HACIA ATRÁS SINTONIZADOR 11 BOTÓN VOLUMEN 12 BOTÓN PROG PRESET NOTA el mando a distancia funciona con pilas CR2025 ...

Page 58: ...58 ES INSTALACIÓN Montaje del altavoz Montar en la pared ...

Page 59: ...ente y recibe una corriente constante no conmutada El aparato también está equipado con un sistema de respaldo de pilas para el reloj que funciona con 2 pilas AA UM 3 no incluidas en el envío NOTA las pilas pueden utilizarse como una opción de respaldo para conservar la hora del reloj si se produce un corte de electricidad En caso de corte de electricidad la hora del reloj no se mostrará sin embar...

Page 60: ...timento de pilas del mando a distancia 2 Inserte una pila CR2025 de 3 V Asegúrese de que la pila está colocada correctamente El mando a distancia no funciona si la pila no está colocada correctamente 3 Vuelva a instalar la tapa del compartimento de pilas ADVERTENCIA No ingerir las pilas Riesgo de quemaduras El mando a distancia suministrado contiene una pila de botón Si se ingiere la pila de botón...

Page 61: ...s CD USB BT y radio Dirija el mando a distancia hacia el sensor del mando a distancia IR en la parte frontal del aparato 9 Las funciones de los botones del mando a distancia son las mismas que las de las teclas de control del aparato El rendimiento del sensor infrarrojo puede degradarse causando un funcionamiento deficiente si hay una fuente de luz ambiental fuerte en la misma habitación La distan...

Page 62: ... botones VOLUMEN 17 18 en el aparato o 4 11 en el mando a distancia para elegir el volumen deseado Recepción FM y FM estéreo Cuando escuche la radio FM pulse el botón ST MONO en el mando a distancia para cambiar entre el modo Estéreo y el modo Mono El icono de FM estéreo ST aparecerá en el display si el aparato se encuentra en modo Estéreo Se recomienda sintonizar el programa en modo Mono si la se...

Page 63: ...n 7 Repita los pasos 3 6 para guardar hasta 30 estaciones FM Buscar una estación almacenada En modo Radio pulse varias veces el botón PRESET 12 o PRESET 5 en el mando a distancia para buscar las estaciones almacenadas CD Reproducir un CD 1 Pulse el botón STANDBY 2 en el aparato o 1 en el mando a distancia para encender el aparato 2 Pulse el botón SOURCE en el mando a distancia o el botón CD USB pa...

Page 64: ...a carpeta incluso si está en modo PLAY PAUSE El modo PLAY PAUSE continuará en la primera pista de la carpeta seleccionada Modo de reproducción Repetir 1 Si pulsa una vez el botón REPEAT REPETIR 13 en el aparato o 5 en el mando a distancia el display LCD mostrará REPEAT 1 de forma fija Se repetirá continuamente la pista actual Repetir todo Al pulsar dos veces el botón REPEAT el display LCD muestra ...

Page 65: ...pista o regresar al inicio de la pista actual 2 Durante la reproducción mantenga pulsados los botones AVANZAR o REBOBINAR 1 3 en el aparato o 9 10 en el mando a distancia para avanzar o retroceder dentro de la pista actual Lista de reproducción sólo con mando a distancia El usuario puede programar el orden de reproducción de hasta 32 pistas en modo CD y 99 pistas en modo MP3 El modo Lista de repro...

Page 66: ...onectar la función BT pulse el botón FUNCIONES 4 en el aparato o el botón MODE 7 en el mando a distancia para cambiar a otro modo o desconectar la función del dispositivo BT Indicaciones sobre el uso del BT Si la intensidad de la señal es débil su receptor BT podría interrumpir la conexión pero volvería automáticamente al modo de sincronización Para una mejor recepción de la señal retire cualquier...

Page 67: ...REPEAT ALL aparecerá en el display Se repetirán continuamente todos los archivos REP_FOLDER Presione dos veces el botón REPEAT y REPEAT FOLDER aparecerá en el display Se repetirá continuamente la carpeta actual REPEAT OFF Vuelva a pulsar el botón REPEAT para desactivar la función de repetición Indicaciones sobre el uso del USB El aparato sólo puede reproducir archivos MP3 en modo USB Si su disposi...

Page 68: ... equipo conectado Si el nivel de volumen del equipo conectado es demasiado alto el sonido podría distorsionarse Si esto sucede disminuya el volumen del equipo conectado Si el nivel de volumen es demasiado bajo aumente el volumen del equipo conectado NOTA para prevenir interferencias acústicas coloque el aparato lejos del televisor USO DE AURICULARES No incluidos en el envío Al insertar el conector...

Page 69: ... o radio Vuelva a pulsar el botón AL SET 12 para confirmar la selección A continuación parpadea el volumen del despertador NOTA no se puede ajustar el nivel de volumen del despertador si la función del despertador es un pitido 5 Pulse el botón SIGUIENTE o ATRÁS para elegir el volumen del despertador Vuelva a pulsar el botón AL SET 12 para confirmar los ajustes del despertador Notas sobre la funció...

Page 70: ...o 1 del mando a distancia El despertador volverá a sonar al día siguiente Para desactivar el despertador al día siguiente pulse una vez el botón AL SET 12 El icono de despertador desaparecerá Función Snooze repetición Pulse una vez el botón SNOOZE 11 en el aparato para interrumpir temporalmente el modo de despertador El despertador volverá a sonar después de 9 minutos cada vez que pulse el botón F...

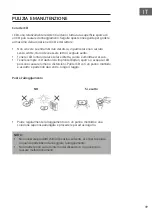
Page 71: ... sol calor o humedad extrema Siempre agarre los CDs por los bordes Las huellas dactilares la suciedad o el agua en los CDs pueden causar ruido o errores de lectura Si un CD está sucio o no se reproduce correctamente límpielo con un paño suave y seco limpiando directamente desde el centro a lo largo del radio Limpieza de la carcasa Limpie la carcasa regularmente utilizando un paño suave y una soluc...

Page 72: ...á la pila insertada con la polaridad correcta Está la pila agotada Es correcta la distancia o el ángulo Recibe el sensor del mando a distancia una luz intensa El CD no se reproduce La reproducción del CD se detiene o no se reproduce correctamente Está el CD correctamente insertado Cumple el CD con los requisitos Está el CD deformado o rayado Durante la reproducción del CD se omiten canciones o la ...

Page 73: ...chivo MP3 falso La reproducción del BT se interrumpe o el sonido está distorsionado Está el aparato demasiado cerca de otro dispositivo que genera radiación electromagnética Hay obstáculos entre el aparato y el dispositivo BT No hay sonido Está el volumen al mínimo Están los auriculares conectados Está el aparato demasiado lejos del dispositivo de audio BT estéreo Está el aparato conectado a un di...

Page 74: ...les consecuencias perjudiciales para la salud El reciclaje ayuda a reducir el consumo de materias primas Este producto contiene pilas que según la Normativa europea 2006 66 EG no deben ser arrojadas al cubo de la basura común Infórmese sobre la legislación de su país que regula la retirada y eliminación de las pilas y baterías La retirada y eliminación de pilas conforme a la ley protege el medio a...

Page 75: ...reil Scannez le QR Code pour accéder à la dernière version du mode d emploi et à d autres informations concernant le produit SOMMAIRE Fiche technique 76 Consignes de sécurité 77 Aperçu de l appareil 78 Télécommande 81 Installation 82 Branchement sur le secteur et utilisation sur pile 83 Premiers pas 84 Utilisation et fonctions 86 Radio FM 86 CD 87 BT 90 USB 91 Aux in entrée aux 92 Écoute au casque...

Page 76: ...end en charge uniquement le protocole en bloc et CBI Formats de fichiers compatibles MPEG 1 Layer 3 WMA non DRM Bit rate compatibles MP3 32 320 kbps WMA 64 160 kbps Général Enceinte 7 6 cm 3 0 pouces 2x membranes Impédance des enceintes 8 Ω Puissance de sortie 1 2 W par canal RMS min à 8 Ω et 1 kHz avec moins de 10 de distorsion harmonique Borne d entrée AUDIO IN Φ 3 5 x 1 Source d alimentation AC...

Page 77: ...jets lourds sur cet appareil Nettoyez l appareil uniquement avec un chiffon sec Ne bloquez pas les ouvertures de ventilation N utiliser que des accessoires recommandés par le fabricant ou des revendeurs qualifiés La garantie est annulée en cas d intervention étrangère sur l appareil Petits éléments éléments d emballage sacs en plastique cartons etc Conservez les petits éléments par exemple vis mat...

Page 78: ...78 FR APERÇU DE L APPAREIL ...

Page 79: ...PTEUR DE LA TÉLÉCOMMANDE 3 SAUTER RECHERCHE AVANT TOUCHE TUNER 10 ÉCRAN LCD 4 TOUCHE DE FONCTION 11 TOUCHE SLEEP SNOOZE VEILLE ALARME SNOOZE 5 TOUCHE PLAY PAUSE SCAN FM 12 TOUCHE AL SET EQ 6 TOUCHE RANDOM 13 TOUCHE REPEAT RÉPÉTITION 7 TOUCHE STOP COUPLAGE BT 14 TOUCHE DE RÉGLAGE DE L HEURE ...

Page 80: ...T DE L ENCEINTE L 17 TOUCHE VOLUME 26 TROUS D ACCROCHAGE 18 TOUCHE VOLUME 27 PRISE AUDIO IN 19 ENCEINTE L 28 PRISE TELEPHONE 20 LECTEUR CD 29 SORTIE D ENCEINTE L 21 ENCEINTE R 30 SORTIE D ENCEINTE R 22 CADRE DE SUPPORT DE L ENCEINTE R 31 PRISE D ALIMENTATION DC IN 23 CADRE DE L APPAREIL 32 PORT USB ...

Page 81: ...HE VOLUME 5 TOUCHE REPEAT RÉPÉTITION RANDOM ALÉATOIRE PRESET 6 TOUCHES NUMÉRIQUES 7 TOUCHE MODE 8 TOUCHE MUTE FONCTION MUET 9 SAUT RECHERCHE AVANT TOUCHE TUNER 10 SAUT RECHERCHE ARRIÈRE TOUCHE TUNER 11 TOUCHE VOLUME 12 TOUCHE PROG PRESET REMARQUE Le fonctionnement de la télécommande nécessite une pile CR2025 ...

Page 82: ...82 FR INSTALLATION Montage des enceintes Montage mural ...

Page 83: ...et appareil fonctionne et que son alimentation est constante non commutée Le système est également équipé d un système de sauvegarde de batterie pour l horloge alimenté par deux piles de type AA UM 3 non incluses REMARQUE Les batteries peuvent être utilisées comme alimentation de secours pour que l horloge continue à fonctionner en cas de panne de courant Dans ce cas l horloge ne s affiche pas mai...

Page 84: ...artiment à piles hors du boîtier de la télécommande 2 Insérez la pile 3V CR2025 Assurez vous que la pile est correctement installée La télécommande ne fonctionnera pas si la pile est mal insérée 3 Remettez en place le couvercle du compartiment des piles MISE EN GARDE Ne pas avaler la batterie Risque de brûlure La télécommande fournie contient une pile bouton Si la pile bouton est avalée des brûlur...

Page 85: ...ionnement du lecteur CD USB et BT ainsi que de la radio Dirigez la télécommande vers le capteur distant IR situé à l avant du système 9 Les fonctions des touches de la télécommande sont les mêmes que les commandes correspondantes de l appareil Les performances du capteur infrarouge peuvent être compromises et provoquer un fonctionnement non fiable si la source lumineuse ambiante est forte dans la ...

Page 86: ...nt 5 Utilisez les touches VOLUME 17 18 sur l appareil ou 4 11 sur la télécommande pour régler le volume au niveau souhaité Réception FM et FM stéréo Lors de la lecture de la radio FM appuyez sur la touche ST MONO de la télécommande pour sélectionner le mode stéréo ou le mode mono Le symbole FM stéréo ST apparaît sur l écran lorsque l appareil est en mode stéréo Il est recommandé de recevoir le pro...

Page 87: ...le réglage 7 Répétez les étapes 3 à 6 précédentes pour mémoriser jusqu à 30 stations FM Rappeler une station mémorisée En mode radio rappelez les stations préréglées en appuyant plusieurs fois sur les touches PRESET 12 ou PRESET 5 de la télécommande CD Lecture d un Cd 1 Appuyez sur la touche STANDBY 2 de l appareil ou de la télécommande 1 pour allumer l appareil 2 Appuyez sur la touche SOURCE de l...

Page 88: ...mode lecture pause Le mode lecture pause reprend à la première piste du dossier sélectionné Mode de lecture Répéter 1 titre Lorsque vous appuyez une fois sur le bouton REPEAT 13 sur l appareil ou 5 sur la télécommande REPEAT 1 apparaît sur l écran LCD La piste en cours est répétée Répéter tous Lorsque vous appuyez deux fois sur la touche REPEAT l indicateur REPEAT ALL s allume sur l écran LCD Le d...

Page 89: ...re en cours 2 Pendant la lecture maintenez la touche RECHERCHE AVANT ou RECHERCHE ARRIÈRE 1 3 de l appareil ou 9 10 sur la télécommande pour faire une recherche à l intérieur du titre en cours en le lisant à vitesse accélérée Programmation de lecture avec la télécommande seulement L utilisateur peut programmer jusqu à 32 pistes en mode CD ou 99 pistes au format MP3 dans n importe quel ordre Le mod...

Page 90: ...CTION 4 de l appareil ou sur la touche MODE 7 de la télécommande pour passer à un autre mode ou pour déconnecter la fonction de votre appareil BT Remarques sur l utilisation de BT Si la puissance du signal est faible votre récepteur BT risque de couper la connexion mais il reviendra automatiquement au mode d appariement Pour une meilleure réception du signal vous devez éliminer les obstacles entre...

Page 91: ...s fichiers sont répétés REP_FOLDER Appuyez deux fois sur la touche REPEAT l écran affichera REPEAT FOLDER Le dossier actuel est lu à plusieurs reprises REPEAT OFF Appuyez à nouveau sur la touche REPEAT pour désactiver la fonction de répétition Remarques sur l utilisation de l USB L appareil ne peut lire que les fichiers MP3 en mode USB Si votre périphérique USB contient des fichiers MP3 mais que l...

Page 92: ...enant lire de la musique en utilisant l appareil connecté Si le volume du périphérique connecté est trop élevé une distorsion sonore peut se produire Dans ce cas réduisez le volume du périphérique connecté Si le volume est trop bas augmentez le volume sur le périphérique connecté REMARQUE Pour éviter les interférences ne placez pas l appareil près du téléviseur ÉCOUTE AU CASQUE Non fourni En branc...

Page 93: ...éveillé CD USB bip ou radio Appuyez à nouveau sur la touche AL SET 12 de l appareil pour confirmer Le volume de l alarme clignote alors à l écran REMARQUE Le réglage du volume de l alarme n est pas possible si vous choisissez le bip comme source d alarme 5 Appuyez sur la touche AVANCE ou RETOUR pour régler le volume sonore Appuyez à nouveau sur la touche AL SET 12 pour terminer le paramétrage de l...

Page 94: ...sée pour le lendemain Pour désactiver l alarme du jour suivant appuyez une fois la touche AL SET 12 le symbole ALARM disparaît Fonction répétition d alarme Snooze Appuyez une fois sur la touche SNOOZE 11 de l appareil pour interrompre temporairement le mode d alarme L alarme se déclenche à nouveau au bout de 9 minutes à chaque activation Fonction veille automatique Sleep Cette fonction vous permet...

Page 95: ...excessive Prenez toujours les CD par les bords Les traces de doigts la saleté ou l eau sur les CD peuvent provoquer des parasites ou de la distorsion Si un CD est sale ou ne peut pas être lu correctement nettoyez le avec un chiffon doux et sec et essuyez le directement du centre vers l extérieur Nettoyage du boîtier Essuyez régulièrement le boîtier avec un chiffon doux et une solution savonneuse d...

Page 96: ... distance reçoit il beaucoup de lumière La lecture de CD ne démarre pas La lecture de CD s arrête en cours de route ou est de mauvaise qualité Le disque est il inséré avec la face avant vers le bas Le CD est il conforme à la réglementation Le CD est il déformé ou rayé La lecture du disque ignore les chansons ou s arrête au milieu d une chanson L appareil est il à proximité de vibrations excessives...

Page 97: ...génère un rayonnement électromagnétique Existe t il une barrière entre le système et le périphérique audio stéréo BT Pas de son Le volume est il réglé sur Min Les écouteurs sont ils branchés L appareil est il trop éloigné de la source audio stéréo BT L appareil est il associé au périphérique source audio stéréo BT L appareil ne répond pas quand on appuie sur une touche Mettez l appareil en mode ve...

Page 98: ...e votre entourage contre les conséquences négatives possibles Le recyclage des matériaux aide à réduire l utilisation des matières premières Ce produit contient des piles qui sont soumises à la directive européenne 2006 66 CE selon laquelle elles ne doivent pas être éliminées avec les ordures ménagères Renseignez vous sur les dispositions en vigueur concernant la mise en rebut séparée des piles La...

Page 99: ...tivo Scansionare il codice QR seguente per accedere al manuale d uso più attuale e per ricevere informazioni sul prodotto INDICE Dati tecnici 100 Avvertenze di sicurezza 101 Descrizione del dispositivo 102 Telecomando 105 Installazione 106 Collegamento alla rete elettrica e funzionamento a batteria 107 Primi passaggi 108 Utilizzo e funzioni 110 Radio FM 110 CD 111 BT 114 USB 115 AUX IN 116 Con le ...

Page 100: ...o Bulk e protocollo CBI Dati supportati MPEG1 Layer 3 WMA non DRM Supporto Bitrate MP3 32 320 kbps WMA 64 160 kbps Generici Altoparlanti Membrana da 7 6 cm 3 0 pollici x 2 Impedenza altoparlanti 8 Ω Potenza di uscita 1 2 W per canale RMS min operativo a 8 Ω su 1 kHz con un tasso di distorsione armonica di non più del 10 Morsetto di ingresso AUDIO IN Φ 3 5 x 1 Fonti di energia Adattatore AC DC incl...

Page 101: ...nti sopra al dispositivo Pulire il dispositivo solo con un panno asciutto Non bloccare le aperture di ventilazione Utilizzare solo accessori consigliati dal produttore o da un azienda tecnica qualificata La garanzia perde validità in caso di interventi esterni Piccoli oggetti parti dell imballaggio sacchetti di plastica cartone ecc Conservare piccoli oggetti ad es viti e altro materiale di montagg...

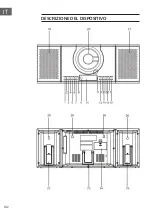
Page 102: ...102 IT DESCRIZIONE DEL DISPOSITIVO ...

Page 103: ...TRO TUNER 8 MEMORIA PROG 2 STANDBY 9 SENSORE TELECOMANDO 3 ANDARE AVANTI RICERCA IN AVANTI TUNER 10 DISPLAY LCD 4 FUNZIONI 11 SLEEP SNOOZE 5 PLAY PAUSA FM SCAN 12 AL SET EQ 6 RANDOM 13 REPEAT RIPETERE 7 STOP CONNESSIONE BT 14 IMPOSTAZIONE ORARIA ...

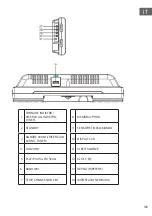
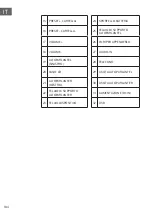
Page 104: ...RTO ALTOPARLANTE L 17 VOLUME 26 FORI PER APPENDERLO 18 VOLUME 27 AUDIO IN 19 ALTOPARLANTE L SINISTRO 28 TELEFONO 20 VANO CD 29 USCITA ALTOPARLANTE L 21 ALTOPARLANTE R DESTRO 30 USCITA ALTOPARLANTE R 22 TELAIO DI SUPPORTO ALTOPARLANTE R 31 ALIMENTAZIONE DC IN 23 TELAIO DISPOSITIVO 32 USB ...

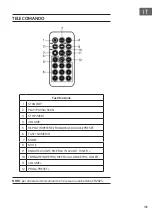
Page 105: ...TOP MEM 4 VOLUME 5 REPEAT RIPETERE RANDOM CASUALE PRESET 6 TASTI NUMERICI 7 MODE 8 MUTE 9 ANDARE AVANTI RICERCA IN AVANTI TUNER 10 TORNARE INDIETRO RICERCA ALL INDIETRO TUNER 11 VOLUME 12 PROG PRESET NOTA per utilizzare il telecomando è necessaria una batteria CR2025 ...

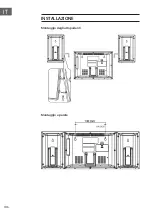
Page 106: ...106 IT INSTALLAZIONE Montaggio degli altoparlanti Montaggio a parete ...

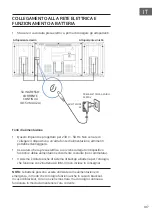
Page 107: ...itivo funzioni e abbia alimentazione di corrente costante non commutata Il sistema è dotato anche di sistema di backup a batteria per l orologio che funziona con 2 batteria AA UM 3 non incluse in consegna NOTA le batterie possono essere utilizzate come alimentazione di emergenza in modo che l orologio funzioni anche in caso di blackout In caso di blackout l ora non viene mostrata ma l orologio con...

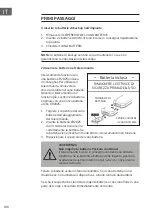
Page 108: ...ggiamento del telecomando 2 Inserire la batteria CR2025 da 3V Assicurarsi di inserire correttamente la batteria Se la batteria viene inserita in modo errato il telecomando non funziona 3 Riposizionare il coperchio del vano batterie AVVERTENZA Non ingerire la batteria Pericolo di ustione Il telecomando incluso in consegna contiene una batteria a bottone Se la batteria a bottone viene ingerita posso...

Page 109: ...do NOTA il telecomando serve solo all utilizzo del lettore CD USB e BT e della radio Indirizzare il telecomando verso il sensore IR sul lato frontale dell impianto 9 Le funzioni dei tasti del telecomando sono uguali ai relativi elementi di controllo sul dispositivo Le prestazioni del sensore a infrarossi possono essere influenzate negativamente e causare un funzionamento inaffidabile se nella stes...

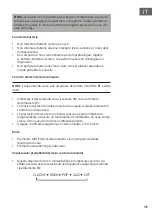
Page 110: ...ilizzare VOLUME 17 18 sul dispositivo o 4 11 sul telecomando per impostare il volume sul valore desiderato Ricezione FM e FM Stereo Quando si ascolta la radio FM premere ST MONO sul telecomando per selezionare la modalità stereo o mono Il simbolo FM Stereo ST compare sul display quando il dispositivo è in modalità stereo Si consiglia l ascolto in modalità mono per emittenti con segnale radio debol...

Page 111: ...e l impostazione 7 Ripetere i passaggi 3 6 per salvare fino a 30 emittenti FM Aprire postazioni di salvataggio predefinite In modalità radio è possibile aprire le emittenti predefinite premendo ripetutamente PRESET 12 o PRESET 5 sul telecomando CD Riproduzione CD 1 Premere STANDBY 2 sul dispositivo o 1 sul telecomando per accendere il dispositivo 2 Premere SOURCE sul telecomando o CD USB per attiv...

Page 112: ...Pausa La modalità Play Pausa viene ripresa dal primo titolo della cartella selezionata Modalità di riproduzione Ripetere 1 Se il tasto REPEAT RIPETERE viene premuto una volta 13 sul dispositivo o 5 sul telecomando sullo schermo LCD compare il messaggio REPEAT 1 Il titolo attuale viene ripetuto Ripetere tutti Se il tasto REPEAT viene premuto due volte si illumina l indicazione REPEAT ALL sul displa...

Page 113: ...ccessivo o tornare all inizio del brano corrente 2 Tenere premuto ANDARE AVANTI o TORNARE INDIETRO 1 3 sul dispositivo o 9 10 sul telecomando per cercare all interno del titolo corrente con una velocità di riproduzione più elevata e udibile Impostazione programma solo con il telecomando L utente può programmare in una sequenza a piacere fino a 32 titoli in modalità CD o 99 titoli in formato MP3 La...

Page 114: ...nzione BT premere FUNZIONI 4 sul dispositivo o MODE 7 sul telecomando per passare a un altra modalità o per interrompere la funzione del dispositivo BT Note per l utilizzo BT Se il segnale è debole il ricevitore BT può interrompere la connessione ma torna automaticamente alla modalità di accoppiamento Per una migliore ricezione è necessario eliminare gli ostacoli tra impianto e dispositivo BT Ques...

Page 115: ...AT ALL compare sul display Tutti i file vengono ripetuti REP_FOLDER Premere REPEAT due volte e sul display compare REPEAT FOLDER La cartella attuale viene ripetuta REPEAT OFF Premere nuovamente REPEAT per spegnere la funzione di ripetizione Note per l utilizzo USB Questo dispositivo può riprodurre file MP3 solo in modalità USB Se il dispositivo USB contiene MP3 ma il display continua a mostrare NO...

Page 116: ...del dispositivo collegato Se il volume del dispositivo collegato è troppo alto il suono può essere distorto Abbassare il volume del dispositivo collegato Se il volume è troppo basso aumentare il volume del dispositivo collegato NOTA per vitare disturbi non posizionare il dispositivo vicino a un televisore CON LE CUFFIE non incluse in consegna Se si inserisce lo spinotto delle cuffie nell ingresso ...

Page 117: ... fonte deve provenire l audio della sveglia CD USB segnale acustico o radio Premere poi di nuovo AL SET 12 per confermare Sul display lampeggia poi il volume della sveglia NOTA l impostazione del volume non è disponibile per la sveglia con segnale acustico 5 Premere AVANTI o INDIETRO per impostare il volume e premere poi AL SET 12 per concludere l impostazione della sveglia Note sulla funzione sve...

Page 118: ...elecomando La sveglia viene reimpostata per il giorno successivo Per disattivare la sveglia del giorno seguente premere una volta AL SET 12 il simbolo scompare Funzione Snooze Premere una volta SNOOZE 11 sul dispositivo per interrompere temporaneamente la modalità sveglia La sveglia viene riattivata dopo 9 minuti ogni volta che si preme questo tasto Funzione Sleep Con questa funzione è possibile p...

Page 119: ...lare diretta calore e umidità eccessiva Tenere sempre i CD dal bordo Impronte digitali sporco o acqua sul CD possono causare rumori o distorsioni Pulire i CD con un panno morbido e asciutto e partendo dal centro lungo il raggio Pulire l alloggiamento Pulire regolarmente l alloggiamento con un panno morbido e una soluzione saponosa allungata e procedere poi ad asciugarlo NOTA Non utilizzare prodott...

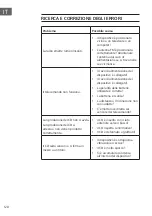
Page 120: ... del dispositivo è collegato La polarità delle batterie utilizzate è corretta La batteria è scarica La distanza o l inclinazione non sono adatte C è molta luce diretta sul sensore del telecomando La riproduzione del CD non si avvia La riproduzione del CD si arresta o non viene riprodotto correttamente Il CD è inserito con il lato anteriore verso il basso Il CD rispetta le normative Il CD è deforma...

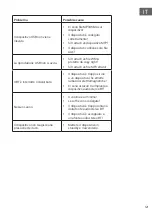
Page 121: ...right Si tratta di un file MP3 errato Il BT è interrotto o disturbato Il dispositivo è troppo vicino a un dispositivo che emette radiazioni elettromagnetiche Ci sono ostacoli tra impianto e dispositivo audio stereo BT Nessun suono Il volume è al minimo Le cuffie sono collegate Il dispositivo è troppo lontano dalla fonte audio stereo BT Il dispositivo è accoppiato a una fonte audio stereo BT Il dis...

Page 122: ...tive Il riciclo di materiali aiuta a ridurre il consumo di materie prime Il prodotto contiene batterie che sono soggette alla direttiva europea 2006 66 CE e non possono essere smaltite con i normali rifiuti domestici Preghiamo di informarvi sulle regolamentazioni vigenti sullo smal timento delle batterie Grazie al corretto smaltimento dei vecchi dispositivi si tutela l ambiente e la salute delle p...

Page 123: ......

Page 124: ......
Reviews: