background image

16

DE

Schallplatte wird dann bis zum Ende wiedergegeben, aber Sie müssen 

das Drehen des Drehtellers manuell beenden. (Bewegen Sie den Tonarm 

manuell zur Tonarmhalterung. Sollte sich der Drehteller noch immer 

drehen, schalten Sie das Gerät über den Lautstärkeregler ab. Ziehen Sie 

den Netzstecker aus der Steckdose, wenn Sie das Gerät für einen längeren 

Zeitraum nicht verwenden.)

Phonodigitalisierung

1.  Stellen Sie mit der Funktionstaste den Phonomodus ein und stecken Sie 

ein Speichermedium in den entsprechenden Anschluss des Geräts (USB-

Stick, SD- oder MMC-Karte).

2.  Legen Sie die Schallplatte auf den Drehteller und bereiten Sie die 

Wiedergabe vor.

3.  Drücken Sie die Aufnahmetaste 

. Es dauert ungefähr 3 – 4 Sekunden, 

bis das Speichermedium gelesen wird. Anschließend blinkt das 

entsprechende Symbol auf dem LCD-Bildschirm auf.

4.  Drücken Sie die Tasten 

 oder 

, um den gewünschten Modus 

auszuwählen (USB oder SD) und drücken Sie anschließend erneut die 

Aufnahmetaste zum Bestätigen (Sie können diesen Schritt überspringen, 

wenn lediglich ein Speichermedium an das Gerät angeschlossen wurde).

5.  Das Gerät aktiviert nach einigen Sekunden den Aufnahmemodus.
6.  Senken Sie den Tonarm zum Starten der Wiedergabe auf die Schallplatte 

ab. Während des Aufnahmemodus, blinkt das USB- oder SD-Symbol auf 

dem Bildschirm auf. 

7.  Drücken Sie zum Stoppen der Aufnahme die Taste 

. Der Bildschirm 

zeigt dann „END“ an und das Gerät wechselt automatisch in den 

Phonomodus.

Hinweis:

Die Aufnahmegeschwindigkeit ist 1:1. Die Aufnahme dauert genauso lange 

wie die wiedergegebene Schallplatte. Das Aufnahmeformat ist auf MP3 mit 

Bitfrequenz 128 kbps eingestellt. 

Summary of Contents for Oakland DAB

Page 1: ...w w w a u n a m u l t i m e d i a c o m O akland DAB Retro Stereoanlage Retro Stereo System 10033747 ...

Page 2: ......

Page 3: ...Hinweise zur Entsorgung 27 Sehr geehrter Kunde wir gratulieren Ihnen zum Erwerb Ihres Gerä tes Lesen Sie die folgenden Hinweise sorgfäl tig durch und befolgen Sie diese um möglichen Schäden vorzubeugen Für Schäden die durch Missachtung der Hinweise und unsachgemäßen Gebrauch entstehen übernehmen wir keine Haf tung Scannen Sie den QR Code um Zugriff auf die aktuellste Bedienungsanleitung und weiter...

Page 4: ... mit folgendem Hinweis GEFÄHRLICHE SPANNUNG Das Blitzsymbol mit Pfeilspitze im gleichseitigen Dreieck soll den Benutzer auf das Vorhandensein einer nicht isolierten gefährlichen Spannung im Gehäuse des Produkts aufmerksam machen die von ausreichender Größe sein kann um eine Gefahr eines Stromschlags für Personen darzustellen Das Dreieck mit dem Ausrufezeichen und folgendem Hinweis ACHTUNG Das Ausr...

Page 5: ...n Techniker oder dem Gerätehersteller durchgeführt werden Zur Reinigung des Gerätes beachten Sie bitte die Empfehlungen des Hinweises Das Netzkabel sollte abgezogen werden wenn Sie es über einen längeren Zeitraum nicht benutzen Das Gerät ist von einer qualifizierten Person zu reparieren wenn a das Netzkabel beschädigt ist b Gegenstände in das Gerät gefallen sind oder eine Flüssigkeit in das Gerät ...

Page 6: ... Batterieentsorgung ist zu achten Das Gerät muss in in gemäßigten Klimazonen eingesetzt werden Explosionsgefahr durch unsachgemäßen Batteriewechsel Batterien nur durch den gleichen oder gleichwertigen Typ ersetzen Der Hauptstecker muss leicht zugänglich bleiben Die Belüftung darf nicht dadurch behindert werden dass die Belüftungsöffnung mit Gegenständen wie Zeitungen Tischdecken Vorhängen usw abge...

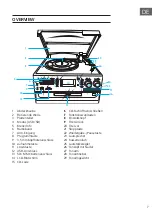
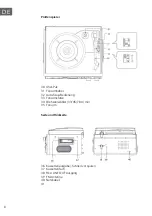
Page 7: ...SB Anschluss 13 SD MMC Kartenanschluss 14 LCD Bildschirm 15 CD Lade 16 CD Fach öffnen schließen 17 Funktionswahltasten 18 Einstellknopf 19 Titel zurück 20 Titel vor 21 Stopptaste 22 Wiedergabe Pausetaste 23 Lautsprecher 24 Kassettenfach 25 Lautstärkeregler 26 Tonkopf mit Nadel 27 Tonarm 28 Tonarmhebel 29 Tonarmgewicht 1 2 3 7 9 12 13 14 15 16 18 17 23 24 28 27 29 26 25 8 10 11 19 20 21 22 4 6 5 ...

Page 8: ...bel 32 Auto Stop Bedienung 33 Tonarmstütze 34 Drehzahlwähler 33 45 78 U min 35 Tonarm Plattenspieler Seite und Rückseite 36 Kassettenausgabe Schnell vorspulen 37 Kassettenfach 38 RCA LINE OUT Ausgang 39 FM Antenne 40 Netzkabel 41 ...

Page 9: ...DE Fernbedienung 42 Stummschalten 43 Programmtaste 44 Wiederholungstaste 45 Modustaste 46 Titel vor 47 Wiedergabe Pause 48 Aufnahmetaste 49 Stopptaste 50 Titel vor 51 Ordner nach oben 52 Ordner nach unten ...

Page 10: ...chendem Abstand zu Wärmequellen Staub Feuchtigkeit Dampf oder starken Magnetfeldern befindet Entfernen Sie die weiße Plastikverpackung von der Nadeln in dem Sie diese nach vorne herunter schieben Entfernen Sie die Klammer welche während des Versands den Tonarm fixiert hat Lösen Sie den Tonarmverriegelungshebel Stecken Sie den Netzstecker des Geräts in die Steckdose Stromquelle Dieses Produkt ist a...

Page 11: ...e die an der Rückseite des Geräts herunterhängt Wickeln Sie diese Antenne vollständig ab um den bestmöglichen FM Empfang zu haben FM und FM Stereo Modus FM Modus Verwenden Sie die Radioauswahltaste um FM auszuwählen Die Programme werden im Monomodus empfangen Verwenden Sie diesen Modus wenn der Stereoempfang schwach ist FM Stereo Modus Verwenden Sie die Radioauswahltaste um FM ST auszuwählen um St...

Page 12: ...cken der Taste 2 DAB manuelle Sendersuche 1 To activate manual tune press and hold the Info Menu button to enter into the Menu then press the or button followed by pressing the button to select and confirm Manual tune 2 The display will show 5A to 13F and their associated frequencies press the or button to move through the DAB channels when your desired frequency appears in the display press the b...

Page 13: ...tellung DRC low mittlere Komprimierung DRC high maximale Komprimierung 1 Zum Anpassen von DRC im DAB Modus drücken und halten Sie die Taste Info Menu um in das Menü zu gelangen Drücken Sie mehrfach die Tasten oder und bestätigen Sie die Auswahl von DRC durch Drücken der Taste 2 Wählen Sie die DRC Komprimierung mit den Tasten oder button followed by pressing the aus und bestätigen Sie Ihre Auswahl ...

Page 14: ...t es sich um eine Sammlung von Radiosendern die in einer einzigen Frequenz gebündelt und übertragen werden Es gibt nationale und lokale Multiplexen Lokale Multiplexen enthalten Sender die spezifisch für bestimmte Gegenden sind Frequency The frequency of the present station will be displayed Signalfehler Wird als Nummer zwischen 0 99 angezeigt Bei einer Fehlerquote von 30 oder höher wäre es nicht r...

Page 15: ...rbrochen Bewegen Sie den Lifthebel zum Fortsetzen der Wiedergabe wieder in Richtung der Vorderseite 9 Um einen anderen Teil der Schallplatte wiederzugeben bewegen Sie den Lifthebel in Richtung der Rückseite und bewegen Sie den tangehobenen Tonarm zu der Stelle von der aus Sie die Wiedergabe starten möchten Bewegen Sie den Lifthebel zum Absenken des Tonarms und zum Fortsetzen der Wiedergabe wieder ...

Page 16: ...nden bis das Speichermedium gelesen wird Anschließend blinkt das entsprechende Symbol auf dem LCD Bildschirm auf 4 Drücken Sie die Tasten oder um den gewünschten Modus auszuwählen USB oder SD und drücken Sie anschließend erneut die Aufnahmetaste zum Bestätigen Sie können diesen Schritt überspringen wenn lediglich ein Speichermedium an das Gerät angeschlossen wurde 5 Das Gerät aktiviert nach einige...

Page 17: ...geben Wichtige Hinweise zur Verwendung von Kassetten Stellen Sie sicher dass Sie die Kassette richtig herum in das Kassettenfach stecken Um zu vermeiden dass die Kassette beschädigt wird wird empfohlen diese nach dem Beenden der Wiedergabe aus dem Gerät zu entnehmen Aufnahme von Musik auf Kassetten 1 Stellen Sie mit der Funktionstaste den Kassetten Aux modus ein und stecken Sie anschließend ein Sp...

Page 18: ...memodus Legen Sie die CD in das CD Fach ein Während des Aufnahmemodus blinkt das USB oder SD Karten Symbol auf dem Bildschirm auf 5 Drücken Sie zum Beenden der Aufnahme die Stopptaste Der Bildschirm zeigt END an und wechselt wieder in den CD USB SD Modus CD encoding 1 Stellen Sie mit der Funktionstaste den CD USB SD modus ein und stecken Sie anschließend ein Speichermedium in den entsprechenden Ge...

Page 19: ...vor dem Einstecken die richtige Richtung 3 Wählen Sie mit der Funktionsauswahltaste den USB SD Modus aus Falls sowohl ein USB Stick als auch eine Speicherkarte eingesteckt wurde wechseln Sie durch Drücken der Modustaste zwischen dem USB und dem SD Modus Nach der Modusauswahl wird das ausgewählte Speichermedium automatisch gelesen und die gesamte Anzahl von Ordnern und MP3 WMA Dateien wird auf dem ...

Page 20: ...garantieren dass USB Sticks und Speicherkarten aller Hersteller unterstützt werden Das Gerät unterstützt SD Karten bis zu 8 GB Anforderungen an die MP3 WMA Spur Playback controls WIEDERGABE VON MP3 WMA DATEIEN PROGAMMIEREN Bis zu 64 MP3 WMA Dateien können in beliebiger Reihenfolge gespeichert werden Vor dem Erstellen der Wiedergabeliste sollten Sie sicherstellen dass sich das Gerät im Stoppmodus b...

Page 21: ...karte in den entsprechenden Anschluss und wählen Sie den USB SD Modus wie zuvor beschrieben aus Drücken Sie die Stopptaste sobald das Gerät das Speichermedium erkannt hat 2 Drehen Sie zur Auswahl des Ordners welchen Sie kopieren möchten die Radioauswahltaste 3 Drücken Sie die Taste Auf dem Bildschirm blinkt ONE auf Drücken Sie zur Auswahl von Fol auf dem Bildschirm die Tasten oder Drücken Sie zum ...

Page 22: ...ue Taste DEL 3 DEL wird während die Audiodatei gelöscht wird auf dem Bildschirm angezeigt Einen Ordner löschen 1 Stecken Sie den USB Stick oder die SD Karte in den entsprechenden Anschluss und wählen Sie dann wie zuvor beschrieben den USB SD Modus aus Drücken Sie sobald das Gerät das Speichermedium erkannt wird die Taste 2 Drehen Sie zur Auswahl des Ordners welchen Sie löschen möchten die Radioaus...

Page 23: ...gler zum Einschalten des Geräts im Uhrzeigersinn 2 Wählen Sie mit der Funktionsauswahltaste den Kassetten AUX Modus aus und schließen Sie anschließend ein externes Audiogerät wie beispielsweise einen CD Player an den AUX IN Anschluss an der Vorderseite des Geräts an Das Audiosignal des externen Audiogeräts wird nun über das Gerät wiedergegeben 3 Wenn ein externes Audio Gerät an die AUX IN Anschlus...

Page 24: ...n des Geräts im Uhrzeigersinn 2 Wählen Sie mit der Funktionsauswahl den Kassettenmodus aus 3 Drücken Sie die Modustaste auf der Vorderseite des Geräts um den BT Modus auszuwählen Sobald der BT Modus ausgewählt wurde wird das BT Symbol permanent auf dem Bildschirm angezeigt 4 Schalten Sie Ihr externes BT Gerät ein und suchen Sie das externe Gerät in der Geräteliste Verbinden Sie die Geräte miteinan...

Page 25: ... CD mit der beschrifteten Seite nach oben in das CD Fach gelegt wurde Wenn Sie eine CD via AUX IN Verbindung wiedergeben lassen stellen Sie sicher dass das Kabel richtig verbunden wurde alle Einstellungen des CD Players richtig vorgenommen wurden das CD Fach geschlossen wurde und das die CD sauber und unbeschädigt ist Wenn Sie Musik eines USB Speichermediums oder SD MMC Karte abspielen stellen Sie...

Page 26: ... DE stellen Sie das Gerät an einen anderen Ort um zu überprüfen ob der Empfang besser wird stellen Sie sicher dass sich keine anderen elektrischen Geräte in der Nähe befinden um Interferenzen zu vermeiden ...

Page 27: ...rtlichen Regelungen und entsorgen Sie Altgeräte nicht über den Hausmüll Durch die regelkonforme Entsorgung der Altgeräte werden Umwelt und die Gesundheit Ihrer Mitmenschen vor möglichen negativen Konsequenzen geschützt Materialrecycling hilft den Verbrauch von Rohstoffen zu verringern Konformitätserklärung Hersteller Chal Tec GmbH Wallstraße 16 10179 Berlin Dieses Produkt entspricht den folgenden ...

Page 28: ...28 DE ...

Page 29: ...ubleshooting guide 52 Disposal Considerations 54 Dear Customer Congratulations on purchasing this equipment Please read this manual carefully and take care of the following hints to avoid damages Any failure caused by ignoring the items and cautions men tioned in the instruction manual are not covered by our warranty and any liability Scan the QR code to get access to the latest user manual and ot...

Page 30: ...lash with arrowhead symbol within the equilateral triangle is intended to alert the user to the presence of uninsulated dangerous voltage within the product s enclosure that may be of sufficient magnitude to constitute a risk of electric shock to persons Triangle with exclamation point plus explanation as follows ATTENTION The exclamation point within the equilateral triangle is intended to alert ...

Page 31: ... be unplugged when not using for a long period of time Device shall be repaired by a qualified person when a the power cord is damaged b objects have fallen into the apparatus or a liquid has been spilled into device c device was exposes to the rain d device does not work correctly without notable exterior change e device is broken The user shall not try to maintain device beyond that which is des...

Page 32: ...n plug shall remain readily operable Before use Avoid installing this unit in places exposed to direct sunlight or close to heat radiating appliances such as electric heaters on top of other stereo equipment that radiates too much heat places lacking ventilation or dusty areas places subject to constant vibration and or humid or moist areas Do not attempt to clean this unit with chemical solvents ...

Page 33: ... 12 USB socket 13 SD MMC card slot 14 LCD display screen 15 Disk tray door 16 CD open close button 17 Function selection 18 Tuning knob 19 Skip down button 20 Skip up button 21 Stop button 22 Play Pause button 23 Right speaker 24 Cassette Player Slot 25 Volume knob 26 Stylus 27 Tone arm 28 Lift lever 29 Tone arm 1 2 3 7 9 12 13 14 15 16 18 17 23 24 28 29 26 27 25 8 10 11 19 20 21 22 4 6 5 ...

Page 34: ...lever 32 Auto stop control 33 Tone arm lock 34 Speed selector 33 45 78 rpm 35 Tone arm Phonograph Back panel 36 Cassette EJ FF Button Eject Fast Forward 37 Cassette Player Slot 38 RCA Line out jack 39 FM wire antenna 40 AC power cord ...

Page 35: ...mote control 41 Mute button 42 Program button 43 Repeat button 44 Mode button 45 Skip down button 46 Play Pause button 47 Record button 48 Stop button 49 Skip up button 50 Folder up button 51 Folder down button ...

Page 36: ...rom sources of excess heat dust moisture humidity or strong magnetic fields Remove the opaque white plastic stylus cover from the phonograph stylus by sliding it forward and down Discard the stylus cover Remove the twist tie that was used to secure the tone arm during shipment Release the tone arm lock lever Connect the plug to your AC outlet Power source This product is designed to operate on 230...

Page 37: ...on the receiver has a built in FM wire antenna hanging at the rear cabinet For best reception completely unravel and extend this wire FM and FM stereo mode FM mode use the radio band selector to select the FM band Programs are received in mono mode Use this mode when stereo reception is weak FM Stereo mode use the radio band selector to select FM ST for receiving stereo programs Once a stereo sign...

Page 38: ...ion that you would like to listen to press the button DAB Manual Tune 1 To activate manual tune press and hold the Info Menu button to enter into the Menu then press the or button followed by pressing the button to select and confirm Manual tune 2 The display will show 5A to 13F and their associated frequencies press the or button to move through the DAB channels when your desired frequency appear...

Page 39: ...ng the button to select DRC 2 Press the or button followed by pressing the button to select and confirm the DRC level DRC high low off Prune You can remove the DAB stations in the station list that cannot be received in your area These are listed with a prefix 1 To perform Prune in DAB mode press and hold the Info Menu button to enter into the Menu repeatedly press the or button followed by pressi...

Page 40: ...with sound Clockwise rotate the power volume knob to increase the volume Make sure the unit s power cord is connected to an appropriate electrical outlet Make sure the wall socket is switched on Make sure the function switch is set to your desired function PHONO USB SD TUNER TAPE AUX When playing records make sure you ve selected correct speed 33 45 78 rpm When playing a cassette make sure it is p...

Page 41: ...binet Slightly move the wire aerial for better reception If none of these measures improve stereo reception try the same station on the FM mono band Try moving your radio to an alternative location to see if the reception improves Check that you do not have other electrical equipment too close to your radio which may cause interference ...

Page 42: ...r towards the front 9 To play a different piece on the record move the lift lever towards the back move the raised tone arm to the start of the piece and then move the lift lever towards the front to lower the tone arm and start playback 10 To adjust the volume level turn the volume knob to the right or left 11 At the end of the record move the lift lever towards the back to raise the tone arm and...

Page 43: ...ct the desired mode USB or SD for encoding then press the record REC button again to confirm You can skip this step if only a USB drive or an SD MMC card is inserted 5 The system will start the encoding mode after a few seconds 6 Lower the tone arm to start playback of the record During encoding the USB or SD icon will be flashing on the display 7 To finish encoding press the stop button The displ...

Page 44: ... cassette in the correct direction To avoid damaging the cassette we strongly recommend taking it out of the equipment after playing the cassette Cassette encoding 1 Set the function button to TAPE AUX mode and then insert a memory device USB drive SD or MMC card 2 Press the REC button it will take 3 4 second to read the memory device then the USB or SD icon will be flashing on the LC display 3 Pr...

Page 45: ...s the record REC button it will take 3 4 second to read the memory device then the USB or SD icon will be flashing on the LC display 3 Press the skip up or skip down button to select the desired mode USB or SD for encoding then press the record REC button again to confirm You can skip this step if only a USB drive or an SD MMC card is inserted 4 The system will start the encoding mode after a few ...

Page 46: ... USB device or memory card The system is able to decode and playback all MP3 WMA files stored in the memory media connected to the USB port or SD MMC card slot 1 Turn the volume knob clockwise to turn the equipment on 2 Following the illustration below insert a USB device face up into the USB port making sure it is fully inserted Alternatively insert a memory card in the direction of the arrow as ...

Page 47: ...yers may not be able to play via the USB socket This is due to variances in the MP3 encoding format it is not a malfunction of the system There are numerous USB and SD device producers and their products vary in solution and format We therefore cannot guarantee that this unit will support all USB and SD devices from every brand This system supports SD cards up to 8GB MP3 WMA track format requireme...

Page 48: ...playback automatically END will be shown on the display and the system will revert to USB or SD mode Copying a folder 1 Insert a USB storage device and SD card then select USB SD mode as described previously When the system has recognised the device press the stop button 2 Turn the tuning knob to select the desired folder for copying 3 Press the record REC button ONE will be flashing on the displa...

Page 49: ...n the display while the file track is being deleted until the deletion is complete Deleting a folder 1 Insert a USB storage device and SD card then select USB SD mode as described previously When the system has recognised the device press the stop button 2 Turn the tuning knob to select the desired folder for deleting 3 Press the delete DEL button ONE will be flashing on the display Press the SKIP...

Page 50: ...dio signal from the external audio device will now be played through the system 3 If an external audio device is connected to the AUX IN socket playing of the auxiliary device takes priority over cassette playback NOTE If you won t use the unit for a long time you had better take the CD out from the disk tray door AUX IN encoding 1 Use the function selector to select TAPE AUX mode and then insert ...

Page 51: ...olume knob clockwise to turn on the equipment on 2 Set the function selector to select TAPE button 3 Press the MODE button on the front panel once to BT mode and the LCD will show BT all the time 4 Turn on your bt device and scan BT will be found on your bt device Paired and connect the unit and your bt device 5 Play your bt device as normally do and the music will be played from the unit ...

Page 52: ...USB SD TUNER TAPE AUX When playing records make sure you ve selected correct speed 33 45 78 rpm When playing a cassette make sure it is properly inserted When playing a CD make sure the CD is dealt face up When playing a CD via the AUX IN connection make sure the cable is firmly connected all controls on the CD player are properly set the disc tray is closed and the disc is clean and undamaged Pro...

Page 53: ...53 EN radio which may cause interference ...

Page 54: ...012 19 EU this symbol on the product or on its packaging indicates that this product may not be treated as household waste Instead it should be taken to the appropriate collection point for the recycling of electrical and electronic equipment By ensuring this product is disposed of correctly you will help prevent potential negative consequences for the environment and human health which could othe...

Page 55: ......

Page 56: ......
Reviews: