47
EN
Charging your device
You can charge your device through the socket on this product with a USB
cable.
Notes:
• The maximum current for USB charging is 5V 1A.
• Not all devices for USB charging are guaranteed.
• When the play mode is switched, the charge will stop slightly.
Play from BT device
1. Rotate the SOURCE knob on the unit or repeatedly press the BT/AUX
button on the remote control to select BT source. “BT” is displayed and
the BT symbol blinks on the display.
2. Activate the BT function in your BT device (see the device user manual).
3. Select „Glastonbury“ on your device for pairing. For elder devices, you
need to input “0000” as pairing password.
4. When connection successful, the BT symbol is displayed on the display.
5. Start music play on your BT device, you can use this unit and remote
control to control the function to your BT device.
- To pause/resume play, press PLAY/PAUSE.
- To skip to a track, press
.
- To increase or decrease the volume, press VOL +/-.
6. Long pressing the PAIRING button on the remote control for more than
2 seconds to disable the BT function from your BT device, the BT symbol
blinks on the display.
Note:
• Any obstacle can reduce the operational range.
• The device will also be disconnected when the device is moved beyond
the operation range.
• If you want to reconnect the device to the unit, place it within the
operational range.
• Compatibility with all BT devices is not guaranteed.
SETTING THE SLEEP TIMER
When the unit is turned on, repeatedly press the SLEEP button on the
remote control to select a set period of time (in minutes): 120, 90, 75, 60,
45, 30, 15
When sleep timer is activated, the “Zz” is displayed.
Summary of Contents for Glastonbury
Page 1: ...w w w a u n a m u l t i m e d i a c o m Glastonbury M icro System M icro systèm e 10031824 ...
Page 2: ......
Page 6: ...6 DE GERÄTEÜBERSICHT Vorne Rückseite ...
Page 28: ......
Page 32: ...32 EN Product OverviewVorne Front view Rear view ...
Page 52: ...52 EN ...
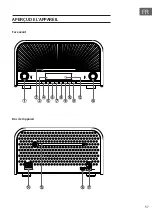
Page 57: ...57 FR APERÇU DE L APPAREIL Face avant Dos de l appareil ...
Page 79: ...79 FR ...
Page 80: ...80 FR ...
Page 81: ......
Page 82: ......

