background image


10

FM TUNER

Operation

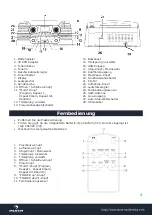
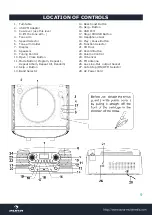
1.  Set the Function Selector (20) to the Radio position.

2.   Select the desired frequency band with the Band Selector (13).

3.   Tune to the desired radio station by turning the Tuning control (9).

4.   Adjust the volume (23) control to desired level.

5.   To turn off the radio, set the Function Selector (20) to the Power OFF position.

Antenna

Move the antenna wire to a position so as to obtain the best reception.

You may have to move the unit to obtain the best reception.

FM Stereo and Mono Reception

When an FM signal is tuned in, setting the Band selector (13) to FM ST. position will enable the 

broadcasting to be received in stereo sound. The FM Stereo indicator (7) will appear on LCD display.

TURNTABLE OPERATION


Preparation

Open the Record Player Cover.

Release the Tone arm Clamp, and remove the stylus protector.

Listening to Records

1.   Set the Function Selector (20) to the PHONO position.

2.   Place a record on the turntable, over the central spindle. Place the EP adapter over the central 


spindle when playing 45RPM records.

3.   Set the Speed Selector (5) to 33 or 45 or 78 rpm according to the record.

4.   Release the tone arm clamp, and remove the protective cap from the stylus.

5.   Lift the Tone arm with the Tone arm Lift Lever.

6.   Move the tone arm to the beginning of the record, or to the start of a particular track.

7.   Gently lower the tone arm onto the record with the Tone arm Lift lever to start playing.

8.   When  the  record  is  finished  the  tone  arm  will  automatically  stop.  Lift  the  tone  arm  from  the 


record and return it to the rest.

9.   To stop manually, lift the tone arm from the record and return it to the rest.

10. 

Auto Stop ON/OFF selector on turntable 

– Set the Function Selector (27) – Switch to ON for 


turntable auto stop function


For EP 33 RPM – Switch to Auto stop “On” position - It enables the record auto stop when ending. 


For EP 45 or 78 RPM – Switch to Auto stop “Off” position, It can play the whole song.

Notes: 

•   Do not stop or turn the platter manually.

•   Moving or jarring the turntable without securing the Tone arm clamp could result in damage to the  

  Tone arm.

•   Replace the protective cap on the stylus when not in use.

Aux out Output

You can connect the unit to external speakers (4 OHM) by connecting the speaker output socket L, R 

to your external speakers (Not included).

Note: 

The sound from the original built-in speakers will still be heard even after connecting the external speakers 

SOURCE SELECTING  - STOP / CD / USB  (17) button

Press this button continuously 3 seconds, It will be switched to CD, or USB mode

Summary of Contents for 10011073

Page 1: ...http www auna multimedia com Retro Stereoanlage 10011073 10011075 10011078 ...

Page 2: ...ine beschädigte Steckdose Installieren Sie dieses Gerät so dass das Netzkabel sofort aus der Steckdose gezogen werden kann wenn Störungen auftreten Kleine Objekte Verpackungsteile Plastikbeutel Karton etc Bewahren Sie die kleine Objekte z B Schrauben und anderes Montagematerial Speicherkarten und Verpackungsteile außerhalb der Reichweite von Kindern auf damit sie nicht von diesen verschluckt werde...

Page 3: ...igen Fähigkeiten oder mangels Erfahrung und oder mangels Wissen benutzt zu werden es sei denn sie werden durch eine für ihre Sicherheit zuständige Person beaufsichtigt oder erhielten von ihr Anweisungen wie das Gerät zu benutzen ist Kinder sollten beaufsichtigt werden um sicherzustellen dass sie nicht mit dem Gerät spielen Transport des Gerätes Bitte bewahren Sie die Originalverpackung auf Um eine...

Page 4: ...ist Typ CR2025 3V Wechseln Sie leergelaufene Batterien 1 Play Pause Knopf 2 Aufnahme Knopf 3 Stop Knopf Moduswahl 4 Titelsprung rückwärts 5 Titelsprung vorwärts 6 Öffnen Schließen Knopf 7 Prog Knopf 8 Mode Knopf Program Repeat 1 Repeat Album Repeat All Random 9 FOLDER up Knopf 10 FOLDER down Knopf 11 Fernbedienungssensor 14 Bassboost 15 Titelsprung rückwärts 16 USB Eingang 17 Stop Knopf Moduswahl ...

Page 5: ... das Ende der Platte erreicht wird der Plattenteller automatisch stoppen Heben Sie den Tonarm und platzieren Sie diesen in dessen Ausgangsposition 9 Sie können dem Abspielvorgang automatisch stoppen indem Sie den Tonarm während des Abspiels heben 10 Auto Stop Funktion 27 a In der Position On wird das Abspielen der Platte bei Erreichen ihres Endes automatisch beendet b In der Position On wird das A...

Page 6: ...unktionswahlschalter 20 auf die Position CD MP3 2 Navigieren Sie mit Hilfe der Buttons 12 und 15 zu dem Titel den Sie überspielen wollen Drücken Sie anschließend den Knopf 19 3 Drücken Sie den Aufnahme Knopf 22 um mit der Aufnahme zu beginnen 4 Bestätigen Sie durch nochmaliges Drücken des Aufnahme Knopfes 22 5 Nochmaliges Drücken des Aufnahme Knopfes 22 stoppt den Aufnahmevorgang 6 Anmerkung Es kö...

Page 7: ...Hinweise zur Entsorgung Befindet sich die linke Abbildung durchgestrichene Mülltonne auf Rädern auf dem Produkt gilt die Europäische Richtlinie 2012 19 EU Diese Produkte dürfen nicht mit dem normalen Hausmüll entsorgt werden Informieren Sie sich über die örtlichen Regelungen zur getrennten Sammlung elektrischer und elektronischer Gerätschaf ten Richten Sie sich nach den örtlichen Regelungen und en...

Page 8: ...thin an equilateral triangle is intended to alert the user to the pre sence of important operating and maintenance servicing instructions in the literature ac companying the appliance WARNING 1 TO REDUCE THE RISK OF FIRE OR ELECTIC SHOCK DO NOT EXPOSE THIS APPLIANCE TO RAIN OR MOISTURE 2 To avoid any damage don t force the cover over its foreseen amplitude CAUTION Visible and invisible laser radia...

Page 9: ...pen Close Button 11 Mode Button Program Repeat 1 Repeat Album Repeat All Random 12 Skip Button 13 Band Selector 14 Bass boost Button 15 Skip Button 16 USB Port 17 Stop CD USB Button 18 Headphone Jack 19 Play Pause Button 20 Function Selector 21 CD Door 22 Record Button 23 Volume Control 24 IR Sensor 25 FM Antenna 26 Aux Line Out output Socket 27 Auto Stop ON OFF Selector 28 AC Power Cord ...

Page 10: ...tive cap from the stylus 5 Lift the Tone arm with the Tone arm Lift Lever 6 Move the tone arm to the beginning of the record or to the start of a particular track 7 Gently lower the tone arm onto the record with the Tone arm Lift lever to start playing 8 When the record is finished the tone arm will automatically stop Lift the tone arm from the record and return it to the rest 9 To stop manually l...

Page 11: ...the CD mode This unit can read CD CD R CD RW B In the MP3 mode This unit can also read as below It can play back MP3 DISC Listening to CD 1 Select CD with the Function selector 20 on the unit to choose the CD mode 2 Press the PLAY PAUSE button on the unit once to start playing the CD from the first track and play indicator will appear on the display 3 Press the PLAY PAUSE button again to start pla...

Page 12: ...sert USB mode the song will be on autoplay Playback starts with the first track the display shows the current track number 2 To interrupt playback press PLAY PAUSE button The time elapsed indicator will flash 3 To resume playback press the PLAY PAUSE again 4 To stop playback press the STOP button ENCODING AND STORING FROM A NORMAL CD You can encode you favorite CD songs into MP3 format and store t...

Page 13: ...ce selector BUTTON 4 SKIP BUTTON 5 SKIP BUTTON 6 OPEN BUTTON 7 PROG BUTTON 8 MODE BUTTON Repeat 1 Repeat Album Repeat All Random 9 FOLDER UP 10 FOLDER DOWN 11 Remote Sensor BATTERY REPLACEMENT When the remote control operation becomes unstable or the distance from which remote control is possible becomes shorter replace the battery with new one USING THE REMOTE CONTROL UNIT To use remote control u...

Page 14: ...ay not be treated as household was te Instead it should be taken to the appropriate collection point for the recycling of electrical and electronic equipment By ensuring this product is disposed of correct ly you will help prevent potential negative consequences for the environment and human health which could otherwise be caused by inappropriate waste handling of this product For more detailled i...

Reviews: