


6. Digital Freeview TV (DVB-T)
6.1 Channel Manager
In Digital TV mode, select Channel
Manager, press ENTER for the submenus.
When in Digital TV mode, press MENU
and select Digital TV, it gives the following
options: Channel Manager, Installation,
Configuration, Software Upgrade, Factory
Default, and Version Information.
Channel Manager allows the user to sort,
edit, delete, and classify the channels.
6.1.1 Channel Organizer
Channel organizer is used to set favourite
channels, change channel positions, lock
and delete channels, and edit channel's name.
1. Channel Organizer can be accessed by
selecting MENU -> Digital TV ->
Channel Manager -> Channel Organizer.
2. If there is no channel saved on the TV,
Channel Organizer can not be accessed,
and it will show “Channel not available”.
3. Use UP/DOWN to select the channel
you want to edit.
- Press RED to select or cancel a favourite.
- Press GREEN to delete or undelete a
channel.
- Press YELLOW to set or cancel a
channel's position change.
- Press BLUE to lock or unlock a channel,
it will ask you to enter the password, the
system default password is 0000.
4. To change the channel name, use
UP/DOWN to select the channel line,
press LEFT/RIGHT to enter the page to
change the name, press RED/GREEN
/YELLOW/BLUE to edit the name.
5. Press EXIT or MENU to exit Channel
Organizer.
-9-
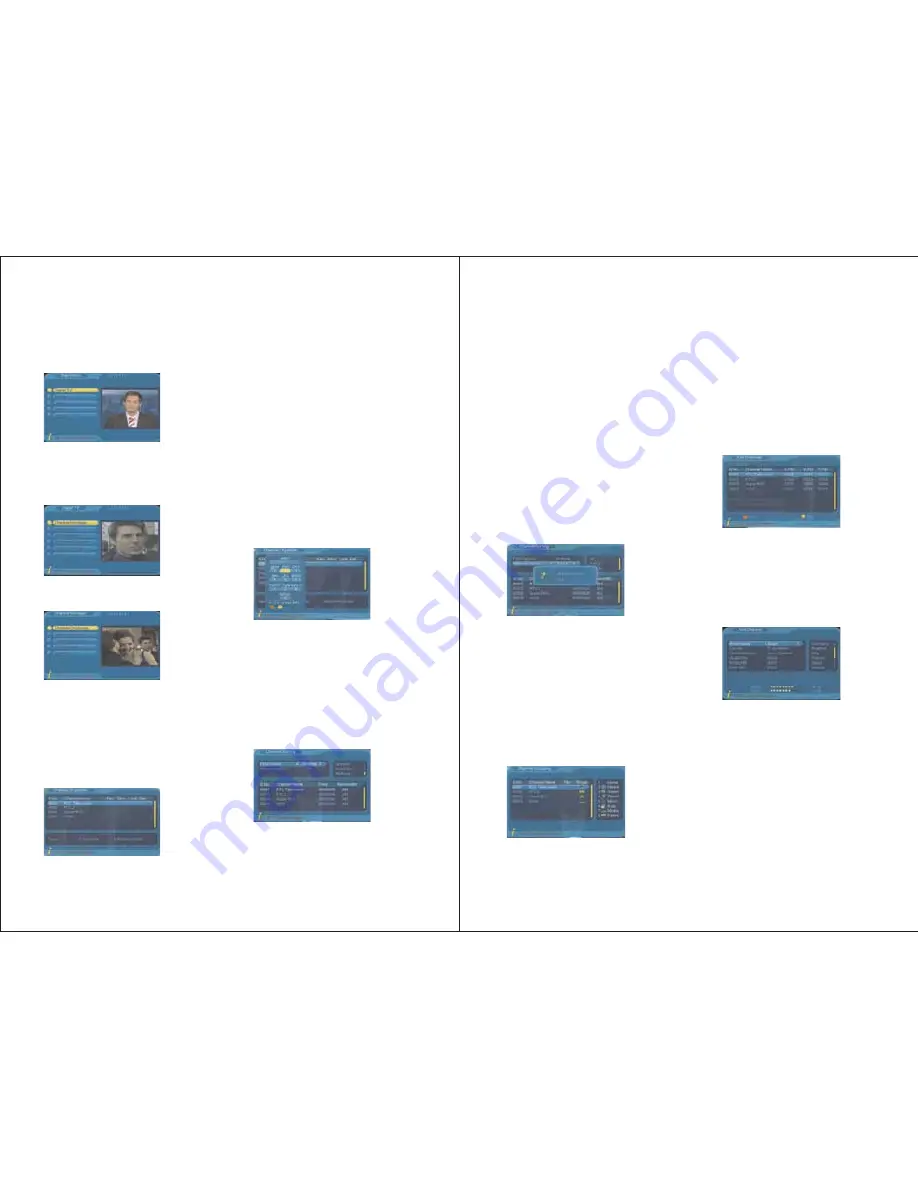
6.1.2 Channel Sorting
It allows the user to sort the channels by
area, alphabetically or by number sequence.
1. Channel Sorting can be accessed by
selecting MENU-> Digital TV->
Channel Manager->Channel Sorting.
6.1.3 Channel Grouping
It allows the user to sort channels into 8
different categories: News, Science, Sports,
Movie, Kids, Music, Fashion and None.
1. Channel Sorting can be accessed by
selecting MENU-> Digital TV->
Channel Manager->Channel Grouping.
2. If there is no channel saved on the TV,
Channel Grouping can not be accessed,
and it will show “Channel not available”.
3. Use UP/DOWN to select the channel,
and then select the category by pressing
the numbers (1-8).
4. After setting, press EXIT, it will show
“Successfully updated”.
It allows the user to add and edit channels.
1. Edit Channels can be accessed by
selecting MENU-> Digital TV->
Channel Manager-> Edit Channels.
6.1.4 Edit Channels
-10-
2. If there is no channel saved on the TV,
Edit Channels can not be accessed, and it
will show “Channel not available”.
3. To add a new channel, press RED, and
then press UP/DOWN to select between
the 6 parameters as shown:
①
②
③
④
Area Name: press RIGHT to enter the
area list, use UP/DOWN to select, press
ENTER to confirm.
Carrier: press RIGHT to enter the
carrier list, use UP/DOWN to select,
press ENTER to confirm.
Channel Name: press RIGHT to enter
the edit page, use RED/GREEN
/YELLOW/BLUE to edit, press ENTER
to confirm.
Audio PID: can be changed by pressing
the numbers.
2. If there is no channel saved on the TV,
Channel Sorting can not be accessed,
and it will show “Channel not available”.
3. Press UP/DOWN to select:
First Option: Area, press RIGHT to
enter the area list, use UP/DOWN to
select, press ENTER to confirm.
Second Option: Sorting rules, press
RIGHT to enter the rule list, use UP
/DOWN to select, press ENTER to confirm.
4. Sorting rules can be selected by pressing
RIGHT/UP/DOWN/LEFT.
5. After sorting rules is selected, press
ENTER to confirm, it will ask “Are you
sure?”, select “Yes” to confirm and to
proceed the sorting, or select “No” to cancel.
①
②
6. Press EXIT or MENU to exit Channel
Organizer.


