background image

ADVANCED MANUAL / Bit One / 

7

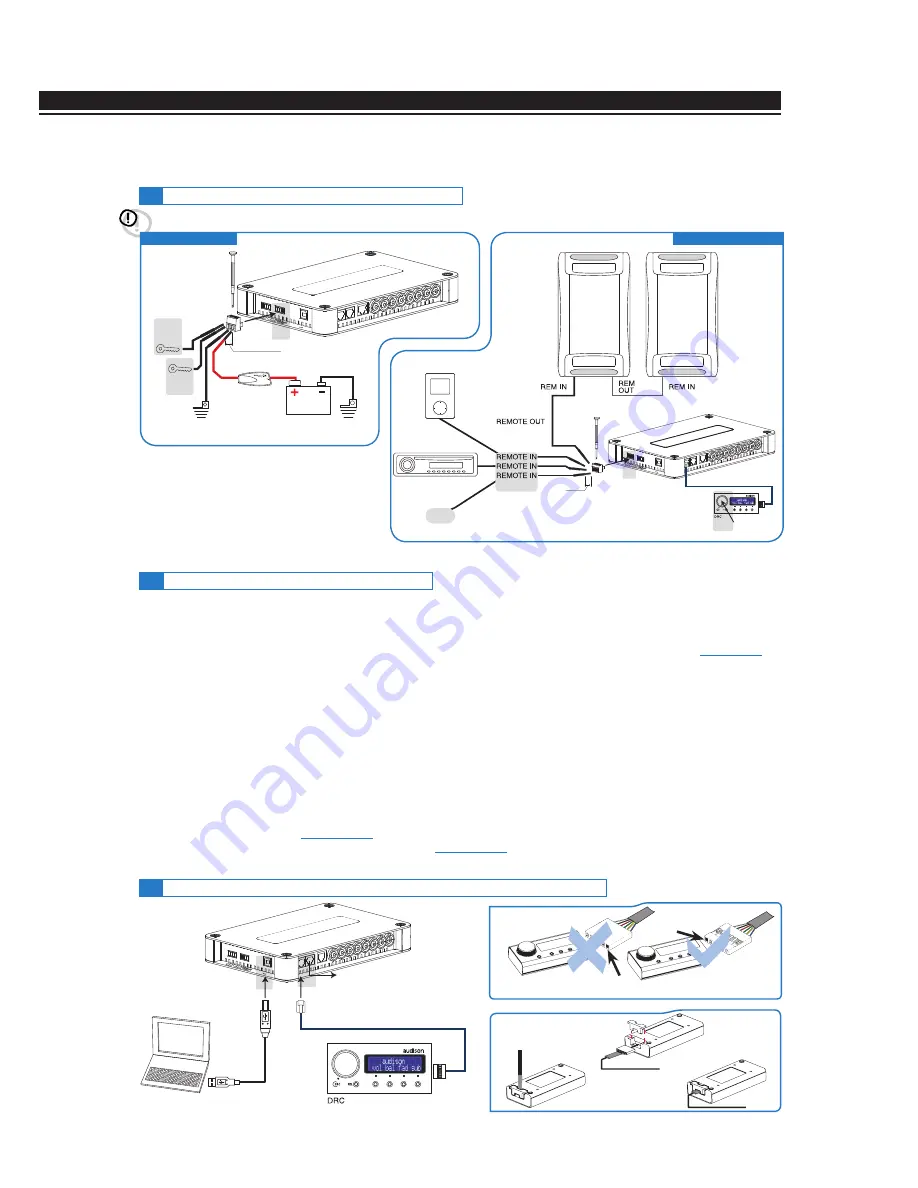
5. CONNECTIONS

1.

  Push the DRC main control switch (to turn on). Keep the DRC main control knob pressed (to shut down). 


In this case no other connections Remote In / KEY SWITCH are required, but they can coexist 

(

see section 12

)

.

2.

  Connecting one of the Remote In plugs using a Remote signal coming from one source, the KEY SWITCH


connection is not required, but it can coexist.

3.

  Through the KEY SWITCH ON OFF. Every time you turn on / off the car ignition key, the Bit One will turn on / off.


If this control is used, KEY SWITCH MEM can not be used.

4.

  Through the KEY SWITCH MEM. If the Bit One was turned off through the KEY SWITCH MEM connection, it 


will automatically turn on again by turning the KEY SWITCH MEM itself. If it was turned off through a different  


method (ex. through the Remote or the DRC) while the KEY SWITCH MEM was still active, the Bit One will not  


turn on again through the KEY SWITCH MEM; you will have to turn it on through either the DRC or the  


Remote. If you use the KEY SWITCH MEM, the KEY SWITCH ON OFF can not be used.

5.

  Through the SPEAKER IN CH1. The AUTO TURN ON (ART) activates by connecting the amplified head


unit output to the SPEAKER IN CH1 input channel, the ART can be disabled on the Bit One.1 (check the label  


on the bottom of your Bit One to know its version) by opening the product and removing the jumper as  


shown in the picture 

(

see section 5.5.1

)

.

6.


Automatically through the hands-free phone kit 

(

see section 5.5.3

)

with the Bit One “mute” control turned off.

Remark:


The Bit One is internally 

protected by a fuse-resistor soldered on its 

printed circuit board. To replace it, contact 

a service centre. The application of an 

external fuse is recommended, though it is 

not indispensable.

REMOTE TURN ON

The Bit One is on when the Audison logo lights up in blue. After receiving the turn-on input the Bit One takes 9 

seconds to become operative. It can be turned on / off in the following ways:

5.3

 PERSONAL COMPUTER and DIGITAL REMOTE CONTROL (DRC)

5.2

 HOW TO TURN ON/OFF THE BIT ONE

5.1

 POWER SUPPLY AND REMOTE TURN-ON

ATTENTION:


to power the Bit One, use 1 mm

2

 (16 AWG) min. cables.

POWER SUPPLY

Fuse Holder

Not provided

suggested fuse

T1A-Delayed

Ground

Battery

12V

Ground

L: 7 mm (5/16”)

3

(section 5.2)

(section 5.2)

4

L: 7 mm (5/16”)

or other

2


(section 5.2)

1

(section 5.2)

AMPLIFIERS

DRC IN

USB cable 

(provided)

DRC / ACLink cable 

(4,5 m / 177,16” in provided 

see section 13.2

)

TO THE SYSTEM’S AMPLIFIER 

ACLink PROVIDED

OK

DRC/ACLink cable (provied)

NO

5

Summary of Contents for bit one

Page 1: ...evision 1 5c Update for Bit One 1 Pc Software 1 5 Bit One Firmware 1 5 0 0 DRC Firmware 1 50 Accessories SFC DRC cable extension Kit Instruction for Windows 7 installation ADVANCED MANUAL www audison eu ...

Page 2: ...tall the Drivers with Windows 7 20 8 HOW TO CONNECT THE BIT ONE TO THE PC 21 8 1 OFFLINE mode 21 8 2 Starting up the Bit One software in TARGET mode warnings 22 8 3 TARGET mode 22 8 4 Selecting the MASTER mode Low Level inputs 23 8 5 Selecting the MASTER mode High Level inputs 27 9 HOW TO SETUP THE BIT ONE WITH THE PC 30 9 1 Features 30 9 2 Main menu File 31 9 3 Main menu Config 32 9 4 Channel Map...

Page 3: ...te Control Control Panel Printed Quick Start Guide 5 0 m 196 85 AC Link RJ 12 cable 5 0 m 196 85 AD Link LAN class 5S RJ45 cable 3 0 m 118 11 USB cable N 4 4 2 x 38 mm self tapping cross head fixing screws 4 5 m 177 16 DRC ACLink cable N 2 fixing brackets with 2 9 x 6 5 mm self tapping cross head screws CD ROM with Bit One Software USB ACNet drivers This Advanced Manual pdf format Test tracks DVD ...

Page 4: ...ING do not use aggressive cleaning agents or abrasive cloth to clean the display Simply use a soft cotton cloth lightly damped with water 225 mm 8 85 150 mm 5 90 201 mm 7 91 126 mm 4 96 4 2 x 38 mm 32 3 mm 1 27 68 mm 2 68 90 mm 3 54 35 mm 1 38 Ø 2 mm 1 8 50 mm 2 16 mm 0 63 17 mm 0 67 12 5 mm 0 49 43 5 mm 1 71 13 5 mm 0 53 3 5 mm 0 14 6 mm 0 23 3 ...

Page 5: ...nput see section 5 5 1 2 Ch1 Ch2 Ch3 Ch4 Ch5 Ch6 Ch7 Ch8 Connect here the specific cables coming from the power output of the main signal source If these inputs are used the MASTER PRE IN inputs can not be used Ch1 features AUTO TURN ON ART providing the ability to automatically turn on off the Bit One through the connection with the source speaker outputs In the Bit One 1 version check label on t...

Page 6: ...re turned on It s necessary to connect the sources Remote Out to the Bit One Remote In and then the Bit One Remote Out to the Remote In of the other devices amplifiers connected to the Bit One section 5 1 2 KEY SWITCH ignition key connection see section 5 2 3 4 MEM it stores the processor status when it is turned off ON OFF it turns the processor on and off when the vehicle turn on off ignition ke...

Page 7: ...ied head unit output to the SPEAKER IN CH1 input channel the ART can be disabled on the Bit One 1 check the label on the bottom of your Bit One to know its version by opening the product and removing the jumper as shown in the picture see section 5 5 1 6 Automatically through the hands free phone kit see section 5 5 3 with the Bit One mute control turned off Remark The Bit One is internally protec...

Page 8: ... film in DVD or DTS can not be reproduced The output of these devices will therefore be set in STEREO mode for the signal to be reproduced If digital signals at frequency higher than 48 kHz 96 192 kHz are supplied the Bit One locks up In that case turn the Bit One off supply the adequate signal and turn it on again 5 4 LOW LEVEL AND DIGITAL INPUT SIGNALS Pre Out Source MAX 6 PRE OUT L R Multi Chan...

Page 9: ... phone conversation allowing to resume the audio reproduction when the phone call is finished Mute Bit One off It turns the Bit One on When a phone call is received the phone ringing tone is audible after around 9 seconds Once the phone call is finished the Bit One turns off 5 5 HIGH LEVEL INPUT SIGNALS Bit One 1 To deactivate the ART function on Ch1 take out the Jumper as indicated in the picture...

Page 10: ...d digital outputs ADLink must not exceed the total available channels ADLINK OUT ACLINK 2 AMPS 5 6 OUTPUT SIGNALS Remark the output channels are 8 in total The sum of the channels of the amplifiers connected must not exceed 8 To increase the number of channels however the same function AMP ID can be assigned to more than one amplifier AMPS DRC 1 AC Link 2 DRC ACLink Function Control ADLink Digital...

Page 11: ...t Computer from the Windows START menu 3 Windows XP right click your mouse on the Bit One v 1 5 CD icon and click on Explore Windows Vista right click your mouse on the Bit One v 1 5 CD icon and click on Explore Windows 7 right click your mouse on the Bit One v 1 5 CD icon and click on Open 4 Windows XP double click on the setup icon Windows Vista double click on the setup icon Windows 7 double cl...

Page 12: ...an be used by anyone who uses that PC Just me if you want that once installed the program can only be used by yourself as single system user Then click on NEXT Windows Vista select Everyone if you have the system administrator privileges so once installed the program can be used by anyone who uses that PC Just me if you want that once installed the program can only be used by yourself as single sy...

Page 13: ... One being the device turned on the laptop has to work with its own battery keeping it disconnected from the mains adapter external power supply Once the connection between the PC laptop and the Bit One is established you can immediately connect the computer if necessary through the mains adapter 6 2 DRIVERS INSTALLATION GUIDE 3 Windows XP The PC will recognise the Bit One interface and will ask y...

Page 14: ...elect the CD Bit One V_15 click on OK then on Next 6 The following window regarding the driver certification warning will show up Windows XP click on Continue Anyway Windows Vista click on Install this driver software anyway Windows 7 click on Install this driver software anyway 7 The system will install the ACLink interface drivers Windows 7 Windows 7 Windows 7 Windows XP Windows XP Windows XP Wi...

Page 15: ...ne and will ask you to install the driver 10 Windows XP select No not this time and click on Next Windows Vista click on Don t search online Windows 7 select START Control Panel Device Manager right click your mouse on the USB Serial port and select Update driver software Browse my computer for driver software 11 Check if the Bit One Setup CD is inside the CD ROM drive Windows XP select Install so...

Page 16: ...Windows 7 click on Install this driver software anyway 14 If the procedure was successfully completed the system will notify you that the driver installation has been completed Windows XP click on Finish Windows Vista click on Close Windows 7 click on Close 15 The installation of the Bit One software and driver is now completed see section 8 Windows 7 Windows 7 Windows 7 Windows XP Windows XP Wind...

Page 17: ...ftware or the drivers or due to undetectable problems on an operating system or hardware level If the DRC display shows the message PC control DRC is disabled In this case the PC is correctly initializing the ACLink bus but the fault is in the Bit One Exit the program on the PC turn the Bit One off then on again then try reconnecting If after turning on the Bit One again one of the above messages ...

Page 18: ...ice uninstall 8 Disconnect the USB plug turn off the Bit One then turn it on again and connect again the USB plug and one available plug to the PC 9 Repeat the installation procedure see section 6 6 Select USB Controllers Universal Serial Bus controllers then right click on Audison ACLink Interface and select Uninstall 7 Click on OK when you are asked to confirm the device uninstall 7 BIT ONE SOFT...

Page 19: ...dow asking you to confirm the device uninstall will appear select Delete the driver software for this device and click on OK 3 Click on Device Manager 5 A window asking you to confirm the device uninstall will appear select Delete the driver software for this device and click on OK 4 Select Ports COM LPT then right click on Audison ACLink Port COM X and select Uninstall 2 Open Control Panel and cl...

Page 20: ...confirm the device uninstall 5 Select USB controllers Universal Serial Bus controllers right click on Audison AC Link Interface and select Uninstall 2 Open the Control Panel and click on Device Manager 3 Select Ports COM and LPT then right click on Audison AC Link Port COMX and select Uninstall 7 4 HOW TO UNINSTALL THE DRIVERS WITH WINDOWS 7 7 Disconnect the USB plug turn the Bit One off then turn...

Page 21: ... to get familiar with the processor multiple functions For more information on the specific functions see section 8 3 for the TARGET mode The software is pre set to start with a 3 way stereo Sub active multi amplified system To set a new virtual system and so to change the inputs and select the outputs you need to select the function I O Configuration Wizard in the Config window of the software ma...

Page 22: ...peaker groups ex 3 way system with active mid low If the system features any speaker connected through the ACLink 2 If you are using a computer equipped with a serial port the software will perform a scan of the PC port looking for the Bit One Fig 1 Then the PC will find the Bit One connected to the ACLink interface Fig 2 Click OK to start up the TARGET mode Click NEXT to search again for the USB ...

Page 23: ... One inputs sensitivity to the signal coming from the source 2 How to calibrate the MASTER inputs levels Follow the instructions as listed below Insert the supplied disk insert the Setup CD if the head unit you are using is an AUDIO CD Player insert the TEST Signal DVD if the head unit you are using is a Dolby Digital AC3 Audio Car Theatre 5 1 featuring analog outputs or if it is an analog audio s...

Page 24: ...ange or right woofer Once the software has been started up this choice will affect the dedicated crossover type 4 How to select the speakers available in the system POSSIBLE ERROR MESSAGE If you want to use a coaxial system as rear channel both tweeter and woofer need to be selected and after that see point n 5 you need to enter that a passive crossover connecting one to the other is present in th...

Page 25: ...in complex systems Ex The 3 way Front can be managed as multi amplified 6 output channels would be required passive mid high speakers separately amplified woofer 4 output channels would be required 3 way passive 2 output channels would be required The Bit One features 8 output channels On this specific step of the procedure any signal can be assigned to each output channel Due to a matter of conve...

Page 26: ...ng the Test track remove the supplied Setup CD or the TEST Signal DVD from the CD player of your head unit and then click OK Remark low level imput De equalization The Bit One software provides the ability to de equalize a Low Level signal You have to connect the signal to the Low Level inputs and select on the Bit One software the high level inputs as type of inputs used see section 8 3 2 Then pr...

Page 27: ...o system featuring a central channel Play track 1 press Play Set all tone controls to zero 0 Set balance and fader to center 0 Adjust the head unit volume to the maximum undistorted output level Press BACK to go back to the previous step Press NEXT to go ahead with the set up procedure Press CANCEL to exit the program Remark calibration is absolutely required to adapt the Bit One inputs sensitivit...

Page 28: ...l group Ex even though you are using Front Left Full and Front Right Full as inputs the software will perform the de equalization also on the Rear Center and Subwoofer as the processor will have to use the signals identified as Front to possibly also manage the outputs Rear Center and Subwoofer Press BACK to go back to the previous step Press NEXT to go ahead with the set up procedure Press SKIP t...

Page 29: ...dure is completed the window will show the message Press Next to Continue Press BACK to go back to the previous step Press NEXT to go ahead with the set up procedure Press CANCEL to exit the program 7 How to select the speakers of your system From this point on the procedure is same as the one of the low level inputs section see section 8 4 4 Screen image sequence 6 8 ...

Page 30: ...plifiers connected to the Bit One remember to perform the adjustments keeping the general volume at a level that does not damage the speakers in your system If it is the first time that you connect your Bit One to a PC we recommend that you FINALIZE the Bit One to avoid losing the data stored when performing the auto setup process see section 9 2 3 The Bit One now has proper basic setup In the fol...

Page 31: ...oaded from a previously saved file EX BitOneConfig1 bit This feature is available both in TARGET and in OFF LINE mode In TARGET mode this feature lets you load again all the settings that have been previously saved This feature is useful if you want to resume all the settings you have previously selected to install another Bit One with the same settings in order to test different acoustic setting ...

Page 32: ... One firmware see section 10 1 6 7 Reset Default Answer it restores the display of the warning messages if they have been disabled by unchecking Don t show me again 8 Restore Factory Defaults it entirely resets the Bit One back to its default settings cancelling all the data previously saved in the Bit One see section 10 3 11 9 Credits it shows the information about the Bit One software in use 10 ...

Page 33: ...ftware has two working modes available Standard and Expert acting on the crossover filter section The Standard mode features some restrictions easing in the use of the software see section 9 6 The Expert mode does not feature any restrictions in the functions to use the software see section 9 6 2 External Source it provides the ability to enable or disable auxiliary sources that have not been or h...

Page 34: ...lso lets you set on MUTE each channel by clicking on the word MUTE on the left hand of the desired channel If MUTE is on the word gets highlighted in green You can also select a channel as shown in the image next to the following chapter 9 5 9 5 SELECT A CHANNEL This window is active You can click on the speaker or on the speaker system to manage each single channel that once selected will show as...

Page 35: ...d on the Channel Map 1 Xover L R Link if this field is activated the modifications applied to one of the channels right or left will automatically be applied also to the other one To activate it click on the blue flashing light 2 Invert Phase it provides the ability to invert the phase of the channel under examination by 180 It can be activated by selecting the green flashing light This function c...

Page 36: ...ass cut off frequency instead the Front Woofer hi pass cut off frequency won t change In EXPERT mode the crossing frequency among speakers of the same front is free meaning that open cuts can be created 6 Filter slope Hi P Slope 12 24 36 48 dB Oct Linkwitz 6 12 18 24 30 36 42 48 dB Oct Butterworth Lo P Slope 12 24 36 48 dB Oct Linkwitz 6 12 18 24 30 36 42 48 dB Oct Butterworth When starting up the...

Page 37: ...e Xover and EQ boxes 4 a blue area for the resultant of the sum between the filtered electrical response and the equalized one SUM Fig 4 by clicking with the mouse on the SUM box In this case the red line and the green area are hidden During the setup process the display shows in real time the changes applied to the electrical signal that is sent to the speakers through the amplifiers The audio si...

Page 38: ...d to the PHONE input Tab showing the typology of system previously set with MASTER input High Lo Level It also lists the selectable channels The Select Input section shows a list of buttons corresponding to the inputs that have been selected during the product setup If you click on the button of an input that input will become active and the Bit One will reproduce the sound that is applied to that...

Page 39: ...s on the input In order to know how this equalizer can be used see section 9 12 This window shows the equalization applied to the selected input signal You can adjust the input sensitivity for the AUX 1 AUX 2 0 3 5V RMS and PHONE OPTICAL 0 6 10V RMS by moving the slider You can adjust the system general volume to best perform adjustment operations by moving the slider 5 6 7 8 9 ...

Page 40: ...lays lets you also perform a manual fine adjustment Preliminary remarks Fine set and Phase Delay The delay assignment according to the distance calculation is theoretical That is small variations need to be applied due to small errors in distance measurement due to the back wave reflections inside the car compartment and mainly due to the speaker phase problem Two speakers reproducing two areas of...

Page 41: ...e Set function 3 Select the channel related to the loudspeaker under exam on the Channel Map and enter the respective distance value on the Set Distance box from the Filter Setting menu 4 Repeat step 3 for each channel 5 Perform all the time delays settings start the music reproduction and select the Fine Set box If you move the values in positive or negative except for the subwoofer in Fig 4 it i...

Page 42: ...tions see section 9 11 d Insert a CD playing a highly dynamic track e Select the Link function 5 move the cursor and increase the output channels level until one of the clipping LEDs turns on 1 move the cursor back of at least 2 3 dB check the value on one of the displays 3 f Increase the Master Volume 6 up to the maximum undistorted level taking it close to 0 dB g In case the signal is highly dis...

Page 43: ...rst slider on the left of the equalizer right click with the mouse moving on the equalizer sliders towards the right shaping the curve as you like see Fig 1 The Bit One software features 31 bands 12 dB graphic equalizer for each system channel In compliance with the ISO requirements frequencies are equally spaced at 1 3 Oct from 20 to 20kHz The graphic equalizer features four specific functions he...

Page 44: ...o apply on the general frequency response The Bit One will automatically perform a gradual interpolation of the data following the signal level and so acting according to the system listening volume Two operational modes are available 1 EASY MODE Insert a CD into the head unit and play a reference musical track Select the operational mode by clicking on Easy A semi automatic procedure starts up Mo...

Page 45: ...our right you can see the main screenshot showing a custom equalization To confirm the adjustments and enable the Dynamic Equalizer while listening to the music click on the X Fig 9 After enabling the Dynamic Equalization the Dynamic Equalization ON OFF provides the ability to turn on ON or off OFF the acoustic effect of the equalization while listening to music Fig 10 The Dynamic Equalization ON ...

Page 46: ... Save Current Preset it saves the memory you are operating on in a file that can be recalled pro format Copy Preset From it provides the ability to copy the content of one memory into another memory Current Preset Default it restores the crossover and equalization default values that would be proposed at the end of the set up procedure The following data will be stored into the presets the filter ...

Page 47: ...battery power you avoid a possible voltage difference in USB ground connection between car ground Bit One and earth PC 1 Bit One functioning problems If while tuning the system with the PC connected to the Bit One the device does not respond proceed as per the following steps a turn the Bit One off pushing the DRC knob or disconnecting the Remote IN or disconnecting the power supply cable for few ...

Page 48: ...e word bitone in both the LOGIN and PASSWORD box 5 Look for the most updated file showing the word firmware followed by four numbers and click on its specific symbol to start the download When requested save the file in your PC 6 Select the entry Update Firmware from the File menu the software will ask you to select the file that you have just downloaded from the Download Area or that you previous...

Page 49: ...nnect bit one device unplug power or terminate this application during updating process disable standby and energy saving features close all running applications disable anti virus and anti spyware systems 10 Launch the PC software still in RESCUE MODE If the firmware update has been correctly completed the dialog box will show the following indications new Bit One Firmware version v 1 5 0 0 new D...

Page 50: ...ings Click YES 13 Exit the program by clicking on CANCEL then turn the Bit One off 14 Turn the Bit One on Launch the Bit One PC Software v 1 5 and proceed clicking on Next following the standard setup and inputs outputs setting procedure see section 8 15 If necessary manually reload the settings of filters delays and equalizations that you previously wrote down or load again the previously saved s...

Page 51: ...ese operations will be repeated only if you want to set the Bit One processor with a system of inputs outputs different from those available in the Bit One memory After selecting the Target mode the software will display the following window notifying the data transfer from the Bit One to the PC 11 STARTING UP THE BIT ONE SOFTWARE IN TARGET MODE IN FINALIZED BIT ONES 11 ...

Page 52: ...tion Dynamic EQ activation if set MASTER source level control activation Volume control Default function Volume can be adjusted either by turning the main knob or pressing button 1 and then turning the knob The volume range goes from 60 min to 0 dB max To access to the right left balance push button 2 and turn the knob to adjust it To access to the front rear balance adjustment press button 3 and ...

Page 53: ...riginal level to correctly set it back to the level it was when it was initially tuned insert the SETUP CD into the head unit play track 1 and press the yes button on the DRC Now adjust the MASTER source volume until the cursor is on 0 and not over to avoid the clipping Brightness to adapt the DRC to the light conditions inside the car compartment you can adjust the display and the red switch beze...

Page 54: ...plifier The software for DRC firmware upgrade requires the correct installation of the Audison AC Link drivers inside the PC that will be used for the upgrade If the Bit One Management Software is already and correctly installed in the PC being used you do not need to install the Audison AC Link drivers again If the PC used for the DRC firmware upgrade is not the PC where the previous software ver...

Page 55: ...ch the software DRC_upgrade_firmware_1 50 exe 4 Wait for the PC to synchronize with the DRC scanning for devices 5 If the PC correctly synchronizes with the DRC click on DRC Upgrade to V 1 50 6 A warning pop up dialog box will appear indicating that you have to close all running programs disable screen saver disable energy saving modes disable anti virus softwares Click Yes 7 Wait until the upgrad...

Page 56: ...ADVANCED MANUAL Bit One 56 8 A pop up dialog box showing the message upgrade completed will appear Click on OK 9 Click on Quit to close the DRC Upgrade Software 12 ...

Page 57: ... can be connected to the 12V power supply while the other can be used to supply the Bit One 2 Put a 1A fuse in the SFC main power cable Input sampling Frequency resolution 86 x 37 x 80 3 3 8 x 1 1 2 x 3 1 8 Output sampling Frequency Introduction SFC is a digital audio signal adaptor S PDIF to place between two devices with digital input output The main purpose of this adaptor is to solve issues re...

Page 58: ...of the cable supplied with the DRC This extension becomes necessary in installations on particularly long vehicles such as the big SUV s Total length of the supplied cable with the extension is equal to 6 5 mt 225 90 CONNECTION PATTERN 13 DRC IN RJ12 female female adapter DRC ACLink cable 4 5m 177 16 in provided 2 m 78 74 DRC cable extension RJ12 ...

Page 59: ...hone IN Digital Coaxial Optical S PDIF Max 48 kHz 24 bit Output stage Low level Pre Ch1 Ch8 Digital ADLink Ch1 Ch8 S PDIF Connection From To Personal Computer 1 x USB B 2 0 To Audison Electronics 2 x ACLink control bus Crossover N 8 one each output channel Filter type Full High Pass Low Pass Band Pass Filter mode and slope Linkwitz 12 24 36 48 dB Butterworth 6 12 18 24 30 36 42 48 dB Crossover Fre...

Page 60: ...ADVANCED MANUAL Bit One 60 audison is a part of elettromedia 62018 Potenza Picena MC Italy www elettromedia it www audison eu ...

Reviews: