background image

PVR User Guide   

37

Direct Print

Direct Print provides a direct connect solution for the PVR to communi-
cate with the printers. If you connect PVR to a printer which supports DPS 
(Direct Print Services), then the photos stored in the PVR can be printed 
directly without needing a PC. It’s that easy!

Follow the steps below to print your photos:

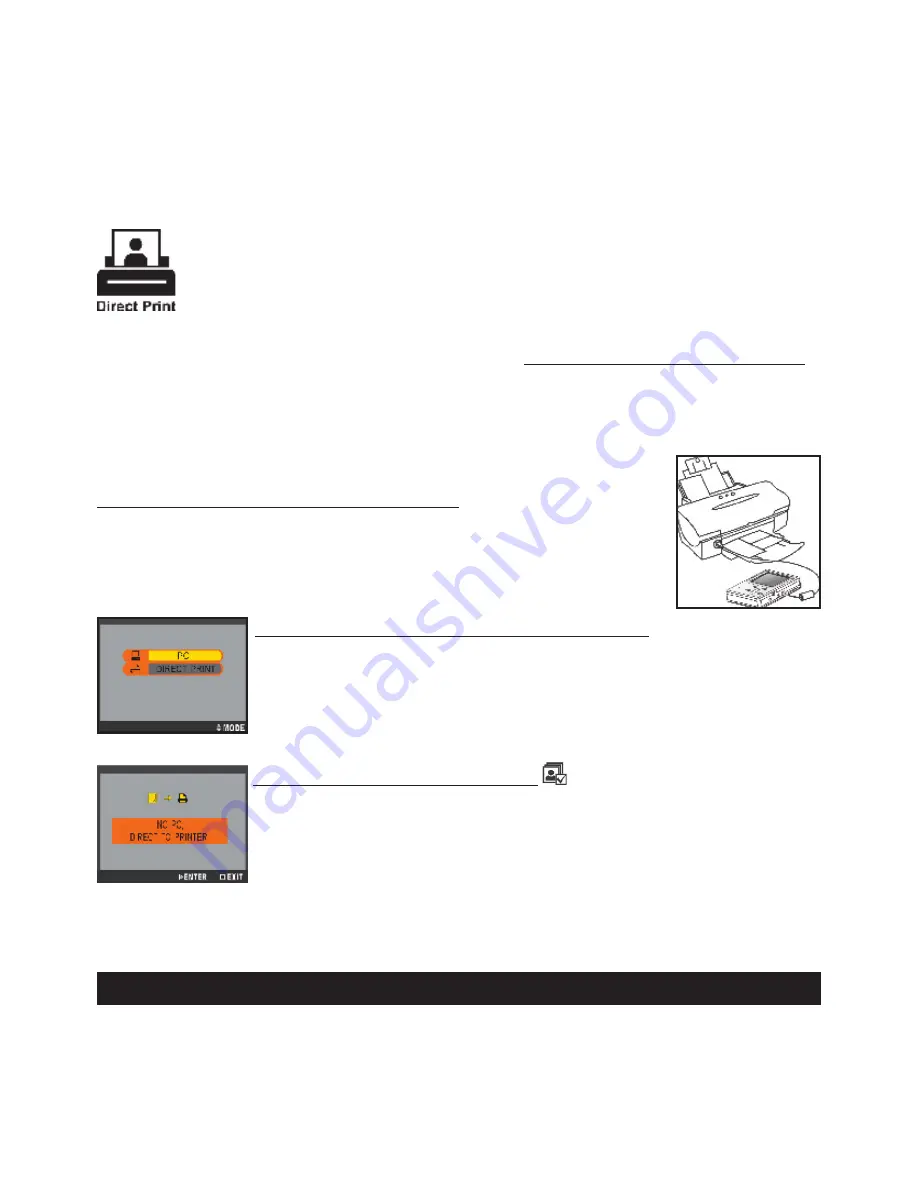
Step 1. Connecting to a printer

Power on the PVR. Connect one end of the included USB 
cable to the USB port of the PVR, the other end to the USB 
port of your printer. 

Step 2. Selecting DIRECT PRINT

Upon connecting the PVR to your printer, a mode selection 
screen appears. Press the MODE button to enter DIRECT 
PRINT. 

Step 3. Selecting Photos

A message appears reminding you not to connect to PC. 
Press the OK button to continue. The DPS menu appears. 
Press the OK button to enter SELECT PIC menu. 

Summary of Contents for PVR1000

Page 1: ...Personal Video Recorder PVR1000 Owner s Manual 128 7114 ...

Page 2: ... The battery used in this unit may present a risk of fire or chemical burn if not used as directed Do not separate recharge disassemble or heat above 100C 212F Battery replacement should be performed by qualified technicians Do not attempt to open the unit No user serviceable parts inside Keep the unit away from children Do not disassemble or dispose product in fire Use only the specified chargers whi...

Page 3: ... Files between PC and PVR 8 Converting and Transferring Files 8 Mass Storage Mode 9 Disconnecting the PVR from your COMPUTER 10 OSD Menu 12 A Photo Player 13 B Video Player 16 C Voice Player 19 D MP3 Player 23 E AV Recorder 27 F Slide Show 29 G Calendar 30 H Game 33 I Setup Menu 35 Direct Print 37 Specifications 40 ...

Page 4: ...G 4 videos View JPEG images Record digital videos Record digital audio Listen to MP3 files Use it as an USB Portable Disk Use it as a SD MMC card reader Record TV shows MPEG 4 compatible ASF file format Print photos directly without attaching to a PC DPS ready Use it as an alarm clock Convert multiple video file formats into MPEG4 compatible ASF format ...

Page 5: ...lease the scroller to go to previous next item in Photo Video Voice MP3 Player Mode F Fwd F Bwd Scroll up down and hold the scroller to speed up the playing of advancing reversing in Video Voice MP3 Player Mode Volume Up Down Press the button and then scroll up down to adjust the volume during playback in Video Voice MP3 Player mode 2 Hold Switch to to lock unlock the buttons including the scrolle...

Page 6: ...phone jack 7 USB port 8 SD MMC CARD slot 9 Battery Cover 10 Mode button Press the Mode button to switch to different modes 11 Speaker 12 Record Vol button 13 Microphone A built in microphone for voice record 14 Power button 15 Menu Stop button Use this button to call up the menu under each mode 16 Play Pause OK button ...

Page 7: ...ick OK to continue 3 A Welcome dialog box appears Click Next 4 The Select Components dialog box appears Click and select the software you want to install and then click Next 5 The Select Program Folder dialog box ap pears telling you that setup program is about to add a program icon to your system you can change the folder name listed in the text box or simply click Next to continue 6 The Start Co...

Page 8: ...B cable provided in the package The following appears Then the Multimedia Converter dialog box appears 2 Press Browse button to select the path where your files reside The files will be listed as thumbnails in the Source field 3 Press Browse button to select the path where you temporary files will reside before uploading to PVR 4 Press Convert button The conversion starts Note The Multimedia Convert p...

Page 9: ...ode you can copy move or delete files pictures exactly the way you manipulate files in Windows user interface Note Do not put the files you want to play on the PVR via Mass Storage Mode For those files you want to play on the PVR use only the Multimedia Converter to convert and upload For MAC Users Mac OS 9 x and 10 1 above By connecting your PVR to a MAC computer refer to the previous page it will au...

Page 10: ...from the menu Windows 2000 ME 1 Click Unplug or Eject Hardware icon in the taskbar 2 Select Stop USB Mass Storage Device from the menu Windows 2000 Select Stop USB Disk from the menu Windows ME Windows 98SE 1 In My computer right click on the removable disk cor responding to the player 2 Select Eject from the menu Mac OS 9 1 and 10 X above 1 Select the player icon shown as NO_NAME or untitled driv...

Page 11: ...don t want to keep the files on your PC for backup check the option de lete temporary file s after the transfer then the files saved in the temporary files folder will be deleted after uploading to PVR The Destination window will be disabled if there is no PVR connected If the PVR is connected to your PC you will see 4 folders labeled PHOTO VIDEO AUDIO and MP3 in this window The folders are automatica...

Page 12: ...PVR only the external memory can be read For better playback speed and viewing quality all the photos converted by Multimedia Converter will be resized to 640 x 480 pixels to fit the PVR screen resolution The PVR calendar can record the date up to the year 2036 The timer record and alarm clock setting can be preset within 24 hours Only one song can be set for alarm clock music If you pick up a song...

Page 13: ...Photo menu contains the following Display MULTIPLE SINGLE photo display Press OK button to enter Display setting Scroll up down to select the preferred setting and press the center but ton of the scroller to confirm Attach Voice Scroll down and press the center button of the scroller to enter Attach Voice setting A message will show on the bottom of the screen Scroll up down to select the photo you...

Page 14: ... of the scroller to enter Effects setting Scroll up down to select your preferred effect and then press the center button to confirm PVR will then apply the effect to the selected photo Once the effect has applied it can t be cancelled or restored to the previous mode Information ON OFF Scroll down and press the center button of the scroller to enter Information setting Scroll up down to select eit...

Page 15: ...g A message will prompt asking if you want to delete the photo press the center button of the function scroller to delete Otherwise you may press STOP button to cancel Delete All Scroll down and press the center button of the scroller to enter Delete All setting A message will prompt asking if you want to delete all the photos in this folder press the center button of the scroller to delete all Ot...

Page 16: ...ayback Scroll up down and hold the scroller to speed up the playing of advancing reversing during playback To return to the normal play release the scroller Scroll up down and release the scroller to go to previous next video clip during playback Press button to pause the playing during playback Press the button and scroll up down the scroller to adjust the volume during playback Press button agai...

Page 17: ...er to start The se lected song will then be repeated playing back To return to a normal play select NORMAL in Repeat setting To repeat A B Scroll down and press the center but ton of the scroller to enter Repeat setting Scroll to A B and press the center button of the scroller to confirm Press MENU button to exit Scroll up down to select a video you want to review Press button to start the playback...

Page 18: ...formation setting Scroll up down to select either to enable or disable the information display and then press the center button of the scroller to confirm When the information display is disabled there won t be any indicators or key instructions shown on the screen except low battery indicator Delete One Scroll up down and press the center button of the scroller to select a video you want to delete...

Page 19: ...ayback To return to the normal play release the scroller Scroll up down and release the scroller to go to previous next audio clip during playback Press button to pause the playing during playback Press button to start recording audio clip wav file Press button and scroll up down the scroller to adjust the volume dur ing playback Press button again to complete the volume adjustment Press MENU butto...

Page 20: ...nds Repeat NORMAL ONE ALL A B To repeat one Scroll up down and press the center button of the scroller to select a song you want to repeat Press MENU button and scroll to ONE The selected song will then be repeated To return to a normal play select NORMAL in Repeat setting To repeat all Scroll down and press the center but ton of the scroller to enter Repeat setting Scroll to ALL and press the cen...

Page 21: ...aying back between point A and B To cancel the playback press to stop Alarm Clock Scroll up down and press the center button of the scroller to select a song Press MENU button and scroll to Alarm Clock setting and then press the center button of the scroller to enter Again press the center button of the scroller to set the time Scroll up down to set the HOUR and then press the center button of the...

Page 22: ... want to delete Press MENU button and scroll to Delete One Press the center button of the scroller to enter Delete One setting A message will prompt asking if you want to delete the song press the center button of the scroller to delete Otherwise press STOP button to cancel Delete All Scroll down and press the center button of the scroller to enter Delete All setting A message will prompt asking i...

Page 23: ...ic Press button to stop playing during playback Scroll up down and hold the scroller to speed up the playing of advancing reversing during playback To return to the normal play release the scroller Scroll up down and release the scroller to go to previous next song dur ing playback Press button to pause the playing during playback Press button and scroll up down the scroller to adjust the volume d...

Page 24: ...s the center button of the scroller to confirm Scroll down the scroller to SAVE and press the center button of the scroller to keep the setting Search Scroll down and press the center button of the scroller to select Search Press button the search starts The PVR will play each of the songs in this folder for 5 seconds Repeat NORMAL ONE ALL A B To repeat one Scroll up down and press the center butto...

Page 25: ...l to A B and press the center button of the scroller to confirm Press MENU button to exit Scroll up down to select a song you want to listen Press button to start the playback The button will be labeled SET A at this time press the button to set the start point of the repeat playback The will then be labeled SET B press button again to set the end of the playback The song will be repeated playing b...

Page 26: ...enter Delete One setting A message will prompt asking if you want to delete the song press the center button of the scroller to delete or press STOP button to cancel Delete All Scroll down and press the center button of the scroller to enter Delete All setting A message will prompt asking if you want to delete all the songs in this folder press the center button of the scroller to delete all Other...

Page 27: ... To exit the menu press MENU again The AV Recorder menu contains the following Timer Record TIME LENGTH Press the center button of the scroller to enter Alarm Clock setting Press the center button of the scroller to set the time Scroll up down to set the HOUR and then press the cen ter button of the scroller to confirm and continue Scroll up down to set the MINUTE and then press the center button o...

Page 28: ... of the scroller to confirm When the information display is disabled no indicators or key instructions will be shown on the screen except low battery indicator LCD Off It s recommended to turn the LCD display off to conserve power during the timed recording While the PVR is wait ing for timed recording the blue LED will keep blinking reminding you that the timed record has been activated To turn th...

Page 29: ... Press button to stop the slide show during playback Press MENU button to enter the Slide Show Menu To exit the menu press MENU again The Slide Show menu contains the following Interval Press the center button of the scroller to enter Interval setting The default timing between slides is set to 5 seconds To change the setting press the center button of the scroller and then scroller up down to inc...

Page 30: ...the screen except low battery indicator G Calendar This PVR can serve as an electronic calendar To enter the Calendar category Press the MODE button or scroll down the scroller to select and then press the center button of the scroller to enter The calendar will display To switch to clock view press MENU button The Calendar menu contains the following Calendar Clock Press the center button of the ...

Page 31: ...n to change the YEAR and then press the center button of the scroller to confirm and continue Step 2 Scroll up down to change the MONTH and then press the center button of the scroller to confirm and continue Step 3 Scroll up down to change the DAY and then press the center button of the scroller to confirm To record the change you ve made scroll down to SAVE and press the center button of the scroll...

Page 32: ...ess the center of the scroller or press OK button to confirm and continue Step 2 Scroll up down to change the MINUTE and then press the center of the scroller or press OK button to confirm and continue Step 3 Scroll up down to change the SECOND and then press the center of the scroller or press OK button to confirm To record the change you ve made scroll down to SAVE and press the center button of th...

Page 33: ... TAC TOE Scroll up down and then press the center of the scroller or press OK button to choose if you want to start the game first or let the PVR go first The first player is The other one is Press the center of the function scroller or press OK button to start Select the square you want to place your symbol or in by scrolling up down and then press the center of the function scroller or press OK to ...

Page 34: ...ith the floating frame and then press the center of the function scroller or press OK button to confirm Players have to arrange all the numbered square in sequence within 50 seconds Only the squares next to the empty frame can be moved To stop the game during playing press button any time ...

Page 35: ...Scroll up down and press the center button of the scroller to enter each item The Setup Menu contains the following STARTUP SOUND OFF ON Scroll up down to turn off on the startup sound and then press the center button of the scroller to confirm STARTUP SCRN OFF IMAGE Scroll up down to disable enable startup screen and then press the center button of the scroller to confirm AUTO LCD OFF 30 Sec 1 Min ...

Page 36: ...se Press the center button of the scroller to confirm BEEP ON OFF Scroll up down to turn on off the beep and press the center button of the scroller to confirm FORMAT When you choose the format option a mes sage will prompt asking if you want to format or not press the center button of the scroller to confirm Otherwise press STOP button to cancel ...

Page 37: ...below to print your photos Step 1 Connecting to a printer Power on the PVR Connect one end of the included USB cable to the USB port of the PVR the other end to the USB port of your printer Step 2 Selecting DIRECT PRINT Upon connecting the PVR to your printer a mode selection screen appears Press the MODE button to enter DIRECT PRINT Step 3 Selecting Photos A message appears reminding you not to c...

Page 38: ...e scroll to confirm All the photos will then be selected Step 4 Enhancing Photo Quality Scroll down to OPTIMAL The default is set to OFF To change the setting press the center button of the scroller and scroll down to select ON Press again the center but ton to confirm Note If you don t want to change the setting you may skip this step or select CANCEL in its menu Step 5 Setting the Number of Copies...

Page 39: ... the center button and scroll up down the scroller to the pre ferred paper Press again the center button to confirm Step 6 3 Setting Borders Scroll down to BORDER To change the border setting press the center button and scroll up down the scroller to either add the border cancel the border or keep the photo in its original Press again the center button to confirm If you are satisfied with the PAPER S...

Page 40: ...n TV System NTSC PAL DPS Support Yes supports Direct Printer Services Audio Effects POP Jazz Classic Bass Rock Interface USB AV In Earphone DC in Memory Card Slot SD MMC Internal Memory Built in 32MB Preformat Space File Format ASF video JPEG photo MP3 WAV audio Power Rechargeable Li ion Battery x1 Power Adapter Mass Storage Windows 98SE 2000 Me XP Mac OS 9 X and 10 1 above Dimensions 96 L x 77 W ...

Page 41: ...an approved warranty station For the location of the nearest warranty station to you call toll free to our control office 1 800 290 6650 This Warranty does not extend to the elimination of externally generated static or noise to correction of antenna problems to costs incurred for installation removal or reinstallation of the product or damage to tapes discs speakers ac cessories or electrical syst...

Page 42: ...AGES FOR BREACH OF THIS OR ANY OTHER WARRANTY EXPRESS OR IMPLIED WHATSOEVER No person or representative is authorized to assume for the Company any liability other than expressed herein in connection with the sale of this product Some states do not allow limitations on how long an implied warranty lasts or the exclusion or limitation of incidental or consequential damage so the above limita tions ...

Reviews: