background image

12

DPF710K

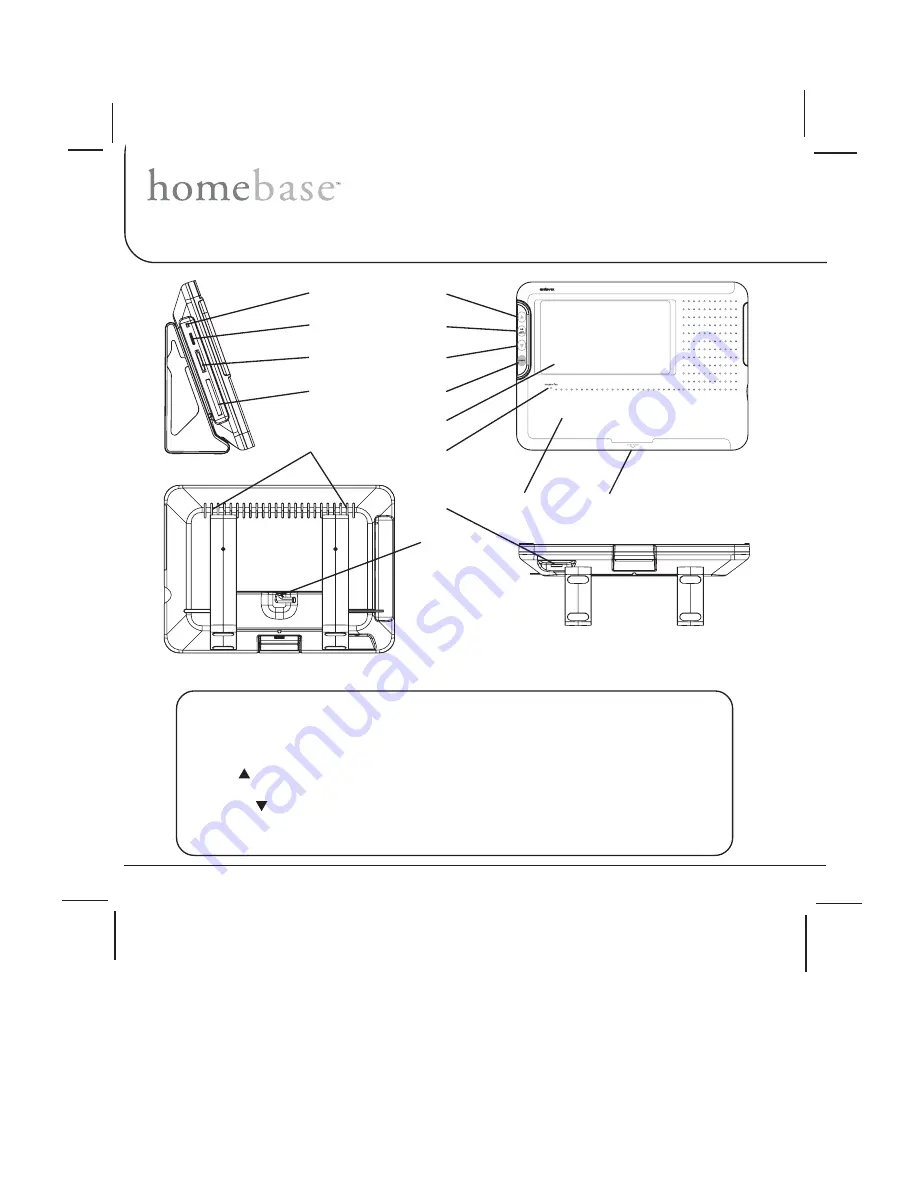
Controls, Indicators and Connectors

1. Power On/Off Switch
2.

USB

Connector

3.

SD/MMC/MS/XD

Connector

4.

CF

Connector

5. Up (

) Navigation Button

6.

OK

/

MENU

Button

7. Down (

) Navigation Button

8.

MEMO

Button

9. LCD Display

10. LED Indicator
11. Memo Writing Surface
12. Microphone
13. Speakers
14.

Control

15.

DC

Input Connector

1

2

3

4

5

6

7

8

9

10

12

11

13

14

15

Summary of Contents for HOMEBASE DPF710K

Page 1: ...DPF710K...

Page 2: ...s Indicators and Connectors 12 Accessory Placement 13 Operating the Homebase 14 Preliminary Connections 14 Connecting the Power 14 Inserting the Memory Card USB Device 14 Power On Main Menu 15 Prelimi...

Page 3: ...should be cleaned as needed with a soft non abrasive cloth 7 Object and Liquid Entry Care should be taken so that objects do not fall and liquids are not spilled into any openings or vents located on...

Page 4: ...its internal memory a memory card or USB memory devices Record and retrieve audio messages Use the calendar to set audio and or event reminders Display time and date Use a timer set an alarm Leave a w...

Page 5: ...volume control Magnetic border for posting notes coupons etc LED indicator lights when there s a message Erasable white board and dry erase marker for quick notes and messages Post it notes for lists...

Page 6: ...net 2 homebase Wall Mount Bracket 1 Adhesive Foam Pad 2 Post It Note Pad 1 Dry Erase Marker 1 Flat Head Self Tapping Screw 2 AC to DC Power Adapter 1 Double Sided Tape 1 Wire Management System 3 Black...

Page 7: ...erence to the AC wall outlet Place the DC wire in the corresponding wire notch 7 Check the amount of wire required to reach the AC outlet Spool excess wire on the four posts inside the rear cavity of...

Page 8: ...e rear cavity of the homebase 5 Attach each angle mount bracket to the homebase by lining up the individual angle mount bracket upper mounting tab with the associated homebase mounting hole 6 Push eac...

Page 9: ...ert two flat head screws and secure the wall bracket to the wall 4 Connect the power adapter plug to the DC input connector at the rear of the homebase 5 Choose the direction of the adapter wire in re...

Page 10: ...and secure the bracket to the wall 4 Connect the power adapter plug to the DC input connector at the rear of the homebase 5 Choose the direction of the adapter wire in reference to the AC wall outlet...

Page 11: ...the front panel by engaging the right side under the protruding lip then slightly bow the panel out and slide the left side under the lip by the control buttons 8 The battery backup feature should now...

Page 12: ...tor 3 SD MMC MS XD Connector 4 CF Connector 5 Up Navigation Button 6 OK MENU Button 7 Down Navigation Button 8 MEMO Button 9 LCD Display 10 LED Indicator 11 Memo Writing Surface 12 Microphone 13 Speak...

Page 13: ...DPF710K 13 Accessory Placement Post It Note Pad Dry Erase Marker Note Pad Storage Receptacle Marker Storage Receptacle homebase...

Page 14: ...he power input connector and the routing and dressing of the adapter power cable The figure below illustrates a typical installation Inserting the Memory Card USB Device All of the memory devices atta...

Page 15: ...is connected otherwise the homebase demonstration demo slide show will start Note The demo slide show images can be erased 2 If the slide show is displayed and the OK MENU button is pressed the main m...

Page 16: ...n button and press OK Record is active Highlight the desired memo and press OK the play erase keep keep as new options appear on the screen Note Unplayed memos are displayed in green exit play erase e...

Page 17: ...ns for 2 seconds advances to the next month Highlight event memo and press OK Press OK and use the up down buttons to highlight the event type Press OK to set it on or as a yearly reminder the event i...

Page 18: ...e up down buttons and press OK Press the OK button and use the up down buttons to highlight voice or event memo 2 Reviewing Calendar Memos Highlight voice memo and press OK Note Pressing erase all wil...

Page 19: ...itiating the count down sequence e To terminate the countdown prior to timeout press the OK button f If the countdown is allowed to time out time s up appears above the digits the display automaticall...

Page 20: ...ages on a connected external media card prioritizing SD MMC xD MS over USB and CF See External Media Menu Highlight photo library using the up down buttons and press OK to access photos stored in the...

Page 21: ...lect exit and press OK to display full screen slide show 1 Single Slide Display Stops slide show and displays only selected picture To resume the slide show turn the Single Slide Display function to o...

Page 22: ...option Press OK Press OK yes no options appear If yes is selected the current slide picture is copied into internal memory Use the up down buttons to highlight the next option Press OK exit next copy...

Page 23: ...wn buttons and press OK and press OK 1 Photo Mode Select between normal mode and wide screen 2 Activation Time Set a time for the unit s display to turn off and turn on to conserve energy Pressing any...

Page 24: ...M indication and press OK f On the top date line above the time the month indication now flashes use the up down buttons to set the month and press OK g Flashing now advances to the day of the month i...

Page 25: ...shing b Use the up down buttons to set the hour and press OK c The minutes digits are now flashing use the up down buttons to set the minutes and press OK d The AM PM indication now flashes use the up...

Page 26: ...d press OK exit memo alarm time date setup clock display general setup screen bottom edge large centered split screen off The clock can be positioned at the bottom edge of the screen in large letters...

Page 27: ...a e F k c o l C d n a r a d n e l a C l a t i g i D e m i T e t a D g n i d r o c e r o i d u a l a t i g i d r o f e n o h p o r c i m l a n r e t n I s e g a s s e M e c i o V l o r t n o c e m u l...

Page 28: ...d through alteration improper installation mishandling misuse neglect accident or by removal or defacement of the factory serial number bar code label s THE EXTENT OF THE COMPANY S LIABILITY UNDER THI...

Page 29: ...DPF710K 29 Notes...

Page 30: ...30 DPF710K Notes...

Page 31: ...DPF710K 31 Notes...

Page 32: ...DPF710K 128 8269B Audiovox Electronics Corp 150 Marcus Boulevard Hauppauge NY 11788...

Reviews: