background image

21

Horizon NavMate 5

4.

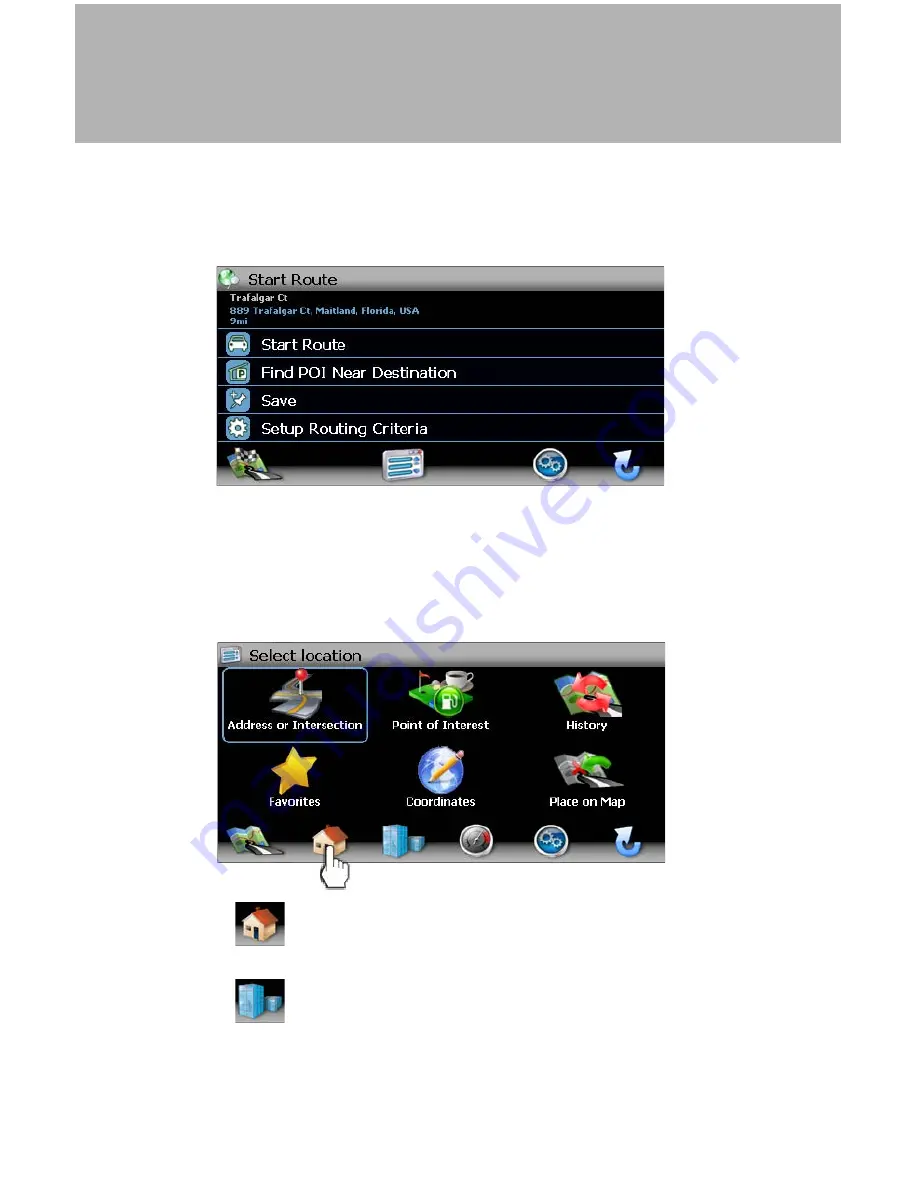
Select an address from the “Select” list to view the “Start Route” screen, 
where you can begin navigation, save the address for later, select a 
different POI or modify routing criteria.

Navigating to your Home or Office Address

Located on the “Select location” screen, the 

Home Address

 and 

Office 

Address

 buttons allow you to quickly navigate to your home or office address 

from your current location. 

Touch the 

 (Home Address)

 icon to navigate to a saved home 

address.

Touch  the


 (Office Address)

 icon to navigate to a saved office 

address.

Summary of Contents for Advent ADVUV630

Page 1: ...DEST NAV PWR VOL A V INPUT ADVUV630 NavMate 5 Navigation Instructions...

Page 2: ...0 uses a vehicle GPS Global Positioning System based navigation device which utilizes digital map data to guide you from your selected location A to location B using location information obtained from...

Page 3: ...rs will not work underground or in some enclosed spaces Horizon NavMate Navigation Tele Atlas Map Data The ADVUV630 is pre loaded with Horizon NavMate 5 and Tele Atlas map data The map data covers the...

Page 4: ...vehicle passenger should operate the device while the vehicle is moving When driving the need to view the display is minimal Voice prompts will guide you to your destinations It is your responsibility...

Page 5: ...vents l Traffic congestion While every attempt is made to ensure that the database is accurate roadways points of interest and business and service locations may change over time Do not use the ADVUV6...

Page 6: ...n on verify that the GPS indicator is green It may take up to 5 minutes to establish the first connection Subsequent connections will be faster 30 seconds to 1 minute but if you have not used the unit...

Page 7: ...ard Command Buttons Press to backspace Press to switch to City Name entry Press to switch to Street Name entry Press to switch to Postal Code entry Press to add a space when entering a multi word loca...

Page 8: ...r entries with more than one word For example to locate Lake Mary enter Lake_ and then the M will become available for selection Selecting from Lists You will often find it necessary to select items f...

Page 9: ...8 Horizon NavMate 5 NOTE Some lists keep track of the five most recently used selections which are placed at the top of the screen This feature allows you to quickly select popular choices...

Page 10: ...vious screen Press the Menu icon to access the Main Menu After panning map press to view a list of locations near the selected posi tion Press to repeat voice prompt Press to go up one line item while...

Page 11: ...to previous destination Favorites Travel to favorite location Coordinates Travel to destination specified by coordinates Place on Map Browse map to choose destination Home Address Return to Home Addre...

Page 12: ...rest POI and then choose them for routing and navigating The map knows two basic states Tracking and Browsing Map Tracking Screen During navigation the screen displays your route in yellow and your su...

Page 13: ...the Main Menu press the button To add a POI destination to your route press the button For one way streets the transit direction is indicated with a red arrow For more information about navigation se...

Page 14: ...to access Map Browsing Mode Use a stylus or your finger to browse the map Your position is identified as the center of the crosshair To zoom in or out press the or icons To return to the map tracking...

Page 15: ...browsing you can click the button to switch between 2D default 3D and Split Screen map views Trip Computer The Trip Computer provides information about your vehicle speed trip related timing elevatio...

Page 16: ...etailed readings for each field Press the Press the buttons on the right side of the screen to navigate the list Use the buttons to move through the list page by page Touch the marked item to select i...

Page 17: ...resume or the X to cancel and go to the Main Menu Finding an Address Access the Select location screen to begin locating an address If you cannot see the Select location screen press the button The S...

Page 18: ...et name is recognized you will automatically be prompted for the street number 3 Enter the street number using the same method described above 4 Press the button to select the street number and access...

Page 19: ...e by page Press the Garbage Can icon to delete the highlighted item 3 Press to select a recent destination from the History list and view the Start Route screen 4 Continue navigation as instructed in...

Page 20: ...ur Address Book Trail Book My POI or Trip Book lists Coordinates Press the Coordinates button to route to a destination by directly entering latitude and longitude values Place on Map 1 Press the Plac...

Page 21: ...art of the map area to enter browsing panning mode and navigate the map Use the buttons to zoom in out 3 Press the button to view and select the address nearest the crosshair or press Quick POI to loc...

Page 22: ...I or modify routing criteria Navigating to your Home or Office Address Located on the Select location screen the Home Address and Office Address buttons allow you to quickly navigate to your home or o...

Page 23: ...erred home or office address and save it for future use Choosing a Location from your Address Book 1 On the Select location menu press Favorites 2 Press Address Book to view a list of Address Book ent...

Page 24: ...lowing a Trail The Trail Book feature allows you to create a path using map points when navigation data is not available To navigate to a saved Trail perform the following steps 1 Press the button to...

Page 25: ...choose any Waypoint as the stating point 6 Choose Start Route from the Start Route screen 7 The system will display a dotted line from your current location to the starting point Follow the dotted lin...

Page 26: ...h Press the State or Province button to select a different State or Province See Address or Intersection on page 75 Searching for a Specific POI To narrow your list of POI search results you can enter...

Page 27: ...based on the characters you entered the city name will appear at the top of the screen 3 Press the button to select the City and return to the Point of Interest menu Select POI Name To retrieve a ver...

Page 28: ...ieve a list of POI s within the parameters you entered Press the buttons on the right side of the screen to navigate the list Use the buttons to move through the list page by page 3 Press to select a...

Page 29: ...he screen to navigate the list Use the buttons to move through the list page by page 3 Press to select a POI destination and access the Start Route screen Using My POI The My POI feature allows you to...

Page 30: ...ites menu If no custom POI categories exist the system will display No POI Found Add Press the green check mark button to go directly to the Add Cate gory screen and continue with Step 4 If personal...

Page 31: ...Category name and go to the Setup Display screen 5 Determine map indicators and settings for your new Category Name Press to edit the POI category name Marker Press to select the marker that will repr...

Page 32: ...y Edit Delete at My POI Category or Destination The following options are available using the buttons at the bottom of the Category and My POI screen Rename the highlighted POI category or destination...

Page 33: ...wing sequence of menu buttons Favorites My POI from the Select location menu 8 Press Category to view custom POI categories 9 Highlight the category to which you would like to add a destination Press...

Page 34: ...you are adding the first POI destination for the selected category press the green check mark button after the No POI Found Add message to view the Save location screen If at least one POI destinatio...

Page 35: ...nformation about your POI Press the name address icon to edit the name of your POI Press the category box to select a custom category for your new POI Press the phone number icon to use the on screen...

Page 36: ...Guidance After choosing a destination the system will determine a route based on your preferences in the Setup menu See Setup Menu on page 112 The status bar at the top of the screen indicates the ro...

Page 37: ...automatically recalculate the route and prompt you to get back on track to your destination You can disable this feature by checking the Auto Recalculation option off X in the Setup menu under Setup...

Page 38: ...e commands To browse during navigation touch and hold the screen to activate the Map Browsing feature Press the button to return to on screen navigation Adding a Detour If you are unable to complete t...

Page 39: ...m the on screen list 4 The NavMate software will recalculate the route based on your chosen Detour information Arriving at your Destination When you are near your destination the destination is indica...

Page 40: ...all After entering an address or searching for a POI you can choose the Save option to bookmark your selection eliminating the need to perform repeated searches Edit Address Book The Address Book feat...

Page 41: ...Book screen appears Press the buttons on the right side of the screen to navigate the list Use the buttons to move through the list page by page Press the icon to rename the highlighted address book e...

Page 42: ...Save location screen appears 2 Refer to information in the section titled Selecting a Destination on page 75 to locate the home or work address on the map Using the Trip Book The Trip Book is a collec...

Page 43: ...exist continue to step 2 2 Press the button to create a new Trip or the button to edit an existing Trip 3 After pressing the button to create a new trip you will see the Enter Name of Trip screen sho...

Page 44: ...Instead of the navigation screen the Select Trip to add destination screen appears Press the name of the trip to which you would like to add this new destination 7 Add additional destinations to your...

Page 45: ...n to select the trip name and view Trip Book destinations for that trip 3 Use the buttons at the bottom of the screen to make changes to your trip destinations or to add a new destination Press the bu...

Page 46: ...s the green check mark to confirm deletion Using the Trail Book The Trail Book option allows adding editing and Setup display for trail book entries The Trail Book allows you to track off road navigat...

Page 47: ...ion press the Trail Book button on the Favorites menu If no trails exist the system will display There are no trails Add Press the green check mark button to go directly to the Name Trail Book Entry s...

Page 48: ...to enter the name for your Trail See Using the Keyboard on page 66 5 Press the button to save the Trail name and go to the Setup Display screen 6 If you d like to modify the trail name press the penc...

Page 49: ...d return to the Setup Display menu 9 Press Scale to set the map scale display preference for this trail 10 Press the green check mark next to each scale setting to make your trail visible at that scal...

Page 50: ...waypoint and then press to save and return to the navigation map 15 Continue adding waypoints along the way until your trail is complete 16 If desired press Waypoints to edit waypoints on your trail...

Page 51: ...rites Trail Book from the Select location menu 2 Highlight the trail you want to edit Press the buttons on the right side of the screen to navigate the list Use the buttons to move through the list pa...

Page 52: ...menu 2 Highlight the trail you want to delete Press the buttons on the right side of the screen to navigate the list Use the buttons to move through the list page by page 3 Press the icon to delete t...

Page 53: ...nge your map orientation You can also edit display settings including the display of on screen navigation icons To get started press the button on the Select location menu You can always press the but...

Page 54: ...select which and how many icons are displayed on the map or to change the map orientation press Display Options on the Setup menu Heading Up North Up Heading Up This mode will display the map with th...

Page 55: ...he initial screen and be required to review safety information in the chosen language Voice Guidance Press to choose from the following available languages for voice guidance English USA TTS Callie En...

Page 56: ...Day Night Settings menu press to select Day or Night mode shown below Press Auto to allow the mode to be chosen automatically based on the time of day Setup Quick POI Choose a category to be displayed...

Page 57: ...ify the volume of voice commands Press the button to increase the volume Press the button to decrease the volume Press the Sound Mute button to silence or resume the voice command volume GPS Diagnosti...

Page 58: ...eset to reset specific parameters to factory default settings and delete stored locations 1 Click the red circled X to select the parameters you want to reset A green check mark will appear 2 Click th...

Page 59: ...In that case search for a known address nearby and browse the map I cannot get a good signal Poor antenna place ment If you have problems getting a satel lite fix with GPS you can see how many satelli...

Page 60: ...59 Horizon NavMate 5...

Page 61: ...Audiovox Electronics Corporation Hauppauge NY 11788 Technical Assistance 1 800 323 4815 www audiovox com 2011 Audiovox Ver 011911 Printed in China...

Reviews: