


HOLD BUTTON
– This button allows you to lock any new parameter settings you set to the effects. The
button LED will glow when the hold function is selected. When the hold selection is not active, any
changes to the effect parameters will be moment.
FILTER BUTTON
– This button is used to activate and deactivate the Filter effect. The Filter effect
tweaks the original sound to add different tonal definition. The effect is almost the same as the PHASE
effect.
SKID BUTTON
– This button is used to activate and deactivate the Skid effect. The Skid effect
simulates the sudden platter stop of a turntable, like pressing the stop button on a turntable.
22. CLEAR BUTTON
– Press CLEAR button, the button is lighted up, and then select the BANK buttons (1 ~ 4)
you would like to clear.
23. Y (FX2) BUTTON
– This button is used to adjust the parameter ratio value. You can push the Y button and
turn the JOG WHEEL to adjust the parameter ratio value.
24. TIME BUTTON
– The button will switch the time value described in the time meter between Elapsed
playing time and TRACK Remaining time.
25. SGL/CTN
– This function allows you to choose between single track play and continuous track play (all
tracks in order). With this button you can also switch AUTO CUE on and off, by pressing it for at least 1
second.
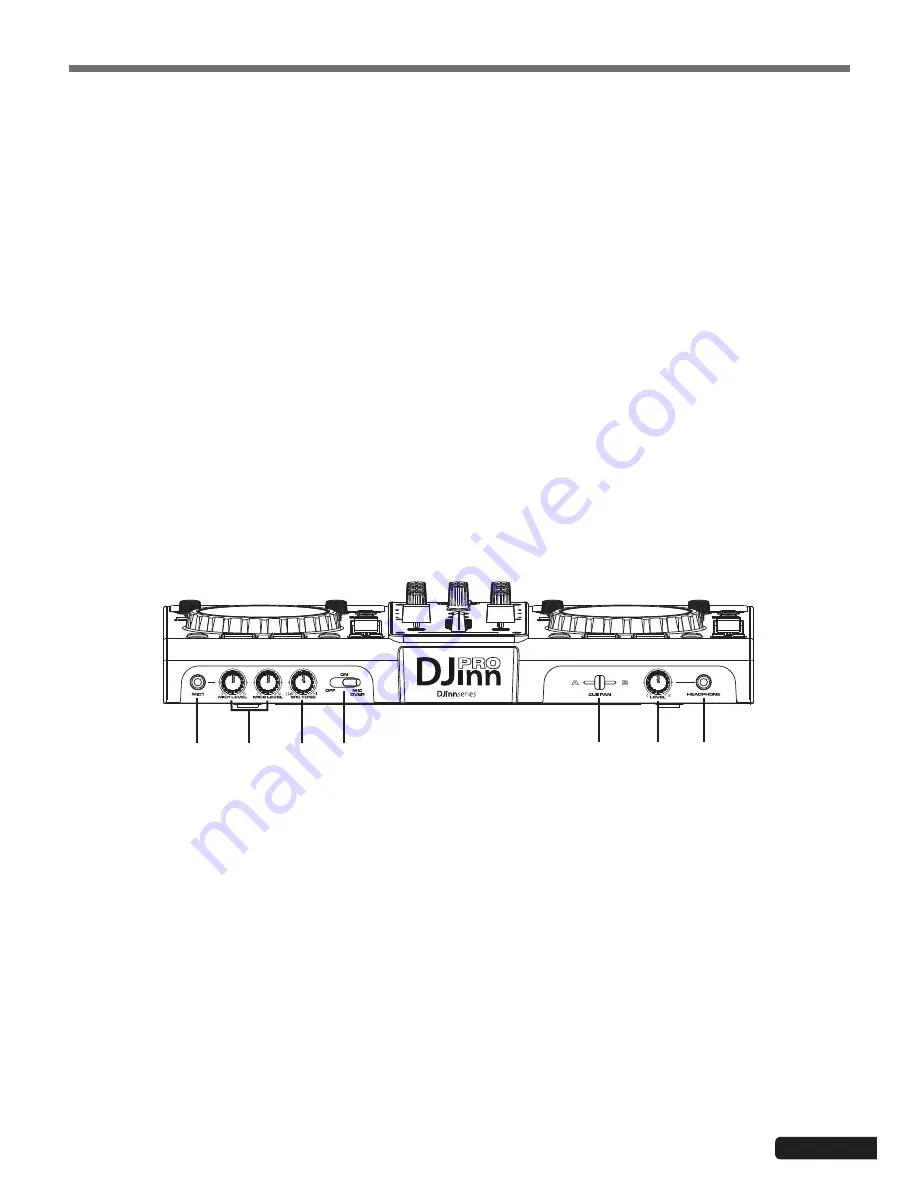
1. MIC 1 JACK
– This jack is used to connect a microphone to the mixer. Connect your microphone via 1/4
inch jack. The volume output level for microphone will be controlled by its own respective VOLUME KNOB.
2. MIC LEVEL CONTROL
– These rotary knobs control the output volume of MICROPHONE 1/2. However,
master volume is controlled by the MASTER VOLUME CONTROL.
3. MIC TONE CONTROL
– This rotary knob control the frequency response of MICROPHONE.
4. MIC ON/OFF/MIC OVER SWITCH
– To set MIC on and off, when switch at the
MIC OVER
position, the
mic1 and 2 on, the sound level for everything other than that from the MIC will decrease to around 20dB.
5. CUE PAN CONTROL
– This function allows you to monitor the CUE level as well as the Program (main
output) level in your headphones. When you turn the CUE PAN to the full left position, you will only hear
the CH 1 signal you playing, on the contrary you will only hear the CH 2 signal you playing. If the CUE PAN
KNOB is set to the center position, you can cue both the channels signal you playing.
6. CUE LEVEL CONTROL
– This rotary knob is used to adjust the headphone volume output level. Turn the
knob in a clockwise direction to increase the headphone volume.
7. HEADPHONES JACK
– This jack is used to connect your headphones to the device allowing you to
monitor the cue channel. Always be sure the CUE LEVEL VOLUME is set to minimum before you put the
headphones on.
FRONT PANEL
1
2
3
4
5
6
7
Front pannel
Djinn Pro -
Multimedia platform for mixing and playback
Page 7
EN


