background image


52


8


Audionet Metal Remote Control 

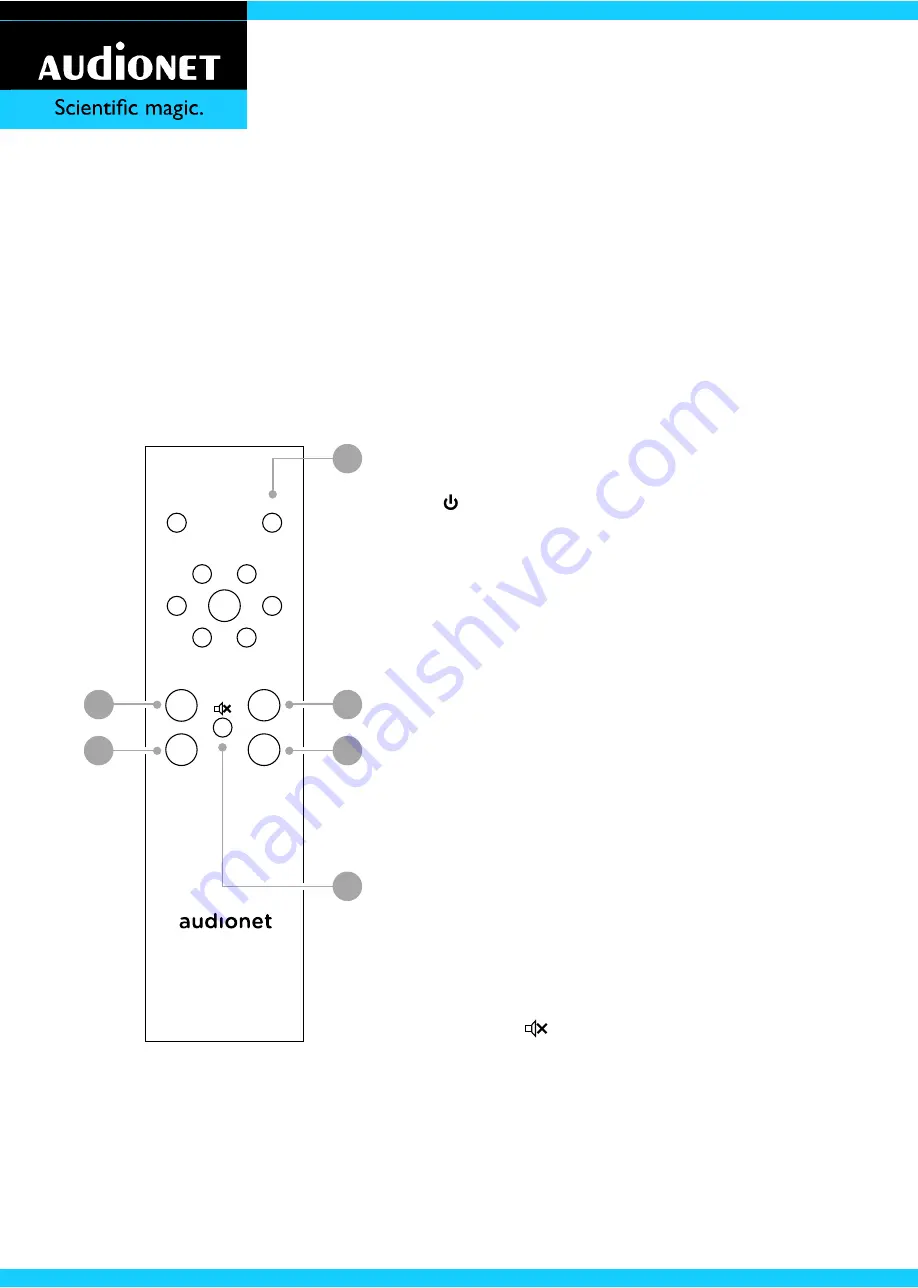
The Audionet Metal Remote Control controls all important functions of the eve-
ryday use of your HUMBOLDT. This chapter explains all commands in detail. 

8.1


Key assignment  

1


Power key HUMBOLDT


Use  the  key  '

HUMBOLDT

'  to 

switch  the  HUMBOLDT  on  or  off. 
This key has the same function as the 

 key on the front panel. If the unit 

is in stand-by mode, use the '

HUM-

BOLDT

'  key  to  turn  it  on.  If  the 

HUMBOLDT is already operating, a 
push  on  the  '

HUMBOLDT

'  key 

powers the unit down to stand-by. 

2


Key CH +


Selects the next input channel of the 
HUMBOLDT. 

3


Key CH -


Selects the  previous input channel of 
the HUMBOLDT. 

4


Key VOL +


Increases  the  volume  of  the  HUM-
BOLDT. 

5


Key


VOL -


Decreases the volume of the HUM-
BOLDT. 

6  Mute key


Mutes  the  HUMBOLDT.  Press  this 
key again to resume to the last vol-
ume level. 

CD 

HUMBOLDT 

/


 + 

 + 


CH 

VOL 

POWER 

Summary of Contents for HUMBOLDT

Page 1: ...User s Manual HUMBOLDT...

Page 2: ......

Page 3: ...3 HUMBOLDT Ultimate Analog Integrated Stereo Amplifier User s Manual HANDMADE IN BERLIN GERMANY...

Page 4: ...4...

Page 5: ...nputs and outputs 13 5 1 Line level inputs 13 5 2 Speaker terminals 13 5 3 Preamplifier outputs 14 5 3 1 Bi Amping 14 5 4 Audionet Link 15 6 Operating 17 6 1 Powering up 17 6 2 Switching on and off 18...

Page 6: ...Control 52 8 1 Key assignment 52 8 2 Changing the batteries 53 8 3 Settings for Audionet preamplifier 53 9 AN Ultimates Control App 55 10 Network setup 56 10 1 Connecting to a wireless network 56 10...

Page 7: ...inspire musical enjoyment and have an excellent reputation amongst all connoisseurs throughout the world Each and every one of our precision man ufactured devices is individually crafted by hand at ou...

Page 8: ...rs for serial ports Cover bag Gloves 2 pairs User s manual that you are currently reading Red warning note Fumigation certificate 1 2 Transport Important Only transport the HUMBOLDT in the original pa...

Page 9: ...9 2 Overview front panel 1 power key 2 rotary encoder 3 keys dynamically assigned functions 4 display I 4 3 2...

Page 10: ...ine in 3 8 line in 4 9 line in 5 10 balanced XLR out 11 line out 12 speaker terminal 13 WLAN antenna socket 14 serial port RS232 15 Audionet Link out 1 16 Audionet Link out 2 17 additional ground term...

Page 11: ...rack or onto a stable table Do not expose the unit to direct sunlight Do not place the HUMBOLDT in close range to heat sources like radiators Do not cover the ventilation openings on top of the HUMBO...

Page 12: ...DT is switched on Before you pull the power cord off its socket at the back panel power down the unit to stand by mode first The HUMBOLDT should only be switched off from the mains in cases of ex tend...

Page 13: ...5 for connecting signal sources at line level Due to its double mono design left and right channel input jacks are separated on the back panel Please connect the left and right input of the same numb...

Page 14: ...tput left and right channel each to connect the unit to additional ampli fier s e g for bi amping purposes or subwoofer The preamplifier outputs are always active and provide a volume controlled full...

Page 15: ...rt bi amping and how they have to be set up correctly 5 4 Audionet Link For your convenience the HUMBOLDT is able to switch all other Audionet units e g power amplifiers on or off that are connected v...

Page 16: ...ionet Link output to connect further Audionet devices to be controlled via Audionet Link in a daisy chain Connect the Audionet Link output to the Audionet Link input of the next unit using a simple op...

Page 17: ...onnect the HUMBOLDT to mains power The display shows a welcome message for a brief moment After that the HUMBOLDT is in stand by mode The display turns dark now The HUMBOLDT should only be switched of...

Page 18: ...HUMBOLDT on and off with the included Audionet Metal Remote Control For detailed information please refer to section Audionet Metal Remote Control on page 52 During powering down you may re start the...

Page 19: ...on page 25 Use the key to switch the HUMBOLDT on or off There is a circular op erating indicator around the key which lights up when the HUMBOLDT is up and running ready to play back music The five k...

Page 20: ...in dB during the change of the volume level as well as a bar graph of the volume in an enlarged manner for a better readability Several seconds after the last volume change the display will revert to...

Page 21: ...n page 10 2 Name of the currently selected input channel fully user definable see section Name on page 50 3 Current volume level in dB relative to the input level refer to previous sec tion Volume con...

Page 22: ...urrently selected input channel and its user defined name is highlighted in blue In order to actually switch to the selected input channel press the Select key If you would like to go back to the main...

Page 23: ...panel to mute or un mute the volume As well as during an input selection the HUMBOLDT uses soft muting The volume is stepped down gently to 80 dB Afterwards the outputs are switched off The displays s...

Page 24: ...e section Key assignment on page 52 Tip If you are within one of the setup menus and would like to mute the volume press the Home key first to get back to the main screen and press the Mute key afterw...

Page 25: ...ay All global settings are located within the setup menu Menu The global settings are applied to all input channels independently Press the Menu key on the front panel to enter the menu for the global...

Page 26: ...as well as on the selected menu item Use the rotary encoder and the Select key for navigating through the menus Turning the rotary encoder moves the triangular cursor up and down from one menu item to...

Page 27: ...Default assigned to the right most key beneath the display This key does always reset the currently edited setting to its factory default value In order to acknowledge and store the default value the...

Page 28: ...members your settings 7 1 Global settings Menu 7 1 1 Display Use the rotary encoder on the front panel to adjust the brightness of the display Turn clockwise to increase or turn counter clockwise to d...

Page 29: ...he left The value in the display turns negative HUMBOLDT allows a shift of the balance up to 9 dB to the left or the right The displayed bar graph visualises a balance shift to the left or the right s...

Page 30: ...the Auto Start function Turn the rotary encoder counter clockwise to disable the Auto Start function Global Settings Power Home Back Display Balance Power Serial By Pass Network Reset Info Select Aut...

Page 31: ...y Auto Power Off function when no input signal is detected for a period of 20 minutes on the currently selected input channel Turn the rotary encoder clockwise to activate the Auto Power Off function...

Page 32: ...Use this setting if the HUMBOLDT is not con nected to a home automation system On The serial port is active The HUMBOLDT is now controlled by a home automation system via the RS 232 interface Importan...

Page 33: ...ub menu By Pass consists of two menu items Input for By Pass and DC Servo for By Pass Global Settings By Pass Home Back Display Balance Power Serial By Pass Network Reset Info Select Input for By Pass...

Page 34: ...Mode to the factory default setting 0 No Input Confirm the change with the Save key afterwards Note The display shows 0 No Input if no input channel is selected for the By Pass Mode factory default I...

Page 35: ...ing to its user s manual 2 Do not connect the output for the front channels Left and Right to the power amplifier but to one of the free inputs of the HUMBOLDT instead 3 In the next step connect the o...

Page 36: ...elected in this menu item The signal at the input channel selected for By Pass Mode operations is passed through the HUMBOLDT at a level of 0 dB i e no change in volume level to the outputs As soon as...

Page 37: ...l switch to the last saved input channel selection and thus into By Pass Mode DC Servo for By Pass Turn the rotary encoder clockwise to activate the DC Servo during By Pass Mode Turn the rotary encode...

Page 38: ...ts output signal The DC Servo eliminates the DC component The input channel dedicated to the By Pass Mode is now AC coupled As factory default the DC Servo for By Pass Mode is acti vated Note The sett...

Page 39: ...onnec tion Turn the rotary encoder counter clockwise to switch off the wireless net work connection Global Settings Network Home Back Display Balance Power Serial By Pass Network Reset Info Select Wir...

Page 40: ...ess network module is active and provides a stand alone ac cess point see section Setting up the Access Point Mode on page 58 Wireless network module is active and connected to the selected wireless n...

Page 41: ...ge 4 refer to section Info on page 45 For information on how to setup the wireless network please refer to section Network setup on page 56 Global Settings Network Connection Home Back Display Balance...

Page 42: ...The HUMBOLDT will re boot automatically and is ready for the play back of music afterwards Important Do not disconnect the HUMBOLDT from mains power while the update process is running This menu item...

Page 43: ...ings The menu item Reset Network resets all network settings to their factory defaults After you press the Select button to choose one of the above listed reset meth ods HUMBOLDT will ask you to confi...

Page 44: ...leave with out resetting the HUMBOLDT After the confirmation of the resetting process a progress bar informs on the current status Also refer to the section Network trouble shooting on page 58 Factor...

Page 45: ...s an overview on all global settings Channel settings for the currently selected input channel are listed on page 2 Global Settings Info 1of 4 Home Back Display Balance Power Serial By Pass Network Re...

Page 46: ...ormation on the HUMBOLDT and its soft ware Device Name of the device Firmware Version number of the firmware Bootloader Version number of the bootloader Font Gfx Version number of fonts and graphics N...

Page 47: ...and alone access point see section Setting up the Access Point Mode on page 58 Connection Whether a network connection is stablished or not MAC MAC Address of the Device IP IP Address of the Device DH...

Page 48: ...channel To decrease the input level turn the rotary encoder counter clockwise instead The display informs on the selected value in dB as well as with a bar graph Options 3 Line Input Home Back Select...

Page 49: ...ctivate the DC Servo for the currently selected input channel Turn it counter clockwise to disable the DC Servo Off The DC Servo is disabled for the currently selected input channel On The DC Servo is...

Page 50: ...arks the character which you now may alter Use the rotary encoder to select the desired character Push the Next key to advance the cursor to the next character position to the right Push the Prev key...

Page 51: ...ay 100 Balance 0 dB Auto Start Off Auto Power Off Off Input for By Pass 0 no input DC Servo for By Pass On Wireless On Channel settings Offset 0 dB for all inputs DC Servo Off for all inputs Name 1 Ba...

Page 52: ...on the front panel If the unit is in stand by mode use the HUM BOLDT key to turn it on If the HUMBOLDT is already operating a push on the HUMBOLDT key powers the unit down to stand by 2 Key CH Select...

Page 53: ...he bottom of the battery compartment 8 3 Settings for Audionet preamplifier The Audionet Metal Remote Control has 6 keys to control an Audionet pre amplifier like the HUMBOLDT The previous section Key...

Page 54: ...position 19 or 16 according to the following table Audionet preamplifier Address HUMBOLDT WATT SAM G2 SAM 20 SE STERN PRE G2 PRE 1 G3 DNA DNP DNA 1 19 MAP 1 16 Note The Audionet Metal Remote Control...

Page 55: ...less to On Please refer to section Network setup on page 56 to configure the HUM BOLDTs connection to the wireless network in your home The main screen of the AN Ultimates app consists of control elem...

Page 56: ...ction Connecting to a wireless network below if you want the HUMBOLDT to connect to an existing wireless network If you want to use the HUMBOLDT s access point please see section Setting up the Access...

Page 57: ...ttings of your wireless network for the correct passphrase 6 Tap Connect and the HUMBOLDT will connect to the selected wireless net work 7 Go to the wireless network settings of your iPhone iPad and l...

Page 58: ...dionetHumboldt net work 4 Start the AN Ultimates app It will connect to the HUMBOLDT and present you a list of wireless networks in your vicinity Choose the item Access Point from this list 5 The HUMB...

Page 59: ...stablish a connection with the current settings This is the case if you don t want to change the settings but you need to repeat the connection at tempt maybe because your router access point was not...

Page 60: ...etwork and afterwards the sub item Connection Now use the button Re Connect The HUMBOLDT tries to reconnect to the selected wireless network Also refer to section Network on page 39 If you would like...

Page 61: ...download the necessary files and store them into the internal memory of the HUM BOLDT When all files are safely transmitted the actual update process is started The dis play of the HUMBOLDT informs t...

Page 62: ...as access to the internet so that the AN Ultimates app is able to access the Audionet Server to check for updates and to download the necessary files Note The AN Ultimates app is disconnected from the...

Page 63: ...press key to continue to stand by mode Important As soon as an error is detected by the protection system HUMBOLDT pow ers down The display gives information about the nature of the error After the di...

Page 64: ...Clipping amplifier or preamplifier are overdriven Overtemperature HUMBOLDT is getting too hot Cooling slots covered Pre Voltage Fuse blown or different fault in power supply pre voltage service case A...

Page 65: ...ul noise on the outputs due to the unexpected loss of mains power After a short drop out of mains power you might read the warning Power Failure In this case press Power off on the front panel to cont...

Page 66: ...ring operations so that a secure operation of the unit is no longer ensured the HUMBOLDT will shut down for security reasons issuing the warning Power Voltage Press key Power off on the front panel to...

Page 67: ...ronment Do not cover the unit Do not open the unit Unauthorised opening will void warranty Do not short circuit the outputs While connecting or removing the HUMBOLDT to or from sources and or speakers...

Page 68: ...68...

Page 69: ...currents Galvanic separation of all analog circuits by opto couplers Rhodium Cinch jacks and speaker terminals by Furutech Volume controller on a double ball bearing axis and with magnetic ratchet and...

Page 70: ...mote control of further Audionet devices User definable names for each input input levels adjustable for each input User selectable function to remove DC levels from signal sources Rhodium fuse Preamp...

Page 71: ...urutech 2 pair XLR balanced gold plated Neutrik 1 D Sub 9 serial port control only 1 SMA for WLAN control only Outputs 2 pair speaker terminals Rhodium Furutech 1 pair RCA line Rhodium Furutech 1 pair...

Page 72: ...printed black or white display color TFT chassis brushed aluminum black anodized Errors and omissions excepted Specifications and design are subject to changes without prior notice audionet GmbH Bruns...

Page 73: ...73...

Page 74: ...74...

Page 75: ...75...

Page 76: ...76 Audionet is a registered trademark of Brunsb tteler Damm 140 B audionet GmbH 13581 Berlin Germany www en audionet de Audionet...

Reviews: