background image

7

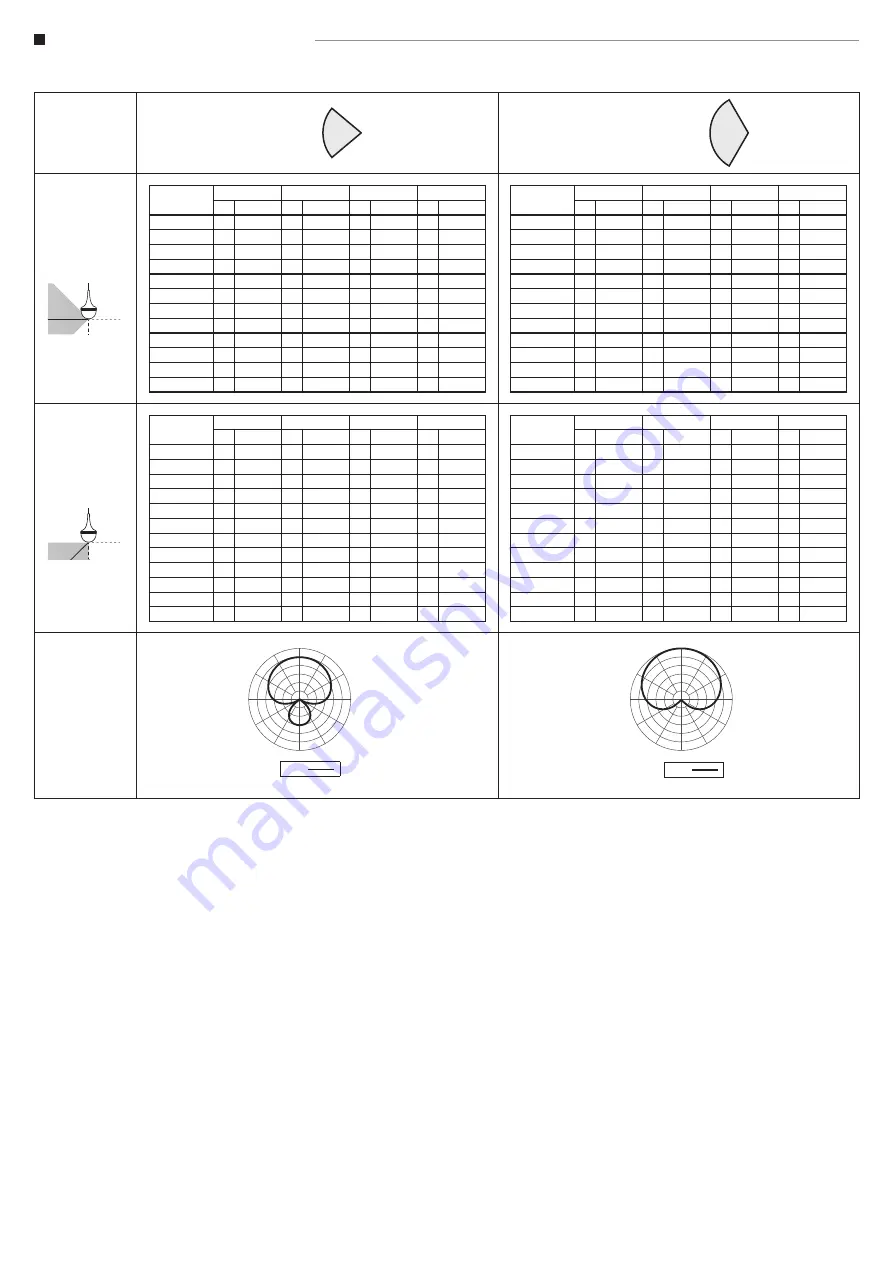
 Using with other compatible mixer

When connecting and using the product with a mixer other than the ATDM-0604, directivity can be controlled by adjusting the output of each channel according to the follow-
ing mixing matrix.

Mixing matrix

Normal

Wide

Tilt up

Tilt down

Polar pattern

Directivity 

direction

O

L

R

Z

φ

Level

φ

Level

φ

Level

φ

Level

0° +

-4dB

-

0dB

-

0dB

-∞

30° +

-4dB

-

+1.2dB

-

-4.8dB

-∞

60° +

-4dB

-

0dB

-∞

-∞

90° +

-4dB

-

-4.8dB +

-4.8dB

-∞

120° +

-4dB

-∞ +

0dB

-∞

150° +

-4dB +

-4.8dB +

+1.2dB

-∞

180° +

-4dB +

0dB +

0dB

-∞

210° +

-4dB +

+1.2dB +

-4.8dB

-∞

240° +

-4dB +

0dB

-∞

-∞

270° +

-4dB +

-4.8dB

-

-4.8dB

-∞

300° +

-4dB

-∞

-

0dB

-∞

330° +

-4dB

-

-4.8dB

-

+1.2dB

-∞

Directivity 

direction

O

L

R

Z

φ

Level

φ

Level

φ

Level

φ

Level

0° +

0dB

-

0dB

-

0dB

-∞

30° +

0dB

-

+1.2dB

-

-4.8dB

-∞

60° +

0dB

-

0dB

-∞

-∞

90° +

0dB

-

-4.8dB +

-4.8dB

-∞

120° +

0dB

-∞ +

0dB

-∞

150° +

0dB +

-4.8dB +

+1.2dB

-∞

180° +

0dB +

0dB +

0dB

-∞

210° +

0dB +

+1.2dB +

-4.8dB

-∞

240° +

0dB +

0dB

-∞

-∞

270° +

0dB +

-4.8dB

-

-4.8dB

-∞

300° +

0dB

-∞

-

0dB

-∞

330° +

0dB

-

-4.8dB

-

+1.2dB

-∞

Directivity 

direction

O

L

R

Z

φ

Level

φ

Level

φ

Level

φ

Level

0° +

-4dB

-

-3dB

-

-3dB +

-3dB

30° +

-4dB

-

-1.8dB

-

-7.8dB +

-3dB

60° +

-4dB

-

0dB

-∞ +

-3dB

90° +

-4dB

-

-7.8dB +

-7.8dB +

-3dB

120° +

-4dB

-∞ +

0dB +

-3dB

150° +

-4dB +

-7.8dB +

-1.8dB +

-3dB

180° +

-4dB +

0dB +

0dB +

-3dB

210° +

-4dB +

-1.8dB +

-7.8dB +

-3dB

240° +

-4dB +

0dB

-∞ +

-3dB

270° +

-4dB +

-7.8dB

-

-7.8dB +

-3dB

300° +

-4dB

-∞

-

0dB +

-3dB

330° +

-4dB

-

-7.8dB

-

-1.8dB +

-3dB

Directivity 

direction

O

L

R

Z

φ

Level

φ

Level

φ

Level

φ

Level

0° +

0dB -

-3dB -

-3dB +

-3dB

30° +

0dB -

-1.8dB -

-7.8dB +

-3dB

60° +

0dB -

0dB

-∞ +

-3dB

90° +

0dB -

-7.8dB +

-7.8dB +

-3dB

120° +

0dB

-∞ +

0dB +

-3dB

150° +

0dB +

-7.8dB +

-1.8dB +

-3dB

180° +

0dB +

0dB +

0dB +

-3dB

210° +

0dB +

-1.8dB +

-7.8dB +

-3dB

240° +

0dB +

0dB

-∞ +

-3dB

270° +

0dB +

-7.8dB -

-7.8dB +

-3dB

300° +

0dB

-∞ -

0dB +

-3dB

330° +

0dB -

-7.8dB -

-1.8dB +

-3dB

90°

120°

150°

180°

210°

240°

270°

300°

330°

60°

30°

LEGEND

1kHz

SCALE IS 5 DECIBELS PER DIVISION

90°

120°

150°

180°

210°

240°

270°

300°

330°

60°

30°

LEGEND

1kHz

SCALE IS 5 DECIBELS PER DIVISION

Summary of Contents for ES954

Page 1: ... female RJ45 female to 3 pin Euroblock connector female and unterminated LED conductors Permanently attached 1 2 m 4 cable with locking grommet enables quick microphone height adjustment UniGuard RFI shielding technology offers outstanding rejection of radio frequency interference RFI Requires 11 V to 52 V DC phantom power Trademarks SmartMixer are trademark of Audio Technica Corporation registere...

Page 2: ...HITE 5 MIC4 Z RED 6 LED RED BLUE 7 GND BLACK 8 GND BLACK Output from the microphone is low impedance Lo Z balanced The signal ap pears across the pair of each output Euroblock connectors on the RJ45 breakout cables Audio ground is the shield connection Output is phased so that positive acoustic pressure produces positive voltage on the left side of each Euroblock connector MIC1 is O omnidirectiona...

Page 3: ...t of the automatic mixer or other logic device When using the product with a mixer with no GPIO terminal the LED ring can be kept permanently lit by connecting the black BK or violet VT wire to the GND terminal When the black wire is shorted the LED ring will be green When the violet wire is shorted the LED ring will be red ...

Page 4: ...Isolator receiver Adjust the length of cable Turn the threaded nut to secure it Seismic cable Tie wrap Release bar Ceiling 1 2 Make sure to attach the included seismic cable to the ceiling to prevent the ceiling mount from falling Using a tie wrap fix the remaining cable to the inside of the ceiling mount to prevent the microphone from falling Rear Front ...

Page 5: ... are made secure the microphone cable to the PCB using the included wire tie 5 Adjust the cable to desired microphone height by either feeding or pulling the cable through the ceiling mount 6 Once the microphone is in the desired position gently turn the threaded nut clockwise to secure Do not over tighten and pull the cable strongly 7 Coil the excess cable into the ceiling mount and replace the b...

Page 6: ...ing July Meeting Room General Network Audio Front Panel System Settings Utilities User Access Apply Delay Unit Type Audio System Ft Output Flip Gain Unit Type dBu Virtual Mic Mode Operator Page System Settings Operator Access Presets Logging System Info Settings Maintenance Preset Board Meeting July Meeting Room Apply Fader Settings Mic Assign 1 2 3 4 5 6 ST Show Mic Show Max Volume Max Volume 1 2...

Page 7: ...1 2dB 180 0dB 0dB 0dB 210 0dB 1 2dB 4 8dB 240 0dB 0dB 270 0dB 4 8dB 4 8dB 300 0dB 0dB 330 0dB 4 8dB 1 2dB Directivity direction O L R Z φ Level φ Level φ Level φ Level 0 4dB 3dB 3dB 3dB 30 4dB 1 8dB 7 8dB 3dB 60 4dB 0dB 3dB 90 4dB 7 8dB 7 8dB 3dB 120 4dB 0dB 3dB 150 4dB 7 8dB 1 8dB 3dB 180 4dB 0dB 0dB 3dB 210 4dB 1 8dB 7 8dB 3dB 240 4dB 0dB 3dB 270 4dB 7 8dB 7 8dB 3dB 300 4dB 0dB 3dB 330 4dB 7 8dB...

Page 8: ...H W D Output connector Euroblock connector Accessories Ceiling mount AT8554 RJ45 breakout cable 2 Seismic cable Isolator 1 Pascal 10 dynes cm2 10 microbars 94 dB SPL For product improvement the product is subject to modification without notice Polar pattern Frequency response Omnidirectional O Figure of eight L R Z 90 120 150 180 210 240 270 300 330 60 30 0 LEGEND 1kHz SCALE IS 5 DECIBELS PER DIVI...

Reviews: