15
Additional Information
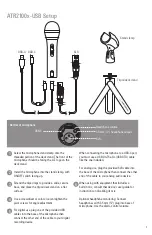
Using headphones
The
1
/
8
" (3.5 mm) headphone jack on the bottom of the microphone allows you to directly monitor your recording with
a pair of headphones. When your preliminary setup is completed, and your USB microphone is connected to your
computer’s USB port (the microphone’s blue LED is illuminated), plug your headphones into the headphone jack on
the bottom of the microphone. While talking into the microphone, you should hear yourself in the headphones. Adjust
the volume up or down by rotating the Up/ Down dial on the bottom of the microphone.
Note:
The Up/ Down dial
only adjusts the volume of the mic’s headphone output; it does not adjust the microphone level.
Selecting software
You have many choices in recording software. Audacity, available for free online at http://audacity.sourceforge.net/, is
a widely used software program that provides basic recording software.
Setting your software levels
Correct adjustment of microphone level is important for optimum performance. Ideally, the microphone level should
be as high as possible without overloading the input of your computer. If you hear distortion, or if your recording
program shows levels that are consistently overloaded (at peak levels), turn the microphone volume (or level) down,
either through your control panel (or system preferences) settings, or through your recording software. If your
recording program shows insufficient level, you can increase the microphone gain either from the control panel (or
system preferences) settings or through your recording program.
No further microphone level adjustments should be needed, as long as the acoustic input does not
change significantly.
Positioning your microphone
It is important to position the microphone directly in line (on axis) with the person speaking/singing or instrument
(or other sound source) to achieve the best frequency response of the microphone.
For use in speaking/singing applications, the ideal placement for the microphone is directly in front of the person
speaking/singing. The same placement is optimal when miking an instrument such as an acoustic guitar, drums or
piano. Experiment with different mic placements to find the best sound for your particular setup.
XLR operation
For live-sound applications, connect the XLRF connector of the included XLR cable to the XLRM output on the bottom
of the microphone; connect the cable’s XLRM connector to a standard XLRF microphone input on your mixer. Turn the
microphone’s ON/OFF switch to the “ON” position. Set the microphone’s level by following the instructions included
with your mixer.
Note:
The ON/OFF switch does not affect the LED.
Protecting your microphone
Take care to keep foreign particles from entering the windscreen. An accumulation of iron or steel filings on the
diaphragm, and/or foreign material in the windscreen’s mesh surface, can degrade performance.


