Audio Technica AT2020USB+ User Manual Download Page 12

11

Using the product

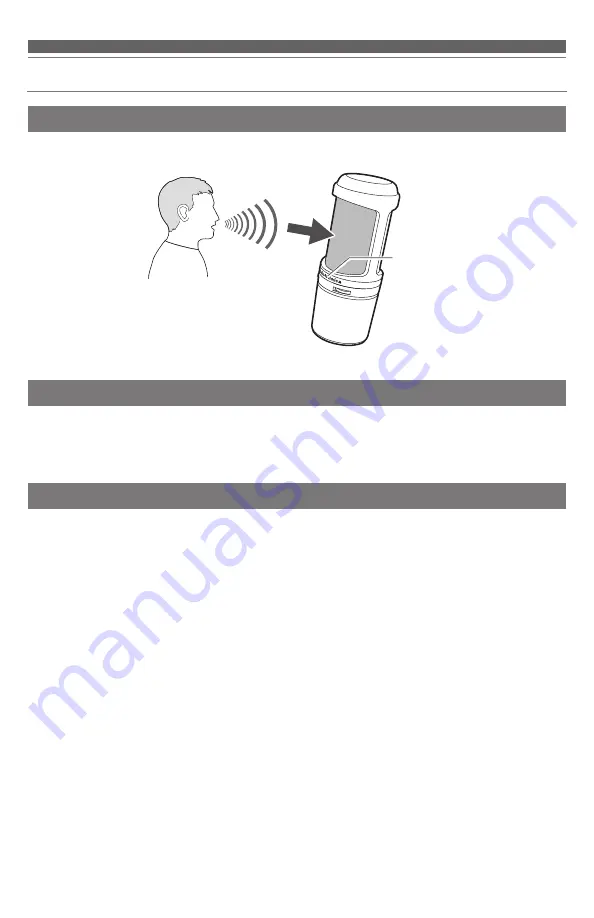
Microphone orientation

To use the product, face towards the side that has the Audio-Technica logo while speaking.

Using software for recording

Software for recording is not included with the product. To use the product to record audio, use commercially 
available recording software. You may need to set up the recording software, such as by setting the audio input 
and output. For details, see the User Manual for the recording software.

Adjusting the microphone level

To get the best performance, you need to appropriately adjust the microphone level of the product. When 
using the product, set the microphone level of the product as high as possible, in a range that does not put 
an excessive load on the computer. If the sound is distorted, or the recording software you are using is always 
at peak levels, then decrease the microphone level of the product in the settings on the control panel (system 
preferences for Mac OS) or the settings for the recording software you are using.

If you feel that the product's microphone level is insufficient, then increase the microphone level of the product 
in the settings on the control panel (system preferences for Mac OS) or the settings for the recording software 
you are using. After that, you do not need to adjust the microphone level of the product, unless the volume of 
the sound source varies greatly.

Audio-Technica logo

Summary of Contents for AT2020USB+

Page 1: ...AT2020USB User Manual Cardioid Condenser USB Microphone...

Page 2: ...e using the product Cautions for the product Do not subject the product to strong impact to avoid malfunction Do not disassemble modify or attempt to repair the product Do not handle the product with...

Page 3: ...ot use a USB hub or USB extension cable When plugging the USB cable into the microphone and the connected device check that the connector is facing in the correct direction before inserting it straigh...

Page 4: ...level of the sound source stored on the computer and the monitored volume level of the audio being input 4 Headphone level control dial Adjusts volume of headphone output 5 USB terminal USB Type B Use...

Page 5: ...ore using the product try setting it up in various positions to discover how best to record sound in your current environment Connection procedure 1 Connect the USB cable USB Type B side to the USB te...

Page 6: ...w that the microphone is receiving power via USB The computer automatically recognizes the product and the driver is installed on the computer In the lower right part of the screen a message appears i...

Page 7: ...6 Using the product For Windows 8 1 Right click Start Menu and select Control Panel 4 Select Sound...

Page 8: ...irm that the product is selected If the product is not selected select the product and then click Set Default 6 In the Recording tab confirm that the product is selected If the product is not selected...

Page 9: ...Double click the product s icon and open the Microphone Properties window 8 Select the Levels tab to adjust the microphone level To adjust the microphone level after you start recording do the adjustm...

Page 10: ...uter 2 Confirm that the indicator lamp on the product lights Indicator lamp lights blue to show that the microphone is receiving power via USB The computer automatically recognizes the product and the...

Page 11: ...10 5 In the Input tab select the product 6 In the Output tab select the product Using the product...

Page 12: ...ng the product set the microphone level of the product as high as possible in a range that does not put an excessive load on the computer If the sound is distorted or the recording software you are us...

Page 13: ...adjusts the volume of the headphone output it does not adjust the microphone level Using the mix control dial The product allows you to monitor your own voice from the product while listening to a so...

Page 14: ...h a dry cloth If the cables become dirty because of sweat etc wipe them with a dry cloth immediately after use Failure to clean the cables may cause them to deteriorate and harden over time resulting...

Page 15: ...t depth 16 bit Supported sampling rates 44 1 kHz 48 kHz Controls Headphone level control Mix control Dimensions 162 mm 6 38 long 52 mm 2 05 maximum body diameter Weight About 386 g 13 6 oz Output conn...

Page 16: ...kHz 5 kHz 8 kHz Frequency response 10 dB 100 50 20 200 10k 5k 1k 500 2k 20k Frequency in Hertz Response in dB LEGEND 0 50 cm Audio Technica Corporation 2 46 1 Nishi naruse Machida Tokyo 194 8666 Japan...

Reviews: